Transcription
VIAVI Instrument Programming Tool(VIP Tool ) User Guide
ContentsIntroduction to the VIP Tool . 1Overview . 1Intended User . 1System Requirements . 1Installing VIP Tool . 2A Sample VIP Tool Directory Structure . 2Enabling the VIP Tool . 2Establishing an Ethernet Connection to the Instrument . 4Connection Types . 4Direct Connection . 4Network Connection . 4Configuring the Instrument’s Network Connection . 5Configuring the 8800 Series Connection . 5Configuring the 3550 Series Connection . 6Configuring the 3900 Series Connection . 6Setting up the Computer for Static IP Connection . 8Testing the Connection . 9The VIP Tool Workbook . 10The VIP Tool Ribbon . 10The Getting Started Sheet . 10The Getting Started Sheet Ribbon .10The Setup Sheet . 11Setup Sheet Fields .12The Setup Sheet Ribbon .14The Script Sheet. 17The Script .17The Script Sheet Ribbon .19Script Sheet Ribbon Script Operations Group .21Script Sheet Ribbon Script Debug Group .22The Trace Data Sheet . 29The Trace Data Sheet Ribbon .30The Results Data Sheet . 32i
ContentsThe Results Data Sheet Ribbon.33Report Sheets . 35Report Sheet Rules .36Tags .36Saving Report Sheets .36The Report Sheet Ribbon .36The Version Sheet . 42The Version Sheet Ribbon .42VIP Tool Programming Language Reference . 43Variables, Tags, and Cell Assignments . 44Variables .44Tags . 50Working with Tags .50Rules of Tag Use .53Considerations for Assigning Values to Tags .53Tag Syntax .55Creating Tag Arrays .58Math Functions . 69Math Function Command Column Syntax .69Math Function Argument Column Syntax .70Using Math Functions to Generate Arguments .71Concatenation . 72Counters and Timers . 73Counter Functions .73Timer Functions.74Goto and Subroutine Functions . 76Goto Function .76Subroutine Function .77Loops and Conditional Statements . 78For Next Loop.78Do Loop .80IF Statement .84Flow Control, Messages and Forms . 86Delay Function .86Schedule Function .87ii
ContentsEnd Function .87Custom Dynamic Message Box .88Wait for Transmit On Dynamic Message Box .91Wait for Transmit Off Dynamic Message Box .93Wait for Audio Level Dynamic Message Box .95Pause Message Box .97Yes/No Selection Message Box .101Applying the Result of Query Yes No to a Conditional Statement .103Choice Message with One Button and Cancel .104Choice Message with Two Buttons and Cancel .106Two Choice Check Box Message with Cancel .111Test Info Entry Form .114Numerical Entry Form .116Text Entry Form.118Message Positioning .119Special Functions . 121Automated Find SINAD Function .121Watts to dBm Calculator .126dBm to Watts Calculator .127Audio Gain/Loss In dB Calculator .128Select A Cell for Viewing Function .129Transfer Trace Data to Another Sheet .130Clear Range of Cells in a Row .131Beep Function .131Time Function.132Date Function .132Close and Open Socket Functions .133Report Tools . 134Define a Name for a Saved Report Command .134Select a Report Sheet to Save Command .134Save a Report as PDF Command.135Save a Report as CSV Command .136Remove Previous Values From Tags Command.136Debug and Notation Tools . 137# Remark Symbol .137/ Inactivate Command Symbol .137iii
ContentsBreakpoint Function .138Debug Print Function .139Utility Commands . 139Copy Function .139Create Tag Function .141Appendix A: VIP Tool and Instrument RCI Resources . 145VIP Tool Resources. 1453900 Series RCI Manuals .1458800 Series RCI Manual .1453550 Series RCI Manual .145iv
Introduction to the VIP ToolIntroduction to the VIP ToolThe VIAVI Instrument Programming Tool (VIP Tool) is an easy-to-use programming tool that is embedded into aMicrosoft Excel workbook. The VIP Tool provides a large range of capabilities that allow a user to write simpleor complex programs in a scripting language designed to be conducive to radio test methodology. The VIP Toolis an easy to use programming tool that is embedded into a Microsoft Excel workbook. The VIP Tool allows theend user to automate operation of a VIAVI instrument by taking advantage of the RCI capabilities of theinstrument. Custom programs can be written to automate common functions or to create test capabilities thatonly automation can provide.OverviewAt its heart, the VIP Tool is a means of communicating with the instrument over an Ethernet connection. In andof itself, this capability is certainly not rare; many programs possess that capability. However, the ability to senda remote command or receive query data is of limited use if there is no means to organize the commands into asequence, perform decisions based upon conditions, and collate test data in a storable form.The VIP Tool uses a scripting language called the VIAVI Instrument Programming Language. This languageallows the operator to branch programs based on conditional statements, perform repetitive tasks throughlooping, and create test reports with a sequence of commands placed within the spreadsheet. This capabilitycombines the power of a scripting language with Microsoft Excel that allows even an entry level technician tocreate programs that can make his job more efficient and profitable.Intended UserThe VIP Tool is an easy-to-use tool that is intended for personnel with little or no programming experience.System RequirementsUsers require the following to use the VIP tool: Microsoft Excel is required to operate the VIP Tool. VIP Tool Option 847 installed on VIAVI instrument.Page 1
Installing VIP ToolInstalling VIP ToolInstalling the VIP Tool is as simple as copying the VIP Tool workbook to your computer; the VIP Tool program isembedded in the workbook. All that is needed to run VIP Tool is to have access to Microsoft Excel and a VIAVIinstrument with Option 847 installed. . No special drivers are required.A Sample VIP Tool Directory StructureThe VIP Tool Setup sheet provides the means to configure paths for the following file types: Script Files Module Files PDF Report Files CSV Report Files (Please check the format between this bullet and the next. The space looks bigger) Export / Import Report SheetsA sample setup may look something like this:The VIP Tool workbook can be copied to the VIP Tool folder, and the sub folders will hold the Script, Module,PDF and report template files.Enabling the VIP ToolThe VIP Tool requires that macros be enabled in Microsoft Excel. Depending on the configuration of Excel, thismessage may be displayed when the VIP Tool workbook is opened.Page 2
Installing VIP ToolIf macros cannot be enabled in the spreadsheet, review the settings in Excel and Trust Center.Select Macro Settings and ensure the settings allow macros. Select, at minimum ‘Disable all macros withnotification’. This setting causes Excel to notify the user that the workbook has macros and allows the operatorto enable them. If configuring macro settings has been disabled, contact your IT administrator.Page 3
Establishing an Ethernet Connection to the InstrumentEstablishing an Ethernet Connection to the InstrumentBefore the VIP Tool can be used, the computer on which Excel is running must be connected to the VIAVIinstrument through an Ethernet connection. This section of the manual provides guidance on establishing andverifying that a valid connection has been made between the computer and the instrument.Connection TypesDirect ConnectionThere are a few different ways to connect the computer to the instrument. One method is a direct connectionfrom the computer to the instrument.The direct connection consists of connecting an Ethernet cable from the computer to the instrument. Generally, acommon Ethernet cable can be used, though if the computer is an older model, it may be necessary to use acrossover Ethernet cable to make the connection.In most cases, a direct connection implies that a static IP connection will be used.Network ConnectionAnother method of connection is that the computer is connected to a network or a switch, and the instrument isalso connected to the network or switch. Again, a common Ethernet cable can be used. to connect theinstrument to the network.Page 4
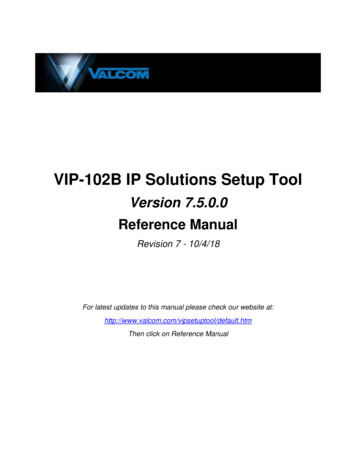
Establishing an Ethernet Connection to the InstrumentIn the case of a switch, the connection type will likely be a static IP connection, though more advanced switchesmay have DHCP capability. In the case of a network connection, the connection type will most commonly beDHCP.Configuring the Instrument’s Network ConnectionConfiguring the 8800 Series ConnectionThe 8800 Series network configuration screen can be reached by selecting the Utilities tab, then selecting theSoftware button from the dropdown menu, and selecting System from the sub menu that appears. Once in theSystem Config menu, press the Remote tab.The example above shows a Static IP configuration. The IP Address is set to 10.10.10.110. This IP address isthe same address to enter in the IP Address field on the VIP Tool Setup sheet.If a DHCP connection is desired, set the Network Mode to ‘DHCP’. When the 8800 is connected to a network,the network will assign an address in the IP address field.The 8800 TCP/IP port, which is set automatically by the VIP Tool when the 88XX model is selected on the SetupSheet, is 9991.NOTE:It should be noted that only one device at a time can be connected to port 9991 of the 8800. Ifport 9991 is occupied by some other program or device, the VIP Tool will not be able toconnect to the 8800 until the port is released by the other device or program.Page 5
Establishing an Ethernet Connection to the InstrumentConfiguring the 3550 Series ConnectionThe 3550 Series network configuration screen can be reached by selecting the System tab, then selecting theSystem Config button from the dropdown menu. Once in the System Config menu, press the Remote tab.The example above is of a Static IP configuration. The IP Address is set to 10.10.10.112. That IP address isthe same address to enter in the IP Address field on the VIP Tool Setup sheet.If a DHCP connection is desired, set the Network Mode to ‘DHCP’. When the 8800 is connected to a network,the network will assign an address in the IP address field.The 3550 TCP/IP port, which is set automatically by the VIP Tool when the 3550R model is selected on theSetup Sheet, is 9991.NOTE:It should be noted that only one device at a time can be connected to port 9991 of the 3550. Ifport 9991 is occupied by some other program or device, the VIP Tool will not be able toconnect to the 3550 until the port is released by the other device or program.Configuring the 3900 Series ConnectionThe 3900 Series setup involves selecting TCP/IP as the remote connection type, then setting up the networksettings.To access the remote connection type setting, select the Utilities menu, then select Hardware Settings andselect Remote from the dropdown menu.Page 6
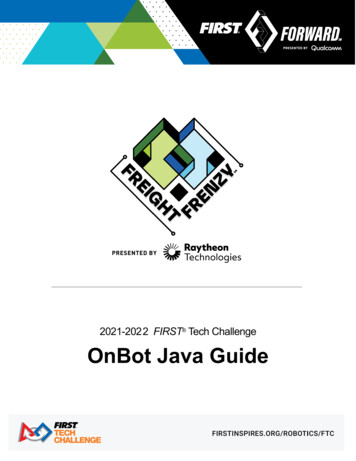
Establishing an Ethernet Connection to the InstrumentOnce on the Remote screen, set the Remote source field to ‘TCP/IP’.NOTE:Note that the TCP/IP port on the 3900 Series is configurable. The default port number is 1234.When connecting to the VIP Tool, verify that the entry in the Setup sheet ‘Port Number’ field isset to match the number entered on this screen.After setting the Remote source, set up the network connection. To access the network settings, select theUtilities menu, then select Hardware Settings and select Network from the dropdown menu.The example above is of a DHCP configuration. The IP Address is set to 10.200.152.13. That IP address is thesame address to enter in the IP Address field on the VIP Tool Setup sheet.Page 7
Establishing an Ethernet Connection to the InstrumentNOTE:Please note that with some Ethernet routers and switches, it may be necessary to select aNegotiation setting other than Auto, such as “100Base Half-Duplex” to avoid negotiationconflicts with the Ethernet router or switch.If a Static IP connection is desired, press the DHCP soft key so that DHCP is disabled. Enter the desired IPaddress and subnet mask and, after entering the IP address, press the Validate Changes soft key.The 3900 Series can host multiple connections on its TCP/IP port. The VIP Tool is capable of connecting to the3900 Series even if another device or program is connected to the instrument.Setting up the Computer for Static IP ConnectionTo use a direct connection with a Static IP connection, the computer must be configured to access the Static IPof the instrument.1. On the computer, access the Ethernet properties of the computer’s Ethernet card. Accessing this menumay vary from computer to computer.2. Once the Ethernet properties menu is open, select ‘Internet Protocol Version 4 (TCP/IPv4) field. Afterselecting the field, press the Properties button.3. Select ‘Use the following IP Address:’.4. In the IP Address Field, enter the IP address that you wish to use. The instrument will need to share thefirst three elements of the IP address, and have a different number on the fourth address element. ForPage 8
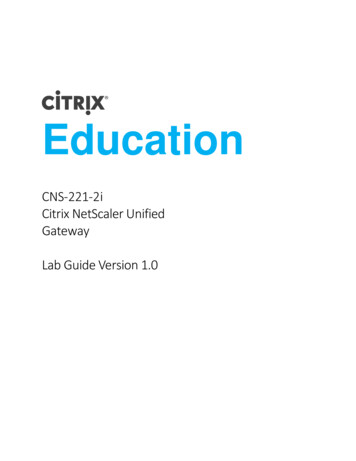
Establishing an Ethernet Connection to the Instrumentexample, this computer’s Static IP is set to 10.10.10.100. Therefore, an instrument that is connected to itcan have the address 10.10.10.110.5. Set the subnet mask to 255.255.0.0. Ensure the subnet mask on your instrument is set to this samesetting.6. When finished, press the OK key on this menu, and the OK key on the first menu to close out theoperation.Testing the ConnectionBefore connecting to the VIP Tool, it is recommended that the Ethernet connection to the instrument be verified.A good way of verifying the connection is to see if the instrument can be pinged from the computer.1. On the computer, open a command prompt.2. In the command prompt, type ‘ping’ followed by the IP address the instrument is set to. For example, ifthe instrument IP address is 10.10.10.104, then one would type: ping 10.10.10.104. If the connection is successful, then the text on the command window will appear like the exampleabove. Each ping receives a reply from the instrument, and no timeout messages appear. Theinstrument and the VIP Tool will be able to communicate back and forth. If the connection is unsuccessful, then the text on the command window will appear like the exampleabove. No pings have been returned by the instrument; each request has timed out. This is indicative ofa communications failure between the computer and the instrument. The VIP Tool will not be able tocommunicate with the instrument until successful communication has been established.Page 9
The VIP Tool WorkbookThe VIP Tool WorkbookThe VIP Tool workbook contains the VIP Tool program and several embedded sheets that provide thefunctionality of the tool. Additional sheets for creating reports or performing calculations can be added to andremoved from the VIP Tool workbook. The VIP Tool cannot interact with sheets that are not a part of the VIPTool workbook.The workbook also contains the VIP Tool ribbon which provides a selection of buttons specific to the currentlyselected sheet.This section of the manual describes the purpose and functionality of each sheet and the ribbon buttons thatapply to each sheet.The VIP Tool RibbonThe VIP Tool ribbon is synchronized to the sheet selection. When a sheet is selected, the VIP Tool ribbon willdisplay the buttons relevant to the sheet that is selected.The VIP Tool ribbon does not automatically re-synchronize if the VIP Tool is saved with a different name afterclicking on ‘File’ and ‘Save As’. The ribbon is still accessible but will not update to a newly selected sheet if adifferent sheet is selected; instead, the VIP Tool ribbon will need to be manually selected. To restoresynchronization, close the newly ‘Saved As’ workbook, then re-open it. After re-opening the workbook, theribbon will synchronize with the different sheets as they are selected.The Getting Started SheetThe Getting Started sheet provides information about the VIP Tool workbook that the user can access directlyfrom the workbook.The Getting Started Sheet RibbonResults Data Sheet Ribbon I/O GroupThe Results Data sheet ribbon I/O group consists of only one button, the ‘Check Connection’ button.Check ConnectionOpens a socket and checks to see if VIP Tool has successfully connected to theinstrument. Closes the socket after the check has completed.The ‘Check Connection’ button is used to verify if the instrument is connected to the VIP Tool. This button showsup on several different sheets of the VIP Tool, and on each sheet the functionality of the button is the same. It ison the Setup sheet that the VIP Tool is configured to communicate with the instrument through an Ethernetsocket.Page 10
The VIP Tool Workbook‘Check Connection’ attempts to open a socket to the instrument, based on the settings entered in the SetupSheet. If a valid connection to the instrument is detected, a message indicating successful connection isdisplayed:If, however, the VIP Tool cannot communicate with the instrument, a message indicating unsuccessfulconnection is displayed:If the connection is unsuccessful, select the Setup Sheet and configure the model and IP address of theinstrument to establish a successful connection. The VIP Tool will not execute script commands if there is not avalid connection to the instrument.The Setup SheetThe VIP Tool Setup sheet is used to set up the Ethernet socket that connects the VIP Tool to the instrument.The Setup sheet is also used to set paths for saving various types of files, select which sheet is to be saved as areport, what name to give the report, and to select whether a PDF report is saved in the background or isopened when saved.Page 11
The VIP Tool WorkbookSetup Sheet FieldsThe Setup Sheet contains user editable fields that are used to set Ethernet communication parameters, to selectdefault file paths, and to determine whether a PDF file is automatically opened when saved either by a scriptcommand or when using a ribbon button.The ‘Select Model’ FieldThe ‘Select Model’ field allows the user to select which model the VIP Tool will connect to. This field is a dropdown menu that the provides a list of the instruments the VIP Tool can connect with. Selecting the modelautomatically sets the ‘Port Address’ field setting to the appropriate port address of the selected instrument.The ‘IP Address’ FieldThe VIP Tool must have a valid socket connection to the instrument to communicate with the instrument. The ‘IPAddress’ field is used to point the VIP Tool to the IP address of the instrument it is connected to, therefore theinstrument IP address is entered in this field.The
Microsoft Excel workbook. The VIP Tool provides a large range of capabilities that allow a user to write simple or complex programs in a scripting language designed to be conducive to radio test methodology. The VIP Tool is an easy to use programming tool that is embedded into a Microsoft Excel workbook. The VIP Tool allows the