Transcription
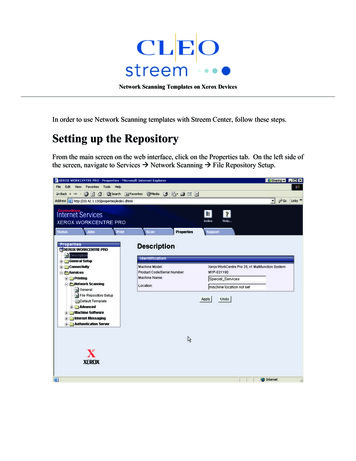
Network Scanning Templates on Xerox DevicesIn order to use Network Scanning templates with Streem Center, follow these steps.Setting up the RepositoryFrom the main screen on the web interface, click on the Properties tab. On the left side ofthe screen, navigate to Services Æ Network Scanning Æ File Repository Setup.
On the File Repository setup page, click the “Add” button in the Alternate FileDestinations box.Fill in the page following the example below.Field NameFriendly NameProtocolName or IPaddressIP Address andPortDocument PathLoginCredentials toaccessDestinationLogin NamePasswordRetype passwordDescriptionName of the repositoryProtocol used for transferringfilesYou can use either the hostname or the IP address for thedestination. IP address isrecommendedThis is the Name or IPaddress of the Streem CenterServer. The last value is theport and it must be set to 21This is the name of the FTPvirtual directory that is locatedon the Streem Center serverThis section does not appearon all models of Xerox WCP.ValueFaxTCPIPThe login name for the FTPsite on the Streem CenterserverThe password for xeroxftpXeroxftpSelect “IP Address”IP address of the Streem Centerserver/Xerox/inCheck SystemftpxeroxThe “Select to save new password” box is automatically checked when you enter a newpassword. When you click “Apply” the admin login box will pop up for the Xeroxdevice. By default the username is admin and password is 1111. (Some models ofWorkcentre Pro use 11111 as the username and x-admin for a password)
Setting up the TemplateFrom the main screen on the web interface, click on the Scan tab. Under Generalinformation enter a name and description for the template. When finished, click the AddbuttonWe need to set the Fax repository that was created in the last step as the file destination.In the File Section, click ADD.In the file destination dropdown box, select the FAX file repository that was created inthe previous section. Verify that the filing policy is set to “Rename new file”Click Apply.
Select the Default file repository and click Delete.On the Document Management Fields section, click the Add Button. In the Field Namebox, enter FaxNumber (Note this must be spelled exactly)Check the Yes radio button to make it User editable and enter “Fax Number” as the fieldlabel. (The field label is the text that is displayed at the Xerox console. This can bespelled any way that you like.)Note: Some models have a checkbox named “Require User Input” check this if it isavailable.Click ApplyBelow is a reference of the possible fields that can be created. FaxNumber is required, allothers are optional
FaxNumber - The destination fax number(s). Multiple fax numbers must beseparated by a * or # . The characters "(", ")", "-", as well as spaces are allowed butnot required. The FaxNumber field is Required.FaxTo - The destination To Name(s). Multiple names must be separated by acomma. Multiple names will be assigned to fax numbers in the sequential order inwhich the fax number was entered. Names will appear on both the fax header and onthe fax cover page if entered. The FaxTo field is Optional.FaxSubject - The subject that will appear on the system fax cover page. TheFaxSubject field is Optional. (Cover page must be enabled)FaxFromName - The sender's name which will appear on the system fax cover page.The FaxFromName field is Optional. (Cover page must be enabled)FaxFromNumber - The sender's fax number which will appear on both the faxheader and the fax cover page. The FaxFromNumber field is Optional.BillingCode - An accounting code that will be stored in the Streem Center databasefor accounting purposes. The BillingCode field is Optional.Notes - Text that will appear in the Notes section of the system fax cover page. TheNotes field is Optional. (Cover page must be enabled)ConfirmationEmail - By default, Streem will deliver a hardcopy confirmation reportto the originating device. Using this field, this report can be re-directed to an emailaddress. Multiple addresses may be entered and must be separated by a comma.Another method of delivering confirmations to multiple recipients is to enter agroup/distribution address. The ConfirmationEmail field is Optional.Cleo Communications, 4203 Galleria Drive, PO Box 15835, Loves Park, IL 61111Phone (815) 639-1100 Fax (888) 435-2348 streeminsales@cleo.com www.cleo.com 2009, Cleo Communications. All rights reserved. Cleo and Streem are registered trademarks of Cleo Communications. Streem Alert is a registeredtrademark of Cleo Communications. Streem Fax and Streem Print are trademarks of Cleo Communications. XEROX and Xerox Business PartnerTMare trademarks of XEROX CORPORATION. 08/06. All other company, brand, or product names are or may be trademarks of their respective holders.
Network Scanning Templates on Xerox Devices In order to use Network Scanning templates with Streem Center, follow these steps. Setting up the Repository From the main screen on the web interface, click on the Properties tab. On the left side of the screen, navigate to Services Æ Network Scanning Æ File Repository Setup.