Transcription
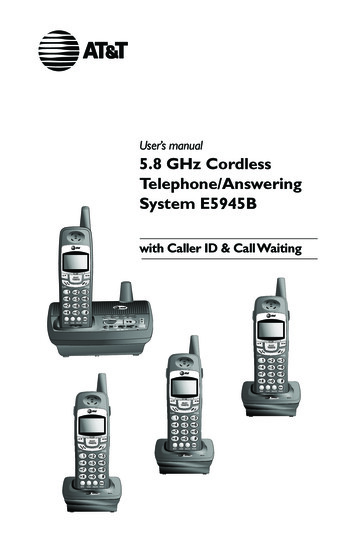
User’s manual5.8 GHz CordlessTelephone/AnsweringSystem E5945Bwith Caller ID & Call Waiting
Congratulations on your purchaseof this AT&T product.Before using this telephone system, you mustread Important safety instructionson pages 45 to 47 of this manual.NEED HELP?Our representatives are hereto help you with any questions concerning theoperation of this product, available accessories,or any other related issues.Call toll free1 (800) 222-3111In Canada, call1 (866) 288-4268or visit our website atwww.telephones.att.comModel no.:AT&T E5945BProduct name:5.8 GHz cordless telephone/answering systemSerial no.:(found on the bottom of the telephone base)Purchase date:Place of purchase:
IMPORTANTInformation about caller ID with call waitingThis product has a caller ID with call waiting feature that works withservice from your local telephone service provider.Caller ID with call waiting lets you see who is calling before answeringthe telephone, even when on another call.You may need to change your phone service to use thisfeature. Contact your phone service provider if: You have both caller ID and call waiting, but as separate services (youmay need combined service). You have only caller ID service, or only call waiting service. You don’t subscribe to any caller ID or call waiting services.You can use this product with regular caller ID service, and you can usethis product’s other features without subscribing to either caller ID orcombined caller ID with call waiting service.There are fees for caller ID services, and they may not be available in allareas.Depending on your service subscription, you may see the caller’s number, or the caller’s nameand number. This product can provide information only if both you and the caller are in areasoffering caller ID service, and if both telephone companies use compatible equipment. Thetime and date are sent by the service provider along with the call information.Copyright 2006 Advanced American Telephones. All rights reserved.AT&T and the Globe Design are trademarks of AT&T Corp.,licensed to Advanced American Telephones.
You must install andcharge the battery beforeusing the telephone.STOP!See page 7for easy instructions.For customer service or productinformation, visit our web site atwww.telephones.att.comor call 1 (800) 222-3111.In Canada, call 1 (866) 288-4268.CAUTION: To reduce the risk of fire or injury to persons or damage to the telephone, read and follow these instructions carefully: Use only replacement battery 3301 (SKU 91076. Part number 80-5071-00-00). Do not dispose of the battery in a fire. Like other batteries of this type, it could explodeif burned. Check with local codes for special disposal instructions. Do not open or mutilate the battery. Released electrolyte is corrosive and may causedamage to the eyes or skin. It may be toxic if swallowed. Exercise care in handling batteries in order not to create a short circuit. Do not allowconductive materials such as rings, bracelets, or keys to touch the battery. The batteryor conductor may overheat and cause harm. Charge the battery provided with or identified for use with this product only in accordance with the instructions and limitations specified in this manual. Observe proper polarity orientation between the battery and battery charger.Do not disassemble your telephone. There are no user-serviceable parts inside. Refer toqualified service personnel for servicing.
User’s manual5.8 GHz CordlessTelephone/AnsweringSystem E5945Bwith caller ID & call waitingTable of contentsGetting startedDial from the call log.26Delete call log entries.27Add entries to the directory.28Quick reference guide. 2Parts checklist. 4Before you begin. 5Telephone base installation. 6Battery installation & charging. 7Wall mounting. 8Belt clip & optional headset. 9Answering system operationMessage capacity.29Day and time announcements.30Outgoing announcements.31Changing feature options.32Message playback.33Recording and playing memos.34Message window displays.35Remote access.36Telephone operationCordless handset programming.10Basic cordless handset operation.12Base operation.13Options while on calls.14Call transfer.15AppendixDisplay screen messages, lights andtones.37Troubleshooting.39Important safety instructions.45FCC part 68 and ACTA .48FCC part 15 .49Limited warranty.50Technical specifications.53Index.54Remote access wallet card.55DirectoryDirectory.16Speed dial.17Entering names into directory.19Entering numbers into directory.20Directory search.21Changing directory entries.22Caller ID operationHow caller ID works.23About names.24Review call log.25
Getting startedQuick reference guideCordless handsetPHONE/FLASHPress to make or answer a call.During a call, press to receive an incomingcall if call waiting is activated (see page 14).SELECT/TRANSFERPress to store a programming option(see page 10-11).During a call, press to transfer a callbetween cordless handsets (see page15).CID VWhile in menus, press to scroll down.When the telephone is not in use, press todisplay call log entries (see page 25).While entering names or numbers, press todelete last character entered.During a call, press CIDto lowerlistening volume.OFF/CLEARDuring a call, press to hang up.While using menus, press to cancel anoperation, back up to the previousmenu, or exit the menu display. (seepages 10-11).V DIRCHANWhile in menus, press to scroll up.When the telephone is not in use, press todisplay directory entries (see page 21).While entering names, press to advance thecursor to the next space.During a call, pressDIR to increaselistening volume.When the telephone is off the hook, forexample, when on a call, pressing theCHAN or DELETE button causesthe telephone to scan for a clearer channel when there is static or interferenceon the line ( see page 14). MENUREDIAL/PAUSEPress to display menu(see page 10-11).While the telephone is idle, press todisplay the last number called (seepage 12).While dialing or entering numbers intothe directory, press to insert a four- second dialing pause (see page 20).DELETEWhen the telpehone is in CID mode, presseither the CHAN or DELETE button todelete the displayed caller ID entry ( seepage 27), or press and hold the CHAN orDELETE button to delete all caller ID entries( page 27).
Getting startedQuick reference guideTelephone baseCHARGE/IN USEHANDSET LOCATORFlashes when one of the cordless handsets is in use.On steady when the cordless handset is properlypositioned to be charged in the telephone base.Flashes when there is an incoming call.Press to page the cordless handsets if none of the handsetsare in the telephone base. Press again to cancel the page.Press OFF/CLEAR on cordless handset, or place cordlesshandset in the telephone base or charger to cancel the pageon that handset only; all other handsets will still be paged.Answering system controls (see pages 29-36 )Press to play or stop playing messages.ANSWER ON .Press to turn answering system on or off.CLOCK .Press to review or set the answering system clock.SETUP.Press repeatedly to listen to the setup options.ANNC .Press to review or record announcement. Press again to quit.RECORD . .Press to record a memo or after pressing ANNC to record an outgoing announcement.DELETE.Press to delete a message during playback. Press and hold to deleteall old messages when idle.REPEAT.Press to repeat message. Press twice to play previous message.SKIP.Press to skip message.
Getting startedParts checklistSave your sales receipt and original packaging in case it is necessary to ship your telephone for warranty service.Telephone baseCordless handsetsCordless handset chargersPower adaptersBelt clipsWall mount bracketBatteriesTelephone line cordBattery compartment doors
Getting startedBefore you beginCaller ID and call waitingTelephone operating rangeThe caller ID with call waiting featuresin this telephone let you see who'scalling before answering the telephone,even when on another call. Thesefeatures require services provided byyour local telephone company.The cordless telephone handset operates with the maximum power allowedby the Federal CommunicationsCommission (FCC). This cordlesshandset and the telephone base cancommunicate over only a certain distance - which can vary with the locations of the telephone base and thecordless handset, the weather, and theconstruction of your home or office.Contact your telephone service provider if: you have both caller ID and callwaiting, but as separate services(you may need combined service),If there is an incoming call but thecordless handset is out of range, thecordless handset might not ring - or ifit does ring, the call might not connectwell when PHONE/FLASH is pressed.Move closer to the telephone base,then pressPHONE/FLASH to answerthe call. you have only caller ID service, oronly call waiting service, or you currently do not have any callerID or call waiting services.You can use this telephone with regular caller ID service, and you can useits other features without subscribingto either caller ID or combined callerID with call waiting service. There maybe fees for these services, and theymay not be available in all areas.If you move out of range during a telephone conversation, you might hearnoise or interference from the cordless handset. To improve reception,move closer to the telephone base.Caller ID features will work only ifboth you and the caller are in areasoffering caller ID service, and if bothtelephone companies use compatibleequipment.If you move out of range withoutpressing OFF/CLEAR, your telephonewill be left off the hook and the linewill be busy. To hang up properly, walkback toward the telephone base whileperiodically pressing OFF/CLEAR untilthe call is disconnected.See Caller ID operation on page 23for more details about how these features work.If you experience noise or interferencewhile on a call, press the CHAN buttonuntil a clearer channel is selected. Batteries for cordless handsetUse only the supplied rechargeablebatteries or AT&T replacement batterymodel 3301 (SKU 91076. Part number80-5071-00-00).
Getting startedTelephone base installationInstall the telephone base as shown below. Choose a location within the home: away from any other cordless (wireless) device such as cordless telephones, 802.11wireless router (for example, WiFi), and away from other electronic equipment, microwave oven, television, computer, etc.Avoid excessive heat, cold, dust, and moisture. If you need to install your telephone within the same room as other cordless telephones or wireless products, you may need to select a different channel for yourrouter and or change the channel on your telephone handsets (see page 14).Plug the telephone linecord into a modular telephone jack.Plug the larger power adapterinto an electrical outlet notcontrolled by a wall switch.NOTES:1. Use only the power adapter supplied with this product. If you need a replacement, call 1 (800) 222-3111. In Canada,call 1 (866) 288-4268.2. Be sure to use an electrical outlet not controlled by a wall switch.
Getting startedBattery installation & chargingPress in and downwardon the tab to open thebattery compartmentcover.Plug the battery connectorinto the handset batterycompartment, matching thecolor coded label.Place the batteryand wires in thecompartment.Slide the battery compartment cover up untilit clicks into place.After battery installation, place the cordless handset in the telephone base or chargerand allow to charge for at least 16 hours before use. You can keep the battery chargedby returning the cordless handset to the telephone base or charger after each use. Whenthe battery is fully depleted, a recharge takes about 16 hours. The talk time on a fullycharged battery is about five hours depending on environmental conditions, and the standbytime is approximately five days. Actual battery life will depend on the usage conditions, andthe age of the battery.Caution: Use only the supplied rechargeablebattery or AT&T replacement battery model 3301(SKU 91076, part number 80-5071-00-00).Plug charger power adapterinto the jack on the underside of the charger, then plugthe adapter into an electricaloutlet not controlled by a wallswitch.Place the cordless handset in the telephone baseor charger to charge forat least 16 hours beforefirst use.Return cordless handset to the telephone base or charger to rechargewhen this symbol appears.(When in use the cordless handsetwill beep when battery is low).BATTERY LOW--1-8/12 10:06amLow battery indicator.Off hook mode.3--1-8/12 10:06amLow battery indicator.Idle mode.
Getting startedWall mountingThe telephone base can be installed on any standard telephone outlet as shown below.Choose a location away from electronic equipment such as personal computers, computer routers, television sets or microwave ovens. Avoid excessive heat, cold, dust ormoisture.1) Connect the telephone line cord andthe power adapter to the telephonejack at the bottom of the telephonebase and the modular telephone walljack, as shown on page 6.bb2) Install the wall mount bracket ontothe telephone base. First put the twofront wall mount bracket tabs into thefront notches on the bottom of thetelephone base, then squeeze the reartabs of the wall mount bracket wheninserting them into the rear notcheson the bottom of the telephone base.NOTE: To disassemble the wallmount bracket, squeeze the rear notcheswhile lifting up the wall mount bracketback and away from the telephone base.a3) Plug the power adapter into electricaloutlet not controlled by a wall switch.4) Plug the telephone line cord into amodular telephone wall jack.5) Position the wallmount bracketover the wall outletmounting pegs.Press and slide thewall mount bracketdown firmly so it isheld securely onthe outlet mountingpegs. a
Getting startedBelt clip & optional headsetSnap belt clip into notches onside of cordless handset. Rotateand pull to remove.For hands-free telephone conversations, use any industry standard 2.5 mm headset (purchased separately). For best results, use an AT&T 2.5 mm headset.Plug 2.5 mm headsetinto the jack on theside of the cordlesshandset (beneathsmall rubber flap).
Telephone operationCordless handset programmingEach cordless handset operates as an individual unit.The ringer sound, ringer volume, date/time, dial modeand language must be programmed separately foreach cordless handset. Follow the steps below toprogram the cordless handset. To stop at any time,press OFF/CLEAR.Choose cordless handset ringer sound1. Press MENU to begin programming.2. Press CIDV or DIR until the screen displaysRINGER: and the current setting.3. Press SELECT/TRANSFER to change the current setting.4. Press CIDV or DIR to display 1, 2, 3, 4 or OFF.There will be a sample of each ringer tone.5. Press SELECT/TRANSFER to choose the displayed ringertone and exit.RINGER: 1NOTE: If you choose OFF, the cordless handset ringer will be turnedoff, and the screen will display RINGER OFF when the cordless handset isidle (not in use). If there are any un-reviewed calls, the screen will display XXMISSED CALLS instead of RINGER OFF.Set cordless handset display date and timeDATE/TIME1/01 12:001. Press MENU to begin programming.am2. Press CIDV or DIR until the screen displaysDATE/TIME.3. Press SELECT/TRANSFER to view or change date andtime.NOTE: You can choose to set thetime manually, or you can allow it to beset automatically with incoming caller IDinformation. The time will be set automatically only if you subscribe to the caller IDservice provided by your local telephonecompany (see page 5). The date andtime for the answering machine need tobe set separately (see page 29).4. Press CIDV or DIR to change the month in the dateand time line at the bottom of the display, then pressSELECT/TRANSFER.5. Repeat step 4 to set day, hour, minute, and AM/PM.6. Press SELECT/TRANSFER to save selection and exit.10
Telephone operationCordless handset programmingChoose dial modeDIAL MODE: TONEThe dial mode defaults to TONE. If you do not havetouch tone service, you will need to change the settingto PULSE by following these steps:1. Press MENU.2. Press CIDV or DIR until the screen displays DIALMODE: and the current setting.3. Press SELECT/TRANSFER to change the current setting.4. Press CIDV or DIR to display TONE or PULSE.5. Press SELECT/TRANSFER to choose displayed dialmode and exit.Choose cordless handset display languageLANGUAGEThe default language for the handset screen displays isEnglish. To change the language to Spanish (Espanol), orFrench (Francais). follow these steps:1. Press MENU.2. Press CIDV or DIR until the screen displaysLANGUAGE.3. Press SELECT/TRANSFER to change the current setting.4. Press CIDV or DIR to choose between ENGLISH,FRANCAIS, or ESPANOL.OFF LOW HIGH5. Press SELECT/TRANSFER to choose display languageand exit.Choose ringer volume setting1. Press and hold CIDV or DIR when the cordlesshandset is idle (not in use). The screen will displayOFF LOW HIGH.NOTE: If you choose OFF, thecordless handset ringer will be turnedoff, and the screen will display RINGEROFF when the cordless handset is idle(not in use). If there are any un-reviewedcalls, the screen will display XX MISSEDCALLS instead of RINGER OFF.2. Press CIDV or DIR to highlight the desired option(blinking text). There will be a sample of each ringervolume.3. Press SELECT/TRANSFER to choose the blinking ringervolume and exit.11
Telephone operationBasic cordless handset operationMaking and answering callsTo answer an incoming call, press PHONE/FLASH (orany key except OFF/CLEAR, CIDV or DIR). To makea call, press PHONE/FLASH, then dial a number. PressOFF/CLEAR or place the cordless handset back in thebase or charger to hang up.To preview numbers before dialing, enter numbers first,then press PHONE/FLASH to dial. Press CIDV anytimeto make corrections when entering numbers.NOTE: Only one cordlesshandset can be on a call at a time. Ifanother cordless handset attemptsto join a call, its screen will displayOTHER HANDSET ON and thenOR OUT OF RANGE.The screen displays the elapsed time as you talk (inhours, minutes and seconds).NOTES:1. The elapsed time format is in minutes and seconds MM:SS until onehour has elapsed, then it will change to hours, minutes and secondsH:MM:SS.2. PressingPHONE/FLASH to access service from your local telephone service provider will not affect the elapsed time. The elapsed timewill not be carried over to the other cordless handset on a transferred call.Last number redialWhile the telephone is not in use, press REDIAL/PAUSEon the cordless handset to display the last numbercalled (up to 32 digits). To dial the number displayed,press PHONE/FLASH. Or, after pressingPHONE/FLASH, press REDIAL/PAUSE to call the last number dialed.To delete this number, press REDIAL/PAUSE twice whenthe telephone is not in use. This will clear the redialmemory and leave it blank.12345678901RedialNOTE: Pressing CIDV or DIR while the telephone is ringingcan temporarily adjust the ringer volume(OFF LOW HIGH). The next telezphonecall will ring normally.Temporary ringer silencingPressOFF/CLEAR while the telephone is ringing totemporarily turn off the ringer. The next telephone callwill ring normally. You can answer the call or let thecaller leave a message. This will silence the ringer without disconnecting the call. If the answering system is on,the caller will be asked to leave a message.12
Telephone operationBase operationHandset LocatorPress to page all cordless handsets for up to 60 seconds.Press again, then pressPHONE/FLASH on the cordlesshandset, or place the cordless handset in the telephonebase to cancel the page.NOTES:1. PressingOFF/CLEAR on any cordless handset will silence the ringeron that cordless handset, but will not cancel the page.2. If one of the cordless handsets is charging in the telephone base, pressingHANDSET LOCATOR does not generate a paging tone.13
Telephone operationOptions while on callsVolume controlWhile on a call, press the CIDV and DIR buttons onthe cordless handset to adjust the listening volume.V VolumeFlashToneChannelCall waitingIf you have subscribed to call waiting service from thelocal telephone service provider, there will be a beepif someone calls while you are already on a call. Thetelephone number of the new incoming call will also bedisplayed on the screen. Press PHONE/FLASH to putyour current call on hold and answer the new call. Youcan press this button anytime to switch back and forthbetween calls.Temporary tone dialingIf you have pulse dial (rotary) service, you can temporarily switch to touch tone dialing during a call by pressing TONE/*. This can be useful if it is necessary to sendtone signals to access the answering systems or longdistant services. After hanging up or pressingPHONE/FLASH, the telephone automatically returns topulse dial (rotary) service.Channel selectionDuring a call, if there are clicks and pops, or if thespeech sometimes fades, press CHAN on the handsetto scan for a clearer channel between cordless handsetand the telephone base.14
Telephone operationCall transferCall transferDuring a conversation, you can transfer the call toanother cordless handset. Press SELECT/TRANSFER to transfer the external callto another cordless handset. You will see ENTER 14. After entering the destination handset number, thecordless handset will display CALL TRANSFERREDand the selected handset will begin ringing. To answer the call, pressPHONE/FLASH.NOTES:1. Before the transferred call is answered, the person at the originatinghandset can press PHONE/FLASH to cancel the transfer and resumethe external call.2. If the transferred call is not answered within 30 seconds, the originating handset will start ringing and show TRANSFERRED CALL. If PHONE/FLASHis not pressed within another 30 seconds, the external call will end automatically.3. If the destination cordless handset cannot be found, the originating cordless handset will generate an error tone and continue the external callautomatically.4. This unit does not have an intercom function. People using the cordlesshandsets cannot talk to each other.15
DirectoryMemory capacityPAT JOHNSON5550100Each cordless handset has its own directory. Each directory can store up to 30 entries (including nine speeddial locations). Each entry can contain a number up to24 digits, and a name up to 15 letters. A convenientsearch feature can help find and dial numbers quickly(see page 21).NOTES:1. Each cordless handset has its own directory. Making changes to the directory of one handset will not affect the directories of the other handsets.2. If all memory locations are in use, an error tone will sound with MEMORYFULL message when entering a number. This means the memory is full,and you will not be able to store a new number until an existing one isdeleted.16
DirectoryNOTE: If all memory locationsare in use, an error tone will soundwhen entering a number. This meansthe memory is full, and you will not beable to store a new number until anexisting one is deleted.Speed dialOn the cordless handset, the numbers called most frequently can be stored in speed dial locations 1-9 anddialed with only two button presses.You can enter nine speed dial numbers of up to 24 digits. Each number is stored in a one-digit speed diallocation (1-9).The nine speed dial numbers on the cordless handsetwill be automatically added to the handset directory.You can easily dial these telephone numbers by pressingand holding a dialpad key and then pressingPHONE/FLASH.You can also convert existing directory entries intospeed dial entries.NOTE: The speed dial feature occupies up to nine of the thirty memorylocations in the directory. For example, if there are only five speed dial entries,then up to 25 entries can be stored in the directory. If there are already 30entries in the directory, no new directory or speed dial entries can be stored inmemory until some of the existing ones are deleted.17
Directory1.Speed dialMENUDIRECTORYTo enter a speed dial number1. Press MENU.2. DIR2. Press DIR to display SPEED DIAL.3. Press SELECT/TRANSFER.SPEED DIAL4. Press dial pad to choose speed dial location (1-9).3.SELECT/TRANSFER5. Enter a name up to 15 characters (see page 19), thenpress SELECT/TRANSFER.6. Enter a telephone number up to 24 digits (see page20), then press SELECT/TRANSFER.ENTER 1-97. Choose distinctive ringing (yes or no) by pressingCIDV or DIR. If you choose Yes (and if you havecaller ID service), a different ringing style will alertyou when this person calls.4.8. Press SELECT/TRANSFER to store the number. Therewill be a confirmation tone.MUTECHANREDIALTo call a speed dial numberENTER NAME01(See pages 19-20).To use speed dialing, press and hold a dial pad button(1-9) to display the number and name stored in thatspeed-dial location, then press PHONE/FLASH to dial.To edit or delete a speed dial numberNOTE: You can convert anydirectory entry into a speed dialentry (see page 22).Press and hold a dial pad button (1-9) to display thedesired entry. Press SELECT/TRANSFER, then press CIDVor DIR until the desired option is displayed (see page22).18
DirectoryNOTE: If all memory locations are in use, an error tone willsound when entering a number.This means the memory is full,and you will not be able to store anew number until an existing oneis deleted.Entering names into directoryTo enter a name Press MENU. Press SELECT/TRANSFER to confirm. The screen will show ENTER NAME.1. Using the table below, enter the name (up to 15alphanumeric characters) of the person.MENU Use DIR to advance to the next space to the right,or use CIDV to delete a mistake.DIRECTORY2.SELECT/TRANSFER When finished entering the name, pressSELECT/TRANSFER.Each press of a particular key causes characters to bedisplayed in the following order:ENTER NAME3.MUTECHANREDIALPAT JOHNSONOptions while entering names: Press the DIR button to move the cursor to theright. Press DIR twice to enter a space. Press CIDV to erase letters. Press # repeatedly to enter an ampersand (&),apostrophe ('), comma (,) hyphen (-), period (.), orpound sign (#).When finished, press SELECT/TRANSFER.19
4.DirectorySELECT/TRANSFEREntering numbers into directoryENTER NUMBERTo enter a numberUse the dial pad to enter up to 24 digits. When thenumber is complete, press SELECT/TRANSFER.5.Options while entering numbers:MUTECHANREDIALPAT JOHNSON55567896.SELECT/TRANSFER Press CIDV to erase digits if you make a mistake. Press REDIAL/PAUSE to enter a four-second dialingpause. The P will be inserted. When finished entering the telephone number, pressSELECT/TRANSFER to confirm.DISTINCT RING? N55567897.SELECT/TRANSFERTo assign a distinctive ringPress CIDV or DIR to select Y (yes) or N (no). If youchoose yes (and if you have caller ID service), a differentring tone will sound when this person calls.Press SELECT/TRANSFER to choose the option displayed(Y or N) and store this entry in the directory.A D appears in the display of each entry that has beenassigned a distinctive ring.20
Directory1. DIRDIRECTORY2. DIRADAM5551234To display first entry DIRDirectory searchFollow the steps on the left to browse through thedirectory or search to find a specific entry. You canpress OFF/CLEAR anytime to exit the directory.To browse through the directoryTo browse, press DIR then press CIDV or DIR toscroll through all entries one by one.A D appears in the display of each entry that has beenassigned a distinctive ring (see page 20).BETH5554321To scroll name by nameNOTE: When reviewing the directory entries, all entries (including thosein the directory and in the speed dial) are displayed in alphabetical order. Eachentry in speed dial is identified by its speed dial number (01-09) in the lowerright corner of the screen.-OR-To search alphabetically5To shorten the search, press DIR then use the telephone dial pad to enter the first letter of a name, thenpress DIR to scroll forward until the desired name isdisplayed.JOHN5550123To search alphabeticallyPress dial pad buttons once for the first letter, twice forthe second, three times for the third, as shown on page19.For example, press 5 (JKL) once to find JENNIFER, twiceto find KEVIN, or three times to find LINDA.To call a displayed numberWhen the desired entry is displayed, pressPHONE/FLASH to dial it immediately.21
Directory1. DIRDIRECTORY2. DIRADAMChanging directory entriesWhen any entry is displayed, press SELECT/TRANSFERto see options. Press CIDV or DIR to highlight thedesired option (blinking text), then press SELECT/TRANSFER again to select it.55512343.SELECT/TRANSFERSPEED EDIT ERASE5551234To edit an entryWhen EDIT is blinking, press SELECT/TRANSFER. Youcan change the name and number (or
Product name: 5.8 GHz cordless telephone/answering system Serial no.: (found on the bottom of the telephone base) Purchase date: Place of purchase: . Plug the telephone line cord into a modular tele-phone jack. NOTES: 1. Use only the power adapter supplied with this product. If you need a replacement, call 1 (800) 222-3111.