Transcription
PCRF替代計算伺服器UCS C240 stic Services 本文檔面向熟悉Cisco ��計算伺服器更換時,在OpenStack和CPS VNF級別需要執行的步驟。
附註:Ultra M �請務必檢查Red Hat Stack部署(OSPD)。[root@director ] su - stack[stack@director ] cd ansible[stack@director ansible] ansible-playbook -i inventory-new openstack verify.ymlplatform ��中驗證系統運行狀況。[stack@director ]# cd tram health ck@director ]# for i in (nova list grep controller awk '{print 12}' sed's/ctlplane //g') ; do (ssh -o StrictHostKeyChecking no heat-admin@ i "hostname;sudo rabbitmqctleval 'rabbit diagnostics:maybe stuck().'" ) & ctor ]# sudo pcs property show �7.從OSPD。 [stack@director ] for i in (nova list grep controller awk '{print 12}' sed's/ctlplane //g') ; do (ssh -o StrictHostKeyChecking no heat-admin@ i "hostname;sudo pcs status") irector ]# sudo systemctl list-units "openstack*" "neutron*" 為HEALTH OK。[stack@director ]# for i in (nova list grep controller awk '{print 12}' sed's/ctlplane //g') ; do (ssh -o StrictHostKeyChecking no heat-admin@ i "hostname;sudo ceph -s" )
任何錯誤:Neutron:[stack@director ]# sudo tail -n 20 tor ]# sudo tail -n 20 stack@director ]# sudo tail -n 20 對API執行這些驗證。[stack@director ] source[stack@director ] nova list[stack@director ] glance image-list[stack@director ] cinder list[stack@director ] neutron ry service status should be “up”:[stack@director ] nova service-listEvery service status should be “ :-)”:[stack@director ] neutron agent-listEvery service status should be “up”:[stack@director ] cinder ector ]# mysqldump --opt --all-databases /root/undercloud-all-databases.sql[root@director ]# tar --xattrs -czf undercloud-backup- date %F .tar.gz ver.cnf /var/lib/glance/images /srv/node /home/stacktar: Removing leading /' from member ��集管理器虛擬機器:[root@CM ]# config br.py -a export --all /mnt/backup/CPS backup (date \%Y-\%m-\%d).tar.gz
or[root@CM ]# config br.py -a export --mongo-all --svn --etc --grafanadb --auth-htpasswd -haproxy /mnt/backup/ (hostname) backup all (date ector ] nova list --field name,host,networks grep compute-10 49ac5f22-469e-4b84-badc-031083db0533 VNF2-DEPLOYM s9 0 8bc6cc60-15d6-4ead-8b6a10e75d0e134d pod1-compute-10.localdomain Replication 10.160.137.161;Internal 192.168.1.131; Management 10.225.247.229; tb1-orch ��1.登入虛擬機器的管理IP:[stack@XX-ospd ] ssh root@[root@XXXSM03 ]# monit stop �止sessionmgr服務:[root@XXXSM03 ]# cd /etc/init.d[root@XXXSM03 init.d]# ls -l sessionmgr*-rwxr-xr-x 1 root root 4544 Nov 29 23:47 sessionmgr-27717-rwxr-xr-x 1 root root 4399 Nov 28 22:45 sessionmgr-27721-rwxr-xr-x 1 root root 4544 Nov 29 23:47 gr-xxxxx的檔案,運行service sessionmgr-xxxxx stop:[root@XXXSM03 init.d]# service sessionmgr-27717 。通常,其格式為 VNFNAME -SERVICE X :[stack@director ] nova aggregate-list ---- ------------------- ------------------- Id Name Availability Zone ---- ------------------- -------------------
29 POD1-AUTOIT mgmt 57 VNF1-SERVICE1 60 VNF1-EM-MGMT1 63 VNF1-CF-MGMT1 66 VNF2-CF-MGMT2 69 VNF2-EM-MGMT2 72 VNF2-SERVICE2 75 VNF3-CF-MGMT3 78 VNF3-EM-MGMT3 81 VNF3-SERVICE3 ---- ------------------- ------------------- 標識計算節點中託管的VM一節中說明 nova aggregate-remove-host[stack@director ] nova aggregate-remove-host VNF2-SERVICE2 �能列在聚合下:nova aggregate-show[stack@director ] nova aggregate-show ��的內容建立名為delete 用的模板相同。delete node.shopenstack overcloud node delete --templates -e ments/puppet-pacemaker.yaml -e ments/network-isolation.yaml -e ments/storage-environment.yaml -e ments/neutron-sriov.yaml -e /home/stack/custom-templates/network.yaml -e/home/stack/custom-templates/ceph.yaml -e /home/stack/custom-templates/compute.yaml -e/home/stack/custom-templates/layout.yaml -e /home/stack/custom-templates/layout.yaml --stack
[stack@director ] source stackrc[stack@director ] /bin/sh delete node.sh openstack overcloud node delete --templates -e ments/puppet-pacemaker.yaml -e ments/network-isolation.yaml -e ments/storage-environment.yaml -e ments/neutron-sriov.yaml -e /home/stack/custom-templates/network.yaml -e/home/stack/custom-templates/ceph.yaml -e /home/stack/custom-templates/compute.yaml -e/home/stack/custom-templates/layout.yaml -e /home/stack/custom-templates/layout.yaml --stackpod1 49ac5f22-469e-4b84-badc-031083db0533Deleting the following nodes from stack pod1:- 49ac5f22-469e-4b84-badc-031083db0533Started Mistral Workflow. Execution ID: �操作變為COMPLETE狀態。[stack@director ] openstack stack list -------------------------------------- ------------ ----------------- ---------------------- --------------------- ID Stack Name Stack Status Creation Time Updated Time -------------------------------------- ------------ ----------------- ---------------------- --------------------- 5df68458-095d-43bd-a8c4-033e68ba79a0 pod1 UPDATE COMPLETE 2018-05-08T21:30:06Z 201805-08T20:42:48Z -------------------------------------- ------------ ----------------- ---------------------- --------------------- �中刪除計算服務:[stack@director ] source corerc[stack@director ] openstack compute service list grep compute-8 404 nova-compute pod1-compute-8.localdomain nova05-08T18:40:56.000000 openstack compute service delete[stack@director ] openstack compute service delete �聯中子代理和open vswitch代理:[stack@director ] openstack network agent list grep compute-8 enabled up 2018-
c3ee92ba-aa23-480c-ac81-d3d8d01dcc03 Open vSwitch agent pod1-compute-8.localdomainNone False UP neutron-openvswitch-agent ec19cb01-abbb-4773-8397-8739d9b0a349 NIC Switch agent pod1-compute-8.localdomainNone False UP neutron-sriov-nic-agent openstack network agent delete[stack@director ] openstack network agent delete r ] openstack network agent delete ��行驗證。[stack@director ] source stackrcnova show[stack@director ] nova show pod1-compute-10 grep hypervisor OS-EXT-SRV-ATTR:hypervisor hostname 4ab21917-32fa-43a6-9260-02538b5c7a5aironic node-delete[stack@director ] ironic node-delete r ] ironic node-list (node delete must not be listed now)安裝新的計算節點有關安裝新UCS C240 閱:Cisco UCS C240 伺服器。步驟2.使用CIMC �級。BIOS升級步驟如下:Cisco 儲存 Cisco 12G SAS模組化Raid控制器(SLOTHBA) �顯示的儲存可以是SSD驅動器。
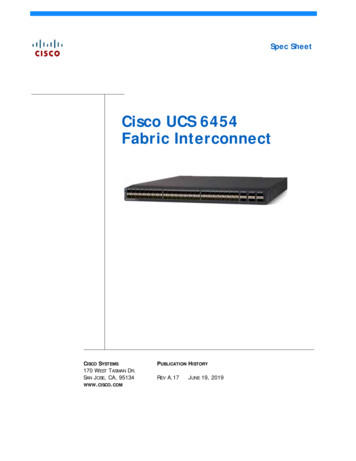
��立虛擬驅動器,請導航到Storage Cisco 12G SASModular Raid Controller(SLOT-HBA) Controller Info Create Virtual Drive from Unused PhysicalDrives
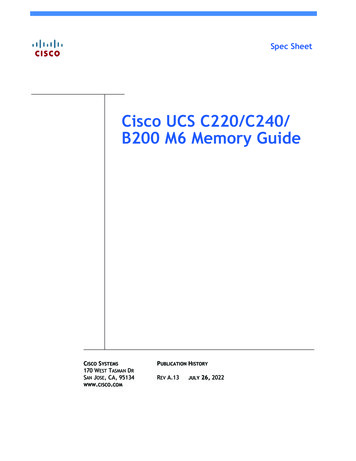
步驟6.選擇VD並設定Set as Boot Drive,如下圖所示。
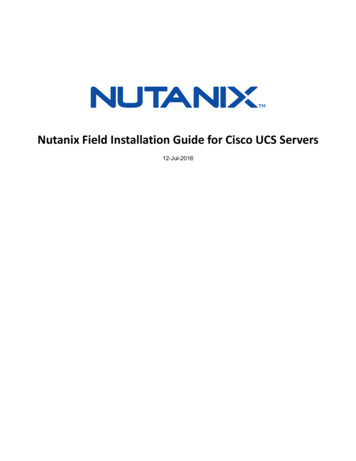
步驟7.若要啟用IPMI over LAN,請導覽至Admin Communication Services 覽至Compute BIOS Configure BIOS Advanced Processor ��細微的變化
�伺服器。建立一個add director ] cat add node.json{"nodes":[{"mac":["],"capabilities": "node:compute-18,boot "3000","arch":"x86 64","pm type":"pxe ipmitool","pm user":"admin","pm password":" PASSWORD ","pm stack@director ] openstack baremetal import --json add node.jsonStarted Mistral Workflow. Execution ID: 78f3b22c-5c11-4d08-a00f-8553b09f497dSuccessfully registered node UUID 7eddfa87-6ae6-4308-b1d2-78c98689a56eStarted Mistral Workflow. Execution ID: 33a68c16-c6fd-4f2a-9df9-926545f2127eSuccessfully set all nodes to ��行節點內檢。[stack@director ] openstack baremetal node manage r ] ironic node-list grep 7eddfa87 7eddfa87-6ae6-4308-b1d2-78c98689a56e None None power off
manageable False [stack@director ] openstack overcloud node introspect 7eddfa87-6ae6-4308-b1d2-78c98689a56e -provideStarted Mistral Workflow. Execution ID: e320298a-6562-42e3-8ba6-5ce6d8524e5cWaiting for introspection to finish.Successfully introspected all nodes.Introspection completed.Started Mistral Workflow. Execution ID: c4a90d7b-ebf2-4fcb-96bf-e3168aa69dc9Successfully set all nodes to available.[stack@director ] ironic node-list grep available 7eddfa87-6ae6-4308-b1d2-78c98689a56e None None available False power nternal api:- 11.120.0.43- 11.120.0.44- 11.120.0.45- 11.120.0.43 take compute-0 .43 and add heretenant:- 11.117.0.43- 11.117.0.44- 11.117.0.45- 11.117.0.43 and herestorage:- 11.118.0.43- 11.118.0.44- 11.118.0.45- 11.118.0.43 and ��超雲堆疊。[stack@director ] ./deploy.sh openstack overcloud deploy --templates -r /home/stack/custom-templates/custom-roles.yaml ronments/puppet-pacemaker.yaml ronments/network-isolation.yaml ronments/storage-environment.yaml ronments/neutron-sriov.yaml -e/home/stack/custom-templates/network.yaml -e /home/stack/custom-templates/ceph.yaml -e/home/stack/custom-templates/compute.yaml -e /home/stack/custom-templates/layout.yaml --stack
ADN-ultram --debug --log-file overcloudDeploy 11 06 17 16 39 26.log --ntp-server 172.24.167.109--neutron-flat-networks phys pcie1 0,phys pcie1 1,phys pcie4 0,phys pcie4 1 --neutron-networkvlan-ranges datacentre:1001:1050 --neutron-disable-tunneling --verbose --timeout 180 Starting new HTTP connection (1): 192.200.0.1"POST /v2/action executions HTTP/1.1" 201 1695HTTP POST http://192.200.0.1:8989/v2/action executions 201Overcloud Endpoint: http://10.1.2.5:5000/v2.0Overcloud Deployedclean up DeployOvercloud:END return value: ��openstack狀態變為完成。[stack@director ] openstack stack list -------------------------------------- ------------ ----------------- ---------------------- --------------------- ID Stack Name Stack Status Creation Time Updated Time -------------------------------------- ------------ ----------------- ---------------------- --------------------- 5df68458-095d-43bd-a8c4-033e68ba79a0 ADN-ultram UPDATE COMPLETE 2017-11-02T21:30:06Z 2017-11-06T21:40:58Z -------------------------------------- ------------ ----------------- ---------------------- --------------------- 態。[stack@director ] source stackrc[stack@director ] nova list grep compute-18 0f2d88cd-d2b9-4f28-b2ca-13e305ad49ea pod1-compute-18 ctlplane 192.200.0.117 ACTIVE -[stack@director ] source corerc[stack@director ] openstack hypervisor list grep compute-18 63 pod1-compute-18.localdomain ��新增了主機。nova aggregate-add-host Running
[stack@director ] nova aggregate-add-host VNF2-SERVICE2 pod1-compute-18.localdomainnova aggregate-show[stack@director ] nova aggregate-show VNF2-SERVICE2從Elastic Services Controller(ESC)恢復VM步驟1. rector ] nova list grep VNF2-DEPLOYM s9 0 8bc6cc60-15d6-4ead-8b6a-10e75d0e134d 49ac5f22-469e-4b84-badc-031083db0533 VNF2-DEPLOYM s9 0 8bc6cc60-15d6-4ead-8b6a-10e75d0e134d ERROR NOSTATE 步驟2.從ESC恢復VM。[admin@VNF2-esc-esc-0 ] sudo /opt/cisco/esc/esc-confd/esc-cli/esc nc cli recovery-vm-action DOVNF2-DEPLOYM s9 0 8bc6cc60-15d6-4ead-8b6a-10e75d0e134d[sudo] password for admin:Recovery VM Action/opt/cisco/esc/confd/bin/netconf-console --port 830 --host 127.0.0.1 --user admin -privKeyFile /root/.ssh/confd id dsa --privKeyType dsa --rpc /tmp/esc nc F2-esc-esc-0 ] tail -f /var/log/esc/yangesc.log 14:59:50,112 07-Nov-2017 WARN Type: VM RECOVERY COMPLETE14:59:50,112 07-Nov-2017 WARN Status: SUCCESS14:59:50,112 07-Nov-2017 WARN Status Code: 20014:59:50,112 07-Nov-2017 WARN Status Msg: Recovery: Successfully recovered VM [VNF2DEPLOYM s9 0 服務
用esc nc ��,請步驟1.登入各自的VM。[stack@XX-ospd ] ssh root@[root@XXXSM03 ]# monit start 檔案,運行service sessionmgr-xxxxx start:[root@XXXSM03 init.d]# service sessionmgr-27717 管理器虛擬機器執行build -init。/var/qps/install/current/scripts/build all.shssh VMe.g. ssh �(VM RECOVERY �一個彈出視窗,然後點選Export Template,如下圖所示。
腦的選項,請檢查Save �擇位置並儲存檔案以供日後使用。
步驟4.登入到要刪除的站點的Active isco-cps/config/gr/tmo/gen:cd ��多個vm groups。 �vm groups。附註:某些vm groups有多個VM。 該部署中,您需要標籤一個或多個vm groups以進行刪除。範例: vm group name cm /name 現在,將 vm group 更改為 vm group nc:operation "delete" 模板檔案。在ESC運行中:
/opt/cisco/esc/esc-confd/esc-cli/esc nc cli edit-config 9:10:19,45909:10:19,45909:10:19,459 Jan-2018INFOINFOINFOINFOINFOINFOINFOINFOINFOINFO UPDATE SERVICE REQUEST RECEIVED(UNDER TENANT) Tenant name: PcrfDeployment name: 18INFOINFOINFOINFO SEND NOTIFICATION STARTS Type: SERVICE UPDATEDStatus: SUCCESSStatus Code: 200 CONFD TRANSACTION ACCEPTED SEND NOTIFICATION STARTS Type: VM UNDEPLOYEDStatus: SUCCESSStatus Code: uster1 / cluster2)。每個群集內都有一個vm 或多個vm groups。附註:某些vm groups有多個VM。 將重新新增該組內的所有VM。範例: vm group nc:operation "delete" name cm /name 將 vm group nc:operation "delete" 更改為僅 vm group �改。 �vm group的placement部分中的主機名。 位置
type zone host /type enforcement 嚴格 /enforcement host wsstackovs-compute-4.localdomain /host /placement �行中:/opt/cisco/esc/esc-confd/esc-cli/esc nc cli edit-config 33,94709:16:33,94709:16:33,947 09:19:00,14809:19:00,14809:19:00,14809:19:00,148 Jan-2018INFOINFOINFOINFOINFOINFOINFOINFOINFOINFO UPDATE SERVICE REQUESTRECEIVED (UNDER TENANT) Tenant name: PcrfDeployment name: 18INFOINFOINFOINFO SEND NOTIFICATION STARTS Type: VM ALIVEStatus: SUCCESSStatus Code: OINFOINFOINFO SEND NOTIFICATION STARTS Type: SERVICE UPDATEDStatus: SUCCESSStatus Code: 200 CONFD TRANSACTION ACCEPTED SEND NOTIFICATION STARTS Type: VM DEPLOYEDStatus: SUCCESSStatus Code: 查PCRF服務是否關閉並啟動。
[stack@XX-ospd ] ssh root@[root@XXXSM03 ]# monsum[root@XXXSM03 ]# monit start essionmgr-xxxxx的檔案,運行service sessionmgr-xxxxx start:[root@XXXSM03 init.d]# service sessionmgr-27717 管理器虛擬機器執行build -init。/var/qps/install/current/scripts/build all.shssh VM e.g. ssh �程式以檢查系統狀態。[root@XXXSM03 init.d]# diagnostics.sh相關資訊 https://access.redhat.com/documentation/enus/red hat openstack platform/10/html/director ion/enus/red hat openstack platform/10/html/director installati.。技術支援與文件 - Cisco Systems
openstack network agent delete [stack@director ] openstack network agent delete c3ee92ba-aa23-480c-ac81-d3d8d01dcc03 [stack@director ] openstack network agent delete ec19cb01-abbb-4773-8397-8739d9b0a349 從Ironic資料庫中刪除 � [stack@director ] source stackrc nova show