Transcription
ConfigureRMS ExpressandWinmor WL2KProvided byMike K4MNJ, NNN0IMM
ContentsIntroduction . 1Download the RMS Express Software. 3Install RMS Express . 6Configure RMS Express . 8Send a Message using RMS Express. 10Configure Winmor WL2K . 12Connect to the Winmor Station to Send/Retrieve Mail . 15Installing the ITS HF Propagation Software . 18Add a MARS Station to Your Profile . 22
IntroductionWinlink 2000 (www.winlink.org) is a worldwide network for passing email traffic over radio. It does not depend on the internet but hasconnectivity to internet-based stations allowing you to send and receive to other winlink.org recipients AND to email account that are internetbased. Winlink is used by mariners, RV enthusiasts, MARS, ARES, and many other agencies who need to communicate when the internet is notavailable.The Winlink system consists of a group of Common Message Servers (CMS) placed at various locations around the world. These connect via theinternet to Radio Message Servers (RMS) in many geographic locations to form a star network configuration. The RMS are the VHF, UHF, or HFRF gateway into the Winlink system. The final component is your station running the software to send/receive messages via your radio.Winlink messages, like regular email, are sent to specific addresses and may contain file attachments such as pictures, weather maps,spreadsheets, ICS forms, etc.Since Winlink is a store-and-forward system, stations do not have to make simultaneousconnections. This removes time constraints on communications.Winlink is heavily used by the US and other governments, and many of the RMS servers arerestricted to non-amateur operations since they operate on frequencies unavailable toamateur radio operators.It is possible to make peer-to-peer connections between two client stations withinpropagation range of each other without going through an RMS. This might be useful in anemergency scenario where Winlink traffic is too heavy or where the RMS gateway isunreachable.Emails sent through the Winlink on the ham bands must follow the usual rules for amateur radio communication and may not be used forcommercial operations, encrypted, or third-party traffic. Winlink messages are monitored by Winlink administrators.You can visit this site to check the current status of RMS servers:http://www.winlink.org/RMSHFStatusClick the link below for a tutorial providing background and explanation of the overall workings of WL2K. I encourage you to read both tounderstand how and why this excellent system works. The author provides a deeper explanation of the different modes and equipmentrequired to take advantage of all that Winlink can do. There is a good troubleshooting section at the end of this document.1
http://www.dtreg.com/Getting Started with Winlink and WINMOR.pdfFind detailed manuals, frequency lists, and other documentation at the winlink.org sitehttp://www.winlink.org/webfm#MARS members can learn how Winlink supports their groups athttp://www.winlink.org/MARSThere is a Yahoo discussion group specifically for WINMOR and RMS Express:http://groups.yahoo.com/group/WINMOR/2
Download the RMS Express SoftwareOpen www.winlink.org from your browserClick Software3
Click the Software buttonAt the dropdown, select User SoftwareRead the feature comparison for each of the options. At thetime of printing, RMS Express seems to provide the bestcoverage, so that’s the option we are going to install.Scroll to the bottom of the RMS Express descriptionClick Winlink FTP site4
Click User ProgramsClick on the RMS Express Setup xxx.zip link.Select Save AsSelect the directory where you want to save this file.Click OKRepeat the process for the itshfbc xxx.zip file.This is the propagation software we install later.Open the RMS Express Zip File.Extract the RMS Express Setup.msi file to the desktop5
Install RMS ExpressDouble click the file you extracted.Click NextClick NextUse the default location unless you are very comfortable withsoftware and Microsoft Windows.6
Click Next to start the installation.If the User Access Control window pops up,Click Yes to allow it to install this application.When complete, click Close.RMS Express has been installed on your computer. Now we need to configure this to work with your rig.7
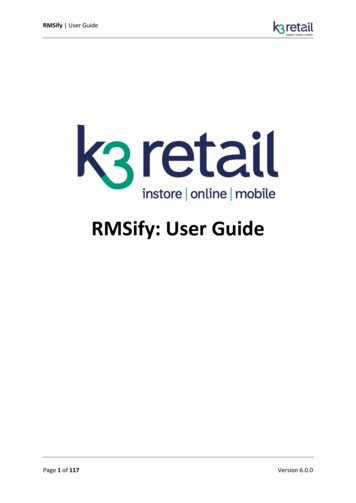
Configure RMS ExpressDouble Click the RMS Express IconThe RMS Express Properties Dialog will appear. If this does notappear, click Files, RMS Express Setup to see this window.Setup basic information as followsMy Callsign:My Grid Square: your callsign Your Locator Set Service Codes toPUBLIC EMCOMMService Codes determine the type of RMS you connect with. Ifyou are a MARS member or affiliated with a non-hamorganization, changing this code will provide access to otherstations. If you are not working with EMCOMM, you cansimply leave this as PUBLIC.Click UpdateAt this point, You have RMS Express Installed. The clientsoftware is comparable to gmail, Hotmail, AOL or other emailsoftware. On the left you have your folders including inbox,sent mail, outbox, saved, and deleted items.Across the top you have some options. For now, note the OpenSession: button and the Drop-down list beside it.Telnet WL2K requires an active internet connection and isuseless when infrastructure is failing. However, Telnet is fastand helpful during normal at-home use. We will use this modein a little while to test the RMS Express system.8
Winmor WL2K is the mode we will configure. This enables youto use low-cost sound card interfaces to network with theWinlink 2000 system.9
Send a Message using RMS ExpressClick the Message button at the top of the RMS Expresswindow.Select New Message from the drop-down valuesThe Compose Message box will open. This is comparable tothe compose message options when using gmail, hotmail, orother commercial mail software.The Enter a New Message dialog should look slightly familiar.Enter information as follows:To:K4MNJ@WINLINK.ORGSubject:Test Message from your callsign Body of message: Whatever you want to say to me Click Post to OutBox.You may also send your first message to your own commercialemail box. Once you have done this, you can send email fromyour commercial mailbox to your winlink mailbox by including//WL2K in the beginning of the subject. For MARS messages,add //MARS X/subject where X is the appropriate priority code.10
Click the Outbox system folder.The message you created is waiting in your outbox to be sentto me when you next connect to the Winlink network.Be sure Telnet WL2K is selected In the Session dropdown,Click Open Session:Click Start to initiate the telnet mail transfer session.THIS WILL NOT WORK if you do not have a fast internetconnection.The Telnet session will connect to a remote telnet server andwill create your Winlink email account. You have to send amessage at least once every 400 days or so to keep thisaccount active.If there are messages waiting for you, it will retrieve them andplace them in your inbox system folder.Click Exit to close the Telnet window.You have successfully created a Winlink account and sent yourfirst winlink message.11
Configure Winmor WL2KTip: If you have sound modes working on other software suchas Ham Radio Deluxe, open the software, find the menu whereyou identify your sound card interface, and make a note of fourthings:1) The COM port used to control your rig2) The COM port speed3) The sound card capture device (the device that sendssound INTO your computer)4) The sound card playback device (The device that playssounds OUT of your computer)1) COM Port2) COM Port Speed3) Sound Capture Device4) Sound Playback DeviceWrite this information down Select Winmor WL2K is selected In the Session dropdown,Click Open Session:The WINMOR Setup window will appear.This is where it gets a bit tricky.If you are using a Signalink USB or other USB-style sound cardinterface, select the options that include the words USB.If you are using a computer sound card, select the options thatbest match.Select the appropriate Capture DeviceSelect the appropriate Playback DeviceClick Update12
Three Screens will open.Click Remind Me Later to remove the Registration ReminderSet the TNC to display Spectrum.This is optional. I find it easier to follow the sending RMSsignal using the spectrum view. Experiment with both viewsuntil you are comfortable with this concept.Then select the Winmor Winlink 2000 Session window.Click Setup, then Radio Setup from the top windowSelect your Radio ModelThe Serial Port (COM) to Use for Radio Control (See tip)The Serial Port SpeedIf your rig uses a second serial port to control PTT, set thishere.Click Update.This closes the Setup window and returns to the Sessionwindow.If you cannot automatically control your radio, manually tuneto the dial frequency and set to USB SSB mode.13
Click Channel Selection.Click OK to ignore the propagation software warning for now.We will install this later.Click Update Table to load the Winmor stations list.Wait patiently while this table downloads.If you are not connected to the internet, you can click UpdateTable Via Radio. This will send a message to Winlink networkand the next time you connect, it will download a large file. Donot use this unless you are mobile and you need to refresh thislist.Select the row for the station that is closest to your location orselect the station showing the best propagation.If your rig control is properly configured, your radio will shift tothe frequency indicated.Click Select.The Channel Selector window will close.14
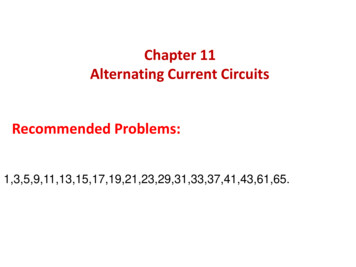
Connect to the Winmor Station to Send/Retrieve MailSet your incoming sound level.The receive level should be adjusted so it hits right in the middleof the green area on the TNC window. Adjust the sound cardinterface of the Windows Sound card controller until your levelsfall into the green area. If the level is blue, the sound is notloud enough. If in the pink, it is too loud.If you use your sound card for other software, the levels shouldbe adjusted already.Set your transmit level.Transmit Audio Setting is measured using the ALC (AutomaticLevel Control) screen in your radio. The SignaLink TX controlshould be set so that the automatic gain control (AGC) in yourradio’s menus shows about 25% from the bottom. Make sureyou turn off audio compression in your radio. Basically, youwant TX set as low as possible but high enough that your radiocan deliver its full power. Once you find the ALC screen in yourradio, you can click “Setup” on the RMS session control screenand select “Transmit Level Test” from the drop-down menu tostart a 4 second transmission. Make sure you aren’ttransmitting on a busy channel when you do this test.15
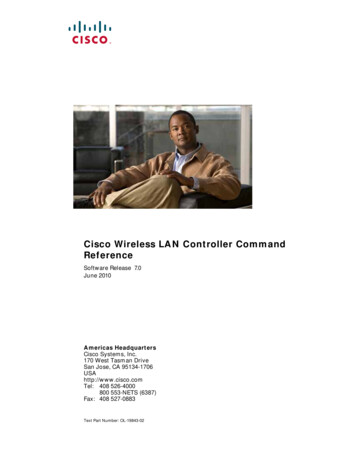
At the Winmor Winlink 2000 Session window.Check to confirm the channel is not busy. If you see a signal inthe spectrum, or hear a signal over the air, wait for this to finishbefore proceeding.Click StartThis will attempt to handshake your system with the WinlinkStation you selected. If everything works, you will hear somesounds similar to fax or modem connections and the twostations will start talking to each other.If the station isn’t connection, you can cancel by clicking AbortDo not click ABORT once the two stations have connected.Use Stop to cancel the session.If everything is working properly, the handshake will initiate andthere will be a peak in the center of the Spectrum indicator fromthe remote system. A solid signal will appear as an X in the4FSK / 74 window.16
The full transaction will look similar to the description showshere. FQ is the Quit command indicating it has worked.Click Exit to close the Winmor Session.Clicking the X will also close the session.17
Installing the ITS HF Propagation SoftwareInstall the HTS HF Propagation software you downloadedearlier.Click Next.Read the Important InformationClick Next.18
Read the License Agreement.Check the I Agree to these terms and conditionsClick Next.Click Install19
Note: If you change the location of the installation folder, youmust also change the location of this software in the RMSExpress Properties window.Click Finish.At the RMS Express Window, Open a Winmor WL2K SessionClick Channel Selection.20
Wait for the indexes to stop updatingNow you have the option to select the “best” station based onyour location, time of day, and propagation calculations.21
Add a MARS Station to Your ProfileIf you are a not MARS member, you are done.At the RMS Express windowClick the dropdown box on the left edge. You should see twooptions.Select the Add Callsign option.The Winlink 2000 system has been designed to work with 6character callsigns. NAVY MARS callsigns are 7 characterslong. The workaround for this is to use the first two charactersof the prefix, the first letter of the suffix, the region digit, andthe last two letters of the suffix.For example, my MARS callsign is NNN0IMMFirst two letter of prefix NNFirst letter of suffix IRegion 4Last two letters of suffix MMMy Winlink Callsign is NNI4MM22
Enter Your Callsign.Enter your full MARS callsign in the Aux Call 1.Enter your Grid Square.Enter the appropriate Service Code.Note: The Service code shown is not the actual code. MARSmembers can register on the Winlink.org site to get access tothe MARS Service Code.Click Update.You select the callsign you want to send/receive Winlinkmessages by picking from this dropdown list.NOTE: Do not use your MARS callsign on the HAM frequenciesand do not use your HAM callsign on the MARS frequencies.This is controlled by setting the Service Code in the priorwindow. If you have done this properly, the system willautomatically control this for you.Using a MARS call on a HAM frequency will get you in troublewith your State Director. I learned this the hard way so youdon’t have to.Follow the same steps you followed in the Configure WinmorWL2K section for your MARS callsign.23
5 Click User Programs Click on the RMS Express Setup xxx.zip link. Select Save As Select the directory where you want to save this file. Click OK Repeat the process for the itshfbc xxx.zip file. This is the propagation software we install later. Open the RMS Express Zip File. Extract the RMS Express Setup.msi file to the desktop