Transcription
Cisco CWDM Passive Optical SystemInstallation NoteThis document provides installation instructions for the Cisco Coarse Wave Division Multiplexer(CWDM) passive optical system. The CWDM passive optical system product numbers are listed inTable 1.Table 1CWDM Passive Optical System Product NumbersProduct NumberDescriptionCWDM-CHASSIS-2 2-slot chassis, 1 RUCWDM-MUX8A 8-channel MUX/DEMUX moduleCWDM-OADM4-1 4-channel OADM module (1470, 1490, 1510, and1530 nm)CWDM-OADM4-2 4-channel OADM module (1550, 1570, 1590, and1610 nm)CWDM-OADM1-1470 Dual single-channel OADM module, 1470 nmCWDM-OADM1-1490 Dual single-channel OADM module, 1490 nmCWDM-OADM1-1510 Dual single-channel OADM module, 1510 nmCWDM-OADM1-1530 Dual single-channel OADM module, 1530 nmCWDM-OADM1-1550 Dual single-channel OADM module, 1550 nmCWDM-OADM1-1570 Dual single-channel OADM module, 1570 nmCWDM-OADM1-1590 Dual single-channel OADM module, 1590 nmCWDM-OADM1-1610 Dual single-channel OADM module, 1610 nmWDM-1300-1550-S 1300 nm/1550 nm splitter cableCAB-SM-LCSC-1M LC to SC connector cable, 1 mCAB-SM-LCSC-5M LC to SC connector cable, 5 mCorporate Headquarters:Cisco Systems, Inc., 170 West Tasman Drive, San Jose, CA 95134-1706 USACopyright 2004–2005 Cisco Systems, Inc. All rights reserved.
ContentsContentsThis installation note contains the following sections: Overview, page 2 Safety Overview, page 9 Installing the CWDM Passive Optical System, page 15 Connecting the CWDM Passive Optical System to Your System, page 18 Specifications, page 25 Translated Safety Warnings, page 27 Obtaining Documentation and Submitting a Service Request, page 35OverviewThe Cisco CWDM passive optical system provides optical networking support for high-speed datacommunication for metropolitan area networks (MANs) over a grid of eight CWDM optical wavelengthsin both ring configurations or point-to-point configurations.The Cisco CWDM passive optical system includes these components: 2-slot chassis for Cisco Optical Add/Drop Multiplexers (OADMs) CWDM OADMs– 8-channel multiplexer/demultiplexer– Two 4-channel OADMs– Eight dual single-channel OADMs 1300 nm/1550 nm WDM splitter cable CWDM GBIC and CWDM SFP transceiversCWDM 2-Slot ChassisThe CWDM 2-slot chassis (CWDM-CHASSIS-2) is a standard 19-inch chassis that is one rack unit (RU)in height. Each CWDM 2-slot chassis can hold two CWDM OADM modules. You can install the CWDM2-slot chassis in the same equipment rack as your system or in an adjacent rack so that you can connectthe OADMs to the CWDM GBIC transceivers or the CWDM SFP transceivers.Cisco CWDM Passive Optical System Installation Note278-16565-02
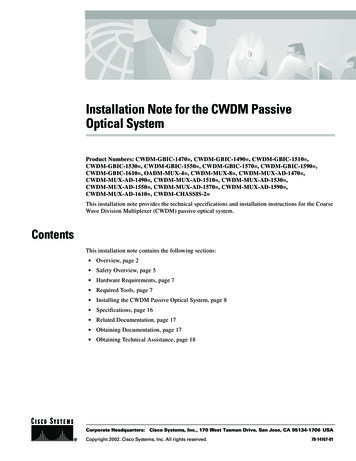
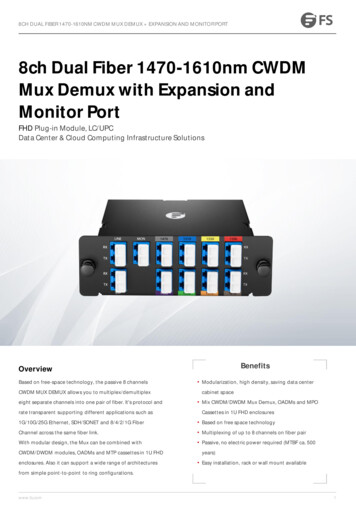
OverviewCWDM OADMsThe CWDM OADMs are passive devices that can multiplex/demultiplex or add/drop wavelengths frommultiple fibers onto one optical fiber. The OADM connectors are interfaced to the color-matchingCWDM GBIC or CWDM SFP transceivers on the equipment side. All OADMs are the same size. TwoOADM modules can be installed in a CWDM 2-slot chassis (CWDM-CHASSIS-2). There are threedifferent types of CWDM OADM modules8-Channel Multiplexer/Demultiplexer (CWDM-MUX-8A )The 8-Channel Multiplexer/Demultiplexer (CWDM-MUX-8A ) allows you to multiplex/demultiplexeight separate channels into one pair of fiber. Dual fiber is used for both the network connection and theCWDM GBIC or CWDM SFP transceiver connections. The eight available wavelengths are 1470-nm,1490-nm, 1510-nm, 1530-nm, 1550-nm, 1570-nm, 1590-nm, and 1610-nm. Themultiplexer/demultiplexer, shown in Figure 1, is equipped with a monitor port that allows you to attacha power meter or an optical spectrum analyzer to assist you in monitoring and troubleshooting thenetwork.8-Channel Multiplexer/Demultiplexer (CWDM-MUX8) Front X TXRX TX15101530RX TXRX TX1550RX TX1590RX1570RX TX1610RXINVISIBLE LASERDO NOT VIEW114000Figure 14-Channel OADM (CWDM-OADM4-1 and CWDM-OADM4-2 )The 4-Channel OADM (CWDM-OADM4-1 and CWDM-OADM4-2 ) allows you to add/drop fourchannels (with different wavelengths) into one direction of an optical ring. The other wavelengths arepassed through the OADM. The 4-channel OADMs are transparent to the 1300-nm wavelength andincludes a 1300-nm/1500-nm filter to mix legacy SONET/SDH/ATM ring installations with CWDMinstallations on the same optical fiber. Dual fiber is used for both the network and the GBIC or SFPconnections. The two 4-channel OADMs, shown in Figure 2 and Figure 3, support the followingwavelengths: CWDM-OADM4-1—1470-nm, 1490-nm, 1510-nm, and 1530-nm. CWDM-OADM4-2—1550-nm, 1570-nm, 1590-nm, and 1610-nm.The 4-channel OADM modules are equipped with a monitor port that allows you to attach a power meteror an optical spectrum analyzer to assist you in monitoring and troubleshooting the network.Cisco CWDM Passive Optical System Installation Note78-16565-023
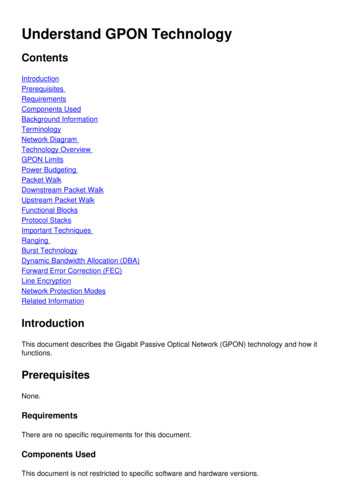
OverviewTXNETWORKRX TXPASSRXTX1470RX TX1510RXTXMONITORRX TXMONITORRXTX1490RX TX1530RXCWDMOADM4-1INVISIBLE LASERDO NOT VIEWFigure 3CWDMOADM4-21139984-Channel OADM (CWDM-OADM4-1) Front Panel4-Channel OADM (CWDM-OADM4-2) Front PanelTXNETWORKRX TXPASSRXTX1550RX TX1590RXTXMONITORRX TXMONITORRXTX1570RX TX1610RXINVISIBLE LASERDO NOT VIEW113999Figure 2Dual Single-Channel OADMs (CWDM-OADM1-xxxx)The Dual Single-Channel OADMs (CWDM-OADM1-xxxx) allows you to add/drop two channels of thesame wavelength into the two directions of an optical ring. The other wavelengths are passed throughthe OADM. The dual single-channel OADMs are transparent to the 1300-nm wavelength and includes a1300-nm/1500-nm filter to mix legacy SONET/SDH/ATM ring installations with CWDM installationson the same optical fiber. Dual fiber is used for both the network and the CWDM GBIC and CWDM SFPconnections. Eight versions of this OADM are available, one for each wavelength of light. (See Table 2.)The dual single-channel OADMs, shown in Figures 4 through 11, are color coded and match the colorcoding of the CWDM GBIC and CWDM SFP transceivers. The dual single-channel OADM modules areequipped with a monitor port that allows you to attach a power meter or an optical spectrum analyzer toassist you in monitoring and troubleshooting the network.Table 2Dual Single-Channel OADMsProduct NumberDescriptionConnector ColorCodeCWDM-OADM1-1470 Dual single-channel OADM (1470 nm)GrayCWDM-OADM1-1490 Dual single-channel OADM (1490 nm)VioletCWDM-OADM1-1510 Dual single-channel OADM (1510 nm)BlueCWDM-OADM1-1530 Dual single-channel OADM (1530 nm)GreenCWDM-OADM1-1550 Dual single-channel OADM (1550 nm)YellowCWDM-OADM1-1570 Dual single-channel OADM (1570 nm)OrangeCWDM-OADM1-1590 Dual single-channel OADM (1590 nm)RedCWDM-OADM1-1610 Dual single-channel OADM (1610 nm)BrownTable 3 provides a comparison of the CWDM passive device types.Cisco CWDM Passive Optical System Installation Note478-16565-02
OverviewTable 3CWDM Passive Device Type ComparisonNumber ofGigabitNumber ofFiber Strands to Ethernet Linksthe Network(Maximum)NetworkArchitectureOptionsProduct NumberDevice TypeCWDM-OADM1-xxxx OADM ADM4-1 pointCWDM-OADM4-2 CWDM-MUX8 The OADM module ports are color coded to help with installation. Each color indicates the wavelengthof the port. For more information about the color codes, see the “Connecting the CWDM Passive OpticalSystem to Your System” section on page 18.Figure 4Dual Single-Channel OADM Front Panel (1610 nm)CISCO WDM 10RXINVISIBLE LASERDO NOT VIEWFigure RKDual Single-Channel OADM Front Panel (1590 nm)CISCO WDM 90RXINVISIBLE LASERDO NOT VIEWFigure RKDual Single-Channel OADM Front Panel (1570 nm)CISCO WDM 70RXINVISIBLE LASERDO NOT TWORKCisco CWDM Passive Optical System Installation Note78-16565-025
OverviewFigure 7Dual Single-Channel OADM Front Panel (1550 nm)CISCO WDM KRXTXMONITORRXEASTTX1550RXINVISIBLE LASERDO NOT VIEWFigure 8113967RXNETNETWORKEQUIPMENTTXDual Single-Channel OADM Front Panel (1530 nm)CISCO WDM KRXTXMONITORRXEASTTX1530RXINVISIBLE LASERDO NOT VIEWFigure 9113968RXNETNETWORKEQUIPMENTTXDual Single-Channel OADM Front Panel (1510 nm)CISCO WDM RXINVISIBLE LASERDO NOT VIEWFigure TWORKDual Single-Channel OADM Front Panel (1490 nm)CISCO WDM RXINVISIBLE LASERDO NOT VIEWFigure TWORKDual Single-Channel OADM Front Panel (1470 nm)CISCO WDM 70RXINVISIBLE LASERDO NOT TWORKCisco CWDM Passive Optical System Installation Note678-16565-02
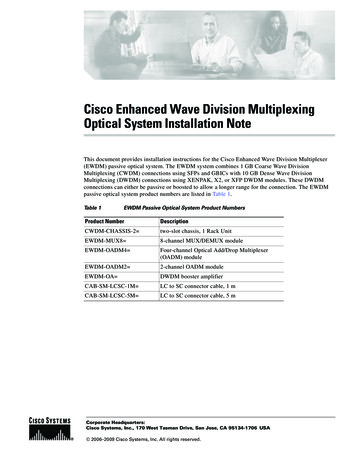
OverviewWDM Splitter Cable (WDM-1300-1550-S )The WDM splitter cable provides bidirectional, multiplexing/demultiplexing for 1310-nm and 1550-nmsignals. The WDM splitter cable is a Y cable (see Figure 12) with a 1310-nm branch terminating in anSC connector and a 1550-nm branch terminating in an LC connector. The common trunk branch of theY cable is terminated in an SC connector. The WDM splitter cable is 1 meter in length.Figure 12WDM Splitter CableNetworkSC connector1500nm (1460-1620nm)LC connector1300nm (1260-1360nm)SC connector120107Splitter cable(WDM-1300-1550-S )CWDM GBIC and CWDM SFP TransceiversThe CWDM GBIC and CWDM SFP transceivers are hot-swappable input/output devices that link yourswitching module to the CWDM passive optical system using a pair of single-mode fiber-optic cables.The two transceiver types have different form factors and use different fiber-optic cable connectors.Figure 13 shows a CWDM GBIC transceiver which uses an SC connector, and Figure 14 shows aCWDM SFP transceiver which uses an LC connector.CWDM GBIC711 SIN0G0CWD 0BASE LE-MM -COGBIC WDM G DE-155 BIC0 Figure 1326484472531Color label identifying laser wavelength5Optical bore dust plug2Alignment groove6Receive optical bore3Spring clip7Color dot identifying laser wavelength4Transmit optical boreCisco CWDM Passive Optical System Installation Note78-16565-027
OverviewWarningUse of controls, adjustments, or performing procedures other than those specified may result inhazardous radiation exposure. Statement 1057Figure 14CWDM SFPCC WDlL as MNS # s -S/N 50 1 F: 7 21 PO / C 14H 01 F 71 R 02 1 3 0 23 4 G4 05 .6 0 13 0-13Color arrow on labelReceive optical boreTransmit optical boreBail clasp113753DustplugThe CWDM GBIC and CWDM SFP transceivers are available in eight wavelengths. (See Table 4.) EachCWDM GBIC and CWDM SFP transceiver is color coded to match the connector colors on the OADMmodules.Table 4CWDM GBIC and SFP Transceiver Color CodesGBIC TransceiverProduct NumberSFP TransceiverProduct NumberDescriptionConnectorColor CodeCWDM-GBIC-1470 CWDM-SFP-1470 1000BASE-CWDM, 1470 nmGrayCWDM-GBIC-1490 CWDM-SFP-1490 1000BASE-CWDM, 1490 nmVioletCWDM-GBIC-1510 CWDM-SFP-1510 1000BASE-CWDM, 1510 nmBlueCWDM-GBIC-1530 CWDM-SFP-1530 1000BASE-CWDM, 1530 nmGreenCWDM-GBIC-1550 CWDM-SFP-1550 1000BASE-CWDM, 1550 nmYellowCWDM-GBIC-1570 CWDM-SFP-1570 1000BASE-CWDM, 1570 nmOrangeCWDM-GBIC-1590 CWDM-SFP-1590 1000BASE-CWDM, 1590 nmRedCWDM-GBIC-1610 CWDM-SFP-1610 1000BASE-CWDM, 1610 nmBrownFor information on installing, removing, and maintaining the CWDM GBIC and SFP transceivers, referto the Cisco CWDM GBIC and CWDM SFP Installation Note that accompanies the CWDM GBIC andCWDM SFP transceivers.Cisco CWDM Passive Optical System Installation Note878-16565-02
Safety OverviewSafety OverviewThroughout this publication, safety warnings appear in procedures that, if performed incorrectly, canharm you. A warning symbol precedes each warning statement.Statement 1071—Warning DefinitionWarningIMPORTANT SAFETY INSTRUCTIONSThis warning symbol means danger. You are in a situation that could cause bodily injury. Before youwork on any equipment, be aware of the hazards involved with electrical circuitry and be familiarwith standard practices for preventing accidents. Use the statement number provided at the end ofeach warning to locate its translation in the translated safety warnings that accompanied thisdevice.SAVE THESE INSTRUCTIONSWaarschuwingBELANGRIJKE VEILIGHEIDSINSTRUCTIESDit waarschuwingssymbool betekent gevaar. U verkeert in een situatie die lichamelijk letsel kanveroorzaken. Voordat u aan enige apparatuur gaat werken, dient u zich bewust te zijn van de bijelektrische schakelingen betrokken risico's en dient u op de hoogte te zijn van de standaardpraktijken om ongelukken te voorkomen. Gebruik het nummer van de verklaring onderaan dewaarschuwing als u een vertaling van de waarschuwing die bij het apparaat wordt geleverd, wiltraadplegen.BEWAAR DEZE INSTRUCTIESVaroitusTÄRKEITÄ TURVALLISUUSOHJEITATämä varoitusmerkki merkitsee vaaraa. Tilanne voi aiheuttaa ruumiillisia vammoja. Ennen kuinkäsittelet laitteistoa, huomioi sähköpiirien käsittelemiseen liittyvät riskit ja tutustuonnettomuuksien yleisiin ehkäisytapoihin. Turvallisuusvaroitusten käännökset löytyvät laitteenmukana toimitettujen käännettyjen turvallisuusvaroitusten joukosta varoitusten lopussa näkyvienlausuntonumeroiden avulla.SÄILYTÄ NÄMÄ OHJEETAttentionIMPORTANTES INFORMATIONS DE SÉCURITÉCe symbole d'avertissement indique un danger. Vous vous trouvez dans une situation pouvantentraîner des blessures ou des dommages corporels. Avant de travailler sur un équipement, soyezconscient des dangers liés aux circuits électriques et familiarisez-vous avec les procédurescouramment utilisées pour éviter les accidents. Pour prendre connaissance des traductions desavertissements figurant dans les consignes de sécurité traduites qui accompagnent cet appareil,référez-vous au numéro de l'instruction situé à la fin de chaque avertissement.CONSERVEZ CES INFORMATIONSCisco CWDM Passive Optical System Installation Note78-16565-029
Safety OverviewWarnungWICHTIGE SICHERHEITSHINWEISEDieses Warnsymbol bedeutet Gefahr. Sie befinden sich in einer Situation, die zu Verletzungen führenkann. Machen Sie sich vor der Arbeit mit Geräten mit den Gefahren elektrischer Schaltungen undden üblichen Verfahren zur Vorbeugung vor Unfällen vertraut. Suchen Sie mit der am Ende jederWarnung angegebenen Anweisungsnummer nach der jeweiligen Übersetzung in den übersetztenSicherheitshinweisen, die zusammen mit diesem Gerät ausgeliefert wurden.BEWAHREN SIE DIESE HINWEISE GUT AUF.AvvertenzaIMPORTANTI ISTRUZIONI SULLA SICUREZZAQuesto simbolo di avvertenza indica un pericolo. La situazione potrebbe causare infortuni allepersone. Prima di intervenire su qualsiasi apparecchiatura, occorre essere al corrente dei pericolirelativi ai circuiti elettrici e conoscere le procedure standard per la prevenzione di incidenti.Utilizzare il numero di istruzione presente alla fine di ciascuna avvertenza per individuare letraduzioni delle avvertenze riportate in questo documento.CONSERVARE QUESTE ISTRUZIONIAdvarselVIKTIGE SIKKERHETSINSTRUKSJONERDette advarselssymbolet betyr fare. Du er i en situasjon som kan føre til skade på person. Før dubegynner å arbeide med noe av utstyret, må du være oppmerksom på farene forbundet medelektriske kretser, og kjenne til standardprosedyrer for å forhindre ulykker. Bruk nummeret i sluttenav hver advarsel for å finne oversettelsen i de oversatte sikkerhetsadvarslene som fulgte med denneenheten.TA VARE PÅ DISSE INSTRUKSJONENEAvisoINSTRUÇÕES IMPORTANTES DE SEGURANÇAEste símbolo de aviso significa perigo. Você está em uma situação que poderá ser causadora delesões corporais. Antes de iniciar a utilização de qualquer equipamento, tenha conhecimento dosperigos envolvidos no manuseio de circuitos elétricos e familiarize-se com as práticas habituais deprevenção de acidentes. Utilize o número da instrução fornecido ao final de cada aviso paralocalizar sua tradução nos avisos de segurança traduzidos que acompanham este dispositivo.GUARDE ESTAS INSTRUÇÕES¡Advertencia!INSTRUCCIONES IMPORTANTES DE SEGURIDADEste símbolo de aviso indica peligro. Existe riesgo para su integridad física. Antes de manipularcualquier equipo, considere los riesgos de la corriente eléctrica y familiarícese con losprocedimientos estándar de prevención de accidentes. Al final de cada advertencia encontrará elnúmero que le ayudará a encontrar el texto traducido en el apartado de traducciones que acompañaa este dispositivo.GUARDE ESTAS INSTRUCCIONESCisco CWDM Passive Optical System Installation Note1078-16565-02
Safety OverviewVarning!VIKTIGA SÄKERHETSANVISNINGARDenna varningssignal signalerar fara. Du befinner dig i en situation som kan leda till personskada.Innan du utför arbete på någon utrustning måste du vara medveten om farorna med elkretsar ochkänna till vanliga förfaranden för att förebygga olyckor. Använd det nummer som finns i slutet avvarje varning för att hitta dess översättning i de översatta säkerhetsvarningar som medföljer dennaanordning.SPARA DESSA ANVISNINGARCisco CWDM Passive Optical System Installation Note78-16565-0211
Safety OverviewAvisoINSTRUÇÕES IMPORTANTES DE SEGURANÇAEste símbolo de aviso significa perigo. Você se encontra em uma situação em que há risco de lesõescorporais. Antes de trabalhar com qualquer equipamento, esteja ciente dos riscos que envolvem oscircuitos elétricos e familiarize-se com as práticas padrão de prevenção de acidentes. Use onúmero da declaração fornecido ao final de cada aviso para localizar sua tradução nos avisos desegurança traduzidos que acompanham o dispositivo.GUARDE ESTAS INSTRUÇÕESAdvarselVIGTIGE SIKKERHEDSANVISNINGERDette advarselssymbol betyder fare. Du befinder dig i en situation med risiko forlegemesbeskadigelse. Før du begynder arbejde på udstyr, skal du være opmærksom på deinvolverede risici, der er ved elektriske kredsløb, og du skal sætte dig ind i standardprocedurer tilundgåelse af ulykker. Brug erklæringsnummeret efter hver advarsel for at finde oversættelsen i deoversatte advarsler, der fulgte med denne enhed.GEM DISSE ANVISNINGERCisco CWDM Passive Optical System Installation Note1278-16565-02
Safety OverviewCisco CWDM Passive Optical System Installation Note78-16565-0213
Safety OverviewWarningOnly trained and qualified personnel should be allowed to install, replace, or service this equipment.Statement 1030WarningUltimate disposal of this product should be handled according to all national laws and regulations.Statement 1040WarningClass I (CDRH) and Class 1M (IEC) laser products. Statement 1055WarningUse of controls, adjustments, or performing procedures other than those specified may result inhazardous radiation exposure. Statement 1057NoteThe maximum output is less than 10 mW when measured through a 3.5-mm apeture located at a distanceof 100 mm and the wavelength is 1470-nm to 1610-nm from the multichannel MUX or OADM moduleoutput connectors. Other fiber-optic ports have been tested and comply with the Class 1 limits ofIEC 60825-1 and Class 1 limits of 21 CFR 1040.10 (with considerations pursuant to FDA LaserNotice 50, dated July 26, 2001).Cisco CWDM Passive Optical System Installation Note1478-16565-02
Installing the CWDM Passive Optical SystemInstalling the CWDM Passive Optical SystemThe following sections provide installation procedures for the CWDM passive optical systemcomponents: Required Tools, page 15 Installing the 2-Slot Chassis (CWDM-CHASSIS-2 ), page 15 Installing the CWDM OADM Modules, page 16 Removing the CWDM OADM Module, page 17 Installing and Removing CWDM GBIC and CWDM SFP Transceivers, page 17Required ToolsYou will need these tools to install the CWDM passive optical system: Number 2 Phillips screwdriver for the 10-32 or the 12-24 chassis installation screws. Wrist strap or other personal grounding device to prevent ESD occurences. Antistatic mat or antistatic foam to set the equipment on. Fiber-optic end-face cleaning tools and inspection equipment. For complete information oninspecting and cleaning fiber-optic connections, refer to the white-paper document at this chnologies white paper09186a0080254eba.shtml Level (optional) Tape measure (optional)Installing the 2-Slot Chassis (CWDM-CHASSIS-2 )NoteEnsure that you install the 2-slot chassis in the same rack or an adjacent rack to your system so that youcan connect all the cables between your CWDM OADM modules and the CWDM GBIC and CWDMSFP transceivers in your system.CautionWhen performing the following procedures, wear a grounding strap to avoid ESD damage to the OADMmodule. Some platforms have an ESD connector for attaching the wrist strap.To mount the 2-slot chassis in an equipment rack, follow these steps:Step 1Remove the 2-slot chassis from the shipping packaging.Step 2Position the 2-slot chassis in the rack where you are going to install it. Align the mounting holes in thechassis L brackets with the mounting holes in the equipment rack to ensure that the 2-slot chassis ismounted straight and level. Use a level or tape measure to verify that the chassis is positioned level inthe rack.Cisco CWDM Passive Optical System Installation Note78-16565-0215
Installing the CWDM Passive Optical SystemStep 3Secure the 2-slot chassis using four (two per side) 12-24 x 3/4-inch screws or four 10-32 x 3/4-inchscrews. Thread the screws through the elongated holes in the L bracket and into the threaded holes in themounting post. (See Figure 15.)Mounting the 2-Slot Chassis in the Rack68818Figure 15Installing the CWDM OADM ModulesCautionWhen performing the following procedures, wear a grounding strap to avoid ESD damage to the OADMmodule. Make sure the other end of the ground strap is securely attached to a grounded point.To install the CWDM OADM modules, follow these steps:Align the CWDM OADM module with the slot on the 2-slot chassis. (See Figure 16.)Figure 16Installing a CWDM OADM ModuleCWDMOADM4-2TXNETWORKTXMONITORCWDMOADM4-1RX TXPASSRX TXMONITORRXRXTX1470TX1490RX TX1510RX TX1530TXNETWORKTXMONITORRX TXPASSRX TXMONITORRXRXTX1550TX1570RX TX1590RX TX1610RX120028Step 1RXRXRXCisco CWDM Passive Optical System Installation Note1678-16565-02
Installing the CWDM Passive Optical SystemStep 2Gently push the OADM module into the 2-slot chassis. Ensure that you line up the captive screws on theOADM module with the screw holes on the 2-slot chassis.Step 3Tighten the two captive screws with the Number 2 Phillips screwdriver. Do not overtighten.Step 4Do not remove the optical bore dust plugs at this time.Removing the CWDM OADM ModuleCautionWhen performing the following procedures, wear a grounding strap to avoid ESD damage to the OADMmodule.To remove the OADM module or the multiplexer/demultiplexer module, follow these steps:Step 1Disconnect all network interface cables from the OADM module and immediately install dust plugs inthe network interface cable connectors and the OADM connectors.Step 2Loosen the captive screw on each side of the OADM module or the multiplexer/demultiplexer moduleusing a Phillips screwdriver.Step 3Gently pull on both captive screws to release the OADM module or the multiplexer/demultiplexermodule from the 2-slot chassis.Step 4Pull the OADM module or the multiplexer/demultiplexer module out of the 2-slot chassis, and place iton an antistatic mat or antistatic foam pad.Installing and Removing CWDM GBIC and CWDM SFP TransceiversFor information on installing, removing, and maintaining the CWDM GBIC transceivers and CWDMSFP transceivers, refer to the Cisco CWDM GBIC and CWDM SFP Installation Note that accompaniesthe CWDM GBIC and CWDM SFP transceivers.CautionCWDM SFP and CWDM GBIC transceivers are static-sensitive devices. Always use an ESD wrist strapor similar individual grounding device when handling or coming in contact with CWDM SFP andCWDM GBIC transceivers.NoteTo prevent contamination, do not remove the optical bore dust plugs from the CWDM SFP and CWDMGBIC transceivers until directed to do so.Cisco CWDM Passive Optical System Installation Note78-16565-0217
Connecting the CWDM Passive Optical System to Your SystemConnecting the CWDM Passive Optical System to Your SystemThis section is divided into the following topics:Note Connecting Cables to the Dual Single-Channel OADM Module, page 18 Connecting Cables to the CWDM 4-Channel OADM Module, page 20 Connecting Cables to the CWDM 8-Channel Multiplexer/Demultiplexer Module, page 23Use the CWDM passive optical system connector color codes shown in Table 2 to help you connect theCWDM passive optical system to your system.See Figure 2 through Figure 13 for the OADM and multiplexer/demultiplexer module front panels.WarningClass 1M laser radiation when open. Do not view directly with optical instruments. Statement 1053Connecting Cables to the Dual Single-Channel OADM ModuleNoteMake sure that the CWDM GBIC or CWDM SFP transceiver color code matches the color of the OADMport to which it is connected.To connect the cables to the dual single-channel OADM module, follow these steps (see Figure 17):Step 1WarningInsert the CWDM GBIC or CWDM SFP transceivers into the appropriate modules on your switch orrouter system if you have not already done so. For more information on CWDM SFP and CWDM GBICGBIC transceivers, refer to the Cisco CWDM GBIC and CWDM SFP Installation Note that accompaniedyour transceivers.NoteAlways use single-mode fiber-optic patch cables to connect dual single-channel OADM ports tothe CWDM GBIC or the CWDM SFP transceivers.NoteCWDM GBIC transceivers are equipped with SC connectors. To make connections to the LCconnectors on the OADM modules, you must use an LC to SC patch cable (Cisco part numberCAB-SM-LCSC-1M [1 meter cable], CAB-SM- LCSC-5M [5 meter cable], or an equivalentpatch cable).Invisible laser radiation may be emitted from the end of the unterminated fiber cable or connector. Donot view directly with optical instruments. Viewing the laser output with certain optical instruments(for example, eye loupes, magnifiers, and microscopes) within a distance of 100 mm may pose an eyehazard. Statement 1056Cisco CWDM Passive Optical System Installation Note1878-16565-02
Connecting the CWDM Passive Optical System to Your SystemFigure 17Cabling a CWDM Dual Single-Channel OADM FPCAB-SM-LCSC-1MLC nector120029DualSingle-ChannelOADM moduleTo networkTo optional opticalspectrum analyzerTo networkTo optional opticalspectrum analyzerNoteBefore removing the dust plugs and making any optical connections, observe the following guidelines: Always keep the protective dust plugs on the unplugged fiber-optic cable connectors and thetransceiver optical bores until you are ready to make a connection. Always inspect and clean the SC connector end-faces just before making any connections. Refer tothe Tip on this page for a pointer to a fiber-optic inspection and cleaning white paper. Always grasp the SC connector housing to plug or unplug a fiber-optic cable.Step 2Remove the dust plugs from the network interface cable connector and the transceiver optical bore. Savethe dust plugs for future use.Step 3Inspect and clean the connector’s fiber-optic end-faces. Refer to the Tip below for a pointer to thefiber-optic inspection and cleaning white paper.TipFor complete information on inspecting and cleaning fiber-optic connections, refer to the whitepaper atthis chnologies white paper09186a0080254eba.shtmlCisco CWDM Passive Optical System Installation Note78-16565-0219
Connecting the CWDM Passive Optical System to Your SystemStep 4Connect the single-mode fiber-optic patch cable from the CWDM GBIC or CWDM SFP transceiver tothe OADM module EQUIPMENT connector. Connect the Tx ports to the Rx ports and the Rx ports tothe Tx ports to ensure that the system operates correctly.a.If you are using CWDM SFP transceivers, use an LC-to-LC patch cable.b.If you are using CWDM GBIC transceivers, you must use an SC-to-LC patch cable(CAB-SM-LCSC-1M or CAB-SM-LCSC-5M ).NoteCWDM GBIC transceivers are equipped with SC connectors. To make connections to the LCconnectors on the OADM modules, you must use an LC to SC patch cable (Cisco part numberCAB-SM-LCSC-1M [1 meter cable], CAB-SM- LCSC-5M [5 meter cable], or an equivalentpatch cable).Step 5If you use both channels of the module, repeat Step 4 for the second channel.Step 6Connect the network west backbone single-mode fiber-optic cable to the NETWORK WEST connectoron the OADM module, and connect the east backbone single-mode fiber-optic cable to the NETWORKEAST connector on the OADM module.Step 7If you are planning to monitor your network with an optical power meter or an optical spectrum analyzer,connect your meter or analyzer to the MONITOR port on the OADM.Connecting Cables to the CWDM 4-Channel OADM ModuleNoteMake sure that the CWDM GBIC or CWDM SFP transceiver color code matches the color of the OADMport to which it is connected.To connect the cables to the CWDM 4-channel OADM module, follow these steps (see Figure 18):Step 1Insert the CWDM GBIC transceivers or CWDM SFP transceivers into the appropriate modules on yourswitch or router system if you have not already done so. For more information on installing CWDMGBIC or CWDM SFP transceivers, refer to the Cisco CWDM GBIC and CWDM SFP Installation Note.NoteAlways use single-mode fiber-optic patch cables to connect the CWDM OADM ports to theCWDM GBIC transceivers or CWDM SFP transceivers.NoteCWDM GBIC transceivers are equi
Cisco CWDM Passive Optical System Installation Note 78-16565-02 . (CWDM-MUX-8A ) allows you to multiplex/demultiplex eight separate channels into one pair of fiber. Dual fiber is used for both the network connection and the CWDM GBIC or CWDM SFP transceiver connections. The eight available wavelengths are 1470-nm,