Transcription
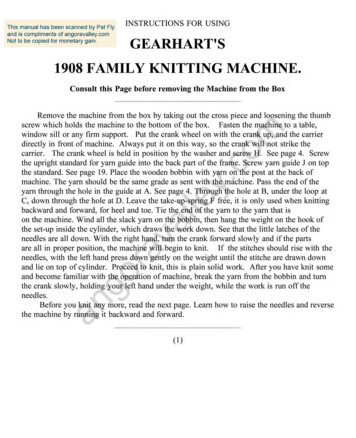
INSTRUCTIONS FOR USINGGEARHART'S1908 FAMILY KNITTING MACHINE.Consult this Page before removing the Machine from the Boxangoravalley.comRemove the machine from the box by taking out the cross piece and loosening the thumbscrew which holds the machine to the bottom of the box. Fasten the machine to a table,window sill or any firm support. Put the crank wheel on with the crank up, and the carrierdirectly in front of machine. Always put it on this way, so the crank will not strike thecarrier. The crank wheel is held in position by the washer and screw H. See page 4. Screwthe upright standard for yam guide into the back part of the frame. Screw yam guide J on topthe standard. See page 19. Place the wooden bobbin with yam on the post at the back ofmachine. The yam should be the same grade as sent with the machine. Pass the end of theyam through the hole in the guide at A. See page 4. Through the hole at B, under the loop atC, down through the hole at D. Leave the take-up-spring F free, it is only used when knittingbackward and forward, for heel and toe. Tie the end of the yam to the yam that ison the machine. Wind all the slack yam on the bobbin, then hang the weight on the hook ofthe set-up inside the cylinder, which draws the work down. See that the little latches of theneedles are all down. With the right hand, tum the crank forward slowly and if the partsare all in proper position, the machine will begin to knit. If the stitches should rise with theneedles, with the left hand press down gently on the weight until the stitche are drawn downand lie on top of cylinder. Proceed to knit, this is plain soUd work. After you have knit someand become familiar with the operation of machine, break the yam from the bobbin and tumthe crank slowly, holding your left hand under the weight, while the work is run off theneedles.Before you knit any more, read the next page. Learn how to raise the needles and reversethe machine by running it backward and forward.(1)
THE FOLLOWING POINTS SHOULD OBSERVED.angoravalley.comBefore you can expect to knit you must learn the construction of the machine, how toreverse, put in and take out needles, adjust cams, etc.When turning the machine forward the needles must run UP OVER the right hand switch orlatch I and under the left land switch.When turning backward, the needles must run UP OVER the left hand switch and under theright.When reversing the machine without work, should a needle, strike the switch the needlemust be lifted up or pressed down so as to allow the switch to adjust itself and the needle topass.The switches, needles and cam all being in full view it is very easy to adjust them so as, torun free either way. The cam is adjusted by turning the nut G,. When turned up it makes thework close, or suitable for fme yam; when turned down it makes the work more open orsuitable for coarse yarn.The needles are all thrown out of action by raising them up as far as they will come, theshanks then pass over the cam. The needles are taken out by raising them up and pushing thetops out from the cylinder and raising the shank from under the wire band. The needles areput in by a reverse operation.If the work raises with the needles, either the yarn is too heavy, the cam is too high, or theweight is insufficient. It is always best to use fine yarn until you learn to operate themachine. The needles, switches and cam should be oiled.The take up spring F must not be used only when knitting heel and toe, or knitting backwardand forward.Avoid running the machine rapidly without work. Always read before working themachine, then read and work together.The machine when attached to table should be level, so the weight holds down even allaround.If the work raises up with the needle when knitting, hold down on the weight.(2)
TO SET UP WORK ON MACHINE.angoravalley.comWind the yam on the bobbin loosely until it is full, filling the large end first, place it on thepost. See Fig. 2, Page 4. Pass the end of yam up through the hole in the yam guide at A,through the hole at B, under the loop C, down through the hole at D, through the eyelet I, andthrough the 1 hole in carrier G. Draw about six feet of yam through, or enough to set up thefirst round of stitches. Place the set-up inside thecylinder and begin to set up the work to the rightof carrier. See Fig. I. Wind the thread to theright, around the setup hook and around theneedle, then around another hook and the nextneedle towards the back part of the machine;continue to set up in this way winding to theright and crossing the thread as you see in Fig.I.Should there be less hooks on the set-up thanthere are needles you can put the yarn from twoneedles on one hook. After you have set uparound the back part of the machine and wellforward on the left, hang the weight on the set-upand tum forward slowly. (See that latches aredown). This will knit and at the same time bringthe empty needles up, then proceed to finishsetting up the work on these needles the same asthe others. In setting up the work, be sure toI"4" igure 1 "cross the yam between the needles and the hook,this makes a selvedge and prevents it from raveling.Leave the work a little slack between the needles and the hooks, so as to allow the needlesto make the first round of stitches. With the work thus set up you are ready to knit, tum thecrank forward and if the stitches rise with the needles, press down on the weight. Thiswill knit plain solid work. The work must never raise with the needles. For coarse workmore weight is required, and the cam must be adjusted so as to force the needles downlow enough to shed the stitches.TO KNIT STOCKINGS WITH SEAMED TOP OR RIB.Take every third or fourth needle out of the machine, and set up work same as with all theneedles.Knit about four stitches with the cam raised a little so as to make the work as close aspossible. Then put in the needles that were taken out and with the work hook take the stitchbelow one of the adjoining needles and put it on the needles just put in, they will form theirown(3)
stitches if you begin to knit, but if the stitches are not lifted from adjoining needles, there willbe a little opening between the rib and the solid work.Lower the cam a little and knit about 100 rounds for the leg. The ankle may be narrowed byraising the cam a little as you did for the rib top. This will tighten the stitch.TO KNIT THE HEELangoravalley.comFIRST PART. Tum the machine until the cam is in front; raise up one-half the needles outof action on the back part of machine. See marks on inside of cylinder. Take out the set-upand weight, and with the heel hook, (bent wire with two hooks) catch the work inside thecylinder close up to the needles in front, on which you knit the heel. Attach the weight to theheel hook, place the take-up spring F under the yam between C and D. It will now appear asin Fig. 2.Knit one course to the right,passing all the needles in actionthrough the cam and out underthe switch to the left. The carrierwill now be on the back part ofthe machine. Now raise oneneedle on the right side ofmachine next to the carrier, thelast needle to pass under theswitch, then knit another coursebackward until all the needles inaction have passed through thecam and out under the switch tothe right. Then raise one needleon the left side of machine next tocarrier, the last needle to passunder the switch. Then knitforward and backward each timeraising one needle until you haveraised all the needles except tenin front which are in action.Always allow the yarn to passaround on the outside of theneedles just raised to prevent anyopen places in the heel, and beFig. 2.sure the slack thread is taken upwhen reversing, either by the take-up spring or your fingers, and also to hold the work welldown as the needles are making stitches.SECOND PART. Continue knitting backward and forward as before,(4)
y.combut instead of raising a needle up, push a needle down each course, on the opposite side fromwhich you raised the needles while knitting first part. Continue this backward and forward,each time pushing a needle down until all the needles are down that were raised in the firstpart, except one on each side, which prevents a hole in the finished work.When fmishing heel, the machine must be in forward action with the cam in front. The heelis now finished and the needles will be in the same position as when you began to knit theheel, except the two needles just mentioned will be up. Now push all the needles down on theback part of machine, and see that the latches of the needles are down, and you are ready toknit the foot. When knitting heel or toe always raise the needles on same side of the machinethat the yam carrier stands, and put them down on the opposite side of machine from the yamcarrier,otherwise yon will have small holes where the heel joins.TO KNIT THE FOOT.lleWith the needles all down, put the other heel hook on the opposite side of the work so theweight will hang even on both hooks. Press down on the weight and continue to knit aroundto form the foot (as in knitting the leg). When you have knit the foot eight inches long, or anydesired length, proceed to knit the toe. This will make a ten inch sock.ravaTO KNIT THE TOE.angoThis is done the same as knitting heel, using one hook, and on the same side of thestocking as the heel. Raise the needles on the back half of machine, knit back and forward,each time raising a needle until there are only ten in action, and continue to knit back andforward pushing down a needle on the opposite side each time and finish just as heel. Whenyou get them all down to where you commence to make the toe, pull three-fourths or a yard ofthread from the machine (measuring from sock) out of yam carrier and place down inside thesock; then put all the needles down and tum the machine once around and the work will dropout, leaving only to bring raw edges together and close them with the knit stitch with thethree-fourths of a yard of yam, as explained, see next page, when the sock is complete.As the heel and toe are being formed, the weight applied with left hand to the set up deviceis not sufficient to hold down the work. The heel hook is intended for this purpose. The hookis to be hooked on the inside of the work about one inch from the last needles raised up. Pulldown sufficiently and commence narrowing for the heel (as described in making the heel).Before commencing to widen back, the hook must be hooked up near the needles again. Whenthe heel is completed the hook can remain while knitting the foot. When the foot is completedthe hook can be removed and used in making the toe. In knitting the heel and toe, care mustbe taken that the work(5)
is properly held down, so that all the needles complete their stitch. If the last needle, inknitting across, fai ls to make its stitch when you reverse the machine to knit back, you wi ll beliable to drop a stitch or leave an open place where the heel joins. But if the work is even lyheld down with the heel hook or by hand, you will avoid that difficulty. You wi ll find thatabout twelve rounds are required to make one inch in length, but in no case rely on thisentirely, as the measurement must be exact, namely, five inch rib, nine inch leg, (fourteeninches from top to bottom) and foot ten inches, unless otherwise instructed.Before knitting a stocking complete, it might be well to practice on turning a heel. This youcan do on one piece by knitting straight and turning a heel every three inch es.y.comCLOSING THE TOE.After the sock or stocking is run out of the machine take a sad or flat iron and damp cloth andpress the toe so the stitches will layout smooth. The sock will then appear like Fig. 3.Ravel out one round until the yarn is broughtto the corner, thread the yarn in a darningango ravalleneedle. Each stitch has the needle passedthrough it twice, thus, pass the needle INFig. 4·through the firststitch and OUT through the next stitch on thesame side, then put the needle IN through thefirst stitch and OUT through the next stitch onthe other side, then put the needle IN throughthe same stitch you brought it OUT of on thefirst side, and OUT through the next stitch onF ig . 3·the same side, so by alternating stitches fromside to side, putting the needle IN the stitchfrom which you brought it OUT, or oppositesides. The toe will be looped together just the same as if knit.(6)
The toe should be pressed before looping together, so as not to ravel, and after it is looped,to make it look neat.LONG STOCKINGS.y.comYou do not take out any of the needles in knitting stockings, but set up with the full set ofneedles. Knit the top a little loose so as to give the required size. Knit from 60 to 100 roundsand then shorten the stitch a very little, knit 10 to i5 rounds and again shorten; knit the lengthrequired, say 130 or 140 rounds. Knit Heel and complete same as for sock. If a measure isprefered, it takes about 24 inches before shortening the stitch, and 6 or 7 for ankle aftertightening.ANOTHER WAYangoravalleKnit 60 to 100 rounds, take out one needle in the center of the cylinder at the back; knit 20r3 rounds; take out the fourth needle on each side of the first one taken out; knit two roundsand take out the fourth needle on each side of the first one taken out. Continue to knit tworounds, removing the fourth needle on each side until every fourth needle is removed. Knit 30to 50 rounds and put in the needles taken out in front where the heel is knit; knit the heel;knit the length required for the foot; put in the rest of the needles taken out; knit three rounds,and knit toe as in other cases. If taking out every fourth needle makes the ankle too small onlyremove them from -the back half of the CYLINDER; this makes the seam only in front of thestocking.INFANTS' STOCKINGS.Any number of needles may be used, less 16 required to be taken out for reversing themachine. In a 72-NEEDLE CYLINDER take out 16, leaving 56. Set up as directed. Knit from30 to 40 times across, then narrow two stitches, one on each side, third time across, until youhave narrowed 8 stitches. In narrowing, lift the stitch from the last needle at the edge and putit over the next needle, then take the empty needles out of the machine. After narrowing 8stitches knit 20 times across for the ankle, leaving the machine ready to turn backward. Liftup all the needles except 9 next to YARN-CARRIER.(7)
valley.comOn these 9 knit one-half of the heel thus: tum the machine backward until the needles have allformed stitches, lift up one needle; run back to the edge and return; lift another needle,continue to knit back and forth, lifting a needle on the inside as before, until only four needlesremain, then put down one needle, just as in knitting the heel of a sock, until 8 are down; thenput all down and knit clear across to the opposite side; then lift up all but 9 needles andperform the same operation on this opposite selvedge as we have thus described, thus formingone-half a heel on each selvedge. You will have to hold the work down on the edges whilethus knitting the heel, either with your fingers or with the HEEL HOOK. Having completedthe heel put down all the needles, knit 18 or 20 times across and you are ready for the toe.Knit the toe thus: Tum until the CAM is at the middle of the work; lift up nine needles oneach edge, knit back and forth, lifting up a needle on each side just as knitting a heel or toe ofsock until only four needles are left down in operation, then push them down as in the toe of asock until only one is left with a double stitch on it on each side, then push all down, knit tothe edge and back, break off the yam and run out the work.TO CLOSE THE SELVEDGE.raYour stocking is now complete, except closing the selvedge down the back. This is donewith a darning needle, by taking up a short stitch on each edge on the wrong side, and sewingover and over as in over seaming. Close the toe as in a sock. Use double yarn in closing theedge.angoThe general principle in knitting a child's stocking, flat web is to set up the number ofstitches required; knit the top of the leg the length required; narrow for the ankle just alike oneach edge; knit half the heel on one edge and half on the other. Knit the proper length for thefoot. Knit the toe in the middle of the needles and not on the edge as the heel. The heel andtoe are always knit with not less than one half of the needles; so where the heel is knit onehalf on one side and one-half on the other, only one-fourth of the needles are used on eachedge. Do not forget that every other stitch on the selvedge is a short stitch, and is alwaysreferred to as the selvedge stitch.(8)
HOW TO ADJUST AND USE THE RIBBING ATTACHMENT.Do Not Undertake to Use the Ribber Until You Have First Learned toKnit Plain and Understand the Machine.y.comRead These Instructions all over Carefully Before Using the Ribber.angoravalleThe Ribber dial carringy 24 needles, works with the 72 cylinder only. To adjust the Ribber,have all the work off the Machine and all the needles in the 72 cylinder. With the needles outof the ribber dial, place the ribber post and dial in position by putting the post with the slotover the lug on the cam-ring. Now drop the ribber down exactly in the center of the cylinder,just so the ribber needles when in, pass under the thread carrier. In this position fasten theribber post to the cam-ring with the screw. Now turn the Machine forward until the pinextending from the under side of the ribber dial strikes and rests against the lug on the insideof the cylinder. See that the ribber is in the center. Now take every third needle out of thecylinder just opposite the grooves in the ribber dial, and put the short needles in the ribber.This will fill all the spaces - 48 needles in the cylinder and 24 in the ribber, then tum forwardand see that the shanks of the ribber needles enter the cam and pass under the thread carrierNo.8. With the ribber thus in position, turn the Machine forward a few rounds to see that theadjustment is all right, - stopping with the cam on the back part of the Machine.If the needles in the ribber should not come exactly between those in the cyEnder, the pinin the ribber dial can be bent a little.Should the carrier be too low or too high, either in ribbing or plain knitting; it can beadjusted by the screw that fastens it to the cam-ring.Now remove the ribber, by taking out the screw that fastens the post to the cam-ring,(9)
angoravalley.comlift the ribber, out with the needles in the ribber dial and lay aside until you set work up on theMachine. Now set the work up on the Machine in the ordinary way, knit about ten rounds andstop with the cam on back of the Machine. Then put the ribber in the Machine again just as itwas before you lifted it out.Be sure in replacing the ribberto have the pin on the under sideof the dial, against the lug on theinside of the cylinder just so thered mark on dial and cylindercome together. This will bring theneedles in the dial in the vacantspace in the cylinder. Fasten theribber post securely to the camring with the screw. Before knittingsee that the latches of the ribberneedles are all laid back, now pressdown on the weight, tum slowly,and with the second round the ribberneedles should take the stitches. The workwill then appear as in Figure 6.If you should fail in the first operation,repeat until you succeed. The ribber postis made of soft iron and should it beFigure 6.necessary, it can be bent.We send out each ribber adjusted so the needles take the thread at the right time, but shouldthe dial move or be displaced on the cam, it can be turned to its place and fastened again bythe screw having a washer under it.TRANSFER OF RIB TOP TO KNITTER.Rib work is knit in a continuous web and cut in pieces whatever length you desire. Thesepieces are then put in the needles axd plain work knit to it. That you may know where to cut(10)
the rib and place on the needles, thereshould be a white or black thread run inone round with the yarn. When the ribis cut off for tops of stockings or otherarticles, it should be cut three or fourrounds above the thread, See Fig. 7.When putting the rib on the needlesleave the stitches with the thread inthem just on the outside of the needles.Theseangoravalley.comFig. 7.\three or four rounds gives the operator something to catch hold of in running the course overthe needles, as shown in Fig. 8. As the stitches are run on the machine is turned so as to bringit tothe most convenient position for the operator. Or you can ravel out 2 or 3 rounds of therib evenly and put the stitches thus exposed on the needles. The only skill(II)
y.comrequired is to keep the course with the thread, and get the loops over the needles and not runthe needles between the loops, then the outside rounds ravel to the needles perfect. In ribbedwork always put the end on the needles that came from the machine last.The other end of the ribbed work will not ravel out.Very heavy yam will not work well on the ribber.The weight for ordinary knitting is not sufficient for the ribber. You must increase theweight by holding down very heavy on it so the stitches all form on the ribber needles free,and the work passes down through the cylinder. If the work clogs on the needles, either theyam is too heavy for the ribber, or the weight is not sufficient. Hold down heavy on theweight.angoravalleWhen you begin operating the Machine read the instructionscarefully observing each point and change.We think these instructions embrace all that is necessary for thesuccessful operation of the Machine.Should you however find any difficulty refer especially to page 2and 18.Make yourself thoroughly familiar with the machine before youbegin to use the Ribber.(12)
DIFFERENT SIZES .There are three things that change the size of a stocking.1. The number of needles in a cylinder. 2. The length of the stitch. 3. The size of the yam.omThe coarser the yam the larger will be the web with any given number of needles, and of course, thefiner the yam the smaller the web. The coarse cylinder, will make a small stocking with fine yam knitwith a short stitch. The fine cylinder will not knit coarse yam. Experience will teach you how to gradeyam in relation to the cylinders. Seamed work is always smaller than where a full set of needles is used.With every other needle out you may knit a small web.HEM TOP STOCKINGS.angoravalley.cA hem top stocking can be knit as follows :Set up the work on all the needles, knit two rounds with cottonthread and then use the yam you wish for stocking. Knit abouttwenty rounds, with medium tight tension. Remove the set-up andtum the work up on the inside and place the first round of stitches,those knit with cotton on the needles. Attach the weight with heelhooks and proceed to knit the leg as for other stockings. Bicyclehose with hem are made in the same way. Different colors can beused for top if desired. Mittens can be knit with hem top. Alsoladies long stockings .Fig. 5.(13)
CHILDREN'S STOCKINGS, PLAIN AND RIBBED.With the 54 cylinder and fine yam, beautiful children's stockings canbe made with the leg knit ribbed, and the ankle and the foot plain.No work is so fine as ribbed work, yet children's stockings andleggings can be knit circular web by taking every other needle outeither the 72 or 88 cylinder; knit around; follow the same principle asfor large stockings and leggings.BABY STOCKINGS.y.comBaby stockings can be knit on the 100 cylinder by taking outevery other needle and using fine yam.DOUBLE HEEL.To knit the double heel and toe, use coarse yam and a slightlylonger stitch; or add fine cotton to the knitting yam.SUSPENDERS.ravalleKnit flat web with the required width, or with Zephyr or Shetlandyams. Bind the ends and add the necessary button-hole strips at theends.MENDING BROKEN STITCHES.angoThis is done with one of the needles of the machine, either in themachine or after the work is out. The needle is used as a crochet needle. You hook it in thedropped stitch and push it far enough through to bring the stitch, below the latch; then draw itback catching the next cross-thread above in the hook above the latch; continue to draw theneedle back until a new stitch is formed; proceed in this way until all the dropped stitches areknit in. If the mending is done out of the machine, you will tie the dropped stitch with a shortpiece, of yam and draw the ends inside the web. When reversing the machine with the workon, always lift up at least 20 needles at the back and tum the machine until the raised needlesare over the cam on back of the machine. After reversing, if you wish to continue to knit, theraised needles must all be put(14)
down again. When reversing the machine without work, lift up a few needles just as they enterthe cam, so they pass either over or under the switch.TO KNIT MITTENS.lleMittens can be made hem top from fine yamy.comLarge size: Set up the work and knit the wristribbed, same as stocking. Put in all the needles andknit about 14 rounds plain. When you are ready forthe thumb, knit backward and forward on 24 needlesabout 40 times for the thumb. This forms a strip.'Close off the point the same as a small stocking andF 19.7·run the needles out. Now, on those24 needles just runout, place 2 stitches from each selvedge edge of the thumb; beginning close down to thehand. When those 24 stitches (12 on each side) are on, then proceed to knit around about 45times for the hand. Close off the same as toe of socks. Close the point of thumb with a needle.angoravaCHILDREN'S MITTS are knit flat web, same as small stocking. Use enough needles tomake the mitt the size you want. Seam the wrist, knit the hand and form the thumb in themiddle of the web by knitting a strip backward and forward,say on 16 needles. Knit backwardand forward 30 times, then narrow off the end of the thumb down to two stitches by throwingthe selvedge stitch on the next needle, but do not widen again. Run the needles all out of thethumb and close the point with a darning needle. Now take the selvedge stitches (8 from eachside of the thumb thus knit) beginning close down at the bottom and put them on the 16 emptyneedles. Loop the yam over the needle and proceed to knit round and round for the hand.When the hand is long enough, narrow from 24 stitches to 8, and widen again to 24, finishjust the same as a stocking. This is for a mitt of 48 stitches.The only difficulty in knitting a thumb is to hold it down, which is done by catching the workclose up to the needles, with the heel hook, or by using the heel attachment.Children's mitts look very nice with the wrist knit CHEVRON OR BAR and DIAMONDstitch until within few rounds of the thumb.(15)
CHILDREN'S MITTS.Children's mitts of various sizes can be knit either circular or flat web by knitting seamedwrist; then knit straight, solid web long enough forhand.; Tum inside out and with a sewing machinerun a seam around the thumb and hand as indicatedby the shaded lines in Figure 8. Cut away the cloth afrom the thumb and hand close to the seam, tumright side out and you have a very nice mitt.10".8.y.comFANCY STITCHES.lleTIDY STITCHES.-Set up flat web of required width; knit once across, change the stitch fromthe second needle to the third, the fourth to the fifth, and so on across; moving to the left knitacross forming loops on the empty needles, knit back again forming stitches with these loops;put the stitch from the second needle over the first that of the fourth over the third, moving thestitches to the right, knit across and back as before, change the stitches to the left andcontinue.ravaCHEVRON STITCH.-Set up flat web on every needle for the desired width; knit once across,put the stitch from the alternate needle upon the next needle to the right,knit once across andchange the loops one needle to the right; work thus twelve times across, and change the loopsto the left twelve times, knitting across each time as before. For wider work, knit more thantwelve times across, before changing, for narrower, less. This makes a suitable trimming forchildren's garments, etc.angoLATTICE STITCH.-Commence as before by taking the stitch from every other needle andputting them over the next to the left, knit once across forming loops, move the loops to thenext needle to the right, knit across, and carry the loops to the left, knit across and carry theloops to the right, and so on to the length desired.RIBBED STITCH.-Set up and knit once across, change the stitches on every third needle oneplace to the left, knit across, carry each loop both to the right and left, over two needles, knitacross, take the loop formed on the same idle needles and carry them both right and left asbefore, continue thus.(16)
BAR AND DIAMOND STITCH.-Set up, knit across, change every alternate stitch to theleft, knit across,. forming loops, and back forming stitches on the empty needles; change thestitches formed with the loops to the right. Knit twice across as before and change to theleft and so continue. When knitting fancy stitches the tension should be loose.y.comChevron Bar and Diamond stitch are suitable for scarfs.To KNIT CORD.-Take out of the machine all but four needles. Set up and attach the heelhook and the light weight. Knit across, pull the needles up as high as they will go; place thethread inside the needles and run back; put the needles down so they will knit, and knit acrossas before; then run back again and so continue knitting one way and running back with theneedles up and the yam inside the needles.A great variety of work can be done on the machine such as leggings, hoods, wristlets,suspenders, limited only by the taste and ingenuity of the operator. Anyone with ordinaryintelligence, can, by reading the instructions and having a machine before them learn to knit.lleEvery machine is put in good working order when it leaves the fact
GEARHART'S 1908 FAMILY KNITTING MACHINE. Consult this Page before removing the Machine from the Box Remove the machine from the box by taking out the cross piece and loosening the thumb screw which holds the machine to the bottom of the box. Fasten the machine to a table, window sill or any firm support.