Transcription
Exterior and InteriorWALL MANUALR
Credits, front cover:Left column1. Architect: Shope Reno Wharton, Photo: Robert Benson2. Architect: Gaylord Grainger, Libby O’Brien-Smith Architects,Photo: Eduardo Calderon3. Architect: Meyers and D’Aleo, Inc., Photo: Otto BaitzCentre columm1. Architect: Gary Tabasinske, AIA, Photo: Chris Eden2. Architect: Alfredo De Vido Associates, Photo: Paul WarcholRight column1. Architect: Tanner and VanDine Architects, Photo: Mark Citret2. Architect: Archimedia, Photo: George Kennedy, AIA & Cosby Bowyer, Inc.3. Photo: Celia Pearson
INTRODUCTIONThis manual is intended for use with Western RedCedar and Alaskan Yellow Cedar shingle andshake applications only. Western Red Cedarproducts manufactured by CSSB members arelabeled with the “Certi” brand name. AlaskanYellow Cedar products manufactured by CSSBmembers are labeled with “Yellow Cedar” at thetop of their label. For ease of reference thismanual refers to “Certi-label TM Western Cedar”and the term is understood to include bothWestern Red Cedar and Alaskan Yellow Cedarproducts manufactured by CSSB members.Certi-labelTM Western Cedar shingles andshakes are the ideal exterior wall claddingfor new construction and remodeling. Theybring life in the form of beauty, texture,durability, insulative quality, and lowmaintenance to any building. Restyling withCerti-label Western Cedar shingles or shakesis easily accomplished, whether replacingthe previous wall material (re-walling) orapplying right over the existing wall (overwalling).Exterior and Interior WallsConstruction ManualMaterial for this manual has been compiledfrom various authoritative sources, andmany of the construction methods shownherein have been developed by the shingleand shake specialists in both the UnitedStates and Canada. The design andapplication details and methods ofconstruction reflect current good buildingpractice. Other options are possible butensure that you check with your local codejurisdiction for approval.The information in this manual isnot intended to supercede localbuilding codes.Cedar Shake & Shingle BureauHistoryOn June 9, 1915, at a meeting of the Trusteesof the West Coast Lumber ManufacturersAssociation, it was agreed to establish abranch of the association to serve thosemembers who manufactured shingles. TheRed Cedar Shingle Bureau was formed as aseparate entity on June 1, 1923. In 1956, theHand-Split Red Cedar Shake Association wasformed. Our influence grew, and as wesurvived both the Great Depression andWorld War II, manufacturers continued theirquality commitment. In 1963 the shake andshingle associations merged to become theRed Cedar Shingle & Handsplit Shake Bureau.In the late 1980s, mill quality controlinspections were subcontracted toindependent, third party quality controlagencies.Each year the Cedar Shake & ShingleBureau's staff answer thousands of technicalquestions and product selection queries. Ourproud history, quality reputation anddedicated members provide excellent Certilabel Western Cedar shingle and shakesiding and roofing products.Certi-labelTM ProductsCerti-label Western Cedar shingles andshakes manufactured by members of theCedar Shake & Shingle Bureau (“CSSB”) arethe only products labeled with the “Certi”brand name. Certi-label Western Cedarshingles and shakes are made byexperienced craftsmen who take pride intheir trade and the quality of their product.Despite their varying sizes and sometimesremote locations, member mills are boundtogether by a rigid quality code.Unannounced independent inspectionsconducted by accredited third party agenciesensure that product quality is maintained.Products are inspected to conform withvarious local, national and internationalcodes and standards (contact the CSSB forspecific details).All CSSB member product has the mill'sdistinctive Certi-label tucked under thebundle strap or printed on the carton. Askingfor “the blue label” or “number one bluelabel” is not specific enough: CSSBmembers' products are the only ones withthe Certi brand name on the label.Approved Installer GuidelinesGood workmanship is crucial to the integrityof any sidewall system. Installers shouldread this manual carefully and ensure thatthey follow proper workmanship practices.CSSB Approved Installers agree to follow theguidelines in this manual, or local coderegulations, if stricter than the guidelinescontained in this manual.Application NoteCerti-label Western Cedar shingles andshakes are applied on walls in a differentmanner than on roofs. The major point ofdifference is in permissible weatherexposures - on walls the maximum weatherexposure is greater than it is on roofs. Agiven area of wall, therefore, will require lessmaterial than the same area of roof.Architect: Gary Tabasinske, AIA, Photo: Chris EdenProduct WarrantyThe CSSB administers a product warranty forcertain product applications performed byan Approved Installer. Consult warrantydocumentation for specific details.Note: This manual replaces all previousversions of the “Cedar Shake andShingle Bureau Design and ApplicationManual for Exterior and Interior Walls”CONTENTSCerti-label Productspages 1-3Exterior New WallConstructionpages 4,6,7,8,9Sidewall FastenerGuidelinespage 5Exterior Over-Walland Re-Wall Constructionpage 10Interior Wall Constructionpage 11Sidewall ApplicationGuidelinespage 12Sidewall Finishingpage 13SidewallCoverage Tablespages 14, 15How to Read a Certi-labelpage 16
CERTI-LABEL WESTERN CEDAR PRODUCTS1CERTIGRADE WESTERN CEDAR SHINGLESNumber 1 Blue Label CERTIGRADERed Cedar Shingles- 100% Edge Grain - 100% All Clear - 100% Heartwood -The premium grade of shingles for sidewalls and roofs. These top-gradeshingles are 100% heartwood, 100% clear and 100% edge grain. Availablein 16" or 18" or 24" lengths.CEDAR SHAKE & SHINGLE BUREAUTHE RECOGNIZED AUTHORITY SINCE 1915SUMAS, WASHINGTON(604) 820-7700Number 2 Red LabelA good grade for many applications. Not less than 10" clear on 16"shingles, 11" clear on 18" shingles and 16" clear on 24" shingles. Flat grainand limited sapwood are permitted in this grade.(604) 820-7700Number 3 Black LabelA utility grade for economy applications and secondary buildings. Not lessthan 6" clear on 16" and 18" shingles, 10" clear on 24" shingles.(604) 820-7700Number 4 UndercoursingA utility grade for undercoursing of double coursed sidewalls only. Not aroofing material and not to be used as a starter course for roofs.(604) 820-7700CERTI-LABEL WESTERN CEDAR SHAKESCerti-Split Handsplit ShakesCERTI-SPLITPREMIUM GRADE100% Edge GrainHandsplit Red Cedar ShakesCEDAR SHAKE & SHINGLE BUREAUTHE RECOGNIZED AUTHORITY SINCE 1915SUMAS, WASHINGTON(604) 820-7700These shakes have split faces and sawn backs. Cedar logs are first cut intodesired lengths. Blanks or boards of proper thickness are split and then rundiagonally through a bandsaw to produce two tapered shakes from eachblank. Available in Premium Grade (100% edge grain) or Number 1 Grade(Up to 20% flat grain allowed in each bundle).Certi-Sawn Tapersawn ShakesPREMIUM GRADE100% Edge GrainTapersawn Red Cedar ShakesCEDAR SHAKE & SHINGLE BUREAUTHE RECOGNIZED AUTHORITY SINCE 1915SUMAS, WASHINGTON(604) 820-7700These shakes are sawn both sides. Premium and Number 1 Grades are themost common. Premium Grade is 100% edge grain, 100% clear and 100%heartwood. Number 1 Grade allows up to 20% flat grain in each bundle.Number 2 and 3 Grades are also available.Certi-Split Tapersplit ShakesCERTI-SPLITPREMIUM GRADE100% Edge GrainHandsplit Red Cedar ShakesProduced by hand, using a sharp bladed steel froe and a mallet. The naturalshingle-like taper is achieved by reversing the block, end-for-end, with eachsplit. Premium Grade only.CEDAR SHAKE & SHINGLE BUREAUTHE RECOGNIZED AUTHORITY SINCE 1915SUMAS, WASHINGTON(604) 820-7700Certi-Split Straight-Split ShakesCERTI-SPLITPREMIUM GRADE100% Edge GrainHandsplit Red Cedar ShakesProduced by machine or in the same manner as tapersplit shakes exceptthat by splitting from the same end of the block, the shakes acquire thesame thickness throughout. Premium Grade only.CEDAR SHAKE & SHINGLE BUREAUTHE RECOGNIZED AUTHORITY SINCE 1915SUMAS, WASHINGTON(604) 820-7700Note: Western Cedar’s natural color varies.
CERTI-LABEL WESTERN CEDAR PRODUCTS2SPECIALTY CERTI-LABEL WESTERN CEDAR SIDEWALL PRODUCTSCertigrade Rebutted & Rejointed ShinglesAlso known as R&R products, these materials have the same specifications asNumber 1 and Number 2 Certigrade shingles, but they are machine re-trimmedfor parallel edges and with smooth butts sawn at right angles where a uniformappearance is desired. They are primarily used for sidewall applications.Rebutted & rejointed shingles are also available with a smooth sanded face, withthe length of the sanded face at a length greater than the maximum exposure.They are manufactured from 16", 18" and 24" lengths. Certigroove Machine Grooved ShinglesMachine grooved shingles are manufactured as a rebutted & rejointed shinglewith one face striated for a length greater than the maximum exposure. Machinegrooved products are for sidewall applications only, and are remanufacturedfrom 16", 18" and 24" shingles.Certi-CutTM pecialty Cut Shingles- 100% Edge Grain - 100% All Clear - 100% Heartwood CEDAR SHAKE & SHINGLE BUREAUTHE RECOGNIZED AUTHORITY SINCE 1915SUMAS, WASHINGTON(604) 820-7700Half CoveHexagonalOctagonalSidewall Carton Packaging ExampleCERTIGRADESpecialty Cut Shingles- 100% Edge Grain - 100% All Clear - 100% Heartwood CEDAR SHAKE & SHINGLE BUREAUTHE RECOGNIZED AUTHORITY SINCE 1915SUMAS, WASHINGTON(604) 820-7700Mill NameAddressTelephoneLook for the Certi-labelon the carton.Half CartonArrowCERTI-CUT SHINGLES These shingles are 5" wide and are manufactured from16" and 18" lengths. A 96 piece carton will cover 25 square feet at 7 1/2"exposure. Nine of the most popular designs are shown. Certi-Cut shingles canalso be custom produced to meet individual design specifications.Note: Western Cedar’s natural color varies.Mill NameAddressTelephoneRoundFull Carton
CERTI-LABEL WESTERN CEDAR PRODUCTS3CERTI-GUARDRPRESSURE-TREATED FIRE-RETARDANT SHAKES & SHINGLESCEDAR SHAKE & SHINGLE BUREAUCERTI-GUARDPressure-Impregnated Treated ProductsCerti-label products can also be treated. Products are available eitherfire-retardant-treated OR preservative-treated. Special care must be taken tofollow the treatment company’s recommended installation instructions.RPRESSURE-TREATED FIRE-RETARDANT SHAKES & SHINGLESCEDAR SHAKE & SHINGLE BUREAUCerti-Guard Fire-Retardant Treated Western Cedar Shinglesand ShakesNumber 1 Grades of Certigrade shingles, and Premium and Number 1Grades of Certi-Split shakes and Certi-Sawn shakes are available pressureimpregnated with fire retardants. Contact the treatment company fortreatment warranty information, accessory product requirements (includingrecommended fastener types) and application details for treated WesternCedar material. Local code jurisdictions may have additional informationregarding applications in specific areas.Certi-Last .40 CCA Preservative-Treated Western Cedar Shinglesand ShakesCERTI-LASTRPRESERVATIVE TREATED CEDAR SHAKES & SHINGLESCEDAR SHAKE & SHINGLE BUREAUNumber 1 Grades of Certigrade shingles, and Premium and Number 1Grades of Certi-Split shakes and Certi-Sawn shakes are availablepreservative-treated by pressure processes. This product is ideal in areas ofhigh humidity. Specify the Certi-Last treating label for this extra protection.Contact the treatment company for treatment warranty information,accessory product requirements (including recommended fastener types)and application details for treated Western Cedar material.Note: Once Western Cedar shingles and shakes are pressure-impregnatedtreated you must contact the treatment company to determine if a finish,such as paint or stain, is allowable.Certi-label Sidewall Application TipsCerti-label Western Cedarshingle and shake size, exposure,width of joints, width of product,kiln versus air-drying process,moisture content and the localenvironment will all affect theexpansion/contraction of Certilabel Western Cedar sidewallproducts. These factors shouldalways be taken intoconsideration when determiningthe installation details andadequate spacing needed foryour specific project. Consultwith your Approved Installer andrefer to page 4 of this manual formore lateral spacing details.Architect: Shope Reno Wharton, Photo: Robert Benson
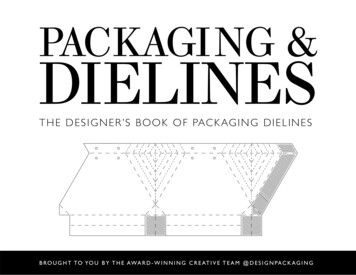
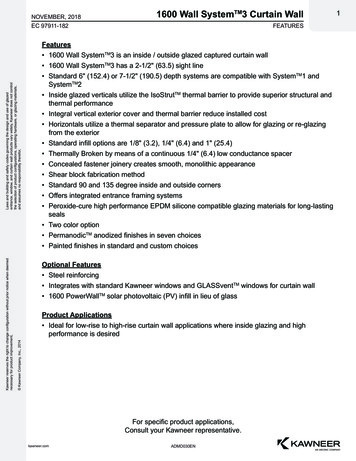
EXTERIOR NEW WALL CONSTRUCTION4Design and Application DetailsThe instructions given here are not meant tosupercede local code requirements. Checkwith your local building official for theirpreference in your area.Preparation - Be sure that the walls aresmooth, without protuberances. Nail ends orpoints should be removed or pounded flush.Underlayment - The CSSB recommendsType 30 felt underlayment (also known as#30 bituminous impregnated buildingpaper). Check with your local buildingofficial for any questions about alternativeunderlayment materials. Apply ithorizontally, with a staple gun, starting at thebase of the wall, with a 2" horizontal overlapwith each succeeding course, and a 6"overlap vertically when starting a new roll.Wrap the Type 30 felt underlayment 4" eachway around both inside and outside corners.Figure 1: StorypoleNumber 1 Grade Certi-label Western Cedarshingles spaced 1/8" to 1/4" apart (keywaysare 1/8" to 1/4" wide). These joints allow forexpansion and prevent possible “buckling.”For every 4" width of dry Certi-label WesternCedar shingle material, the product will expand1/8". Therefore space keyways accordingly,i.e.12" shingle is expected to have 3/8"expansion. Allow minimum 1/4" keywayspacing for Number 2 Grade Rebutted andRejointed Certi-label Western Cedar shingles.Corner Boards - Install corner boards(Figure 8) at this time.Flashing - Flashings associated with doors,windows, and penetration details should bein accordance with good building practice.Laying Out - Determine the number ofCerti-label courses by measuring the heightof the wall at the lowest part of thefoundation, from a point 1" below the top ofthe foundation, to the top of the wall. Dividethe height into equal parts, correspondingclosely to the weather exposure, but notexceeding the maximum weather exposurerecommended. Transfer this measurementand the number of Certi-label courses to astorypole (Figure 1), to lay out courses on allother walls. Whenever possible butt linesshould align with tops or bottoms ofwindows or other openings, and forappearance the exposure of the final courseat the top should match those below.Certi-label Western Cedar shingle and shakesize, exposure, width of joints, width ofproduct, kiln versus air-drying process,moisture content and the local environmentwill all affect the expansion/contraction ofCerti-label Western Cedar sidewall products.These factors should always be taken intoconsideration when determining theinstallation details and adequate spacingneeded for your specific project. Consultwith your Approved Installer and refer toFigure 2: Spacing Detail.Leave a side lap of at least 1 1/2" betweenjoints in successive courses.Figure 2: Spacing DetailFigures 3a and 3b: To prevent the wicking of water, which may causestaining, keep a 1/2” clearance between the first course of Certi-label productsfrom all surfaces below.Certi-label Western Cedar wall shinglesDouble coursing1/2" clearance tobottom flashingTwo last coursesover flashing1/2" clearance tobottom flashingMetal flashingBelt trim detail at topof footing wallMetal flashingFigure 3a: FlashingFigure 3b: Flashing
SIDEWALL FASTENER GUIDELINES5NailsEach Certi-label Western Cedar shingle or shake should beapplied with two corrosion-resistant fasteners, such asstainless steel (type 304 or 316), hot-dipped zinc coated, oraluminum nails or other fastener as accepted by your localbuilding official. Minimum nail lengths are shown in thefastener chart below. In double course applications, theexposed Certi-label Western Cedar shingle or shake shall beface-nailed with two hot-dipped galvanized or stainless steelcasing nails, driven 2" above the butt line, and 3/4" fromeach edge. Certi-label Western Cedar shingles wider than10" require 2 additional nails and these two nails are drivenapproximately 1" apart near the center of the shingle.NOOverdrivenNOUnderdrivenYESCorrect - flushwith surfaceStaplesStaples should be aluminum or stainless steel (type 304 orFigure 4: Nail Driving Detail 316) 16 gauge or other fastener as accepted by your localCenterline of heart1 1/2"Knot orsimilar defectFigure 5: Course Alignmentbuilding official. Two staples should be driven per Certi-labelWestern Cedar shingle or shake with the staple crowns 7/16"minimum horizontal, maximum 3/4" horizontal, to the Certilabel Western Cedar shingle or shake butt. Staples aredriven in the same location as nails relative to the sides andoverlapping butt line. Certi-label Western Cedar shingleswider than 10" require 2 additional staples and these twostaples are driven approximately 1" apart near the center ofthe shingle.Important Notes:Underdriving or overdriving anyfastener will affect the integrityof the Certi-label WesternCedar sidewall system.Certi-Guard (fire-retardanttreated) or Certi-Last(preservative-treated) WesternCedar shingles and shakes:ALWAYS ask the treatmentcompany which fasteners arerecommended for use with theirpressure-treated Certi-labelWestern Cedar shingles andshakes. Some fasteners are notcompatible with treated material.The information on this page isnot meant for use with sidewallpanel applications. Pleasecontact the manufacturer forspecific panel fastener details.Fasteners should be long enough to penetrate into thesheathing at least 3/4" or all the way through and drivenflush with the surface of the Certi-label Western Cedarshingle or shake. In all applications, staples shall beconcealed by the course above. Fasteners cannot be electrogalvanized as they will cause staining. Nails are preferred,for aesthetic reasons, in sidewall applications usingexposed fasteners.1234Wide Shingle Fastener DetailSingle Course Sidewall FastenersDouble Course Sidewall FastenersProduct TypeProduct TypeNail Type & Minimum LengthCertigrade, R&R andSanded ShinglesType (in)16", 18" and 24" Shingles5d Box 1 3/4or same size casing nailsNail Type & Minimum LengthCertigrade, R&R andSanded ShinglesType (in)16" and 18" Shingles3d Box 1 1/424" Shingles4d Box 1 1/2Certigroove ShinglesType (in)16" and 18" Shingles3d Box 1 1/424" Shingles4d Box 1 1/2Certi-Split & Certi-Sawn ShakesType (in)18" Straight-Split Shakes5d Box 1 3/418" and 24" Handsplit Shakes6d Box 224" Tapersplit Shakes5d Box 1 3/418" and 24" Tapersawn Shakes6d Box 2Certigroove Shingles16", 18" and 24" ShinglesType (in)5d Box 1 3/4Certi-Split & Certi-Sawn Shakes18" Straight-Split ShakesType (in)7d Box 2 1/4or 8d 2 1/27d Box 2 1/4or 8d 2 1/27d Box 2 1/4or 8d 2 1/27d Box 2 1/4or 8d 2 1/218" and 24" Handsplit Shakes24" Tapersplit Shakes18" and 24" Tapersawn Shakes
EXTERIOR NEW WALL CONSTRUCTION6Single CoursingDouble the starting course at the base of thewall (Figure 6). Apply with 1/8" to 1/4"keyway space between Certi-label WesternCedar shingles, giving a pronouncedindividual effect to each course.Offset the side joints in any one course atleast 1 1/2" over joints in adjacent courses(Figure 2).Plywood panelor dimensionallumber sheathingEnlarged toshow detail(Figure 6)Type 30 feltunderlayment*Use a straight edge, nailing it lightly to thewall with the edge at the butt line (to keepcourses straight and level). Check for levelevery 3 or 4 courses.The outer course is applied 1/2" lowerthan the inner course as a drip courseto help shed waterThis wall application features concealednailing (Figure 6), with nails drivenapproximately 1" above the butt line of thesucceeding course. For Certi-label WesternCedar shingles up to 10" wide, place twonails in each shingle 3/4” from each edge.With Certi-label Western Cedar shingleswider than 10", drive two additional nailsapproximately 1" apart near the center.Because Certi-label Western Cedar shinglesvary in width there should be little waste. Atcorners, or at door or window frames, youmay have to trim a selected Certi-labelWestern Cedar shingle slightly.The CSSB recommends installing overplywood panel or dimensional lumbersheathing. If other sheathing materials areapproved for use by your local buildingofficial, the holding power of the fastenersshould also be considered carefully.Plywood panelor dimensionallumber sheathingConcealed nailingType 30 feltunderlayment*The outer course is applied 1/2" lowerthan the inner course as a drip courseto help shed waterUndercoursing grade shingles*The Cedar Bureau recommends Type 30 felt underlayment andwill refer to required underlayment with this description throughoutthis manual. Check with your local building official for any questionsabout alternative underlayment materials.Figure 6: Single CoursingArchitect: Shope Reno Wharton, Photo: Robert Benson
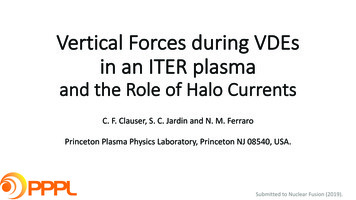
EXTERIOR NEW WALL CONSTRUCTION7Double CoursingTo obtain an attractive wall characterized bywide weather exposures and deep shadowlines, Certi-label Western Cedar shingles andshakes can be applied double coursed. Thismethod offers economy because of the wideexposures of the outer course and the use ofless expensive undercoursing Certi-labelWestern Cedar shingles for the under layer(Figure 7). For double coursing exposuredetails refer to the chart on page 12.In double coursing, the bottom or startercourse is laid triple with two undercourseCerti-label Western Cedar shingles or oneundercourse Certi-label Western Cedarshingle over a wood lath and then the outercourse. This gives the bottom course thesame slant as succeeding courses. All outercourses are applied 1/2" lower than theundercourse (Figure 7). A straight edge canbe used to facilitate placement and nailing ofboth the undercourse and exposed course.Number 3 or undercoursinggrade Certi-labelWestern Cedar shinglesPlywood panelor dimensionallumber sheathingType 30 feltunderlaymentThe outer course is applied 1/2" lowerthan the inner course as a drip courseto help shed waterApply nails instraight line approximately 2"above shingle buttsDouble undercoursingFigure 7: Double CoursingUndercourse Certi-label Western Cedarshingles are fastened at the top with one nailor staple in the center. The exposed Certilabel Western Cedar shingle or shake is facenailed with two casing-type nails, drivenapproximately 2" above the butt line, 3/4"from each edge. With Certi-label WesternCedar shingles wider than 10" drive twoadditional nails approximately 1" apart nearthe center.The CSSB recommends installing overplywood panel or dimensional lumbersheathing. If other sheathing materials areapproved for use by your local buildingofficial, the holding power of the fastenersshould also be considered carefully.Architect: Tanner and VanDine Architects, Photo: Mark Citret
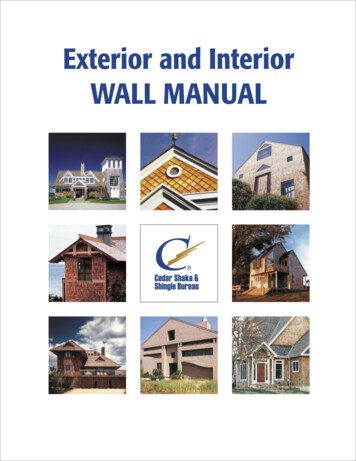
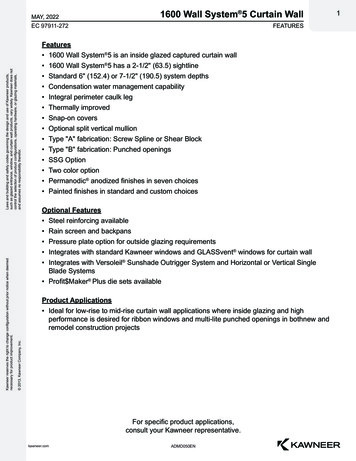
EXTERIOR NEW WALL CONSTRUCTION8CornersNeatly fitting inside or outside corners areeasily made. It is standard practice to laceoutside corners (Figure 8e). On wideexposures this method requires small nailsnear the Certi-label Western Cedar shinglebutts to tighten and hold the lapped corners.For these corners use only nails that arecorrosion resistant. In double courseapplications, the exposed Certi-label WesternCedar shingle or shake shall be face-nailedwith two hot-dipped galvanized or stainlesssteel casing nails, driven 2” above the buttline, and 3/4” from each edge. Certi-labelWestern Cedar shingles wider than 10”require 2 additional nails and these two nailsare driven approximately 1 inch apart nearthe center of the shingle. Corner boards alsocan be used to advantage by nailing a 1 x 4cedar board to a 1 x 3 cedar board, thenattaching the preassembled corner to thebuilding (Figure 8a).It is good practice to use flashing behindCerti-label Western Cedar shingles or shakesat the inside corners. They may be buttedagainst a square wood strip (Figure 8b), orthey may be fitted one course to the other(Figure 8d). When the latter method is used,courses must be completed on each wallprogressively, and can be best applied byworking from the corners while alternatelyfitting one course to the other. (Figure 9)1x41x3bacdea) Certi-label Western Cedar shingles butted against c) Mitered cornercorner boardsd) Laced inside corner with flashing behind insideb) Certi-label Western Cedar shingles butted againststrip on cornersquare wood strip, flashing behinde) Alternated laced outside cornerFigure 8: Corner Option DetailsIt is preferred practice to installinside/outside corner flashing tosafeguard against the crackingor tearing of Type 30 feltunderlayment at these corners.Figure 9: Fitting Laced Corner Courses
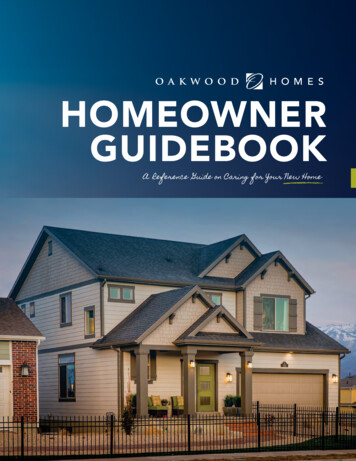
EXTERIOR NEW WALL CONSTRUCTION9Design and Application InstructionsStaggered Butt CoursingFor single course application, an attractiveeffect can be made by staggering the butt ofthe Certi-label Western Cedar shingle fromthe horizontal line. Apply the Certi-labelWestern Cedar shingle irregularly at variabledistances below (but not above) thehorizontal line.Staggered butt applications are made byshortening the exposure less than thegreater maximum exposure. No Certi-labelWestern Cedar shingles or shakes shall beapplied greater than the maximum exposureallowed. Check with local building codes forapproval of the staggered butt coursinginstallation method.1" max. for 16" &18"Certi-label WesternCedar shinglesPlywood panelor dimensionallumber sheathing1 1/2" max. for 24"Certi-label WesternCedar shinglesType 30 feltunderlaymentThe outer course is applied 1/2" lowerthan the inner course as a drip courseto help shed waterDouble starter courseFigure 10: Staggered CoursingButt nail all double coursed Certi-label WesternCedar shingles that are exposed more than theirmaximum single course exposure.Architect: Alfredo De Vido Associates, Photo: Paul WarcholRibbon CoursingA double shadow line effect can be obtainedby raising the outer course Certi-labelWestern Cedar shingles approximately 1"above the undercoursing. Use Number 1Grade Certi-label Western Cedar shingles forundercoursing when applying ribboncoursing (Figure 11).Plywood panelor dimensionallumber sheathingType 30 feltunderlaymentFinished courseDouble starter courseThe outer course is applied 1/2" lowerthan the inner course as a drip courseto help shed waterFigure 11: Ribbon Coursing
EXTERIOR OVER-WALL AND RE-WALL CONSTRUCTION10Design and Application InstructionsFurring if requiredRe-wallingOnce the old exterior wall material has beenremoved and the old nails or otherprotrusions cleaned away, the new wall canbe applied. Type 30 felt underlaymentshould be applied since it is newconstruction.Over-wallingApplying Certi-label Western Cedar shinglesor shakes right over an old wall - whetherwood, brick, stucco, or synthetic products - iseasily done. It saves time involved in bothremoving the old exterior and in disposing ofit. However, avoid nailing over vinyl oraluminum as they are not sufficiently strongto provide a proper support.First, nail moulding strips on the face ofexisting window and door casings, flush withthe outer edges. The Certi-label WesternCedar shingles or shakes are then joined tothe mouldings (Figure 12).Over Beveled Siding - Applying a newCerti-label Western Cedar shingle or shakewall over old beveled siding can beaccomplished in either of two ways: 1) Byfilling in the low points of the wall with lowgrade lumber or plywood strips (calledhorse feathers) of appropriate thickness andthereby increasing the potential nailingsurface, or 2) by nailing the Certi-labelWestern Cedar shingles or shakes to the highpoints of the bevels of each course of the oldwall, or of alternate courses (provided itdoes not result in weather exposure greaterthan is recommended (Figure 13).1. Apply new casing to bring Certi-label WesternCedar shingles or shakes flush with surface2. The integrity of the original flashing is to beutilized. Additional trim is considered to bedecorative only. If the original window does nothave good structural integrity, it must beremoved and a new one installed. New casingsare to be installed as part of proper wallconstruction as shown throughout this manual.2Figure 12: Typical Window and Door Casing DetailFigure 13: Over BeveledSiding DetailDouble starter course1 x 3 or 1 x 4 nailingstrips spaced according toexposure of Certi-labelWestern Cedar shingles orshakes, regardless ofsingle or double course.(See pages 6-7 )Figure 14: OverMasonry DetailEnsure that the first course is properlyattached. All Certi-label Western Cedarshingle and shake product installation mustmeet nailing and exposure guidelines asdetailed in this manual. It may be necessaryto add occasional nailing strips.Over Masonry - Masonry walls are easilycovered, by vertically furring the walls andapplying nailing strips (1 x 3 or 1 x 4) spacedaccording to the exposure and single/doublecourse product design. The nailing stripsshould be fastened with special nails, drivenbetween the bricks or blocks, so that theouter shingled wall will be firmly attached(Figure 14).1Double starter courseOver Stucco - Nailing strips should beattached with nails long enough to penetratethe stucco and the underlying sheathing. Donot apply directly to the stucco, which is tooweak to provide a proper support. If the oldstucco is removed, new Type 30 feltunderlayment is then applied to the walls,and the shingling can proceed as in newconstruction (Figure 15).Figure 15: Over Stucco DetailDouble starter course
INTERIOR WALL CONSTRUCTION11Design and Application DetailsCerti-label Western Cedar shingles or shakesare building materials that adapt easily tomany different structural forms. Their use ininteriors is practically unlimited, and a widevariety of imaginative effects can beachieved.Certi-label Western Cedar shingles or shakescan be readily applied over almost anyinterior wall surface, including wood
Red Cedar Shingles CEDAR SHAKE & SHINGLE BUREAU THE RECOGNIZED AUTHORITY SINCE 1915 SUMAS, WASHINGTON (604) 820-7700 The premium grade of shingles for sidewalls and roofs. These top-grade shingles are 100% heartwood, 100% clear and 100% edge grain. Available in 16" or 18" or 24" lengths. Note: Western Cedar's natural color varies.