Transcription
READ ME FIRSTNI-DAQmx and DAQ DeviceInstallation GuideInstall your software before installing new hardware.Install Application SoftwareInstall NI application software, such as NI LabVIEW, or another application developmentenvironment (ADE), such as ANSI C or Visual Basic .NET. Refer to the NI-DAQmx Readme onthe software media for supported application software and ADE versions.Back up any applications before upgrading software or modifying the application.Install NI-DAQmxInstall NI-DAQmx driver software before installing new hardware devices so Windows candetect them.1.Insert the software media. If the NI-DAQmx installer does not open automatically, selectStart»Run. Enter x:\autorun.exe, where x is the drive letter. Complete the instructions.2.Register your NI hardware online at ni.com/register when prompted.3.The last dialog box opens with the following options. Restart Later to install more NI software or documentation. If you are using a MXI-3link from a PC to control a PXI chassis, exit and install the MXI-3 software, availableat ni.com/downloads, before using the DAQ device. Shut Down or Restart if you are ready to install your device. Restart if you are using a system running the LabVIEW Real-Time Module.Download NI-DAQmx to the target using MAX. Refer to the MAX Remote SystemsHelp by selecting Help»Help Topics»Remote Systems in MAX.If you have problems installing your software, go to ni.com/support/daqmx.
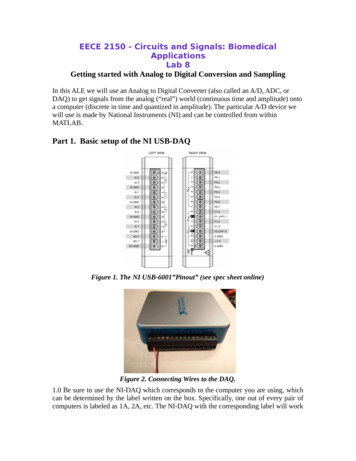
Unpack and Install the Devices, Accessories,and CablesRemove the packaging and inspect the device. Contact NI if the device is damaged. Do notinstall a damaged device.If you have more than one DAQ device to install, install them all now using the procedure foryour device type. If your system includes SCXI modules to connect to DAQ devices, first installthe DAQ components.The device is static sensitive. Always properly ground yourself and theequipment when handling or connecting the device.CautionFor safety and compliance information, refer to the device documentation, available at ni.com/manuals or on the NI-DAQmx software media.The following symbols may be on your device.This icon denotes a caution, which advises you of precautions to take to avoid injury,data loss, or a system crash. When this symbol is marked on the device, refer to theRead Me First: Safety and Electromagnetic Compatibility document for precautionsto take.When this symbol is marked on a product, it denotes a warning advising you to takeprecautions to avoid electrical shock.When this symbol is marked on a product, it denotes a component that may be hot.Touching this component may result in bodily injury.PCI and PCI Express DevicesComplete the following steps to install a PCI and PCI Express device:1.Power off and unplug the computer.2.Remove the computer cover and/or the expansion slot cover.3.Touch any metal part of the computer to discharge any static electricity.Figure 1. Installing a PCI/PCI Express Device3121. PCI/PCI Express DAQ Device2. PCI/PCI Express System Slot2 ni.com 3. PC with PCI/PCI Express SlotNI-DAQmx and DAQ Device Installation Guide Read Me First
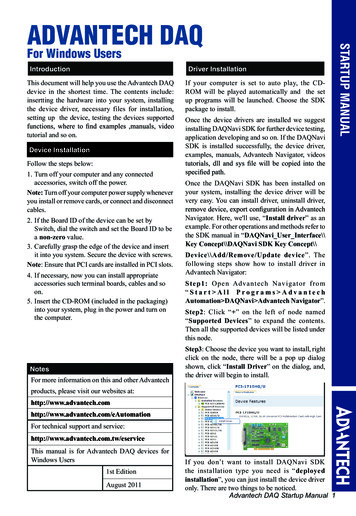
4.Insert the device into the applicable PCI/PCI Express system slot. Gently rock the deviceinto place. Do not force the device into place.Per the PCI standard, NI PCI DAQ devices with the Universal PCI connector are supportedin PCI-compliant buses, including PCI-X. You cannot install PCI Express devices in PCIslots and vice versa. PCI Express devices support up-plugging into a PCI Express slot ofhigher lane width. For guidelines, refer to ni.com/pciexpress.5.Secure the device mounting bracket to the computer back panel rail.6.(Optional) On NI M and X Series PCI Express devices, such as the NI PCIe-625x/635x,connect the PC and the device disk drive power connectors. Refer to the device user manualfor when to use the disk drive power connector. Use a disk drive power connector that isnot in the same power chain as the hard drive.Figure 2. Attaching Disk Drive Power to the PCI Express Device211. Device Disk Drive Power Connector2. PC Disk Drive Power ConnectorConnecting or disconnecting the disk drive power connector can affect the analogperformance of your device. To compensate for this, NI recommends that you self-calibratethe PCI Express DAQ device in MAX after connecting or disconnecting the disk drivepower connector; refer to the DAQ Getting Started Guide available online at ni.com/manuals.7.Replace the computer cover, if applicable.8.Plug in and power on your computer.PXI and PXI Express DevicesComplete the following steps to install a PXI and PXI Express device:1.Power off and unplug the PXI/PXI Express chassis. Refer to your chassis manual to installor configure the chassis.Caution Refer to the Read Me First: Safety and Electromagnetic Compatibilitywith your PXI/PXI Express chassis or device before removing covers or connectingor disconnecting signal wires.NI-DAQmx and DAQ Device Installation Guide Read Me First National Instruments 3
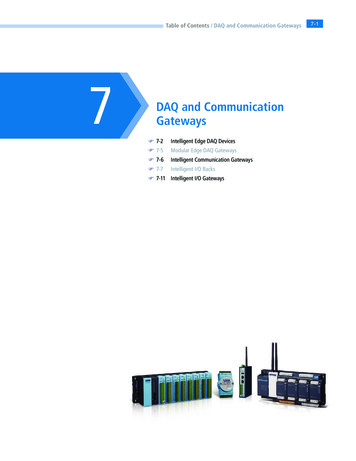
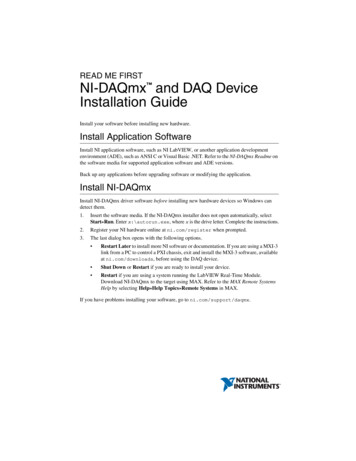
Figure 3. Installing a PXI/PXI Express Device in the Chassis1PXI-1000B273641.2.3.4.5PXI/PXI Express ChassisPXI/PXI Express System ControllerPXI/PXI Express ModuleInjector/Ejector Handle2.5. Front-Panel Mounting Screws6. Module Guides7. Power SwitchIdentify a supported PXI/PXI Express slot in the chassis. Some devices havePXI/PXI Express slot requirements; for information, refer to the device documentation.Figure 4. Symbols for PXI Express/PXI Express Hybrid/PXI SlotsNI PXIe-1062Q11. PXI Express System Controller Slot2. PXI Express Peripheral Slot2343. PXI Express Hybrid Peripheral Slot4. PXI Express System Timing SlotIf you are using a PXI Express chassis, you can place PXI devices in the PXI slots. If a PXIdevice is hybrid slot compatible, you can use the PXI Express Hybrid slots. PXI Expressdevices can be placed only in PXI Express slots and PXI Express Hybrid slots. Refer to thechassis documentation for details.3.Remove the filler panel of an unused PXI/PXI Express slot.4.Touch any metal part of the chassis to discharge static electricity.5.Ensure that the PXI/PXI Express module injector/ejector handle is not latched and swingsfreely.6.Place the PXI/PXI Express module edges into the module guides at the top and bottom ofthe chassis.7.Slide the device into the PXI/PXI Express slot to the rear of the chassis.8.When you begin to feel resistance, pull up on the injector/ejector handle to latch the device.9.Secure the device front panel to the chassis using the front-panel mounting screws.10. Plug in and power on your PXI/PXI Express chassis.4 ni.com NI-DAQmx and DAQ Device Installation Guide Read Me First
Windows Device RecognitionWindows versions earlier than Windows Vista recognize newly installed devices when thecomputer restarts. Vista installs device software automatically. If the Found New Hardwarewizard opens, Install the software automatically is recommended for each device.NI Device MonitorAfter Windows detects newly installed NI devices, NI Device Monitor runs automatically atstartup.Make sure the NI Device Monitor icon, shown at left, is visible in the taskbar notificationarea. Otherwise, the NI Device Monitor does not open. To turn the NI Device Monitoron, unplug your device, restart NI Device Monitor, and plug in your device. LaunchNI Device Monitor from the Start menu, (Windows 8) from NI Launcher, or(Windows 10) from the All Apps menu.The NI Device Monitor prompts you to select from the following options. These options mayvary, depending on the devices and software installed on your system. Begin an application with this device—Launches LabVIEW. Choose this option if youhave already configured your device in MAX. Configure and test this device—Opens MAX. Test this device—Launches MAX test panels for your device. Launch Instruments & Apps for this device—Launches NI ELVISmx InstrumentLauncher. This option only appears if your device supports NI ELVISmx. Do nothing—Recognizes your device but does not launch an application.The following features are available by clicking the NI Device Monitor icon and then clickingthe Settings icon at the top right corner of the panel: Run at startup—Runs NI Device Monitor at system startup (default). Prevent all notifications—Prevents future notifications for any device. Reset Default Actions—Clears all actions set by the Always Do This option and restoresfactory default settings. Exit—Turns off NI Device Monitor. To turn on NI Device Monitor, launch NI DeviceMonitor from the Start menu, (Windows 8) from NI Launcher, or (Windows 10) from theAll Apps menu.AccessoriesInstall accessories and/or terminal blocks according to the instructions in their installationguides. For SCXI and SCC signal conditioning systems, continue with the instructions in theDAQ Getting Started Guide.NI-DAQmx and DAQ Device Installation Guide Read Me First National Instruments 5
TroubleshootingIf you have problems installing your software, go to ni.com/support/daqmx. For hardwaretroubleshooting, go to ni.com/support and enter your device name, or go to ni.com/kb.If you need to return your National Instruments hardware for repair or device calibration, go toni.com/info and enter rdsenn to start the Return Merchandise Authorization (RMA) process.Go to ni.com/info and enter rddq8x for a complete listing of the NI-DAQmx documentsand their locations.Next StepTo confirm your device is working properly and start your application, refer to the DAQ GettingStarted Guide available online at ni.com/manuals. Additional resources are online atni.com/gettingstarted.You can find device terminal/pinout locations in MAX, the NI-DAQmx Help, or the devicedocumentation. In MAX, right-click the device name under Devices and Interfaces, and selectDevice Pinouts.Refer to the NI Trademarks and Logo Guidelines at ni.com/trademarks for more information on National Instruments trademarks. Otherproduct and company names mentioned herein are trademarks or trade names of their respective companies. For patents covering NationalInstruments products/technology, refer to the appropriate location: Help»Patents in your software, the patents.txt file on your media, or theNational Instruments Patents Notice at ni.com/patents. You can find information about end-user license agreements (EULAs) and third-partylegal notices in the readme file for your NI product. Refer to the Export Compliance Information at ni.com/legal/export-compliancefor the National Instruments global trade compliance policy and how to obtain relevant HTS codes, ECCNs, and other import/export data. NI MAKESNO EXPRESS OR IMPLIED WARRANTIES AS TO THE ACCURACY OF THE INFORMATION CONTAINED HEREIN AND SHALL NOT BE LIABLE FORANY ERRORS. U.S. Government Customers: The data contained in this manual was developed at private expense and is subject to the applicablelimited rights and restricted data rights as set forth in FAR 52.227-14, DFAR 252.227-7014, and DFAR 252.227-7015. 2003–2016 National Instruments. All rights reserved.373235AA-01Feb16
Install NI-DAQmx Install NI-DAQmx driver software before installing new hardware devices so Windows can detect them. 1. Insert the software media. If the NI-DAQmx installer does not open automatically, select Start»Run. Enter x:\autorun.exe, where x is the drive letter. Complete the instructions. 2.