Transcription
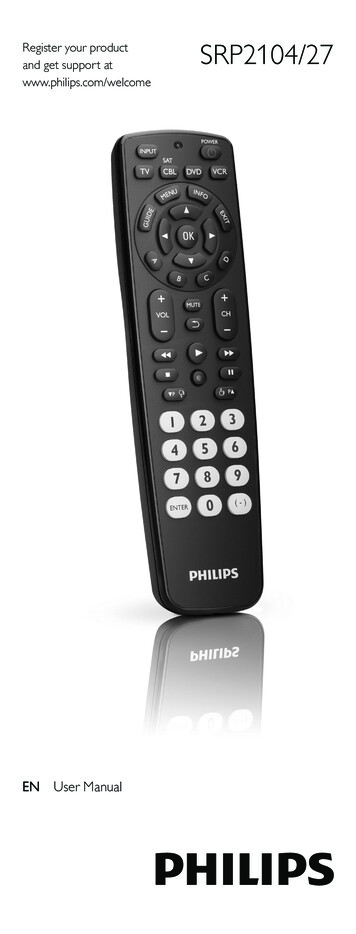
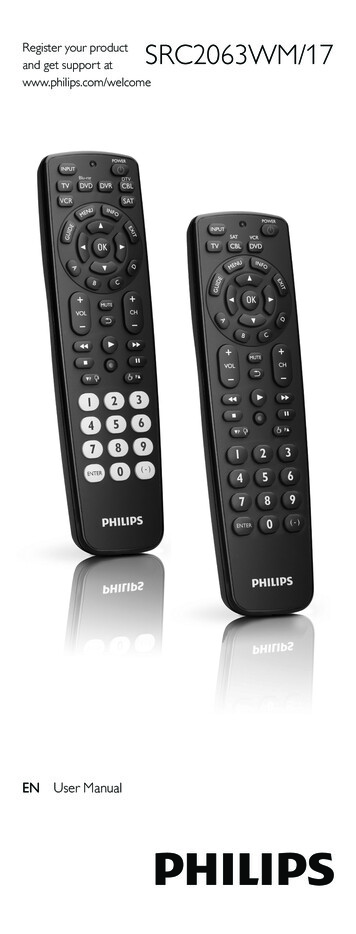
SRC2063WM/17Register your productand get support atwww.philips.com/welcomeEN User Manual
1124Your SRC2063WM. 3-4Getting started. 4-82.1 Inserting the batteries.42.2 Setting up the universal remotecontrols. 4-8Using the universal remote controls.9-11.3.1 Buttons and functions.9-10 3.2 Resetting a button to its originalfunction.11Service and support.12-15.4.1 Frequently asked questions.12-144.2 Need help?.14.FCC Compliancy.15Notice for Canada.16.Helpline.17Brand list.18-30Information to the consumer.31Compliance with EMF.31Recycling and disposal.1Your SRC2063WM43568771923SRP2006/27Congratulations on your purchase of thePhilips SRC2063WM universal remote controltwinpack. The pack contains the 3-device remotecontrol SRP2003 and the 6-device remotecontrol SRP2006. After setting up the remotecontrols you can operate up to 3 differentdevices with the SRP2003 and up to 6 differentdevices with the SRP2006.456877SRP2003/272Simple SetupBoth universal remote controls come with theinnovative Simple Setup technology.After setup, the remote controls can operate TV,DVD player / recorder (including Blu-ray player)and all common Cable, Satellite, DTV and otherset top boxes, such as DirecTV, Comcast, AT&T,Verizon, Time Warner, Scientific Atlanta, Tivo andmany more.The SRP2006 can also be set up for VCR, andDVR.Simply follow the instructions in chapter 2.2 toset up the remote controls for your devices.EN3English3Table of contentsFor an overview ofthe buttons and theirfunctions refer tochapter 3.1.Your SRC2063WM92
To fully benefit from the support that Philipsoffers, register your product atwww.philips.com/welcome.2G etting started2.1 Inserting the batteries Insert 2 AAA typebatteries, notingthe and configuration in thebatterycompartment.NoteWhen replacing the batteries, all user settingswill be retained in the remote controlmemory for 5 minutes.2.2 Setting up the universal remotecontrolsThe example below instructs you how to setup your universal remote controls for your TV.You can repeat the same steps for other devices(DVD player / recorder, DTV, Cable / Satellitebox, DVR and VCR) which you want to operate,using the universal remote controls.NoteThe setup procedure is the same for bothremote controls.4ENDevice nameTVEnglishThe remote controls can be set up to operateany 3 or 6 of the following devices:Description raditional TV, LCD /TPlasma TV and projectionTV, TV part of TV / VCR,TV / VCR / DVD and TV /DVD combosDVD DVD player / recorder(DVDR), DVD / HardDisk Drive combination(DVDR-HDD), Blu-Rayplayer, High DefinitionDVD player (HD-DVD),DVD part of TV / DVD,TV / VCR / DVD and VCR/ DVD combosCBL/SAT Cable box, satellitereceiver, Internet ProtocolTV (IPTV), Free To Air TV,High Definition Televisiondecoder (HDTV), DigitalTelevision (DTV) and TivoVCR Video cassette player /(SRP2006 only) recorder, VCR part of TV/VCR, TV/VCR/DVD andVCR/DVD combosDVR Digital / Personal Video(SRP2006 only) Recorder (DVR / PVR), TivoExample: setting up the universal remotecontrols to operate your TV:1 Switch ON the TV manually or use theoriginal remote control for this. Tune tochannel 1.2 Press and hold the 5 sec.device selectionbutton for 5 secondsuntil the red Setuplight blinks. Theremote control isnow in setup mode.EN5Getting startedGlow buttons (SRP2006 only)The SRP2006 glow buttons: (ENTER, (-) andthe numeric buttons) glow in the dark, enablingeasy use of the remote control, even in a dimlylit room.
3 Look up the 4-digit5-60 SEC.45 66ENEnglishImportantIf you made a mistake: Press the device selection button twice toexit setup. The red Setup light turns off. Restart from the beginning. I f the device does not respond at all or not toall of the button commands or if you cannotfind the code for your brand, enter ‘9, 9, 9, 9’ instep 3 and continue with step 4.The remotecontrol will now search its full database for acode that works with your TV. Full databasesearch may take up to 15 minutes.2.2.1 Setting up the remote controls forother devices (DVD player / recorder,DTV, Cable / Satellite box, DVR andVCR)1 Make sure the device is switched on andoperational. E.g. insert a disc in the DVDplayer / recorder or a video cassette in theVCR (SRP2006 only).2 Then follow steps 2 to 6 of ‘Setting up theuniversal remote controls to operate yourTV’. Make sure to use the correct deviceselection button:- for SRP2003:or.- for SRP2006:,,,or.2.2.2 Improving buttonsWhen correctly set up, the remote controlshould be able to operate all your devices.However, when using the remote control for thefirst time it might occur that some buttons donot yet function as expected.In this case you can have the remote controlsearch for alternatives.NoteImproving buttons is not possible when thecode was found during full database search(with code ‘9, 9, 9, 9’).EN7Getting startedcode for your brandin the brand list atthe back of this usermanual. A 4-digit code isshown for each brand. Use the digitbuttons to enter thecode for your brand. If the red Setuplight turns off,an invalid codewas entered. In this case, try again. Aim the remote5 - 60 sec.control at the TV.Press and hold thebutton. Releaseit immediately assoon as the TVswitches off. This step normally takes between 5 and60 seconds. In extreme circumstancesthis step can take up to 15 minutes. Switch ON the TV.Try out the buttonsthat you need foroperating it. Try, forexample, if the- CH and digitbuttons function properly. If a button does not work as expected, pressand hold that button. Release it immediatelyas soon as it works. For more information,see chapter 2.2.2. Press thedevice selectionbutton twice tofinish setup.2x When nobutton ispressed for 5 minutes or more, theremote control will exit setup mode,automatically saving all your settings.
After initial setup1 Make sure the receiving device is able torespond. E.g. when you try to repair the Playbutton for your DVD player, make sure toinsert a DVD into the DVD player otherwisethe Play button is not able to function.2 Select the devicethat you wish tooperate (e.g. DVD). Press theordevice selectionbutton to selectDVD.3 Keep buttons 5 sec.andpressedsimultaneously for5 seconds. The red Setuplight lightsup. The remote control is now in setupmode.4 Press and hold the button that does notfunction and immediately release it when thedevice responds. If the button still does not function asexpected, try pressing it again for a longerperiod of time.5 Press theorselection buttontwice to save yoursettings and exit2xsetup mode. When nobutton is pressed for 5 minutes or more,the remote control will exit setup mode,automatically saving all your settings.8ENU sing the universalremote controls3.1Buttons and functionsEnglish3The illustrations on page 2 gives an overview ofall buttons on the remote controls. Try out thebuttons you need for operating your devices.Using the universal remote controlsDuring initial setup1 Make sure the receiving device is able torespond. E.g. when you try to repair the Playbutton for your DVD player, make sure toinsert a DVD into the DVD player otherwisethe Play button is not able to function.2 Press the button that does not function, keepit pressed and immediately release it whenthe device responds. Repeat this for everybutton that does not function. If the button still does not function asexpected, try pressing it again for a longerperiod of time.Notes 1234 uttons having the same functions as theBbuttons on your original remote controlmay have different namings on theSRP2003 / SRP2006 (e.g. Info / Display). Only functions that are available on youroriginal remote control can be used foroperating your devices with the universalremote controls. Setup light. Lights upwhen a remote controlcommand is being sent,when you just selecteda device and when theremote control is in setupmode. selects available sourceinputs (antenna, cable,etc.). device selection buttons. Select the device to beoperated. GUIDE. electronic program guide. MENU. menu on / off. INFO. on-screen channelinformation. EXIT. exits / clears on-screenmenu displays. 3 4 1 2. cursor up, down, left, rightin a menu. OK. confirms your selection.EN9
53.2 Resetting a button to itsoriginal functionEnglishordered following therequirements for cableboxes.A - Yellow, B - Blue, C - Red,D - Green.If an improved button (see chapter 2.2.2) stilldoes not function as expected, you can alwaysreset the button to its original function.1 In the current6 VOL -. adjusts TV volume. . mutes TV sound. . previous program / Last /Back. CH -. next / previous channel.2789 . rewind.5 2. play. 6. fast forward. 9. stop. 0. record. ;. pause. 4P 3P. previous (4P) / next(3P) page / track invarious modes./ . set your Thumb ratings. used after direct channelselection. some devicesrequire ENTER to bepressed after channelselection. selects between oneand two-figure channelnumbers. digit buttons for directchannel / track selection.3device mode, keep 5 sec.digit buttonsandpressedsimultaneously for 5seconds, until thered Setup light lights up. The remote control is now in setup mode. Press digit buttons, , and, inthat order. After eachbutton pressthe red Setuplight blinks once. Press the buttonthat you wish toreset twice. E.g. the22 button.2x After eachbutton pressthe red Setup light blinks once. The red Setup light will blink onemore time to confirm that the buttonwas succesfully reset to its originalfunction. switches the selecteddevice on / off.NotebuttonFor some TV brands / types, thewill only turn off the TV. You will have topress a digit button (direct channel selection)to turn on the TV again.10ENEN11Using the universal remote control A, B, C, D. Context sensitive buttons,
4.1Frequently asked questionsIn this chapter you will find answers to the mostfrequently asked questions about your universalremote controls.4.1.1 SetupI cannot enter setup mode.Battery level too low or battery lifetime cameto an end. Replace the batteries. See chapter 2.1.After replacing the batteries, test if theremote control still operates your devices. Ifit does not, you have to set up the remotecontrol again. For this refer to chapter 2.2.The brand code for my device is missing in the‘Shortlist of brands’ in the Quick Start Guide.The ‘Shortlist of brands’ only mentions the mostcommon TV, DVD, CBL/SAT, DVR and VCRbrands. You will find a complete brand list on page18-30 of this user manual. Use ‘9999’ as 4-digit code in case you cannotfind your brand in the complete brand list.Note that using ‘9999’ may result in a longsetup (up to 15 minutes).My TV switches OFF in step 4 but does notswitch ON again in step 5.TVs of some brands (e.g. Panasonic) onlyswitch ON after a long press on one of thedigit buttons. After a long button press in setupmode the remote control will start trying toimprove the button (see chapter 2.2.2) insteadof switching ON the TV. In this case, switch ON the TV manuallyor use the original remote control for this.Continue with step 6. After successfullycompleting setup, the remote control willswitch ON the TV with a long button presson one of the digit buttons, just as youroriginal remote control.12ENAfter setup, not all buttons work as expected. Try improving the button(s).See chapter 2.2.2.How do I set up the remote control for combodevices (TV / VCR, TV / DVD, DVD / VCR, etc)?Some combo devices require you to set up twodifferent device selection buttons to controlboth parts of the combo device. For example,if you have a TV / DVD combo, you might needto set up the remote control for both TV andDVD to operate your TV / DVD combo.4.1.2 OperationThe remote control does not wake upanymore.Battery level too low or battery lifetime cameto an end. Replace the batteries. See chapter 2.1.After replacing the batteries, test if theremote control still operates your devices. Ifit does not, you have to set up the remotecontrol again. For this refer to chapter 2.2.The device I want to operate does not respondat all / does not respond to all of the buttoncommands. Check if the buttons you press are availableon the original remote control of the device. Try improving buttons. See chapter 2.2.2.Wrong code selected during setup. Set up the remote control again for thedevice. Always test if the device responds,before leaving setup mode.It may be that the buttons that you are tryingto use have a different naming on the originalremote control. Try out all buttons to find the one(s) youneed.EN13EnglishService and supportService and support4
WarningThe batteries should not be exposed toexcessive heat such as sunshine, fire or thelike.4.2Need help?We advise you to first read this user manualcarefully. It is provided to help you set up anduse the remote control.If, however, you require extra information orhave additional questions about setup, usage,spare parts, warranty, etc. of the universalremote controls, you can always contact us.When calling our helpline, make sure to havethe SRP2003 and / or SRP2006 at hand whenyou call, so that our operators can help youdetermine whether the universal remotecontrol(s) is / are working properly.You will find our contact details at the end of thisuser manual.The model numbers of your Philips universalremote controls are SRP2003/17 andSRP2006/17. The model number of the twinpackis SRC2063WM/17.Date of purchase:./ ./ .(day/month/year)NoteThis equipment has been tested and foundto comply with the limits for a Class B digitaldevice, pursuant to part 15 of the FCC Rules.These limits are designed to providereasonable protection against harmfulinterference in a residential installation.This equipment generates, uses and canradiate radio frequency energy and, if notinstalled and used in accordance with theinstructions, may cause harmful interference toradio communications.However, there is no guarantee thatinterference will not occur in a particularinstallation.If this equipment does cause harmfulinterference to radio or television reception,which can be determined by turning theequipment off and on, the user is encouragedto try to correct the interference by one ormore of the following measures: Reorient or relocate the receivingantenna. Increase the separation between theequipment and receiver. Connect the equipment into an outlet ona circuit different from that to which thereceiver is connected. onsult the dealer or an experienced Cradio/TV technician for help.For online support go to:www.philips.com/welcome. Click ‘Support’ and follow the on-screeninstructions.14ENEN15EnglishWill my settings be deleted when I replace thebatteries?No. All user settings will be retained in theremote control memory for 5 minutes.FCC CompliancyThis device complies with Part 15 of the FCCRules. Operation is subject to the following twoconditions: This device may not cause harmful interference. This device must accept any interferencereceived, including interference that may causeundesired operation.Service and support4.1.3 Batteries
CautionUser changes or modifications not expresslyapproved by the party responsible forcompliance could void the user’s authority tooperate the equipment.3 HelplineCountryPhone numberUnited States of AmericaCanada001-888-744-5477Notice for CanadaThis class B digital apparatus complies withCanadian ICES-003.16EN17
AA.R. Systems.0012ABC.0013Abex.0014ABS.0016Accele Vision.4194Access HD.3554Accurian.0022Acer.0028Acura.0036ADC.0040 054Adventura.0055Adyson.0058Agashi.0063Agazi.3522 iba.0078Akira.0079 .0104Allorgan.0105Allstar.0108Alpha Digital.4014AlphaStar.0113Alpine.0114America Action.0123American High.0125Americast.0127Amphion .0140AMTC.4015 (DB1)Amtron.0141AMW.0143Anam.0146Anam ronix.0159AOC.0165Aolinpiya.4089 (DB1)Apache.0169Apex.3691Apex Digital. m.0184Aristona.0192Arrgo.0197Arris.4931 dio ihua.4092 (DB1)Baird.0311Bang & Olufsen.0314Baohuashi.0316 (DB1)Basic 76 (DB1)Bell & Howell.0350Bell ExpressVu.0352 (DB1)Bell star-Daewoo.0369Binatone.0378Black Blue Parade.0394Blue Sky.0395Blue le 4238Caihong.0462Caixing.4093 (DB1)California nic.0486 (DB1)Captive fei.0527Changfeng.0528 (DB1)Changhai.0529Changhong.0530Channel Master.0531Chaparral.0533Ching Tai.0541Chun Yun.0545Chunfeng.0546Chung Hsin.0547Chunlan.4097 d list888.0006 (DB1)
Diamond tal ish OSPHERE.4396 7 Line.0955 .0971Expressvu.0977Exquisit.0978FFagor Life.4102Feilang.0990Feilu.0991Feiyan.0992 .1052Fujitsu General.1053Funai.1056Furi.1057FUTEC.3960 d.1075Gateway.1076GBC.1078GC 87Gemini.1089General Instrument.1093General r.1114Go Video.112621Brand 0CMS Hightec.0591Coby.0597Colortyme.0601Colour S Electronics.0663CTC.0664CTX.0665Curtis rPower.0674Cybertron.0675Cytron.0680
HHaier.1175Haihong.1176Haiyan.1177 193Harley .1214Hello Kitty.1221Hema.1222Hemmermann.1223Hewlett hi.1251Hitachi i.1272Hongyan.1274 .1293 (DB1)Huari.1294Hughes.4205Hughes .1341iLuv.4234Ima.1342Imperial.1346Imperial Crown.1347 1354Ingersol.1355Initial.1356Inno tant .1415JBL.1420JC rold.1431Jiahua.1435 (DB1)JiaLiCai.1436 (DB1)Jinque.1440 (DB1)Jinta.1441 (DB1)Jinxing.1442Juhua.1461 (DB1)JVC.1464jWin.1465KKaige.1470 (DB1)Kaisui.1471Kamp.1475Kanghua.1477Kangli.1478 (DB1)Kangyi.1479 2Kingsley.1520Kioto.1523Kiton.1525KLH.1529Kloss ter.1543Kongque.1545 smos.1557Koss.1558KTV.1572Kuaile.1573 (DB1)Kunlun.1578 (DB1)Kyoshu.1583Kyoto.1585LL&S Electronic.1588Landel.1593Lasonic.1600Layco.
period of time. 5 Press the or selection button twice to save your settings and exit setup mode. When no button is pressed for 5 minutes or more, the remote control will exit setup mode, automatically saving all your settings. 3 Using the universal remote controls 3.1 Buttons and functions The illustrations on page 2 gives an overview of