Transcription
SmartScan Label Link 3.0 for QuickBooksTable of Contents1. Introduction to SmartScan Label Link 3.0 2Getting Started .2Startup Checklist .2Installing SmartScan Label Link .3Registering SmartScan Label Link .3Working with QuickBooks.4Adding a Barcode Field to QuickBooks .4Decreasing QuickBooks Access Time.4Setup Permissions in QuickBooks .4Setting New Company File .52. Using SmartScan Label Link. 6Working with Label templates .6Adding a Label template.6Editing Label Templates.7Working with Fields.8Accessing the Field Editor.8Add New Field .9The Formula Editor.9Printing Labels .12Adding Items Individually.12Adding Items from Transactions.13Printing Labels .13
SmartScan Label Link 3.0 for QuickBooks1. Introduction to SmartScan Label Link 3.0SmartScan Label Link gives the user the ability to print barcode labelsbased on Items specified in QuickBooks. Items can be imported fromQuickBooks on an individual basis or on a transaction-level basis, addingall Items on a given Purchase Order, Sales Order, or Invoice. Items canthen be sent to label template software such as BarTender, using customfields designed with Label Link’s Field Editor module to format importeddata exactly how the user desires. The user can then further specify howthe specially formatted data appears on the printed labels using the labeltemplate software, before printing out a label that matches the needs of thecompany more closely than ever before.One implication of the new Label Link paradigm is the ability to printPacking Slips. By including multiple different Items on one label, and bycustomizing the Fields that appear on a label, as well as the appearance ofthe label itself, it is now possible to create custom Packing Slips to expeditethe shipping process.Getting StartedMake sure you have the following: SmartScan Label Link CDMouseLabel template software such as BarTenderPrinter(Optional): A custom field assigned in QuickBooks (see p. 4) for thebarcode number (SmartScan Custom Field Manager – installation andinstructions are on the Label Link CD – can expedite the process ofassigning barcode numbers to the Items once this field is created).Startup Checklist Install SmartScan Label Link (p. 3)Set up QuickBooks permissions (p. 4) Connect to Company File (p. 4)Edit Label (p. 6) Edit Fields (p. 8)Add Items to List (p. 12)Edit Label file in label template software (p. )
SmartScan Label Link 3.0 for QuickBooksInstalling SmartScan Label LinkContact Baus Systems for software download instructions or insert theSmartScan Label Link CD into the computer CD drive. The SmartScanLabel Link Setup Wizard will appear. Follow the screens and use thedefault settings, except change the installation to “Everyone”.Registering SmartScan Label LinkWhenever SmartScan Label Link is opened prior to being registered, the“Register with Baus Systems, L.L.C.” window appears. Clicking “SkipRegistration” will proceed with the demo installation, but to continuepast the trial period, the program will need to be registered:1.Enter your company name and the copy number you received on theCD cover.2.Click Register Now.3.When the Registration Information window appears, send the Key1and Key2 information to Baus Systems, L.L.C.4.A copy of this information can be printed out by pressing the Printbutton.5.Enter the Activation Code given to you by Baus Systems, L.L.C.6.Click “Done” to close the Registration Information dialog box.7.Verify that your copy is now registered. The message should say“Registered to: (your company)”8.Click “Done.”
SmartScan Label Link 3.0 for QuickBooksWorking with QuickBooksSmartScan Label Link connects with the QuickBooks Company file to gettransaction and Item information. If a separate barcode field is needed,then the Company file must have a custom field specified for this purpose.Also, QuickBooks must be configured to grant permission for SmartScanLabel Link to access the Company file.Adding a Barcode Field to QuickBooksTo add a barcode/scan code field to QuickBooks:1.Start QuickBooks and log in as “Admin” in Single User Mode.2.Click the Item List Icon.3.Double click any Item.4.Click.in the popup.5.Click6.Enter a name for your barcode/scan code field in one of the unusedtext boxes.7.Check the check box next to the name you just entered:.8.Click.9.Enter the barcode numbers in the barcode/scan code field.10. Click11. Click.12. Repeat steps 3, 4, and 9-11 for each Item in the list.Decreasing QuickBooks Access TimeYou can decrease QuickBooks access time by having your QuickBooksCompany file open on the computer on which you are running SmartScanLabel Link.Setup Permissions in QuickBooksLog into QuickBooks in Single User Mode as “Admin” to setpermissions for SmartScan Label Link to access the Company file. InLabel Link, select from the menu: File Open New Company. Thefollowing message will appear in QuickBooks for you to grant accesspermission for Label Link:
SmartScan Label Link 3.0 for QuickBooks1.2.3.4.5.6.7.8.9.Choose “Yes, always; allow access even if QuickBooks is notrunning” and set “Login as:” to Admin if this option is available (if itis not available, skip to step 4). Click Continue.Confirm to Proceed: “Are you sure you want to allow this access?”Click Yes.Access Confirmation: Click DoneLabel Link will now bring up a dialog box asking if you want toupdate your lists now. Click Yes to import your Item and Transactiondata to Label Link.In QuickBooks, select the menu item Company Modify ServiceAccess. If this option is not available, select Edit Preferencesinstead.Selected Integrated Applications from the manu on the left and switchto the Company tab.Select LabelLink and click Properties.Check the boxes that allow the application to access QuickBooks andauto-login as Admin.Click OK, then OK again. When this is complete, you may log out ofSingle User Mode or close QuickBooks.Setting New Company FileIf at any time Label Link is not connected to the current Company file, theCompany file currently open in QuickBooks can be accessed as follows:1.Open the Company File in QuickBooks2.In LabelLink, select File Open New Company.3.Click OK.
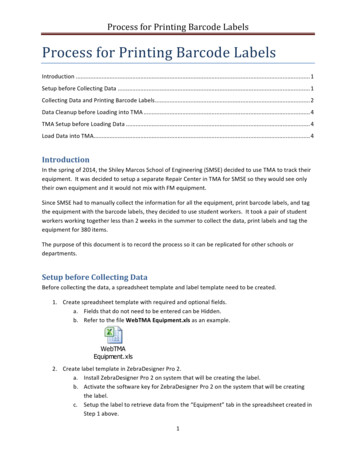
SmartScan Label Link 3.0 for QuickBooks2. Using SmartScan Label LinkWorking with Label templatesBefore printing any labels, you need to select a Label template from theCurrent Label Template drop-down menu for Label Link to use whenprinting labels.Adding a Label templateIf there are no Label templates on this list, or if you have a new templatethat needs to be added to the list, select the Add New Label Template . option. This will bring up the “Add New Label Template” dialog box:This dialog provides options for naming the label, selecting whether thelabel is a BarTender or Wasp label, opening the label template in theassociated Labeler, setting the number of Items that will be printed on eachlabel, and specifying whether Items with more than one quantity selectedwill be printed out multiple times, or just once with a quantity specified.Clicking the Browse button will allow you to browse for the desired labeltemplate to associate with Label Link. When all the options are properlyconfigured, click the Add button to add the template to the list.
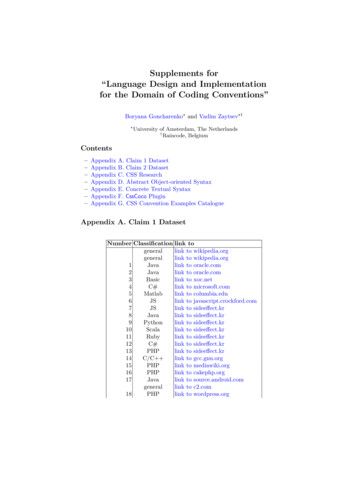
SmartScan Label Link 3.0 for QuickBooksEditing Label TemplatesIf a label that is already on the list needs to be modified, this can be doneby selecting the Edit Label Templates . option from the Current LabelTemplate drop-down menu, which will bring up the “Edit Label TemplateProperties” window:The “Edit Label Template Properties” window is the main launching pointfor doing most activities involving the Label templates. In addition toproviding a way to change the settings that were originally set through the“Add New Label Template” dialog box, this window allows access to FieldEditor, discussed in the next section. You can also add and delete Labeltemplates through this dialog.
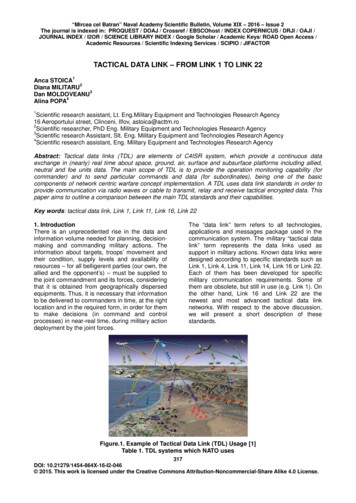
SmartScan Label Link 3.0 for QuickBooksWorking with FieldsSmartScan Label Link 3 provides a much more robust Field Editor thanprevious releases of Label Link. It is now possible to define any number ofspecialty Fields for inclusion in custom Labels. This section will contain abrief discussion of some of the basic features of the Field Editor, but theuser is encouraged to experiment with our numerous options to find a stylemost suited to the task at hand. For an example, we will walk the userthrough the creation of a Barcode Field.Accessing the Field EditorTo access the Field Editor, select Edit Label Templates from theCurrent Label Template drop-down menu. Select a Label template on theLabel list, and then click the Edit Fields button. This will bring up the“Edit (MyLabel) Fields” window:This window has two lists of fields: Transaction level Fields, which usedata drawn from the Transaction (i.e., Invoice, Sales Order, or PurchaseOrder) which adds a given Item to the list of Items to be printed; and Itemlevel Fields, which use data from the Item itself. There are five columns ina Field row which can be changed in this window:1.Fields can be deleted by clicking the Delete button in the Field’s row.2.The Type can be modified by the drop-down menu in the Typecolumn, which allows the Field to be specified as a Number, Date, orBoolean (true/false value) type, or specified as Any, which meansthat the Field could be any of the above.3.The Edit button brings up the Formula Editor, which is discussedbelow.4.The Default Value (what appears in a Field if it has no value) can bechanged by clicking on the Default Value column for the Field andentering a value.5.The Length (the maximum number of characters that can appear inthe Field) can be changed by clicking on the up/down arrows in theLength column.For now, click on the Add New Field button at the bottom of the window tobring up the Add New Field dialog box.
SmartScan Label Link 3.0 for QuickBooksAdd New FieldThe Add New Field dialog box allows the user to name and define a newField for use in the Label Link database for label printing.For our Barcode field, change the name of the field to Barcode, and set theMax Length to 10 – we don’t want to have too many characters showing upin the barcode, after all. Set the Default Value to “0000000000” so you caneasily tell if a barcode is invalid. Then change the Field Data Type to Any.It might seem more natural to set it to Number, but we actually want thebarcode to be a sequence of characters, since that’s how it will be treatedby the barcode printer. If you’re not sure what type to make a Field, youcan still edit the Formula in the Formula Editor, and then Label Link willdecide what type the Field is.Finally, click the Edit button after the Formula text box. This will bring upthe Formula Editor, where you can choose the pieces of the Formula from alist. When you close the Formula Editor, your Formula will beautomatically inserted into the Formula text box.The Formula EditorThe Formula Editor provides an interface for creating and editing theFormulas that are used to generate Field values. The Formula Editorwindow consists of three main areas: The Formula definition area, theVariables & Test Values area, and the Commands, Keywords & Operatorsarea.
SmartScan Label Link 3.0 for QuickBooksThe Formula definition areaThe Formula definition area shows the current text of the Formula you areediting. Typing is enabled in this area, so if you know how you want todefine the Formula, you can type it in directly, and you can change/removemistakes.The Variables & Test Values areaThe Variables & Test Values areaconsists of a wide assortment ofFields imported from QuickBooksthat can be added to the Formula.When you click the Insert button nextto a variable, the name of the variableis inserted into the Formula definitionarea at the cursor position. Testvalues for the variable can bemodified by editing the entry in the Value column for the variable. Thisaffects what appears in the Test area when the Test button is clicked whilethe variable is included in the Formula (the Formula Editor doesn’t haveaccess to any data imported from QuickBooks, so this feature is importantin making sure your Formula works the way you expect it to).The Commands, Keywords & Operators areaThe Commands, Keywords & Operators areacontains functions and operators that allow theuser to modify what appears as a result of usingthe Formula. This includes such operations asperformingmathematicaloperationsonnumbers, inserting the current Date/Time,simplifying, altering, or combining strings oftext, and having the Formula choose what todisplay based on what is contained in variables.Clicking the Insert button next to an item insertsthat item into the Formula definition area at thecursor position (additionally, if there is a block of text selected in theFormula definition area and the parentheses or quotation operators areselected, then the parentheses/quotes are inserted around the selected text).For information about what a given item does, hover the mouse pointerover the item.
SmartScan Label Link 3.0 for QuickBooksOther areasThe Test area is also of note.This area, situated just underthe Formula definition area, allows you to test whether the Formula youhave entered is working the way you expect it to. To test your Formula,click Test. The Formula Editor will then parse the Formula using whatevervalues you have specified as test values for the variables you are using.The final area of note is the Default Output area. It is possible that, in theprocessing of a Formula, one of the inputs to the Formula might be invalidand cause the Formula to fail. In this case, the Formula will return thevalue specified by the Default Output. To change this output, input aFormula that gives the output you want to be the default and click Test.When the outcome appears in the Test area, click the Set button, and theDefault Output value willbe set to the value in theTest area.To continue our barcode Field example, scroll down in the Variables &Test Values area until you get to Item [Your Barcode Custom Field] (ifyou can’t see the Variables & Test values area, click the button “ Variables & Commands” to show it). Click the Insert button in the barcoderow to insert the variable’s name into the Formula definition area. ClickTest, and the Test value for the barcode will appear in the Test area. ClickOk when you’re done to finish.
SmartScan Label Link 3.0 for QuickBooksPrinting LabelsWhen Label Link is connected to the QuickBooks Company file and aLabel Template is selected for printing, you are now ready to add Items tothe list of Items to be printed. There are two ways to do this: you can addItems individually, or from QuickBooks Transactions.Adding Items IndividuallyTo add Items individually, first make sure you are on the “Items to BePrinted” tab of the main window.In the Add Labels Type dropdown menu, select either Sales Item orPurchase Item. This affects what Fields are imported for prices anddescriptions of the Items, and whether the Item will be associated with aCustomer or a Vendor. Click Add Items to bring up the Add Itemswindow.This window contains a list of all the Items imported from QuickBooks,with their Description and the quantity to be printed. The quantity to beprinted starts at 0 for all Items. You can change the number of labels to beprinted for an Item by typing in the quantity in the Qty column, or byclicking the Up/Down arrows next to the Qty column. You can alsoassociate all the Items entered here with a particular Customer/Vendor byselecting the desired Customer/Vendor from the dropdown menu at the topof the window.
SmartScan Label Link 3.0 for QuickBooksAdding Items from TransactionsTo add Items from Transactions, first go to the “Transaction Lists” tab ofthe main window.Select from the Transaction Type dropdown menu the type of QuickBookstransaction you want to load Items from – either Invoice, PO (PurchaseOrder), or SO (Sales Order). Then click the Load button to import theTransaction data from QuickBooks.This will bring up the Transaction List Filterdialog box, which allows you to specifyeither a date range for Transactions to import,or a particular Transaction number to import.Select the Modified Date tab to enter a daterange, or select the Invoice Number tab to enter a specific Invoice Number.Click Ok when finished to import the Transaction list.The list of Transactions will now be populated with Transactions of thespecified type. If there is any problem with the imported list, you canreload the list by clicking the Reload buttonTo add all the Items from a Transaction to the list of Items to be printed,select the Transaction and click the Add Items button. This will send all ofthe Items in the selected Transaction to the print list, and transfer the viewto the “Items to Be Printed” tab.Printing LabelsOnce the list of Items to be printed has Items in it, you can print by clickingthe Print button. Alternately, you can click the Preview button to launchthe labeler software that uses the Label file associated with the CurrentLabel Template. From within the labeler software, you can modify theLabel file to display the Fields you have specified in Label Link at thelocations you want on the labels.
SmartScan Label Link 3.0 for QuickBooks4. Using the Labeler SoftwareSmartScan Label Link currently supports two label printing programs:BarTender and Wasp Labeler. In this section, we will discuss how toperform some commonly used tasks in each of these programs.BarTenderWhen Print Preview is selected in Label Link with a BarTender label filelinked with the Current Label Template, Label Link will launch BarTenderwith the current Item data. The window that first appears contains thetemplate that BarTender uses for generating labels, not one of the labelsthat will be printed. It is on this template that you can select what datafrom Label Lin k is used to generate labels, as well as where it will appearon the labels.Creating ObjectsObjects are what BarTender uses to display text, barcodes, and graphics onlabels. To create an Object, right-click on an empty area on the labeltemplate, select Create, and click the Object you want to create. This willplace a new Object of the specified on the label template at the location youclicked. Barcode and Text Objects can be assigned constant data byclicking on them and typing in the specified text, or they can be assigneddata from the Label Link database as described below.
SmartScan Label Link 3.0 for QuickBooksModifying Barcode and Text ObjectsBarcode and Text Objects can be modified to display data drawn from theLabel Link database, as well as static data that will display the sameregardless of the database contents. To connect a Barcode or Text Objectwith the Label Link database, double-click on the Object to bring up theModify Selected Object dialog box. Select the Data Source tab, and thenselect “Database Field” in the Source dropdown menu. This will add theField Name dropdown menu to the Options section of the dialog box.Select the Label Link Field you want this Object to display.If the Object you are modifying is a Barcode Object, then the HumanReadable tab is also available. This tab contains options to specify whethera translation of the barcode will appear with the barcode, as well as wherethis translation will appear with respect to the barcode. To show HumanReadable text along with the barcode, go to the Human Readable tab andselect the Full option under Visibility. You can then change the Placementof this text to be either above or below the barcode, and change theAlignment of the text to Left, Right, or Center Aligned, or Aligned to haveeach character directly under the bars that translate to that character (BarDensity). Other options might also be available for certain barcodesymbologies, which can be selected on the Bar Code tab.Other tabs in the Modify Selected Object dialog allow you to change theFont and text size for the selected Object; manually change the position androtation of the Object; modify the Object’s name; and specify whether ornot the Object is to be included when labels are printed or viewed in thePrint Preview. Feel free to experiment with the various different settingsexposed through this dialog box to get the labels looking the way you want.
SmartScan Label Link 3.0 for QuickBooksConnecting to the Label Link databaseSmartScan Label Link comes with pre-made label files, already configuredto retrieve information from the Label Link database. However, it ispossible that these files could accidentally be deleted or modified to nolonger access the Label Link database correctly. If this happens, it willbecome necessary to reconnect to the database manually.To connect to the Label Link database, open the File menu and selectDatabase Connection Setup. This will open the Database ConnectionSetup dialog box:If there are any entries under the All Databases entry in the box on the leftof the Database Connection Setup dialog box, select them and click theRemove button to remove them from the list, until only the All Databasesentry remains. Then click the Add button to bring up the Add DatabaseConnection Wizard.The first screen of the Add Database Connection Wizard requests aDatabase Platform. Select Microsoft Access, and then click Next. Thenext screen requests a database name. Click the Browse button to open theBrowse window and browse to the Label Link database location. Thelocation of the Label Link database depends on whether you are usingWindows XP or Windows Vista.Windows XP: Documents and Settings\All Users\Application Data\LabelLink3\Labels.mdbWindows Vista: (Current Link3\Labels.mdbNote: If any of the folders in Vista don’t appear, you might needto set your Folder View settings to Show Hidden Files & Folders. To dothis, open the Start Menu and select the Control Panel, then open FolderOptions. Select the View tab, and change the “Hidden files and folders”setting to “Show hidden files and folders.”Click Next. On the next screen, select the PrintOut table from the list onthe left, then click the Add button to add it to the list on the right. ClickFinish to return to the Database Connection Setup dialog box, and thenclick OK to return to the main window.
SmartScan Label Link 3.0 for QuickBooks Working with QuickBooks SmartScan Label Link connects with the QuickBooks Company file to get transaction and Item information. If a separate barcode field is needed, then the Company file must have a custom field specified for this purpose. Also, QuickBooks must be configured to grant permission for .