Transcription
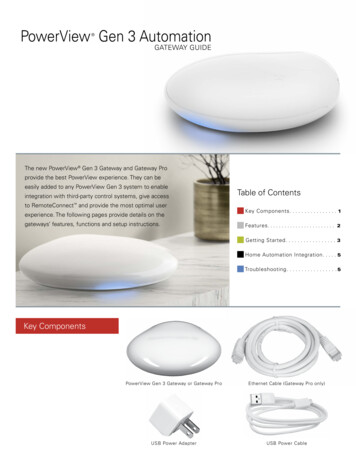
PowerView Gen 3 Automation GATEWAY GUIDEThe new PowerView Gen 3 Gateway and Gateway Proprovide the best PowerView experience. They can beeasily added to any PowerView Gen 3 system to enableintegration with third-party control systems, give accessto RemoteConnect and provide the most optimal userexperience. The following pages provide details on thegateways’ features, functions and setup instructions.Table of ContentsKey Components. . . . . . . . . . . . . . . . 1Features. . . . . . . . . . . . . . . . . . . . . . . . 2Getting Started. . . . . . . . . . . . . . . . . 3Home Automation Integration. . . . . 5Troubleshooting. . . . . . . . . . . . . . . . . 5Key ComponentsPowerView Gen 3 Gateway or Gateway ProEthernet Cable (Gateway Pro only)USB Power AdapterUSB Power Cable
FeaturesThe new PowerView Gen 3 Gatewayand Gateway Pro provide the followingfeatures and benefits:4. Range extender for large homes5. Shade synchronization (hembaralignment) for more than 4 shades1. Home automation compatibility andvoice control of your shades*6. Best whole home control whenshades are in multiple rooms2. RemoteConnect — create, edit anddelete Scenes and Automations, aswell as control individual shades,from anywhere in the world7. Ensures Automations always stayon time and in sync3. Reduced latency for large homes* Some features require additional hardware and/orthird-party equipment. Visit hunterdouglas.comfor details.HOW IT WORKSPOWERVIEW GEN 3WITHOUT A GATEWAYPOWERVIEW GEN 3WITH A GATEWAYPhone or tablet sendscommand directly to shadesPhone, tablet or third-partycontrol system sends commandto gateway; gateway then sendscommand to shadesOPTIONSThe gateway is offered in two differentmodels to fit a variety of needs. Bothfeature an aesthetic design that blendsinto any home décor.POWERVIEW GEN 3GATEWAYPOWERVIEW GEN 3GATEWAY PROProductNumberof ShadesWi-FiEnabled(Both 2.4and 5 GHz)Gateway15XGateway Pro30XEthernetEnabledPower OverEthernet(PoE)Enabled3rd PartyIntegrationsXXXX2
Getting StartedIMPORTANT: All gateways (regardless ofhow many are in a project) are set up solelythrough the PowerView App. To downloadthe PowerView App from the Google Playor App Store, go to www.hdpvapp.com orscan this QR code:PowerViewPLACEMENT IN THE HOMEPlace your gateway in a central location toall shades in the home. If you have morethan one gateway, space them out in thehome. This will help ensure your gatewayconnects to every shade.CONNECT POWER TO GATEWAY1. C onnect one end of the USB powercable to the USB power adapter.2. P lug the USB power adapter intoan AC outlet or power strip.3. P lug the other end of the USBpower cable into the power porton the back of the gateway.NOTE: During the boot-up process,the gateway’s LED will display differentbehavior to visually communicate itsstatus. Please refer to the LED Chart inthe PowerView App. Navigate to“More” “Accessories” “Gateways” “LED Chart” to view this chart. Do notinterrupt the gateway boot-up processuntil the gateway is ready to be added tothe PowerView Home.CONNECT USING AN ETHERNETCABLE (OPTIONAL, AVAILABLEFOR GATEWAY PRO ONLY)Connect the Ethernet cable from thePowerView Gen 3 Gateway Pro to an openLAN port on your router.NOTE: The PowerView Gen 3 Gateway Prooffers Power-over-Ethernet (PoE). Youmust have a separate PoE injector orPoE capable switch for your router.3
ADDING A GATEWAY (OR GATEWAYS)TO YOUR POWERVIEW HOMENOTE: All gateways (regardless of howmany are in a project) must be set upthrough the PowerView App.IMPORTANT: If you are an installer, you doNOT need the Homeowner’s Home Wi-Finetwork credentials to set up a gateway.After the homeowner accepts ownership ofthe PowerView Home in the PowerView App,the homeowner will be prompted to connecttheir gateway(s) to their Home Wi-Fi networkto complete the gateway setup.Gateways can be set up in one oftwo ways:1. D uring the initial Home setupprocess2. After the Home is createdby navigating to “More” “Accessories” “Gateways”The PowerView App will guide youthrough the entire process of configuringyour gateways. Please follow each stepcarefully in the app to successfully set upall gateways.IMPORTANT: All Rooms must be in rangeof the gateway. If some Rooms are notin range, those shades will not connectsuccessfully to the gateway. Repositionthe gateway in the home and select“Try Again.” If, after attempting thismultiple times, all Rooms still are not inrange, we recommend adding anothergateway to the PowerView Home.CONNECT YOUR GATEWAY TOYOUR WI-FI NETWORKIf Wi-Fi was not added during the initialhome setup and the homeowner did notadd the Wi-Fi network upon receivingownership of the PowerView Home,follow the steps below to connect yourgateway to your Wi-Fi network.1. Navigate to “More” “Accessories” “Gateways”2. Select the desired gateway3. Select “Info & Options”4. Select “Set Up Wi-Fi”NOTE: If your Wi-Fi network does notappear in the list of available networks,select the “Refresh” button in the top-rightcorner of the screen and try again. If it stilldoes not appear, select “Add Network”to manually add your Wi-Fi network.HOW TO DELETE A GATEWAYFROM A HOME1. O pen the PowerView App andnavigate to “More” “Accessories” “Gateways”2. Select the desired gateway3. Select “Info & Options”4. Select “Delete Gateway”IMPORTANT: If you have more than onegateway in the home, you will need toreconfigure your gateway network. Thiswill ensure all shades that were assignedto the deleted gateway are assigned to anactive gateway.To reconfigure the gateway network,navigate to “More” “Accessories” “Gateways” “Gateway Network” “Reconfigure Network.”4
Home AutomationIntegrationPowerView Automation integrates witha variety of leading third-party controlsystems and devices.To add a third-party control system ordevice, navigate to “More” “Integrations.” For more instructions,please visit https://help.hunterdouglas.com/TroubleshootingLED ColorMeaningSolid WhiteGateway is starting up.Blink Green/PurpleGateway is ready to be set up but is notconnected to the internet.Blink GreenGateway is ready to be set up.Blink Green/AmberGateway is registering shades and finishinghome setup.Blink Blue/PurpleGateway is connected to the home but isnot connected to the internet.Solid BlueGateway is connected to the home.Blink BlueGateway is connecting to shades foroperation.Flash Blue/RedGateway is unable to connect to shadesfor operation.Solid AmberThe “P” button has been pressed and heldon the gateway. The gateway is awaiting acommand in the app.To learn more about integration, pleasecontact your local Hunter Douglas dealeror visit zed/powerviewmotorization1. W hat do the colors mean fromthe gateway LED? The gateway’s LED displaysdifferent colors to visuallycommunicate its status. To viewthe Gateway LED chart in thePowerView App, navigate to“More” “Accessories” “Gateways” “LED Chart.”2. W hat do the “P” and “R” buttonsrepresent on the back of mygateway? “P” button– Quick press: Gateway will searchfor a firmware update– Long press ( 6 seconds):Action list will appear in thePowerView App (pictured right) “R” button– Quick press: Gateway will reboot– Long press ( 6 seconds):Gateway will factory resetBlink AmberGateway is updating its firmware.Blink Red/AmberGateway factory reset is in progress.ICES-003This Class B digital apparatus complies with Canadian ICES-003. Operation is subject to the following two conditions: (1) this device may not cause harmfulinterference and (2) this device must accept any interference received, including interferencethat may cause undesired operation.NMB-003Cet appareil numérique de la classe B est conforme à la norme NMB-003 du Canada. L’utilisation de ce dispositif est autorisée seulement aux conditions suivantes : (1) il ne doit pasproduire de brouillage et (2) l’utilisateur du dispositif doit être prêt à accepter tout brouillageradioélectrique reçu, même si ce brouillage est susceptible de compromettre le fonctionnementdu dispositif.FCC StatementThis equipment has been tested and found to comply with the limits for a Class B digital device,pursuant to Part 15 of the FCC Rules. These limits are designed to provide reasonable protectionagainst harmful interference in a residential installation. This equipment generates, uses and canradiate radio frequency energy and, if not installed and used in accordance with the instructions,may cause harmful interference to radio communications. However, there is no guarantee thatinterference will not occur in a particular installation. If this equipment does cause harmfulinterference to radio or television reception, which can be determined by turning the equipmentoff and on, the user is encouraged to try to correct the interference by one or more of thefollowing measures: Reorient or relocate the receiving antenna. Increase the separation between the equipment and receiver. Consult the dealer or an experienced radio/tv technician for help.Note: Changes or modifications not expressly approved by the manufacturer responsible forcompliance could void the user’s authority to operate the equipment.This device complies with Part 15 of the FCC Rules. Operation is subject to the following twoconditions:(1) this device may not cause harmful interference and (2) this device must accept anyinterference received, including interference that may cause undesired operation.CE StatementHunter Douglas Window Fashions,One Duette Way, Broomfield, CO 80020, USAHunter Douglas hereby declares that the PowerView Gateway is incompliance with the essential requirements and other relevant provisionsof Electromagnetic Compatibility (EMC) Directive 2014/30/EU and Radio Equipment Directive (RED) 2014/53/EU. A copy of the DoC can be obtainedonline: www.hunterdouglas.com/RFcertificationsThe Bluetooth word mark and logos are registered trademarksowned by Bluetooth SIG, Inc. and any use of such marks byHunter Douglas is under license. Other trademarks and tradenames are those of their respective owners. 2022 Hunter Douglas. All rights reserved.All trademarks used herein are the property ofHunter Douglas or their respective owners. 5/225
Home automation compatibility and voice control of your shades* 2.RemoteConnect — create, edit and delete Scenes and Automations, as well as control individual shades, from anywhere in the world 3. Reduced latency for large homes 4. Range extender for large homes 5. Shade synchronization (hembar alignment) for more than 4 shades 6.