Transcription
Fireplace ManualMANUAL DE LACHIMENEAElectric Fireplacewith Touch Screen Controls.
CONGRATULATIONS!Enjoy the warmth and ambiance of your new, one-of-a-kind, energy efficient electric fireplace.Please be sure to read and retain this short and easy to read owner’s manual.GENERAL INSTRUCTIONS. READ PRIOR TO USE. (If using this product in a cold climate,unpack the fireplace and allow the heating unit to acclimate to interior temperatures for 12hours prior to use.)IMPORTANT INSTRUCTIONSGeneral warning: When using electrical appliances, basic precautions should always befollowed to reduce the risk of fire, electrical shock, and injury to persons, including the following:1Read all instructions before using the heating unit (ETLus Listed).DO NOT plug into loose fitting outlet. Check periodically for a secureplug/outlet fit. If the plug does not fit snugly into the outlet or if the plug becomes veryhot, your outlet may need to be replaced. Check with a qualified electrician to replace the outlet before use of the fireplace.DO NOT use in outlet that is controlled by a wall switch.This unit is equipped with the patented Cool Touch Vent. This vent is designedto keep the front of your fireplace cool while in heat mode. Even with this advancedvent, this heater is hot when in use. To avoid burns, do not let bare skin touch hotsurfaces. If provided, use handles when moving this heater. Keep combustible materials,such as furniture, pillows, bedding, papers, clothes, and curtains at least 3 feet (0.9 m)from the front of the heater and keep them away from the sides and rear.Always plug heaters directly into a 3-Prong, Grounded wall outlet/receptacle. Neveruse with an extension cord, adapter or re-locatable power tap (outlet/power strip).Extreme caution is necessary when any heating unit is used by or near children orthe physically impaired and whenever the heater is left operating and unattended.DO NOT place objects on top of the fireplace.Always unplug the heating unit when not in use.DO NOT operate any heater with a damaged cord or plug or after the heatermalfunctions, has been dropped or damaged in any manner. Discard heater, or returnto authorized service facility for examination and/or repair.DO NOT use outdoors.This heating unit is not intended for use in bathrooms, laundry areas and similar indoorlocations. NEVER locate heating unit where it may fall into a bathtub or other watercontainer.DO NOT run cord under carpeting. DO NOT cover cord with throw rugs, runners, orsimilar coverings. DO NOT route cord under furniture or appliances. Arrange cordaway from traffic area and where it will not be tripped over.To prevent overloading a circuit, DO NOT plug the heater into a circuit that is alreadysupplying power to other appliances.DO NOT plug this heating unit into power strips or surge protectors.To disconnect heater, turn controls to off, then remove plug from outlet.DO NOT insert or allow foreign objects to enter any ventilation or exhaust openingsas this may cause an electrical shock, fire or damage to the heater.To prevent a possible fire, do not block air intakes or exhaust in any manner. DO NOTuse on soft surfaces, like a bed, where openings may become blocked.A heating unit has hot and arcing parts inside. DO NOT use it in areas wheregasoline, paint or other flammable liquids are used or stored.
DO NOT modify this heating unit. Use it only as described in this manual. Any otheruse not recommended by the manufacturer may cause fire, electrical shock or injury.The output air may vary in temperature. At times the air may become intense enoughto burn exposed skin. Use of this heating unit is not recommended for persons withreduced sensitivity to heat or an inability to react to avoid burns.DO NOT burn wood or other materials in this fireplace.DO NOT strike fireplace glass.When transporting or storing the fireplace and cord, keep in a dry place, free fromexcessive vibration and store so as to avoid damage.This heater has a self-protection function. If the heater does not operate normally, toreset the heater, unplug the power cord from outlet for 15 minutes. Then plug thepower cord back in for reuse of the heater. Connect to properly grounded outlets only.SAVE THESE INSTRUCTIONS.SET UPPlace the heating unit on a firm, level surface free of obstructions and at least 3 ft.(0.9 m) away from any combustible materials. DO NOT use on an unstable surfacesuch as bedding or deep carpeting.OPERATIONThis section will explain the function of each convenient control.INSTRUCTIONSConnect to 3-PRONG OUTLET ONLY. This heater is for use on 120 volts. The cord hasa 3-prong plug as shown in figure A. If you have a 2-slot outlet as shown in figure B, please DONOT use a 2-slot to 3-prong adapter plug as shown in figure D. Have a licensed electricianreplace your 2-slot outlet with a 3-prong grounded outlet shown in figure C. Or, replace it witha 3-prong Ground Fault Circuit Interrupter (GFCI) with the label "No Equipment Ground" asshown in figure E. DO NOT PLUG INTO LOOSE FITTING OUTLET. DO NOT ATTEMPTTO MODIFY THIS PLUG OR DEFEAT THIS SAFETY FEATURE IN ANY WAY.NOYESfigure Afigure BFireplace 3-ProngPlug HeadDO NOT use 2-slotOutlet with No Holefor Grounding Pinfigure CUse 3-ProngGrounded OutletGrounding Pinfigure DDO NOT use a2-slot to 3-Prongadapterfigure EUse 3-Prong Ground Fault CircuitInterrupter (GFCI) Outlet with Label"NO EQUIPMENT GROUND."The heater may emit a slight, harmless odor when first used. This odor is a normal conditioncaused by initial heating of internal heater parts and will not occur again.MAIN FIREPLACE CONTROL PANELThe fireplace main power control is located on the upper right hand corner of the glassfront.MAIN POWER/ON: The fireplace main power is on when it is plugged into the 3-prongoutlet/receptacle. Power is provided to the touch fireplace control panel on the upper righthand of glass front. The thermostat display will show the current room temperature. Fireplacewill return to factory default settings if unplugged or if power supply is interrupted.2
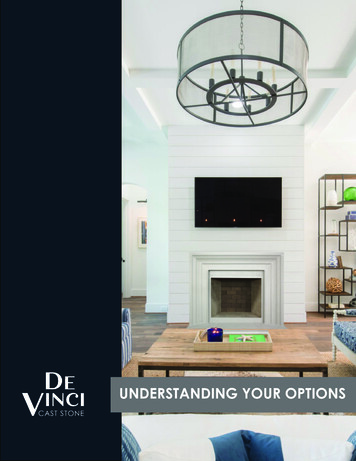
Touch Fireplace Control PanelThe Touch Fireplace Control Panel is located on the front upper right hand corner of the glass front.To locate the Touch Fireplace Control Panel refer to Figure F.F(Figure F)D(FANH28L46(HEATD NO HEAT) C HIGH, LOW) B(TIMERHOURS)AA – ON/OFF BUTTON: The fireplace on/off touch button supplies the main power to the fireplace.B – SLEEP TIMER BUTTON: The Sleep Timer automatically shuts off the fireplace heatat a preset time. There are five settings: 2 hours, 4 hours, 6 hours, 8 hours and no timelimit for continuous operation. The fireplace heat will automatically turn off when the timercompletes time limit setting. The Sleep Timer can be canceled at any time by pressing theSLEEP TIMER BUTTON repeatedly until the sleep timer displays “0” or off.C – HEATER HIGH/LOW/Fan/OFF MODE BUTTON: The heater High/Low/Fan/Offbutton is used to cycle through the heat mode settings. There are four settings: FlameOnly, High Heat, Low Heat and Fan with no heat.D – THERMOSTAT BUTTONS:DIGITAL THERMOSTAT: Your heater is equipped with a Digital Thermostat thatallows you to set your heater to your precise comfort level.SETTING THE DIGITAL THERMOSTAT:1. In both the High and Low Heat modes you may press the up or down buttons toreach your desired temperature.2. Once you have reached your desired temperature, the display will return to current roomtemperature and gradually increase until the room has reached the preset temperature.3. If the unit will not start in the digital thermostat mode*, please make sure the "settemperature" is higher than the current room temperature. *default temperature setting is 80 .NOTE: It is normal for the heater to cycle ON and OFF as it maintains the presettemperature. To prevent the unit from cycling, you need to raise the thermostatsetting. When the preset temperature is reached, the fan will run for 60 secondswithout heat. This cool down process ensures an accurate and consistenttemperature reading. If you unplug the heater, you will have to reset the digitalthermostat again by following the above instructions.Remote Control (optional product offering)Operation, Buttons and IndicatorsOn the first usage of the remote control, remove the battery tab. The receiver for theremote control is mounted behind the touch fireplacecontrol panel.BDE3A A. Power: Turns the unit On and OffB. Timer Hours: Automatically shuts off the Fireplaceheat at a preset time. There are five settings: 2 hours, 4 hours,6 hours, 8 hours and no time limit for continuous operation.The fireplace heat will automatically turn off when the timercompletes time limit setting. The timer can be cancelled at anytime by pressing the Timer Hours button repeatedly until theC sleep timer displays turn off.C. Heat High/Low/FAN/OFF: Is used to cycle through theheat mode setting. There are four settings: Flame Only, HighHeat, Low Heat and Fan with no heat. To cycle through the 4settings press the button to go to the next heat setting.D. Temperature Settings Up: Is used to turn up the
thermostat heat temperature. Press once to increase the temperature 1 . Unit can go up to88 . If continuous heating function is desired, press up button until "on" appears on digitalthermostat read out. Unit will stay in Heat-On override by using either High-, or Low-heatsetting. Disconnecting the unit from power source will reset back to default of 80 .E. Temperature Settings Down: Is used to turn down the thermostat heat temperature. Press once to decrease the temperature 1 . Unit can go down to 58 .CLEANINGCLEANING AND MAINTAINING THE HEATING INSERTAlways unplug the heater before cleaning and allow to cool. The heating insert can becleaned and maintained by following the simple steps listed here.CLEANING THE HOUSINGIt is ok to wipe down the heating insert with a water dampened cloth and mild soap. Refrainfrom using strong or abrasive cleansers. Periodically vacuum air intake vents on the back ofthe unit to remove any dust and/or lint which may interfere with fireplace operation.CLEANING THE GLASSA retail glass cleaner and a non-abrasive cloth should be used to clean all glass surfaces.Any other servicing should be performed by an authorized service representative.STORAGEWhen storing or moving your fireplace, always protect the unit from tipping, falling andimpacts that may damage the fireplace. Protect the unit from excessive moisture and dust.ELECTRICAL RATINGThis product is rated at 120Volt 1500 watts. ETLus Listed.For New Units1 YEAR LIMITED WARRANTYA. This 1 year limited warranty applies to replacement of product found to be defectivein material or workmanship. This warranty does not apply to damage resulting fromcommercial, abusive, unreasonable use or supplemental damage. Defects that are the resultof normal wear and tear will not be considered manufacturing defects under this warranty.HEAT SURGE IS NOT LIABLE FOR INCIDENTAL OR CONSEQUENTIAL DAMAGES OFANY NATURE. ANY IMPLIED WARRANTY OF MERCHANTABILITY OF FITNESS FOR APARTICULAR PURPOSE ON THIS PRODUCT IS LIMITED IN DURATION TO THE DURATIONOF THIS WARRANTY. Some jurisdictions do not allow exclusion or limitation of incidental orconsequential damages or limitations on how long an implied warranty lasts, so the abovelimitations or exclusions may not apply to you. This warranty gives you specific legal rights,and you may also have other rights which vary from jurisdiction to jurisdiction. This warrantyapplies only to the original purchaser of this product from the original date of purchase.B. At its option, Heat Surge will repair or replace this product if it is found to be defective in material orworkmanship. While within the warranty period, defective product may be returned to Heat Surge.C. This warranty does not cover damage resulting from any unauthorized attempts torepair or from any use not in accordance with the instruction manual.D. Please contact Heat Surge to obtain a return authorization number prior to returning unit.E. Please return unit in original packaging to avoid unnecessary delays and/or fees.CUSTOMER SATISFACTIONIf you experience a problem, please contact Heat Surge customer service at1-800-924-7964 or mail questions or comments to:Heat Surge Customer Satisfaction Dept. P.O. Box 9902 Canton, OH 447114
¡FELICITACIONES!Disfrute del calor y ambiente que proporciona su nueva y única chimenea eléctrica conconsumo eficiente de energía.Lea y guarde este manual del propietario que es breve y de fácil lectura.INSTRUCCIONES GENERALES. LEER ANTES DE USAR LA CHIMENEA. (Si utiliza esteproducto en un clima frío, desembale la chimenea y permita que la unidad de calefacción alcancela temperatura interior del sitio durante 12 horas antes del uso).INSTRUCCIONES IMPORTANTESADVERTENCIA GENERAL: Para reducir el riesgo de incendio, choque eléctrico y lesiones apersonas, cuando utilice aparatos eléctricos, deberá seguir las siguientes precauciones básicas:LEA TODAS LAS INSTRUCCIONES ANTES DE UTILIZAR LA UNIDAD DECALEFACCIÓN (EN LA LISTA DE ETLus).NO enchufe la unidad en un enchufe flojo. Revise de maneraperiódica que el enchufe/toma no estén flojos. Si el enchufe no entra de maneraajustada en la toma o si el enchufe se calienta demasiado, puede que seanecesario reemplazar la toma de corriente. Consulte con unelectricista capacitado para reemplazar la toma antes de usar la chimenea.NO la conecte en una toma de corriente que sea controlada por un interruptor de pared.Esta unidad cuenta con la Cool Touch Vent (persiana que no se calienta) patentada.Esta persiana está diseñada para mantener la parte frontal de la chimenea fría en elmodo de calefacción. Aun con esta persiana de avanzada, este calentador está calientecuando está en uso. Para evitar quemaduras, no permita que la piel sin protecciónentre en contacto con las superficies calientes. Si se incluyen, use las agarraderascuando mueva este calentador. Mantenga los materiales combustibles, talescomo muebles, almohadas, ropa de cama, papeles, ropa y cortinas por lo menos a 3pies (0.9 metros) de la parte frontal de este calentador y lejos de los lados y la parteposterior.Enchufe siempre los calentadores directamente en una toma de corriente/receptáculo de pared de 3 ranuras. Nunca los utilice con un cable de extensión,adaptador o fuente de corriente móvil (toma de corriente/regleta).Se requiere ejercer extrema precaución cuando cualquier unidad de calefacción estécerca de niños o personas con discapacidad física o sea utilizada por ellos y cuandoel calentador se deje en funcionamiento sin supervisión.NO coloque objetos sobre la chimenea.Desenchufe siempre la unidad de calefacción cuando no esté en uso.NO haga funcionar ninguna unidad de calefacción que tenga un cable o enchufedañado o luego de que la unidad falle, se haya dejado caer o resulte averiada decualquier otra forma. Deseche la unidad de calefacción, o envíela a un centro deservicio autorizado para que la examinen y/o reparen.NO utilice la unidad a la intemperie.Esta unidad de calefacción no se debe utilizar en baños, áreas de lavandería o sitiossimilares en interiores. NUNCA ubique la unidad de calefacción donde se puedacaer en una bañera u otra fuente de agua.NO coloque el cable bajo una alfombra. NO cubra el cable con alfombras de área,tapetes, ni otras cubiertas similares. NO coloque el cable bajo muebles o aparatoselectrodomésticos. Coloque el cable lejos de áreas de tránsito y en donde nadiepueda tropezar con él.Para evitar la sobrecarga del circuito, NO enchufe la unidad de calefacción en un5
circuito que ya suministra energía a otros electrodomésticos.NO enchufe esta unidad de calefacción en regletas o protectores de sobretensión.Para desconectar la unidad de calefacción, apague los controles y luego saque elenchufe del tomacorriente.NO introduzca ni permita que entren objetos extraños en las aberturas de ventilación oescape, ya que pueden producir choque eléctrico, incendios o daños a la unidad decalefacción.Para evitar un posible incendio, no bloquee las entradas de aire o escape de ningunamanera. NO utilice la unidad en superficies blandas, como una cama, donde lasaberturas se puedan obstruir.Una unidad de calefacción tiene partes calientes y de arco en el interior. NOla utilice en áreas donde se utiliza o almacena gasolina, pintura u otros líquidosinflamables.NO modifique esta unidad de calefacción. Utilícela solamente como se indica en estemanual. Cualquier otro uso no recomendado por el fabricante puede ocasionarincendios, choque eléctrico o lesiones.El aire que emana puede variar en temperatura. A veces, el aire puede estar tancaliente que puede quemar la piel expuesta. El uso de esta unidad de calefacciónno se recomienda para personas con sensibilidad reducida al calor o que no puedanreaccionar para evitar quemaduras.NO queme leña u otros materiales en esta chimenea.NO golpee el vidrio de la chimenea.Al transportar o almacenar la chimenea y el cable, mánténgalos en un sitio seco, librede vibraciones excesivas y guárdelos de manera tal que no se produzcandaños.Esta unidad de calefacción tiene una función de autoprotección. Si la unidad decalefacción no funciona normalmente, para volver a iniciar la calefacción, desenchufeel cable de corriente del tomacorriente durante 15 minutos. Luego vuelva a enchufarel cable de energía para volver a usar la unidad de calefacción. Solo se debenconectar en una toma de corriente debidamente conectada a tierra.GUARDE ESTAS INSTRUCCIONES.InstalaciónColoque la unidad de calefacción en una superficie firme y nivelada que esté libre deobstrucciones y por lo menos a 0.9 metros (3 pies) de materiales combustibles. NO lautilice en una superficie inestable, como una cama o alfombra gruesa.FuncionamientoEn esta sección se explica el funcionamiento de cada control de la unidad.INSTRUCCIONESCONECTAR SOLAMENTE EN UNA TOMA DE CORRIENTE DE 3 RANURAS. Estecalentador es para usarse con 120 voltios. El cable tiene un enchufe de 3 palas como semuestra en la figura A. Si tiene una toma de corriente de 2 ranuras como se muestra enla figura B, NO use un adaptador de 2 ranuras a 3 palas como se muestra en la figuraD. Solicite a un electricista capacitado que reemplace su toma de corriente de 2 ranurascon una toma de corriente con conexión a tierra de 3 palas como se muestra en la figuraC. También puede reemplazarla con un Interruptor de circuito por pérdida a tierra (GFCI)con la etiqueta "sin equipo de tierra", como se muestra en la figura E. NO ENCHUFE LAUNIDAD EN UNA TOMA DE CORRIENTE FLOJA. NO TRATE DE MODIFICAR ESTEENCHUFE O ANULAR ESTE DISPOSITIVO DE SEGURIDAD DE NINGUNA MANERA.6
NOYESfigura Cfigura BNO use unatoma decorriente de2 ranuras sinorificio para elpolo de tierrafigura ACabeza del enchufede 3 palas de lachimeneaUse una tomade corrientede 3 palas conconexión atierrafigura EPolo de tierrafigura DNO use unadaptadorde 2 ranurasa 3 palasUse una tomade corrientecon interruptorde circuitopor pérdida atierra (GFCI)con la etiqueta“SIN EQUIPODE TIERRA”.Esta unidad de calefacción puede emitir un leve olor inofensivo cuando se utiliza porprimera vez. Este olor es una condición normal producida por el calentamiento inicialde las piezas internas de la unidad y no se producirá de nuevo.PANEL DE CONTROL PRINCIPAL DE LA CHIMENEAEl panel de control principal de energía de la chimenea está ubicado en la esquinasuperior derecha de la parte delantera de vidrio.ENERGÍA PRINCIPAL/ENCENDIDA: La energía principal de la chimenea estáencendida cuando está enchufada en la toma de corriente/receptáculo de 3 ranuras.La energía es suministrada al panel de control táctil de la chimenea en la partesuperior derecha de la parte delantera de vidrio. La pantalla del termostato mostrará latemperatura ambiente actual. La chimenea regresará a la configuración de fábrica si sedesenchufa o se interrumpe el suministro de energía.Panel de control táctil de la chimeneaEl panel de control táctil de la chimenea está ubicado en la esquina superior derechade la parte delantera de vidrio de la unidad. Para ubicar el panel de control táctil de lachimenea, consulte la Figura F.F(FigurA F)D(VENTILADORD SIN CALOR) CH28L46(CALOR ALTO,(TIEMPOS DELBAJO)B TEMPORIZADOR AAUTOMÁTICO)A - BOTÓN DE ENCENDIDO/APAGADO: El botón táctil de encendido/apagado de launidad suministra la energía principal a la chimenea.B - BOTÓN DE TEMPORIZADOR DE APAGADO AUTOMÁTICO: El temporizadorde apagado automático apaga el calor de la chimenea una vez transcurrido unplazo preestablecido. Hay cinco posiciones: 2 horas, 4 horas, 6 horas, 8 horasy sin límite de tiempo para funcionamiento continuo. El calor de la chimenea seapagará automáticamente cuando el temporizador automático llegue al límite detiempo establecido en la configuración. El temporizador de apagado automáticose puede cancelar en cualquier momento presionando varias veces el BOTÓN DETEMPORIZADOR DE APAGADO AUTOMÁTICO hasta que el temporizador muestre "0"u “off” (apagado).C - BOTÓN DE MODO ALTO/BAJO/VENTILADOR/APAGADO DEL CALENTADOR: El botónHigh/Low/Fan/Off (alto/bajo/ventilador/apagado) del calentador se usa para recorrer el ciclo de losmodos de calor. Hay cuatro posiciones: Solo llama, calor alto , calor bajo y ventilador sin calentador.7
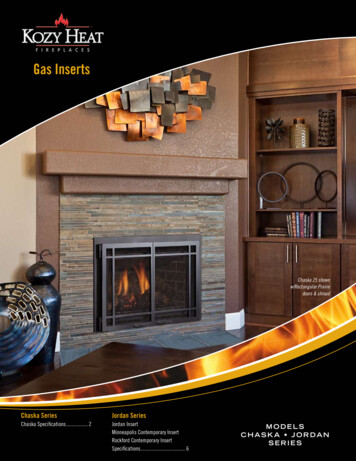
D - BOTONES DEL TERMOSTATO:TERMOSTATO DIGITAL: Su unidad de calefacción está equipada con untermostato digital que le permite configurarla al nivel de comodidad exactoque desee.CÓMO FIJAR EL TERMOSTATO DIGITAL:1. Tanto en el modo alto como en el bajo puede presionar los botones de subir obajar para alcanzar la temperatura deseada.2. Una vez que llegue a la temperatura deseada, la pantalla volverá a la temperaturaambiente actual y aumentará gradualmente hasta que la habitación haya alcanzadola temperatura preestablecida.3. Si la unidad no se enciende en el modo de termostato digital*, asegúrese de que la"temperatura fijada" sea superior a la temperatura ambiente actual. *La temperaturapredeterminada es de 27 C (80 F).NOTA: Es normal que la unidad se encienda y se apague mientras mantienela temperatura preestablecida. Para evitar que la unidad se apague y se vuelva aencender, debe aumentar la configuración del termostato. Cuando se alcance latemperatura preestablecida, el ventilador funcionará durante 60 minutos sin calor.Este proceso de enfriamiento garantiza una lectura de temperatura precisa yuniforme. Si desenchufa la unidad de calefacción, deberá restablecer el termostatodigital nuevamente siguiendo las instrucciones anteriores.Control Remoto (oferta de producto opcional)Funcionamiento, botones e indicadoresAntes de usar el control remoto, quite la lengüeta de las pilas. El receptor para el controlremoto se encuentra detrás del tablero de control, dentro de la chimenea.A. Encendido (Power): Enciende y apaga la unidad.BADCEB. TIEMPOS DEL TEMPORIZADOR AUTOMÁTICO:Apaga automáticamente el calor de la chimenea aun tiempo preestablecido. Hay cinco posiciones:2 horas, 4 horas, 6 horas, 8 horas y sin límite detiempo para funcionamiento continuo. El calor de lachimenea se apagará automáticamente cuando eltemporizador automático llegue al límite de tiempoestablecido en la configuración. El temporizadorautomático se puede cancelar en cualquiermomento presionando varias veces el botón dehoras del temporizador hasta que las pantallas deltemporizador se apaguen.C. Calor alto/bajo/Ventilador/APAGADO:Se usa para recorrer el ciclo de los modos de calor.Hay cuatro posiciones: solo llama, calor alto , calorbajo y ventilador sin calentador. Para pasar por las 4configuraciones de calor, presione el botón para ir a la siguiente configuración.D. AUMENTO DE LA CONFIGURACIÓN DE TEMPERATURA : Se usa paraaumentar la temperatura del calor del termostato. Presiónelo una vez para aumentarla temperatura 1 . La unidad puede llegar hasta los 31 C (88 F). Si se desea la funciónde calor continuo, pulse el botón hacia arriba hasta que aparezca "on" en la lectura deltermostato digital. La unidad permanecerá en el modo de invalidación de calor usandola configuración de calor alto o calor bajo. La desconexión de la unidad de la fuente deenergía restablecerá los valores predeterminados de 27 C (80 F).E. Disminución de la configuración de temperatura: Se usa paradisminuir la temperatura del calor del termostato. Presiónelo una vez para disminuir la8
temperatura 1 . La unidad baja hasta los 14 C (58 F).LIMPIEZALIMPIEZA Y MANTENIMIENTO DE LA PIEZA INSERTABLE DE CALEFACCIÓNDesenchufe siempre la unidad de calefacción antes de limpiarla y deje que se enfríe.La pieza insertable de calefacción se puede limpiar y mantener siguiendo los sencillospasos que se enumeran a continuación:LIMPIEZA DEL ALOJAMIENTOSe puede limpiar la unidad de calefacción con un paño húmedo y jabón suave. Evite usarlimpiadores fuertes o abrasivos. Periódicamente aspire la parte de atrás de la unidad,también la parte donde sale el aire, para que no interfiera con el funcionamiento de lachimenea.LIMPIEZA DEL VIDRIOSe debe utilizar un limpiador para vidrios comercial y un paño no abrasivo para limpiar todaslas superficies de vidrio.Cualquier otro servicio debe realizarse por personal autorizado.ALMACENAMIENTOAl almacenar o trasladar la chimenea, siempre proteja la unidad para que no se voltee, caigao se dé golpes que la puedan dañar. Proteja la unidad de la humedad y polvo excesivos.CLASIFICACIÓN ELÉCTRICAEste producto está clasificado para 120 voltios y 1500 vatios. Se encuentra en la lista deETLus.Para las Nuevas UnidadesGARANTÍA LIMITADA POR 1 AÑOA. Esta garantía limitada por 1 año cubre el reemplazo del producto que presentedefectos en los materiales o mano de obra. Esta garantía no cubre daños queresulten del uso comercial, no razonable o abuso, o daños suplementales. Losdefectos que se presenten que sean el resultado del uso y desgaste normal nose considerarán defectos de fabricación cubiertos por esta garantía. HEAT SURGENO SE RESPONSABILIZ A POR DAÑOS INCIDENTALES O CONSECUENTESDE NINGUNA NATURALEZA. CUALQUIER GARANTÍA DE COMERCIABILIDAD OIDONEIDAD PARA UN FIN ESPECÍFICO SOBRE ESTE PRODUCTO ESTÁ LIMITADA ALA DURACIÓN DE ESTA GARANTÍA. Algunas jurisdicciones no permiten la exclusióno limitación de daños incidentales o consecuentes o limitaciones sobre la duraciónde las garantías implícitas, así que las limitaciones o exclusiones anteriores puedenno corresponder en su caso. Esta garantía le otorga derechos legales específicos ypuede tener otros derechos que varían de jurisdicción en jurisdicción. Esta garantíasolo se otorga al comprador original de este producto a partir de la fecha original dela compra.B. Heat Surge se reserva el derecho de decidir si reparará o reemplazará este producto si9
presenta defectos en los materiales o mano de obra. Mientras la garantía esté vigente, losproductos defectuosos se pueden devolver a Heat Surge.C. Esta garantía no cubre daños que resulten de intentos de reparaciones no autorizadaso del uso que no esté estipulado en este manual de instrucciones.D. Sírvase contactar a Heat Surge para obtener el número de autorización de retornoantes de devolver la unidad.E. Devuelva la unidad en su embalaje original para evitar demoras y/o cargos innecesarios.SATISFACCIÓN DEL CLIENTESi usted tiene algun problema, por favor contacte al servicio al cliente de Heat Surge al1-800-924-7964 o envíe por correo sus preguntas y opiniones a:Heat SurgeCustomer Satisfaction Dept.P.O. Box 9902Canton, OH 44711, EE. UU.10
P.O. Box 9902 Canton, OH 44711www.HeatSurge.comn 2017 HS B4593A BR19694R-2
B. at its option, Heat Surge will repair or replace this product if it is found to be defective in material or . Heat Surge Customer Satisfaction Dept. P.O. Box 9902 Canton, OH 44711 thermostat heat temperature. Press once to increase the temperature 1 . Unit can go up to