Transcription
QIES USER MAINTENANCE APPLICATIONUSER’S GUIDEPrepared forDepartment of Health and Human ServicesCenters for Medicare & Medicaid Services7500 Security Boulevard, Building S2-11-07Baltimore, Maryland 21244
Table of ContentsINTRODUCTION . 3ACCESSING THE SYSTEM . 4MENU BAR. 8USER PROFILE . 9USER INFORMATION TAB .10CHANGING USER INFORMATION .11SECURITY QUESTIONS TAB .12CHANGING SECURITY QUESTION RESPONSES .16PASSWORDS .20FORGOTTEN PASSWORD OR INACTIVE ACCOUNT .20UPDATE EXPIRED PASSWORD .25CHANGE PASSWORD.27HELP .30LOGOUT .3007/2015 v1.00QIES User Maintenance ApplicationUser’s Guide2
INTRODUCTIONThe Quality Improvement Evaluation System (QIES) User Maintenanceapplication was created in response to an identified need for enhancedsecurity in the QIES national systems that included individual, rather thanfacility-identified user IDs, and stricter password requirements.With the QIES User Maintenance application (QUMA), QIES users set uptheir own user profiles and security information and can perform self-serviceaccount reset functions in the event of a forgotten password or an inactiveaccount.This user’s guide provides information and instructions pertaining to the QIESUser Maintenance application.07/2015 v1.00QIES User Maintenance ApplicationUser’s Guide3
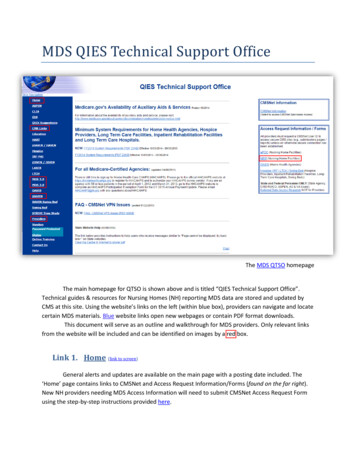
ACCESSING THE SYSTEMA link to the QIES User Maintenance application is readily accessible to QIESusers at the following locations: QIES to Success web site (Figure 1)Welcome to the CMS QIES Systems for Providers page (Figure 2)Figure 1. QIES to Success Web Site Home Page07/2015 v1.00QIES User Maintenance ApplicationUser’s Guide4
Figure 2. Welcome to the CMS QIES Systems for Providers Page (MDSExample)To access the QIES User Maintenance application:1.Select the link to the QIES User Maintenance Application from one of thepages listed above, the QIES National System Login page for QIESUser Maintenance (Figure 3) is presented.Figure 3. QIES User Maintenance Application Login Page07/2015 v1.00QIES User Maintenance ApplicationUser’s Guide5
NOTE: Persons using the JAWS screen reader must start the JAWSapplication prior to accessing the QIES User Maintenance Login page inorder to maintain password privacy.The following shortcut keys are available for elements of the QIES UserMaintenance Login page:Alt uAlt wAlt g2.User ID fieldPassword fieldLogin buttonEnter your user ID and password, and select the Login button.The system responds with a pop-up box (Figure 4) informing you in howmany days your password will expire.Figure 4. Password Expiration Days Notice3.Select the OK button.The QIES User Maintenance Password Update page (Figure 5) ispresented.07/2015 v1.00QIES User Maintenance ApplicationUser’s Guide6
Figure 5. QIES User Maintenance Password Update PageNOTE: After 12 minutes with no interaction with the server, a pop-up dialogbox warns you that your online session will timeout in 3 minutes and asks ifyou would like to extend it. Select the OK button to extend your session.After 15 minutes of inactivity you are logged out of QIES User Maintenanceand must log in with your user ID and password in order to use the QIES UserMaintenance application once again.Every page of the QIES Maintenance application includes the followingconstants: The CMS logo and the title of the application, QIES User Maintenance,span the topA Skip Navigation Links link – to the far-right, under the CMS logo and theapplication titleThe Skip Navigation Links link allows users utilizing assistive readers tobypass the menu bar items, moving focus to the main body of the page.The keyboard shortcut to quickly bring focus to the Skip Navigation Linkslink is Alt n. Once in focus, press Enter to activate the link. The QIES User Maintenance menu bar – under the Skip Navigation LinkslinkThe QIES User Maintenance menu bar provides access to thefunctionality of the QIES User Maintenance application.07/2015 v1.00QIES User Maintenance ApplicationUser’s Guide7
MENU BARThe QIES User Maintenance menu bar includes the following items. Theremainder of this guide describes the functionality of these items. Password UpdateUser ProfileHelpLogoutThe following shortcut keys bring focus to items on the QIES UserMaintenance menu bar:Alt 1Alt uAlt pAlt oPassword Update pageUser Profile pageHelp pageLogoutWith focus on one of these items, press the Enter key to access the page oractivate the function.NOTE: Shortcut keys utilizing numbers function only with the numeric keysalong the top of the keyboard. They do not function with the numeric keys inthe “10-key” pad of the keyboard.07/2015 v1.00QIES User Maintenance ApplicationUser’s Guide8
USER PROFILEThe QIES User Maintenance application allows you to establish and maintaina user profile that includes basic information about you, as well as a set ofsecurity questions for you to use in the event you forget your password oryour account must to be reset due to lack of use.NOTE: The first time you access the QIES User Maintenance application,you should complete your user profile.To access the QIES User Maintenance User Profile page, select the UserProfile item (Figure 6) from the menu bar.Figure 6. User Profile Menu Bar ItemThe QIES User Maintenance User Profile page (Figure 7) is presented.07/2015 v1.00QIES User Maintenance ApplicationUser’s Guide9
Figure 7. QIES User Profile PageA user profile is maintained on two tabs of the User Profile page: User InformationSecurity QuestionsUser Information TabWhen you access the User Profile page, the User Information tab (Figure 10)is presented by default. The User Information tab contains fields for thefollowing user information. All fields are required. First nameLast namePhone numberE-mail addressNOTE: If you are a new user or a user who has not yet completed your userprofile, the fields on the User Information tab are empty. If you previouslyprovided your user profile information, that information is displayed in thefields on the User Information tab.Please ensure that your e-mail address is correct. The self-service forgottenpassword/inactive account reset feature of the QIES User Maintenanceapplication requires your current, valid e-mail address.Additionally, for users associated with providers, the User Information tabprovides a Do Not Share Email checkbox. Check this box if you prefer thatyour e-mail address is not shared with State agencies.07/2015 v1.00QIES User Maintenance ApplicationUser’s Guide10
If you have not already completed your user profile, please provide therequested information and select the Save button.The system responds with a pop-up box (Figure 8) indicating that your userinformation was successfully updated.Figure 8. User Information Successful Update NoticeSelect the OK button.A message on the User Profile page (Figure 9) also confirms that your userinformation was successfully updated:Figure 9. User Information Update Confirmation MessageChanging User InformationIf, at any time you wish to change your user information, you may update oneor more fields on the User Information tab of the User Profile page.To modify your user information:1.07/2015 v1.00Select the User Profile item on the QIES User Maintenance menu bar.QIES User Maintenance ApplicationUser’s Guide11
2.Make changes to the appropriate fields on the User Information tab.NOTE: If you make an error while editing your user information or wish toview the previously saved user information, you may select the Reset buttonto discard all new entries.3.Select the Save button.Security Questions TabThe QIES User Maintenance application includes a self-service feature thatyou may use in the event you forget your password or your account wasinactivated due to lack of use. In addition to your e-mail address, this selfservice feature relies upon three security questions for which you pre-definedthe answers.These security questions are found on the Security Questions tab (Figure 10)of the User Profile page.NOTE: If the Security Question tab is not completed, you cannot use the selfservice feature of the system to reset your account and/or password yourself.Figure 10. Security Questions Tab07/2015 v1.00QIES User Maintenance ApplicationUser’s Guide12
The first time you access the Security Questions tab (Figure 11), the fieldsare empty.Figure 11. User Profile Page – Security Questions TabTo establish answers to the security questions:1.Enter and re-enter your response for each of the three (3) securityquestions.NOTE: Answers to the questions must be three (3) or more characters inlength. You can use letters, numbers, special characters, and spaces. Thevalues are not case-sensitive.07/2015 v1.00QIES User Maintenance ApplicationUser’s Guide13
NOTE: For security purposes, your answers to the security questions aremasked with a solid black circle. Because you cannot visually review youranswers, “Re-enter” fields are provided for each. The system verifies thatyour answer to each security question matches the answer you entered intothe associated “Re-enter” field.2.Select the Save button.The system responds with a pop-up box (Figure 12) indicating that yoursecurity question answers were successfully saved.Figure 12. Security Question Answers Successful Save Notice3.Select the OK button.A message on the User Profile page (Figure 13) also confirms that yoursecurity question answers were successfully saved.07/2015 v1.00QIES User Maintenance ApplicationUser’s Guide14
Figure 13. Security Question Answers Saved Confirmation Message07/2015 v1.00QIES User Maintenance ApplicationUser’s Guide15
Changing Security Question ResponsesIf, at any time, you wish to modify one or more answers to your securityquestions:1.Access the Security Questions tab (Figure 14) of the User Profile page.Figure 14. User Profile – Security Questions Tab2.07/2015 v1.00Select the Edit checkbox(es) (Figure 12) associated with the question(s)you wish to change.QIES User Maintenance ApplicationUser’s Guide16
Figure 15. Security Question Edit CheckboxFor each question you selected the Edit checkbox, the system clears theanswer field and provides a Re-enter Answer field (Figure 16).07/2015 v1.00QIES User Maintenance ApplicationUser’s Guide17
Figure 16. Security Question Answer Ready to Edit3.For each question you selected to edit, enter your new response to thequestion and re-enter the same response in the Re-enter Answer field.NOTE: If you make an error while editing a response, you may select theReset button to discard all new entries.4.Select the Save button to save your changes.The system responds with a pop-up box (Figure 17) indicating that yoursecurity question answers were successfully saved.07/2015 v1.00QIES User Maintenance ApplicationUser’s Guide18
Figure 17. Security Question Answers Successful Save Notice5.Select the OK button.A message on the User Profile page also confirms that your securityquestion answers were successfully saved.07/2015 v1.00QIES User Maintenance ApplicationUser’s Guide19
PASSWORDSThe following rules govern the use of passwords that access QIES systems: QIES passwords are assigned to individuals and must not be shared.A password for QIES National application is valid only for 60 days. After60 days, your password expires and the next time you attempt to log in toa QIES system, you must change your password before access isgranted.If you do not log in with a valid password to a QIES system for 90 days,the status of your user account is changed to Inactive and subsequentattempts to access a QIES system is denied.The QIES User Maintenance application includes a self-service feature thatyou may use in the event you forget your password or you need to reactivatean inactive account. This self-service feature relies upon your e-mail addressand three security questions for which you pre-defined the answers.Forgotten Password or Inactive AccountYou can use the QIES User Maintenance application to: Reset a forgotten password.Reactivate an inactive account.To reset your password or reactive your inactive account:1.07/2015 v1.00On the QIES National System Login page for QIES User Maintenance,select the Forgot your password or Inactive Account? link (Figure 18).QIES User Maintenance ApplicationUser’s Guide20
Figure 18. Forgotten Password/Inactive Account LinkThe system requests your user ID (Figure 19) and challenges you withthree security questions to answer.Figure 19. Security Questions2.07/2015 v1.00Enter your user ID and responses to all three security questions andselect the Login button.QIES User Maintenance ApplicationUser’s Guide21
NOTE: You are allowed three attempts to enter the correct responses to thesecurity questions associated with the user ID you specified. If you do notanswer correctly, the security questions are locked. Contact the QTSO HelpDesk at 1-800-339-9313 for assistance with your account.If you answer all of the security questions correctly, the system displays amessage (Figure 20) indicating that an activation key has been sent to thee-mail address associated with your account. The page now includes anEnter The Activation Key field.Figure 20. Activation Key Response3.Access your e-mail account and open the e-mail message (Figure 21)from info@qtso.com.Figure 21. Activation Key E-mail07/2015 v1.00QIES User Maintenance ApplicationUser’s Guide22
4.Highlight and copy [Ctrl c] the Activation Key. When you copy theActivation Key, ensure that you do not include any blank spaces followingthe last character of the key.5.Return to the QIES User Maintenance Login page and paste [Ctrl v]the Activation Key into the Enter The Activation Key field. Re-enter youruser ID and responses to the three security questions in the appropriatefields and select the Login button.The system responds with a pop-up box (Figure 22) informing you in howmany days your current password will expire.Figure 22. Password Expiration Days Pop-Up Notice6.Select the OK button.The Password Update page (Figure 23) is presented.07/2015 v1.00QIES User Maintenance ApplicationUser’s Guide23
Figure 23. Password Update Page7.Enter and re-enter your new password.NOTE: Select the Show link to display a complete list of password rules.8.Select the Update button.The system responds with a pop-up box (Figure 24) indicating that yourpassword was successfully updated.Figure 24. Password Successful Update Notice9.Select the OK button.A message on the Password Update page (Figure 254) also confirmsthat your password was successfully updated.07/2015 v1.00QIES User Maintenance ApplicationUser’s Guide24
Figure 25. Password Update Confirmation MessageUpdate Expired PasswordPasswords to QIES national applications expire every 60 days. When youattempt to log in to a QIES national application with an expired password, thesystem redirects you to the QIES User Maintenance Password Update page(Figure 26) and displays the message “Your password has expired. Pleasechange it now.”Figure 26. Password Update Page – Your Password Has Expired07/2015 v1.00QIES User Maintenance ApplicationUser’s Guide25
NOTE: If you have not previously established answers to the QIES UserMaintenance application security questions, you are redirected to the SecurityQuestions tab of the User Profile page when you attempt to log in to a QIESnational system with an expired password. To proceed, provide yourresponses to those questions. Refer to the Security Questions section of thisguide for more information.To change your password:1. Enter the following on the Password Update page:Your current password in the Current Password fieldA new password in the New Password fieldThe same new password in the Re-Enter Password field.NOTE: Select the Show link to display a complete list of password rules.2.Select the Update button.The system responds with a pop-up box (Figure 27) indicating that yourpassword was successfully updated.Figure 27. Password Successful Update Notice3.Select the OK button.A message on the Password Update page (Figure 28) also confirms thatyour password was successfully updated. A link to the original applicationinto which you were attempting to log in is provided.07/2015 v1.00QIES User Maintenance ApplicationUser’s Guide26
Figure 28. Password Update Confirmation Message with Return Link4.Select the link to return to the application.You are successfully logged in to the original QIES national application youwere attempting to access.Change PasswordYou can use the QIES User Maintenance application to change yourpassword at any time.To change your password:1.Log in to the QIES User Maintenance application (Refer to the Accessingthe System section of this guide).The QIES User Maintenance Password Update page (Figure 29) ispresented upon completion of a successful login.07/2015 v1.00QIES User Maintenance ApplicationUser’s Guide27
Figure 29. QIES User Maintenance Password Update Page2.Enter your current password in the Current Password field.3.Enter a new password in the New Password field.4.Enter the same new password in the Re-enter Password field.NOTE: Select the Show link to display a complete list of password rules.5.Select the Update button.The system responds with a pop-up box (Figure 30) indicating that yourpassword was successfully updated.Figure 30. Password Successful Update Notice07/2015 v1.00QIES User Maintenance ApplicationUser’s Guide28
6.Select the OK button.A message on the Password Update page also confirms that yourpassword was successfully updated.NOTE: You are allowed to update your password once each day.07/2015 v1.00QIES User Maintenance ApplicationUser’s Guide29
HELPSelect the Help item on the QIES User Maintenance menu bar to access theHelp options that are available to you. The system presents links for thefollowing: Accessibility PolicyContact UsPrivacy PolicyLOGOUTTo log out of the QIES User Maintenance application, select the Logout itemon the menu bar.07/2015 v1.00QIES User Maintenance ApplicationUser’s Guide30
07/2015 v1.00 QIES User Maintenance Application 7 User's Guide . Figure 5. QIES User Maintenance Password Update Page . NOTE: After 12 minutes with no interaction with the server, a pop-up dialog