Transcription
Chair Design with Fusion 360: Step-by-Step GuideSkill level: AdvancedAUTODESK EDUCATION Chair Design in Fusion 3601
Table of ContentsForeword .3Hands-on Exercises .4Lessons .4 Lesson 1: Working with existing design data .5Objectives: .5Exercise 1a: Import a neutral format file .5Exercise 1.b: Insert converted data into a Design.6Exercise 1.c: Create a concept using a T-Spline Plane .6 Lesson 2: Creating an open body concept from a closed primitive .8Objectives: .8Exercise 2.a: Create a T-Spline Quadball. .8Exercise 2.b: Edit the Body. .8Exercise 2.c: Thicken the Body. .9Exercise 2.d: Connect the seat to the purchased frame. .9Review: . 10 Lesson 3: Exporting Data for 3D Printing . 11Objectives: . 11Exercise 3.a: Set options for .STL output. 11Review: . 112Foreword AUTODESK EDUCATION
ForewordAutodesk Fusion 360 works in the Cloud only installing a small localclient to improve performance.To use Fusion 360 you will need an Autodesk ID. As a Student orEducator, you can obtain an Autodesk ID and the Fusion 360 softwarefor free at www.autodesk.com/education. If you already have an ID notrelated to the Education Community it is still possible to obtain Fusion360 at no cost from fusion360.autodesk.com.Designs that you create will be saved on the Cloud in Autodesk 360 andorganized in Projects. These designs will be accesible from any systemwith Fusion 360 by logging in using your ID and can be shared with anyother user who has use of Fusion 360. As you create your designsFusion 360 will save versions and keep a record of your progress.The flexibility in operations to create models and the creativity that itenables will make Fusion different than any other design or CAD systemyou’ve used. Enjoy!AUTODESK EDUCATION Chair Design in Fusion 3603
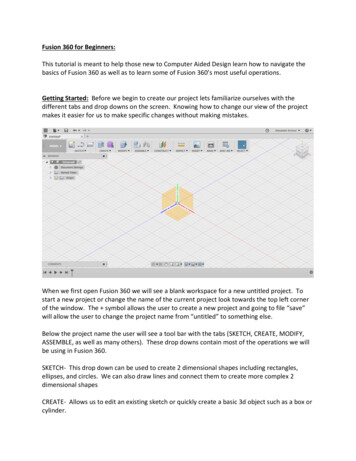
Hands-on ExercisesLessons Importing existing data into a design Creating an open body concept from a closed primitive Exporting data for 3D Printing4Hands-on Exercises AUTODESK EDUCATION
Lesson 1: Working with existing design dataObjectives: Import a neutral format fileInsert converted data into a designCreate a concept using a T-Spline PlaneNote: Before beginning this lesson download the ChairFrame ADV.stp file from the Digital SteamWorkshop page to a local disk.Exercise 1a: Import a neutral format file1. In the Data Panel click the Upload button and upload the ChairFrame ADV.stp file.Note: We do not want to edit this data as it is a model of a part that would be purchased and wemust work from the manufacturer’s data. Instead, we will incorporate it into a design and use it as areference.2. Select New Design in the file menu to create a new tab in Fusion 360 containing a new, emptydesign.AUTODESK EDUCATION Chair Design in Fusion 3605
Exercise 1.b: Insert converted data into a Design1. Click and drag the Chair Frame from the Data Panel into the new design window2. Once the data is converted to a component in the design you will be offered an opportunity toreposition it. Right-click and select OK to finish inserting the data.3. Find the new component in the Browser. Right-click on it and select Ground from the contextmenu to lock it in place.Exercise 1.c: Create a concept using a T-Spline Plane1. Right-click on the design component at the top of the browser and select New Component fromthe context menu.2. Give the new component a name and make it active.3. Create a work plane offset 10mm above one of the mounting padson the Chair Frame.4. Select Create Form from the Create panel of the browser.5. Once the Sculpt workspace is made active, expand the Create paneland select the Plane tool.6. Click on the new work plane to start laying out your T-Spline Plane. Figure 1 chairdesign advanced lesson 017. Rough in a size that is slightly wider than the chair frame, but03extends behind it.8. Use the manipulators to add several faces along the length but keep the number of faces acrossthe plane limited.9. Start the Edit Form tool and select several faces for edit by dragginga selection window from right to left over them. This will allow youto select by just making contact, rather than enveloping the faces.10. To edit the faces when the Triad appears, find the Reorient buttonon the side of the mini-toolbar and click it.11. Click on an edge next to the faces that you selected to edit.12. Click the Stop Reorient button which replaces the Reorient buttonFigure 2 on the mini-toolbar.chairdesign advanced lesson 013. Now that the Triad has been reoriented you can use it to bend,1 04scale or rotate the selected faces based on its location.14. Make a few changes to the model keeping in mind that we will bemaking an additional conceptual model in another exercise.15. When you are finished editing the body you can turn it off, or use theMove tool (Marking Menu) to relocate it and then turn it off.Ideally you want to use Components in the Browser to make it easy toiterate through many design options. You can also copy bodies to preserve6Lesson 1: Working with existing design data AUTODESK EDUCATIONFigure 3 chairdesign advanced lesson 01 05
one concept, while using its geometry as a starting point for another concept.Lesson 1: Working with existing design dataReview: Import a neutral format file Insert converted data into a Design Create a concept using a T-Spline PlaneAUTODESK EDUCATION Chair Design in Fusion 3607
Lesson 2: Creating an open body concept from a closedprimitiveObjectives: Create a T-Spline QuadballEdit the BodyThicken the BodyConnect the Seat to the purchased frameExercise 2.a: Create a T-Spline Quadball.1. If you are no longer in the Sculpt workspace, use Create Form to return toit.2. In the Sculpt workspace, expand the Create pull-down and click onQuadball.3. Select the YZ plane of the design to act as the base for the new body.4. It is recommended that you click the left or right face of the Viewcube to beable to see how the Quadball should be positioned above the chair frame.Figure 4 5. Click the screen a distance above the top of the frame. If your selectionchairdesign advanced lesproves to be too near or far from the frame, the body can be easily moved son 02 01to a preferable position.Exercise 2.b: Edit the Body.1. Once the Quadball is formed, use the Move tool from the Marking Menu toselect it and rotate it 30 to 45 degrees.2. Rotate your view so the view of the Quadball shows the edges on the side asbeing nearly vertical and horizontal, as they did before you rotated it.3. Use the crossing selection window (right to left) to select the faces of the tophalf of the Quadball.4. Delete the selected faces.5. Use Edit Form to make changes to the Body to suit your tastes.Figure 5 chairdesign advanced lesson 02 02Note: Keep in mind that your goal is to create a shape that is complex but can beproduced. The shape cannot fold onto itself.Figure 6 chairdesign advanced lesson 02 038Lesson 2: Creating an open body concept from a closed primitive AUTODESK EDUCATION
Exercise 2.c: Thicken the Body.1. Use the Thicken tool from the Modify pull-down to change the 2D TSpline to a 3D body. Use a thickness of 5mm and set the ThickenType to soft before clicking OK.2. Look closely at your model and use Move if need be to make surethat it is not intersecting with the chair frame. Move if necessary.3. Once the body is in the proper position, click the Finish Form tool inthe toolbar to convert the body to a solid, and exit the sculptFigure 7 workspace.chairdesign advanced lesson 02 04Exercise 2.d: Connect the seat to the purchased frame.1. Turn the body you created off in the browsers.2. Keep the current component active and start a new sketch on one ofthe mounting pads of the chair frame.3. Project the profiles of the pads into the sketch and add lines toconnect the two front pads together.4. Do the same for the rear pads.5. Finish the sketch and start the Extrude tool in the Create pull-down.6. Select the profiles and use the arrow to stretch the extrusion.Figure 8 7. Turn your seat body back on in the browser.chairdesign advanced lesson 02058. The display will update to show your extrusion cutting the seat.9. Switch the Extrusion Operation option to Join and set the extentsto All.10. When the view updates and generates the geometry, click OK tocreate the mounting system for the seat to the chair frame.Note: If you get no result or a warning, you might have to move thebody of the seat up or make sure it is wide enough to be mounted tothe chair frame.Figure 9 chairdesign advanced lesson 02 0611. Add fillets to smooth the edges where the extrusion meets theseat.12. Change the Appearance override to suit your style.AUTODESK EDUCATION Chair Design in Fusion 3609
Lesson 2 - Creating an open body concept from a closed primitiveReview: Create a T-Spline QuadballEdit the BodyThicken the BodyConnect the Seat to the purchased Frame10Lesson 2: Creating an open body concept from a closed primitive AUTODESK EDUCATION
Lesson 3: Exporting Data for 3D PrintingObjectives: Set options for .STL outputExercise 3.a: Set options for .STL output1. Right-click on the Body in the Browser and select Save as STL from thecontext menu.2. In the Save as STL dialog, click the checkbox to turn on Preview Mesh.3. Change the Refinement option to a couple of different options on the pulldown, finally selecting Custom.4. In the Refinement Options change the values for Surface Deviation,Figure 10 Normal Deviation, and Maximum Edge Length to see the effect that it has chairdesign advanced lesson 03 01on the number of triangles listed in the dialog.5. Click OK to open the Save STL dialog.6. Set a location for saving and a file name. Click Save to create the file.Lesson 3 – Exporting data for 3D printingFigure 11 chairdesign advanced lesson03 02Review: Set options for .STL outputAUTODESK EDUCATION Chair Design in Fusion 36011
with Fusion 360 by logging in using your ID and can be shared with any other user who has use of Fusion 360. As you create your designs Fusion 360 will save versions and keep a record of your progress. The flexibility in operations to create models and the creativity that it enables will make Fusion different than any other design or CAD system .