Transcription
PaperCut MF - Ricoh SmartSDK EmbeddedManualContents1Version history . 42Which version do I install? . 532.1Required panel . 52.2Application feature comparison . 5Overview . 73.13.1.1Consistency . 73.1.2Integration . 73.1.3Rate of development . 73.1.4Vendor neutrality . 73.1.5Security . 83.24The solution . 7Support. 8Installation . 94.1Supported models . 94.1.1Integrated Scanning . 94.2Requirements . 94.3Setup procedure . 94.3.1Enable external hardware integration . 94.3.2Verify administrator access via Ricoh Web Image Monitor . 104.3.3Configure the MFD via the Remote Operation Client . 104.3.4Configure the MFD without the Remote Operation Client, part 1 . 114.3.5Install the application. 134.3.6Start and configure the application . 134.3.7Configure the MFD without the Remote Operation Client, part 2 . 164.3.8Set up optional additional network security. 164.4Bypassing PaperCut MF . 165Upgrading to a newer version. 176Post-install testing. 176.1Test preparation. 176.2Test scenarios. 18
PaperCut MF - Ricoh SmartSDK Embedded Manual7Scenario 1: Standard copying. 186.2.2Scenario 2: Copying with account selection . 196.2.3Scenario 3: Print release . 21Configuration . 23Device details . 237.1.1Authentication methods . 237.1.2Tracking . 237.1.3Print release . 237.1.4Held print job settings at the device . 237.1.5Restricting color copying . 257.2Shared accounts . 257.2.17.3Shared account selection . 25Connection details . 26Advanced configuration . 278.1Config Editor . 278.2Customizing the application. 308.2.1Logo . 308.2.2Colors . 318.2.3Welcome text . 318.2.4Guest access button . 318.3Swipe card authentication . 318.3.1No conversion required . 328.3.2Regular expression filter . 328.3.3Format conversion . 328.492018-11-236.2.17.182.2.3Integrated Scanning . 348.4.1Scan prompt timeout . 348.4.2High-compression PDF . 348.4.3PDF Archive . 348.5Adaptable Authentication API (AAA) . 348.6ICE Print Cloud print jobs . 35Known limitations . 369.1Swipe cards and sleep mode. 369.2Connecting supported card readers . 369.3Zero stop . 369.4Duplex copy jobs with an odd number of pages are split into two jobs . 379.5Usernames . 37Copyright 2018 PaperCut Software International Pty. Ltd., All Rights Reserved.2 of 41
PaperCut MF - Ricoh SmartSDK Embedded Manual2.2.32018-11-239.6Integrated Scanning . 379.7ICE Print Cloud print job tracking . 379.8Language at the panel . 389.9Upgrading from 1.0.8 . 3810Troubleshooting and frequently asked questions . 3911Appendix: Supported authentication card readers . 41Copyright 2018 PaperCut Software International Pty. Ltd., All Rights Reserved.3 of 41
PaperCut MF - Ricoh SmartSDK Embedded Manual2.2.32018-11-231 Version historyPaperCut MF version or dateDetails23 November 20188.3 Swipe card authentication; 9.2 Connecting supported cardreaders18.2.02 Which version do I install?; 3 Overview; 4 Installation; 5Upgrading to a newer version; 6 Post-install testing; 7Configuration; 8 Advanced configurationCopyright 2018 PaperCut Software International Pty. Ltd., All Rights Reserved.4 of 41
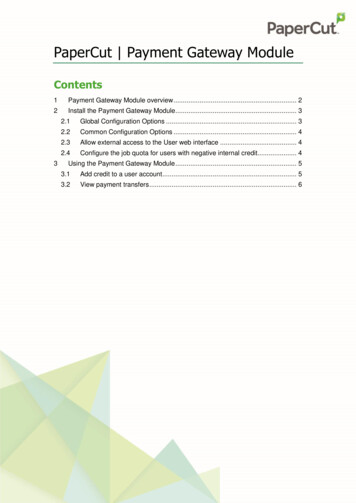
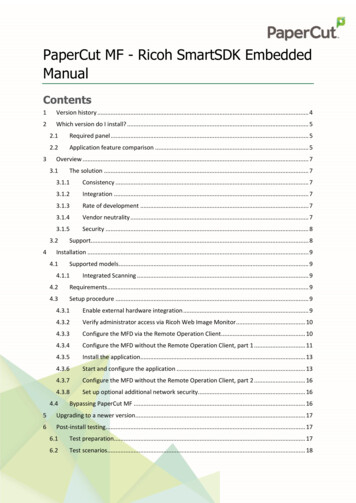
PaperCut MF - Ricoh SmartSDK Embedded Manual2.2.32018-11-232 Which version do I install?SDK/JSmartSDK2.1 Required panelPaperCut’s Ricoh SmartSDK application requires a device with a second-generation Smart OperationPanel. These panels run Android and have no hard keys (see Figure 1). If your device has a differentpanel, refer to the PaperCut MF - Ricoh SDK/J Embedded Manual to determine if your device meetsthe requirements of PaperCut’s Ricoh SDK/J application.Figure 1: Second-generation Smart Operation Panel2.2 Application feature comparisonIf your device has a second-generation Smart Operation Panel, refer to the following table to helpdetermine which application to install.Copyright 2018 PaperCut Software International Pty. Ltd., All Rights Reserved.5 of 41
PaperCut MF - Ricoh SmartSDK Embedded ManualFeatureIntegrate with GlobalScan NXTrack GlobalScan NX jobsMulti-select when releasing print jobsChange the settings of held print jobsTrack USB printingSupport external USB keyboardRun natively in AndroidZero stop for native scanning and faxingOffline mode2.2.32018-11-23SDK/JSmartSDK 1 2 3 41The application does not integrate with the GlobalScan NX SmartSDK application.2The application does not integrate with the GlobalScan NX SDK/J application.3If the user’s credit runs out while scanning or faxing, the user will be logged out when the job iscompleted.4Use a Site Server to minimize outages due to network failures.Copyright 2018 PaperCut Software International Pty. Ltd., All Rights Reserved.6 of 41
PaperCut MF - Ricoh SmartSDK Embedded Manual2.2.32018-11-233 OverviewThis manual provides an overview of the installation, configuration, and operation of PaperCut’sembedded software solution for Ricoh MFDs (Multi-Function Devices) with SmartSDK. For generaldocumentation on PaperCut MF see the PaperCut MF manual (also available as online help in thePaperCut MF Admin web interface).3.1 The solutionToday’s MFDs are smarter – they have touch screens and offer the ability to run applications directlyon the device. The goal of PaperCut’s embedded MFD solution is to leverage these smart devicesand to provide walk-up MFD users with the same set of rich application features provided in theprint control area. These include: Secure access to MFD functionsEnd-user authentication including integration with single sign-on environmentsMonitoring and control of photocopying (quotas, charging, allocation, and logging)Allocation of copying to accounts/departments/cost-centers/projects (shared accounts)Ability to locate shared accounts via select-from-list, keyword search or manual code/pinentry Release jobs from a hold/release queue (Secure & Find Me Printing) Tracking of scanning and faxing Changing and viewing the settings of held print jobs at the deviceHighlights of the embedded solution include: consistency, integration, rate of development, vendorneutrality and security.3.1.1 ConsistencyThe PaperCut software development team develops the embedded solutions in-house. This ensuresthat the copier interface is consistent with the workstation print interface, meaning users only needto learn one system.3.1.2 IntegrationPaperCut is a single integrated solution where print and copier control are both managed in the onesystem. Users have a single account and administrators have the same level of reporting andadministration for all services. The embedded solution interacts with the PaperCut MF ApplicationServer using a Service Oriented Architecture (SOA) and web-services-based protocols.3.1.3 Rate of developmentPaperCut is developed under a release-often policy where new features are made available to usersas soon as they are complete. Unlike hardware-based solutions, new versions can be delivered tousers regularly as software updates.3.1.4 Vendor neutralityPaperCut remains true to its vendor-neutral stance. All embedded solutions are equal and supportall server operating systems including Windows, Linux, and Mac.Copyright 2018 PaperCut Software International Pty. Ltd., All Rights Reserved.7 of 41
PaperCut MF - Ricoh SmartSDK Embedded Manual2.2.32018-11-233.1.5 SecurityA large percentage of PaperCut’s user base is in education environments where security isimportant. All embedded solutions are developed with security in mind. Where security objectivescan’t be satisfied, any known deficiencies are fully disclosed.3.2 SupportContact your reseller or Authorized Solution Center if you require assistance. You can find contactinformation on the About page in the PaperCut MF Admin web interface.Copyright 2018 PaperCut Software International Pty. Ltd., All Rights Reserved.8 of 41
PaperCut MF - Ricoh SmartSDK Embedded Manual2.2.32018-11-234 InstallationThis section covers the installation of the PaperCut MF embedded application for compatible RicohMFDs. The embedded application will allow the control, logging and monitoring of walk-up off-theglass copy, scan and fax usage and may serve as a release station for network prints (for informationon just tracking network printing see the PaperCut MF manual).4.1 Supported modelsPaperCut supports Ricoh MFDs with Embedded Software Architecture (ESA) SmartSDK version 2.10or later. For the latest list of supported models, see http://papercut.com/ricoh#supported.4.1.1 Integrated ScanningThe PaperCut embedded application includes Integrated Scanning, which you can optionally enableper MFD. Integrated Scanning is not available on wide-format models.4.2 RequirementsBefore installing the PaperCut embedded application on to the MFD, ensure that basic monitoring ofnetwork printing has been set up and tested for this MFD. The MFD should show up in the printerlist in the PaperCut MF Admin web interface and have a few print jobs in its print history.After that, ensure that the following points are checked off before getting started: The Ricoh MFD is listed as a supported model (see 4.1 Supported models).The version of the PaperCut MF Application Server is 18.0.1 or later.No applications are installed that use the custom authentication functionality provided byRicoh. Multiple custom authentication applications conflict with each other and causeunpredictable behavior.You have the following information available: the fully-qualified hostname or IP address of the PaperCut MF Application Server the network address of the MFD — a static IP address is recommendedA Ricoh technician might be needed to set system parameters (see 4.3.4.1 Configure customauthentication).Verify that firewalls or other network restrictions don’t prevent the MFD’s access to thePaperCut MF Application Server on its HTTPS port, and port 51443 for the Remote OperationClient.4.3 Setup procedureThis section describes installing PaperCut’s SmartSDK solution on compatible Ricoh MFDs.4.3.1 Enable external hardware integration1. Log in to the PaperCut MF Admin web interface (e.g. https://papercutserver:9192/admin) using a web browser.2. Navigate to Options Advanced and ensure Enable external hardwareintegration is selected.3. Click Apply.Copyright 2018 PaperCut Software International Pty. Ltd., All Rights Reserved.9 of 41
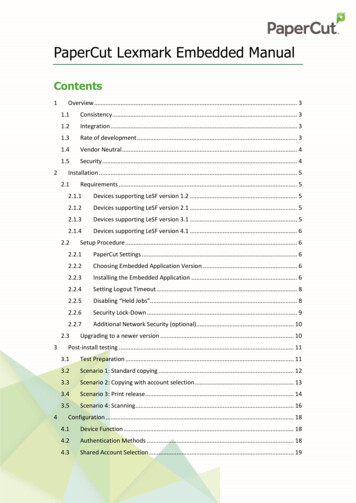
PaperCut MF - Ricoh SmartSDK Embedded Manual2.2.32018-11-234.3.2 Verify administrator access via Ricoh Web Image MonitorRicoh MFDs have an embedded web server that provides an alternate administration interface. Toverify administrator access via Ricoh Web Image Monitor:1.2.3.4.On a computer, open a web browser.Enter the URL of the Ricoh MFD, e.g. http://ricoh-device-ip/.At the top right of the page, click Login.Enter the MFD machine administrator username and password (default is admin with nopassword), then click Login.5. Select Device Management Configuration.4.3.3 Configure the MFD via the Remote Operation ClientThe Remote Operation Client is available to remotely manage your Ricoh MFDs and is installed withthe PaperCut MF Application Server.4.3.3.1Launch the Remote Operation ClientTo launch the Remote Operation Client:1. On the PaperCut MF Application Server, open the following directory: app-dir . Launch the Remote Operation Client:a. If in a Windows environment, open a command prompt with administratorprivileges and run remote-operation-client.batb. If in a UNIX environment, launch the terminal and run:sudo ./remote-operation-clientOnce launched, the window in Figure 2 will be displayed.Figure 2: Remote Operation ClientCopyright 2018 PaperCut Software International Pty. Ltd., All Rights Reserved.10 of 41
PaperCut MF - Ricoh SmartSDK Embedded Manual4.3.3.22.2.32018-11-23Add the required MFDBefore you can manage the MFD, add it to the Remote Operation Client.1. In the Remote Operation Client window, select File Add and specify the IP address orhostname and administrator credentials for the MFD, then click OK. Repeat for each MFD.2. Select the required MFDs in the list of devices.3. Right-click the list, then select Initialize to retrieve the details of the selected MFDs andconfirm they can be managed. If the device model and serial number are populated andthere are no errors in the output display, then the initialization was successful.4.3.3.3Configure the MFDTo configure the MFD to allow PaperCut MF to function properly, in the Remote Operation Client:1. Select the required MFDs in the list of devices.2. On the Configuration tab:a. Select Configure for SmartSDK.b. Click Run. This may take some time to complete. Once completed the output displayshows the line Successfully configured for SmartSDK for each selecteddevice.3. As there is some configuration that the Remote Operation Client is unable to perform, thefollowing configuration steps will need to be performed at the MFD or via Ricoh Web ImageMonitor:a. Step 2.b in 4.3.4.2 Configure permissionsb. All steps in 4.3.4.4 Configure inactivity detectionc. Steps 2 and 3 in 4.3.4.6 Configure control of usage, part 1If you have successfully completed the steps in this section, then proceed to section 4.3.5 Install theapplication, otherwise you may need to configure the MFD without the Remote Operation Client(see the next section).4.3.4 Configure the MFD without the Remote Operation Client, part 1You can also perform the MFD configuration required to allow PaperCut MF to function properly, atthe MFD or via Ricoh Web Image monitor instead of using the Remote Operation Client.4.3.4.1Configure custom authenticationCustom authentication settings allow PaperCut MF to be the authentication application.Set the system parameters as follows:Optional Counter Type, External Optional Counter Type 0Access Control, SDK Certification Device, bit 0 1MF KeyCard, Job Permit Setting 14.3.4.2Configure permissionsConfigure administrator and user permissions:1. Either at the MFD under User Tools System Settings Administrator Tools Administrator Authentication Management or via Ricoh Web Image Monitorunder Device Management Configuration AdministratorAuthentication Management, for each of User Management, Machine Management,Network Management and File Management:a. Set it to On.Copyright 2018 PaperCut Software International Pty. Ltd., All Rights Reserved.11 of 41
PaperCut MF - Ricoh SmartSDK Embedded Manual2.2.32018-11-23b. Select all available settings.2. Either at the MFD under User Tools System Settings Administrator Tools User Authentication Management, or via Ricoh Web Image Monitor under DeviceManagement Configuration User Authentication Management:a. Select Custom Authentication.b. Under Available Functions, deselect all Copier, Printer and OtherFunction(s).4.3.4.3Configure the address bookNew users are added to the address book when using device functions. The address book needs toremove the oldest user if it is full. Either at the MFD under User Tools System Settings Administrator Tools or via Ricoh Web Image Monitor under Device Management Address Book Maintenance, set Auto Delete User in Address Book to On.4.3.4.4Configure inactivity detectionConfigure inactivity detection either at the MFD under User Tools System Settings Timer Settings or via Ricoh Web Image Monitor under Device Management Configuration Timer:1. Use the System Auto Reset Timer to detect inactivity and log the user out. To avoidthe application going to the background when this timer elapses, also set the FunctionPriority to PaperCut MF (configured at the MFD under User Tools ScreenFeatures Screen Device Settings Function Priority).2. Disable the Auto Logout Timer. The user will be logged out when this timer elapses, butit is only active while using device functions or Integrated Scanning.Note that the user will also be logged out if the Sleep Timer elapses.4.3.4.5Configure the scannerConfigure the scanner to avoid it failing when its journal is full. Either at the MFD under UserTools Scanner Features General Settings or via Ricoh Web Image Monitor underDevice Management Configuration Scanner General Settings, set Print &Delete Scanner Journal to Do not Print: Delete Oldest.4.3.4.6Configure control of usage, part 1Configure control of printing and copying (part 1):1. Either at the MFD under User Tools System Settings Administrator Toolsor via Ricoh Web Image Monitor (Print Volume Use Limitation), set MachineAction When Limit Is Reached to Stop Job.2. Either at the MFD under User Tools System Settings Administrator Tools Print Volume Use Limitation: Unit Count Setting or via Ricoh Web ImageMonitor under Device Management Configuration Print Volume UseLimitation:a. Set Copier: Color to 0.b. Set Copier: Black & White to 0.c. Set Printer: Color to 0.d. Set Printer: Black & White to 0.3. At the MFD under User Tools System Settings Administrator Tools, setPrint Volume Use Limitation: Default Limit to 0.Copyright 2018 PaperCut Software International Pty. Ltd., All Rights Reserved.12 of 41
PaperCut MF - Ricoh SmartSDK Embedded Manual2.2.32018-11-23Part 2 of MFD configuration (see 4.3.7 Configure the MFD without the Remote Operation Client, part2) requires the application to be installed and configured, as well as a user logging in and usingdevice functions.4.3.5 Install the applicationTo install the PaperCut MF application in the Remote Operation Client:1. Select the required MFDs in the device list.2. On the Application tab:a. Select Install.b. Click the Browse button.c. Specify the embedded application ZIP file, located in app-dir \providers\hardware\ricoh\smartsdk.d. Click Run.4.3.6 Start and configure the applicationOnce the application is installed, it is ready to be started and configured at the MFD.The application can be started by either of the following methods:1. When the panel powers on or resumes from sleep mode, the PaperCut MF applicationautomatically launches (there may be a few seconds delay where the Ricoh home screen willstill be visible).2. After the PaperCut MF application has been added to the Ricoh home screen (see 4.3.6.2Add the application icon), you can launch it via the PaperCut MF icon.4.3.6.1Log in to the MFD as the machine administratorThe first time the PaperCut MF application runs, it will prompt for configuration information. Toaccess this configuration screen, you must be logged in to the MFD as the machine administrator. Ifyou are not logged in as the machine administrator, you will see the screen in Figure 3 whenPaperCut MF starts.Figure 3: Configure screen when not logged in as the machine administratorTo log in as the machine administrator:Copyright 2018 PaperCut Software International Pty. Ltd., All Rights Reserved.13 of 41
PaperCut MF - Ricoh SmartSDK Embedded Manual1.2.3.4.5.6.7.8.9.2.2.32018-11-23Press the home button on the panel to go to the Ricoh home screen.Press the User Tools icon to display the menu.Select Machine Features.On the User Tools screen, press the Login button.On the dialog, press Login.Enter the machine administrator username then press OK.Enter the password then press OK.On the User Tools screen, press the Exit button.To return to the Ricoh home screen, press either the back or home button to exit the UserTools menu.4.3.6.2Add the application iconWhile logged in as the machine administrator, add the application icon to the Ricoh home screen:1. Press the all apps icon from the home screen.Figure 4: All apps icon2. From the apps screen, press and hold the PaperCut MF icon until the screen switches tothe home screen.Figure 5: Adding the PaperCut MF icon3. Drag the icon to a place on the home screen, then release it to save the position.4.3.6.3Configure the applicationWhile logged in as the machine administrator, configure the application:1. Launch the PaperCut MF application from the home screen and it will prompt forconfiguration information: Device name — the unique name for the MFD as it will be registered in PaperCut MF.Server hostname/IP — the IP or network address of the PaperCut MF ApplicationServer.If using a hostname, make sure it is fully-qualified so it can be correctly resolved.Port — the port used to communicate with the PaperCut MF Application Server. Thisshould be the HTTPS port (9192 by default).Copyright 2018 PaperCut Software International Pty. Ltd., All Rights Reserved.14 of 41
PaperCut MF - Ricoh SmartSDK Embedded Manual2.2.32018-11-232. Press Save changes to save the new settings.The PaperCut MF application then attempts to connect to the PaperCut MF ApplicationServer.3. If you are asked whether you want to accept the server’s certificate, press Acceptcertificate if the SHA-1 fingerprint matches that of the server’s certificate. For steps onhow to view the server’s certificate, see the Troubleshooting SSL section of the PaperCut MFmanual.Once the application successfully connects, the login screen is displayed.Figure 6: Login screenThe MFD is displayed in the PaperCut MF Admin web interface under the External Device Listtab on the Devices page with the name you provided in the steps above. It will be created usingthe cost settings of the [Template printer].Figure 7: MFD appearing in the PaperCut MF Admin web interfaceThe embedded application is now successfully installed. To use the MFD, users must log in to theapplication, and any copying they perform is logged in PaperCut.Copyright 2018 PaperCut Software International Pty. Ltd., All Rights Reserved.15 of 41
PaperCut MF - Ricoh SmartSDK Embedded Manual2.2.32018-11-234.3.7 Configure the MFD without the Remote Operation Client, part 2This step is only required if the steps in section 4.3.3.3 Configure the MFD, have not successfullybeen performed. Before performing the following steps, you need to log in to the embeddedapplication as a PaperCut user, access device functions, and then log out.4.3.7.1Configure control of usage, part 2Either at the MFD under User Tools System Settings Administrator Tools Enhanced Print Volume Use Limitation or via Ricoh Web Image Monitor under DeviceManagement Configuration Print Volume Use Limitation:1. Set Tracking Permission to On.2. Set Stop Printing to On.4.3.8 Set up optional additional network securityThe MFD communicates with the PaperCut MF Application Server over the network (e.g. toauthenticate users or release print jobs). To provide an additional level of security, PaperCut can beconfigured to allow device connections only from a restricted range of network addresses. Thisensures that only approved devices are connected to the PaperCut MF Application Server.By default, PaperCut will allow device connections from any network address. To restrict this to asubset of IP addresses or subnets:1. Log in to the PaperCut MF Admin web interface at https:// papercu
Paperut's Ricoh SmartSDK application requires a device with a second-generation Smart Operation Panel. These panels run Android and have no hard keys (see Figure 1). If your device has a different panel, refer to the PaperCut MF - Ricoh SDK/J Embedded Manual to determine if your device meets the requirements of Paperut's Ricoh SDK/J .