Transcription
Getting Results GuideDoc ID 9399-RLD300GR-AUG00
Contacting Rockwell Technical Support Telephone—440-646-7800Software Technical Support Fax—440-646-7801World Wide Web—www.software.rockwell.comCopyright Notice 2000 Rockwell Software Inc. All rights reservedPrinted in the United States of AmericaPortions copyrighted by Allen-Bradley Company, Inc. and used with permission.This manual and any accompanying Rockwell Software products are copyrighted by RockwellSoftware Inc. Any reproduction and/or distribution without prior written consent from RockwellSoftware Inc. is strictly prohibited. Please refer to the license agreement for details.Trademark Notices WINtelligent Series is a registered trademark, and the Rockwell Software logo, RSAlarm, RSAnimator,RSAssistant, RSBatch, RSBreakerBox, RSButton, RSChart, RSCompare, RSControlRoom, RSData,RSDataPlayer, RSEventMaster, RSGuage, RSJunctionBox, RSLogix Emulate 5, RSLogix Emulate500, RSGuardian, RSHarmony, RSKeys, RSLadder, RSLadder 5, RSLadder 500, RSLinx, RSLogix 5,RSLogix 500, RSLogix 5000, RSLogix Frameworks, RSMailman, RSNetworx for ControlNet,RSNetworx for DeviceNet, RSPortal, RSPower, RSPowerCFG, RSPowerRUN, RSPowerTools,RSRules, RSServer32, RSServer, RSServer OPC Toolkit, RSSidewinderX, RSSlider, RSSnapshot,RSSql, RSToolbox, RSToolPak I, RSToolPak II, RSTools, RSTrainer, RSTrend, RSTune, RSVessel,RSView32, RSView, RSVisualLogix, RSWheel, RSWire, RSWorkbench, RSWorkshop, SoftLogix 5,A.I. Series, Advanced Interface (A.I.) Series, AdvanceDDE, ControlGuardian, ControlView,INTERCHANGE, Packed DDE, WINtelligent, WINtelligent LINX, WINtelligent LOGIC 5,WINtelligent VIEW, WINtelligent RECIPE, WINtelligent VISION, and WINtelligent VISION2 aretrademarks of Rockwell Software Inc.PLC, PLC-2, PLC-3 and PLC-5 are registered trademarks, and Data Highway Plus, DH , DHII, DTL,MicroLogix, Network DTL, PowerText, Pyramid Integrator, PanelBuilder, PanelView, PLC-5/250,PLC-5/20E, PLC-5/40E, PLC-5/80E, SLC, SLC 5/01, SLC 5/02, SLC 5/03, SLC 5/04, SLC 5/05, SLC500, and ControlLogix are trademarks of the Allen-Bradley Company, Inc.Microsoft, MS-DOS, Windows, and Visual Basic are registered trademarks, and Windows NT andMicrosoft Access are trademarks of the Microsoft Corporation.ControlNet is a trademark of ControlNet International.Ethernet is a registered trademark of Digital Equipment Corporation, Intel, and Xerox Corporation.IBM is a registered trademark of International Business Machines Corporation. AIX, PowerPC, PowerSeries, RISC System/6000 are trademarks of International Business Machines Corporation.UNIX is a registered trademark in the United States and other countries, licensed exclusively throughX/Open Company Limited.AutoCAD is a registered trademark of Autodesk, Inc.All other trademarks are the property of their respective holders and are hereby acknowledged.Warranty This Rockwell Software product is warranted in accord with the product license. The product'sperformance will be affected by system configuration, the application being performed, operatorcontrol and other related factors.The product's implementation may vary among users.This manual is as up-to-date as possible at the time of printing; however, the accompanying softwaremay have changed since that time. Rockwell Software reserves the right to change any informationcontained in this manual or the software at anytime without prior notice.The instructions in this manual do not claim to cover all the details or variations in the equipment,procedure, or process described, nor to provide directions for meeting every possible contingencyduring installation, operation, or maintenance.i
Preface . vPurpose of this book. vIntended audience . vHow does it fit in with other Rockwell Software productdocumentation? . vOnline help . vOnline Books . viDocument conventions. viFeedback . viGetting started with RSLogix 5000. 1Introduction . 1Welcome to RSLogix 5000. 1Exploring RSLogix 5000 . 3Quick Start steps. 5Step 1nCreate a Project. 5Step 2nConfigure the Controller . 7Step 3nCreate and Configure I/O . 9Step 4nEnter Tags and Aliases . 10Step 5nEnter Ladder Logic . 11Step 6nDownload . 12Step 7nMonitor Tags. 13Step 8nMonitor Logic . 14System Requirements . 14Hardware Requirements . 14Software Requirements. 14i
Installing RSLogix 5000.15Introduction . 15Installation. 15Before you install RSLogix 5000 . 15Installing RSLogix 5000 software . 16Starting RSLogix 5000 software . 16Troubleshooting installation . 17Troubleshooting Hints. 17Advanced configuration concepts .19Consolidated controller view . 19I/O configuration dialogs . 20Motion configuration . 20Communications configuration . 20Advanced application organization concepts .21Introduction . 21Task properties. 22Program properties. 22Routine properties . 22Advanced data handling concepts.23Introduction . 23Using symbolic programming. 23Data tag aliasing . 23Storage of symbolic names on the controller. 24User-defined structures. 24Three-dimensional arrays. 24Program/controller data scoping. 25ii
System-shared data (produced/consumed tags) . 25I/O addressing methods. 25Advanced ladder editing and function block concepts .27Introduction . 27Quick entry of instructions. 27Adding instructions . 30Branching. 31Add a branch . 31Move a branch level . 31Expand a branch. 31Nest a branch . 31Parallel branch. 31Copy branch level . 32Copy entire branch structure . 32Delete a branch . 32Delete a branch level . 32Online editing. 32Lower-case zone markers . 33Upper-case zone markers . 33ASCII editing . 34About the Function Block Editor . 34Function Block Editor Title Bar. 34Sheet Toolbar . 34Routine Tabs . 35Routine View. 35Routine Splitter . 35Routine Scroll Bars. 35Advanced data monitoring concepts.37Introduction . 37iii
Status display . 37Program verification with auto-navigation . 37Data monitor view . 39Forcing . 40Getting the information you need .41Introduction . 41RSLogix 5000 online help . 41Determining the next step. 42Finding definitions. 43Learning RSLogix 5000 step-by-step . 44ControlLogix Quick Tour Online Tutorial . 45RSLogix 5000 training . 45Technical support services . 46When you call. 46Copy protection .47Introduction . 47Activating RSLogix 5000 . 47About the Activation disk . 47Two methods for activating RSLogix 5000 . 48Activating RSLogix 5000 after installation. 49Protecting your activation files . 50Reactivating a damaged activation key . 51Troubleshooting activation . 52iv
This Getting Results book provides you with information on how to install andnavigate RSLogix 5000. The guide includes troubleshooting information and tipson how to use RSLogix 5000 effectively. It also explains how to access andnavigate the online help.We assume that you are familiar with:§ IBM-compliant personal computers§ Microsoft Windows NT, version 4.0 with Service Pack 4.0§ Allen-Bradley Company’s Logix5550 controllerThe Getting Results book can be considered the entry point into ourdocumentation set. The documentation set contains pertinent, easily accessibleproduct information and ships with the software product. The documentation setis designed to free you from tedious paper shuffling and reduce informationoverload.The Getting Results book, online help, and the Online Books option make up theRSI documentation set.Online helpThe online help includes all overview, procedural, screen, and referenceinformation for the product. The help contains four basic components: overviewtopics, quick start topics, step-by-step procedures, and screen element descriptions(for example, text boxes, drop-down lists, and option buttons).v
Online BooksFor our more complex products, we provide you with online documentation thatyou can elect to install when you install the RSLogix 5000 software. Thisdocumentation includes all reference guides (such as programmer’s guides andcode reference guides) in an electronic format that you can access from the Helpmenu. Using the Online Books option allows you to get instant access to theinformation you need.The conventions used throughout this document for the user interface complywith those recommended by Microsoft. If you are not familiar with the MicrosoftWindows user interface, we recommend that you read the documentation suppliedwith the operating system you are using before attempting to use this software.Please use the feedback form, which you will find packaged with your software, toreport errors and/or let us know what information you would like to see added infuture editions of this document.vi
ChapterThis chapter includes the following information:§ Welcome to RSLogix 5000 § Quick Start steps§ Navigating the softwareWith the RSLogix 5000 Logix programming software package, you need only oneprogramming software for sequential, process, drive, and motion controlprogramming. The RSLogix 5000 software package provides you both symbolicprogramming with structures and arrays for increased productivity, and aninstruction set that serves all of these types of applications.RSLogix 5000 is designed to work with Rockwell Automation's Logix Platformsand the Logix5000 family of controllers. RSLogix 5000 functionality includes:§ ease of configuration, including a graphical controller organizer, I/Oconfiguration dialogs, a motion configuration tool, and point-and-clickmethods of configuration§ sophisticated data handling, using both arrays and user-defined structures, toprovide the flexibility necessary for the application rather than forcing it to fitthe particular memory structure as defined by the controller’s data tablememory§ easy-to-use I/O addressing methodsGetting started with RSLogix 5000 § 1
§ a free-form ladder editor that allows you to modify multiple rungs of logicsimultaneously, as well as to enter logic either from the point-and-clickinterface or via an ASCII entry prompt§ a flexible, easy-to-use function block diagram editor that allows you to programyour logic via function blocks§ drag-and-drop editing and navigation to quickly move data elements from onedata file to another, rungs from one subroutine or project to another, orinstructions from rung to rung or function block diagram to function blockdiagram within a project§ an instruction set that includes motion, relay ladder, and function blockinstructions§ logical application organization, using task, program, and routine structures§ diagnostic monitoring capability, including a status display of the currentcontroller state, a program verification feature, and a robust data monitor§ highly integrated motion support2 § Getting Results with RSLogix 5000
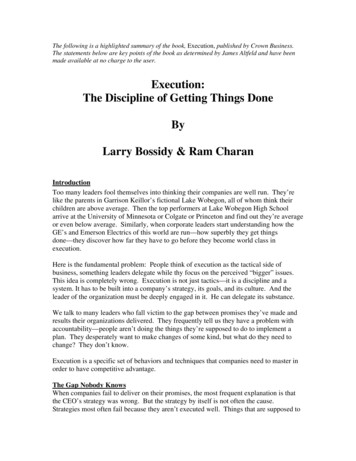
To navigate through the various windows and toolbars in RSLogix 5000 moreeasily, you should understand what they contain and what functionality eachprovides.When you open a project in RSLogix 5000, you can expect to see:Menu barStandard toolbarOnline barLadder Edit toolbarTabbed InstructiontoolbarCreate Component toolbarCommon Logic toolbarController OrganizerView paneResults windowStatus bar§ The Menu bar - Select functionality from the menus that appear as you clickeach selection on this bar.§ The Create Component toolbar - Use this toolbar to create new projectcomponents (e.g., tags, routines, programs, etc.).§ The Online bar - This toolbar displays program and controller status. Thistoolbar indicates the operational mode as well as whether there are editspresent.§ The Common Logic toolbar - This toolbar contains all ladder logic items thatare not instructions (e.g., rungs, branches), as well as the most commonly usedinstructions.§ The Standard toolbar - This toolbar contains many functions, (e.g., cut, copy,paste) that you will use repeatedly as you develop and test your logic program.Getting started with RSLogix 5000 § 3
§ The Ladder Edit toolbar - This toolbar contains all of the online editingfunctions, as well as some common editing functions.§ The Tabbed Instruction toolbar - This toolbar displays instruction mnemonicsin tabbed categories. When you click on a category tab, the instruction toolbarjust above it changes to show that category of instructions. Click on aninstruction to insert it in your ladder program.§ The status bar - Look at the status bar for ongoing status information orprompts as you use the software.§ The Controller Organizer - The Controller Organizer is a graphicalrepresentation of the contents of your controller project.§ The View pane - The main window of the RSLogix 5000 software provides youwith a framework in which you can view various editors (e.g., the LadderEditor, Tag Editor, Data Type Editor, etc.).You can increase the amount of space you have for editor windows by hidingthe Controller Organizer (View Controller Organizer or Alt 0) and theResults window (View Results or Alt 1).§ The Results window - The Results window appears at the bottom of the mainRSLogix 5000 window after you have performed an operation that yieldsmultiple results or errors. This window provides you with error and statusinformation on an operation as it executes.This window consists of two tabs:§ The Error Tab - If you perform an operation that results in an error, theerror is highlighted in the Results window.§ The Search Tab - When you use the Find All and Replace All functions, thefind and replace results are written to the Search tab.TIPIf you want to know what any of the icons represent, simply moveyour cursor over the icon. A floating tooltip will appear and tell youwhat the icon is used for.4 § Getting Results with RSLogix 5000
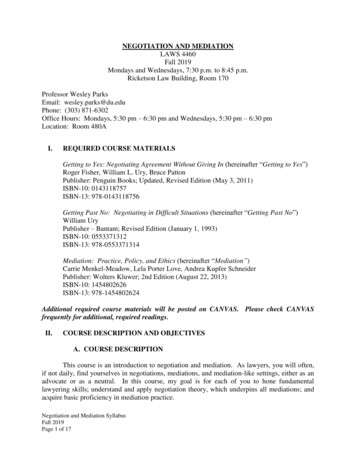
The following steps explain how to get up and running quickly with RSLogix 5000as soon as you install it.Step 1nCreate a ProjectRSLogix 5000 is based on projects, which are complete sets of files associated withyour controller’s programming and configuration. Follow these steps to create anew project.1.From the File menu, choose New.The New Controller dialog appears.2.From the Type pull-down menu, choose the controller type that you wish touse for this project.3.Enter the name you wish to use for the new project.The name you enter here will be used to create the project file; the .acdextension will automatically be appended to this name (i.e., you do not need toenter it).4.Enter a description of the controller.Getting started with RSLogix 5000 § 5
5.Choose the appropriate chassis type in which the controller will reside.Note: This field is disabled if you have chosen a FlexLogix controller type.FlexLogix does not have a physical chassis, and therefore you do not need toselect a chassis type.6.Enter the slot number for this controller.In ControlLogix, controllers occupy a numbered slot in the chassis and can beplaced in any slots. It is also possible to place multiple controllers in the samechassis.For FlexLogix, since there is no physical chassis, this field is disabled, and slotnumber 0 is displayed.7.Enter the appropriate revision information for your controller.This field defaults to the latest revision for the given controller type. ForFlexLogix, this field is disabled.8.Enter the directory in which you want to store the project file.The directory defaults to the one you configured in the Workstation Optionsdialog. If you want to use a different directory, type its path or click on theBrowse button to find the directory.The project file is created in this directory with the same name as the controller,with a .ACD file extension. For example, if your controller name is Oven1, theproject file name will be Oven1.ACD.9.Click on OK to create the project.Once the project file is created, you will see the Controller Organizer, whichshows everything in the controller.The default configuration contains a continuous task, called MainTask. TheMain Task contains a program called MainProgram. The Main Programcontains a routine called MainRoutine, which is configured as the main routine.In addition, if you have chosen a FlexLogix controller, two FlexBus 1794virtual backplane adapters are created in slots 3 and 4 under the I/OConfiguration folder. These two folders will contain all local I/O forFlexLogix, other than the two local slots for communication. The first foldercontains all the I/O configured on the local Flex rail housing the Flexcontroller; the second folder contains all I/O configured for the local noncontroller rail.6 § Getting Results with RSLogix 5000
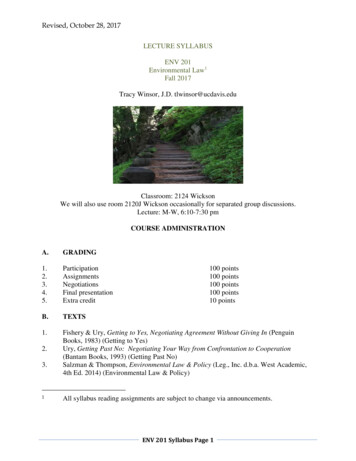
Step 2nConfigure the ControllerFollow these steps to configure the controller. For this Quick Start, most of thedefault settings will be useful for you.1.From the Edit menu, choose Controller Properties.The Controller Properties dialog appears, with the General tab selected.This dialog contains the information you provided in the New Controllerdialog. You can make any changes you wish to the general controllerproperties here, or proceed to Step 2.2.Click on the Date/Time tab to configure the controller’s wall clock time andthe coordinated system time status.Note: You can only configure the wall clock time while you are online.3.Click on the Serial Port tab to configure the controller’s serial port.Getting started with RSLogix 5000 § 7
4.Click on the System Protocol tab to configure the controller’s serial port forDF1 Point to Point, DF1 Master, or DF1 Slave.Select the protocol you would like to use from the drop-down list. Configureother parameters on this tab according to the protocol you choose.5.Click on the Advanced tab to configure advanced controller properties such assystem fault program, power-up handler program, and system overhead timeslice.If you are online, you can also view controller memory usage statistics from thistab.6.Click on the File tab to view information about the project file.Note: This tab is informational only; you cannot edit any of the attributesshown here.7.Click on the OK button to accept your configuration and close the ControllerProperties dialog.8 § Getting Results with RSLogix 5000
Step 3nCreate and Configure I/OFollow these steps to create and configure inputs and outputs. In RSLogix 5000,you must manually add all I/O and Communications modules.1.Right click on the I/O Configuration Folder in the Controller Organizer, andchoose New Module.The Select Module Type dialog appears.2.Choose the module type you want to create and click on OK.The Create Module wizard leads you through a series of dialogs from whichyou can complete the process of creating and configuring the I/O module.3.Enter the configuration information for the module you are creating.You must enter the name of the module and the current slot number where themodule resides.Getting started with RSLogix 5000 § 9
4.Click the Finish button when you’re done entering information in the Createwizard.Step 4nEnter Tags and AliasesFollow these steps to enter tags and aliases.1.Right click on the Controller Tags folder in the Controller Organizer andchoose Edit Tags.The Tag Editor appears. At this point, the Editor will be empty, since youhave not created any tags yet.2.In the create tag row, indicated by an asterisk (*), enter the name of the tag inthe Tag Name column.3.Enter a description of the tag, if desired.4.To create a base tag, enter the tag data type.5.To create an alias tag, enter the tag to which the new tag refers.TIP6.You can create new tags from the New Tag dialog (choose NewComponent Tag from the File menu). If you create a new tagusing this approach and you choose data types AXIS, MOTIONGROUP, MESSAGE, or PID, the Configure button will be enabled.Click on this button to access a wizard that will lead you through theconfiguration of these data types.Select the scope for the tag from the pull-down menu, if desired.All tags are controller scoped by default.7.Select the style in which you want to display the value of the tag (e.g., Hex,Binary, etc.).Based on the data type you selected, a default style is chosen automatically.10 § Getting Results with RSLogix 5000
8.Press Enter.This moves the current cell to the next row, which creates a new tag. If there isany error in your tag definition, you will be prompted.TIPIf you have already defined the I/O modules, RSLogix 5000automatically added tags for these modules. All I/O tags arecontroller scoped.TIPThe background color of a cell indicates whether the cell is read onlyor not. A white background indicates that the cell is modifiable; grayindicates that the cell is read only.Step 5nEnter Ladder LogicFollow these steps to enter the ladder logic you will use to define your programsand routines.1.Right click on the Main Routine icon in the Controller Organizer and chooseOpen.The RSLogix 5000 software opens the Ladder Editor Routine window. If theladder routine is empty, RSLogix 5000 automatically adds the first rung.2.From the Ladder Instruction toolbar, click on the tab corresponding to theinstruction group from which you want to add an instruction.3.Select the desired instruction and drag it into the ladder editor routine view.The instruction is added to the rung or branch on which you chose to put it.4.Modify the instruction as necessary.Use the Tag Browser to define the corresponding tag.5.Use the Ladder Instruction toolbar to add additional rungs, branches, branchlevels, or instructions as required by your routine.6.Right mouse click on the routine tab and choose Verify Routine.Any errors in your rung will be sent to the Results window .7.Make the necessary modifications to your rung.8.Right mouse click and choose Accept Pending Rung Edit.Note: This is only required if you are online. You do not need to do thiswhen you are offline unless you have a pending rung edit you created whileonline.Getting started with RSLogix 5000 § 11
If you are online, the Accept Pending Rung Edit command transfers the rungto the controller, but does not execute it if you are in Run mode. Any errors inyour rung are sent to the Results window.Step 6nDownloadFollow these steps to download your project to the controller.1.From the Communications menu, choose Who Active.The Who Active dialog appears, from which you can select a communicationspath to the controller. If RSLinx is not already runni
The RSLogix 5000 software package provides you both symbolic programming with structures and arrays for increased productivity, and an instruction set that serves all of these types of applications. RSLogix 5000 is designed to work with Rockwell Automation's Logix Platforms and the Logix5000 family of controllers. RSLogix 5000 functionality .