Transcription
Thermo Scientific Revco LaboratoryRefrigeratorsInstallation and Operation34830H61Rev. GOctober 2017Visit us online to register your warrantywww.thermoscientific.com/labwarranty
IMPORTANT Read this instruction manual. Failure to follow the instructions in this manual can resultin damage to the unit, injury to operating personnel, and poor equipment performance.CAUTION All internal adjustments and maintenance must be performed by qualified service personnel.Material in this manual is for informational purposes only. The contents and the product it describes aresubject to change without notice. Thermo Fisher Scientific makes no representations or warranties withrespect to this manual. In no event shall Thermo be held liable for any damages, direct or incidental,arising from or related to the use of this manual. 2017 Thermo Fisher Scientific Inc. All rights reserved.
Table of ContentsTable of ContentsIntroduction.1Safety Precautions.2Pre-Installation.3Unpacking . 3Installation.4Location . 4Wiring . 4Leveling .5Door Seal .5Door Operation .5Final Checks. 7Shelves and Wire Baskets (Drawers) Slides .8Control Panel.9Control Panel Features .9Display Functions .11Alarm Setpoints .11Service Mode Parameters. 12Operation.13Start Up . 13Product Loading Guidelines .13Automatic Defrost .14Temperature Setpoint Control .14Interior Light Switch (Glass Door Units Only) .14Convenience Outlet (Chromatography Refrigerators Only) .14Alarm Systems.16Operating the Alarm .16Local and Remote Alarms .16Installing a Remote Alarm (Optional) . 17Alarm Test .17Chart Recorders.19Set Up and Operation .19Power Supply .20Changing Chart Paper . 20Calibration Adjustment .21Maintenance .22Cleaning the Wire Baskets (Drawers) and Cabinet Interior .22Removing the Wire Baskets (Drawers) . 22
Table of ContentsReinstalling the Wire Baskets (Drawers). 23Cleaning the Condenser .23Troubleshooting .25Accessories .26Warranty .29
Introduction1 IntroductionThermo Scientific (Revco) Laboratory Refrigerators described in thismanual are sample storage devices, designed for storage of samples between1 C and 8 C.The devices are not intended to store flammable inventory, nor for use in apatient environment, or in a hazardous environment. Not intended for useas a medical device under FDA classification. Not intended for use as amedical device as classified by the Medical Device Directive 2007/47/EC.This manual provides installation and operation instructions for laboratoryrefrigerators, including general purpose, pharmacy, and chromatographymodels.The control system, standard on all models, includes: Key-operated power and alarm switch Preset temperature setpoint ( 4 C or 5 C) Digital temperature display with 0.1 C resolution Graphic temperature display Audible and visual power failure indicators Alarm silence, ringback, and automatic reset functions Pushbutton alarm testOther standard features include: Keyed door locks Remote alarm contacts CFC-free refrigerant CFC-free foamed in-place urethane insulation Quiet, hermetically sealed refrigeration compressorsSeven day chart recorders are available as optional accessories on all models.For descriptions of other options and accessories, refer to Section 12.Thermo Scientific Revco Laboratory RefrigeratorsInstallation and Operation1
Safety Precautions2 Safety PrecautionsIn this manual and on labels attached to this product, the wordsWARNING and CAUTION mean the following:WARNING: A potentially hazardous situation which, if not avoided, couldresult in serious injury or death.CAUTION: A potentially hazardous situation which, if not avoided, mayresult in minor or moderate injury or damage to the equipment.Before installing, using or maintaining this product, be sure to read thismanual and product warning labels carefully. Failure to follow theseinstructions may cause this product to malfunction, which could result ininjury or damage.The following important safety precautions apply to this product:2Installation and Operation Use this product only in the way described in the product literature andin this manual. Before using it, verify that this product is suitable for itsintended use. Do not modify system components, especially the controller. Use OEMexact replacement equipment or parts. Before use, confirm that theproduct has not been altered in any way. Your unit must be properly grounded in conformity with national andlocal electrical codes. Never connect the unit to overloaded powersources. Disconnect the unit from all power sources before cleaning,troubleshooting, or performing other maintenance on the product or itscontrols. If the equipment is used in a manner not specified by the manufacturer,protection provided by the equipment may be impaired.Thermo Scientific Revco Laboratory Refrigerators
Pre-Installation3 Pre-Installation3.1 UnpackingAt delivery, examine the exterior for physical damage while the carrier’srepresentative is present. If exterior damage is present, carefully unpack andinspect the unit and all accessories for damage.If there is no exterior damage, unpack and inspect the equipment within fivedays of delivery. If you find any damage, keep the packing materials andimmediately report the damage to the carrier. Do not return goods withoutwritten authorization. When submitting a claim for shipping damage,request that the carrier inspect the shipping container and equipment.Thermo Scientific Revco Laboratory RefrigeratorsInstallation and Operation3
Installation4 InstallationDo not exceed the electrical and temperature ratings.CAUTION: Improper operation of the equipment could result indangerous conditions. To preclude hazard and minimize risk, follow allinstructions and operate within design limits noted on the dataplate.4.1 LocationInstall the unit in a level area free from vibration with a minimum of 6" ofspace on the sides and rear, and 12" at the top are recommended. Forundercounter models, a minimum of 1" of space on the sides, top and rearare recommended.Do not position the equipment in direct sunlight or near heating diffusers,radiators, or other sources of heat. The ambient temperature range at thelocation must be 59 to 90 F (15 to 32 C).4.2 WiringCAUTION: Connect the equipment to the correct power source. Incorrectvoltage can result in severe damage to the equipment.DANGER: For personal safety and trouble-free operation, this unit mustbe properly grounded before it is used. Failure to ground the equipmentmay cause personal injury or damage to the equipment. Always conform tothe National Electrical Code and local codes. Do not connect unit to alreadyoverloaded power lines. Always connect the equipment to a dedicated (separate) circuit. Electricalcodes require fuse or circuit breaker protection for branch circuit conductors.Use time delay fuses for #12 AWG circuits.Chromatography refrigerators are equipped with a duplex vapor-proofinterior outlet with a maximum of 4 amps per receptacle.The customer should have the wall receptacle and circuit checked by aqualified electrician to verify the receptacle is properly grounded and meetspower requirements specified on the data plate.Where a two prong wall receptacle is encountered, it is the personalresponsibility and obligation of the user to have it replaced with a properlygrounded three prong receptacle.WARNING: Do not under any circumstances cut or remove the third(ground) prong from the power cord. Do not use a two-prong adapter plug.The wiring schematic is attached to the back of the cabinet.4Installation and OperationThermo Scientific Revco Laboratory Refrigerators
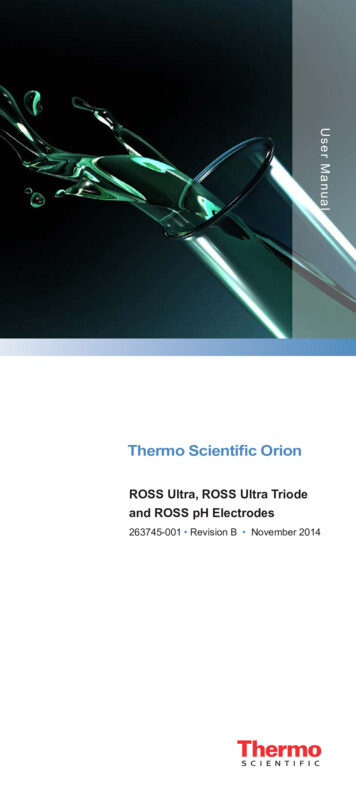
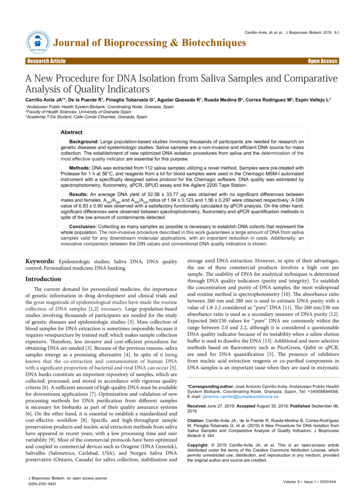
Installation4.3 LevelingIt is important to make sure the unit is level. Use thin sheets of metal to levelunits equipped with casters.Undercounter models come with leveling feet installed, with castersprovided in a bag inside the cabinet. The unit must be level. To levelundercounter units, rotate the leveling screws, located under the frontcorners of the unit, until the unit is level. If the floor is seriously out of level,you may need to shim the corners with thin sheets of metal.4.4 Door SealTo check the door seal, complete the following steps:1. Open the door.2. Insert a strip of paper (a couple of inches wide) between the doorgasket and the cabinet flange and close the door.3. Slowly pull the paper strip from the outside. You should feel someresistance.4. Repeat this test at 4-inch intervals around the door. If the door doesnot seal properly, replace the gasket.Note Door seal integrity is critical for refrigerators and freezers. A loose fittinggasket allows moist air to be drawn into the cabinet, resulting in quicker frostbuildup on the evaporator coil, longer running time, poor temperaturemaintenance, and increased operation cost.4.5 Door OperationSolid doors and standard glass doors for models larger than theundercounter model stay open if opened 90 degrees. Door spring tensioncannot be adjusted.If the self-closing doors do not work properly, make sure the unit is level.4.5.1 Adjustable Hinged GlassDoors (Undercounter ModelsOnly)On Undercounter models with hinged glass doors, you can use a regularscrewdriver to adjust spring tension and center each door on its frame. Theadjustment screws (“torque” for tension and “sag” for door placement) arelocated on the bottom hinge bracket (shown below in Figure 1).Hinged glass doors can be propped open with metal braces at the bottomhinges. Open the door 90 degrees or until you feel some resistance. Push thedoor open past the resistance and the metal braces engage. To close the door,push it toward the unit (past the resistance).Thermo Scientific Revco Laboratory RefrigeratorsInstallation and Operation5
InstallationFigure 1. Undercounter Hinge Bracket for Glass Door AdjustmentsCAUTION: Do not overtighten the tension as damage to the equipmentcan result.WARNING: Disconnect equipment from main power before attemptingany maintenance to equipment or its controls.4.5.2 Sliding Glass Doors45 ft³ models have self-closing sliding glass doors.If the self-closing mechanism is not working properly, check to make surethat the unit is level.The sliding glass doors can be locked in the closed position, using thetubular key provided. To lock these doors:1. Locate the spring-loaded lock bolt at the bottom left of the right-handdoor frame.2. The lock bolt has a small red dot. Insert the key over the bolt, liningup the dot with the ridge on the key.3. Rotate the lock bolt one half turn so that the dot is at the bottom ofthe bolt.4. Remove the key and push in the bolt to lock the door. The door canbe locked only when the dot is in the bottom position.To unlock the doors:1. Insert the key over the bolt, lining up the dot with the ridge on thekey.2. Rotate the lock bolt one half turn so that the dot moves back to thetop of the bolt. The bolt will then spring back to the unlockedposition.6Installation and OperationThermo Scientific Revco Laboratory Refrigerators
InstallationTo hold the right-hand door open, slide the door to the left and use thehook located in the side of the left-hand door.4.6 Final ChecksBefore start up, complete the following steps:1. Make sure that the unit is free of all wood or cardboard shippingmaterials, both inside and outside.2. Verify that the unit is connected to a dedicated circuit.CAUTION: Connect the equipment to a separate, dedicated, powersource. Power fluctuations can result in severe damage to the equipment.Thermo Scientific Revco Laboratory RefrigeratorsInstallation and Operation7
Shelves and Wire Baskets (Drawers) Slides5 Shelves and WireBaskets (Drawers)SlidesFor safety in shipping, the shelves are packaged and secured inside thecabinet. Insert the shelf support hangers (included with the shelves) into thebuilt-in pilasters (located on the inside walls of the cabinet interior) at thedesired locations. Position the shelves on the flat supports (refer to Figure 2).Note The number of shelves supplied per cabinet varies according to type of unitand size of cabinet.Note Also, pharmacy refrigerators come with drawers as an optional accessory.Refer to the product catalog for more information. Figure 2. Shelf Support HangerThe slides of the wire baskets (standard for pharmacy refrigerators) aresimilar but have a small wire safety clip at the front pilaster which preventsthe slides from falling when the wire baskets (drawers) are removed. Tochange the position of the slides of the wire baskets (drawers), complete thefollowing steps:1. Locate the safety clip.2. Slip your fingernail or a small screwdriver under the bottom of thewire clip and pry it out toward the inside of the refrigerator.3. Lift up the slide at front. The slide is free to move from the frontpilaster.4. The slides of the wire baskets (drawers) must be removed from the rearpilaster at approximately a 45 degree angle towards the center of thecabinet.5. Pull the slide towards the front of the cabinet.For more information on removing and reinstalling the wire baskets(drawers), refer to Section 10.8Installation and OperationThermo Scientific Revco Laboratory Refrigerators
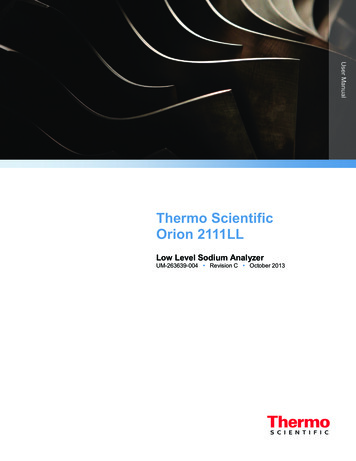
Control Panel6 Control PanelFigure 3. Refrigerator Control Panel6.1 Control PanelFeaturesThe control panel is located on the top right side of your refrigerator. Youcan use the three pushbuttons (#5, #8, and #9 in Figure 3) to change thetemperature display (#1) or to adjust temperature and alarm setpoints. Thethermometer display (#2) provides a quick visual indicator of currentcabinet temperature and alarm conditions.Before starting up your refrigerator, take some time to review the controlpanel functions:1. Main temperature display — during normal operation, shows cabinettemperature in degrees Celsius, as measured by the sensor inside thecabinet. You can use the buttons to display other values such assetpoints and extreme values. The number in the main display flasheswhen you are changing a value.2. Thermometer — shows cabinet temperature and alarm conditions.There are 10 horizontal bars: 9 are displayed during normal operation,the tenth (top) bar indicates a warm alarm condition. The number ofbars illuminated indicates approximate cabinet temperature.Depending on alarm settings, 4 or 5 bars illuminated indicate that thecabinet is at setpoint.For example, suppose that the cabinet temperature setpoint is 4 C and thatthe warm and cold alarm setpoints are 8 C and 0 C. Then the number ofbars illuminated indicates cabinet temperature as follows:Thermo Scientific Revco Laboratory RefrigeratorsInstallation and Operation9
Control urebulb only0 C (cold alarm)6 bars4.8 C1 bar0.8 C7 bars5.6 C2 bars1.6 C8 bars6.4 C3 bars2.4 C9 bars7.2 C4 bars3.2 C10 bars8.0 C (warm alarm)5 bars4.0 C (setpoint)When cabinet temperature exceeds the warm alarm setpoint, the top bar ofthe thermometer flashes. When temperature is lower than the cold alarmsetpoint, the bulb flashes.When you are in programming mode (described in 1) the thermometershows the setpoint value you are changing.3. Power failure — illuminates when the main power supply isinterrupted. In this case the audible alarm also sounds.4. Service required — illuminates when the controller is in serviceprogramming mode or when simulated warm or cold alarmconditions are failing to occur during an alarm test.5. Increase — pushbutton used to increase setpoint values inprogramming mode and for various display functions.6. Door ajar — illuminates when the refrigerator door is open and thealarm is activated (key switch turned to the alarm position). (Thisfeature is not available for 45 ft³ sliding glass door models.)7. Battery low — illuminates when the backup battery is low.8. Decrease — pushbutton used to decrease setpoint values inprogramming mode and for various display functions.9. Scan — pushbutton used to change the main display and for variousother functions.10. Audible alarm — illuminates during warm and cold alarm conditions.For full descriptions of display, programming, and service functions, refer toTables 1, 2, and 3.10Installation and OperationThermo Scientific Revco Laboratory Refrigerators
Control Panel6.2 Display FunctionsTable 1: Control Panel Display Functions (including optional alarm functions)FunctionMeaningSequenceDisplayNormal operationDefault display whilerefrigerator is running—Temperature display, thermometer showcabinet temperature.Cold excursionShow coldest cabinettemperature since laststartup or resetPressThermometer, display show cold excursionwhile button is pressed.Warm excursionShow warmest cabinettemperature since laststartup or resetPressThermometer, display show warm excursionwhile button is pressed.MuteSilence audible alarmPress ScanThermometer, display show cabinettemperature, alarm icon continues to flash.ResetReturn to default displayafter alarm conditionandPresssimultaneously, holdfor five secondsExcursion values are reset; Thermometer,display show cabinet temperature. Displayblinks to confirm reset.Alarm testTest by simulating warmalarm conditions; keyswitch must be in alarmmodeand ScanPresssimultaneously, holdfor five seconds.Display and thermometer show simulatedcabinet temperature, alarms flash and sound asappropriate. Alarms clear when test iscompleted.6.3 Alarm SetpointsTo enter programming mode, press Scan, hold for 5 seconds, and release.The first two values displayed are the warm and cold alarm setpoints. Notethat the alarm setpoints cannot be adjusted when the key switch is in thealarm position.Table 2: Alarm Setpoint Programming Functions (with alarm option only)FunctionProgramming SequenceAdjust cold alarm setpointEnter programming mode by pressing Scan and holding for 5 seconds. On release, theandtocurrent cold alarm setpoint value flashes in the temperature display; useadjust it. The display automatically returns to normal operating mode 30 seconds after thelast key entry or after scrolling through both available functions and parameters.Adjust warm alarm setpointEnter programming mode and press Scan repeatedly. The current warm alarm setpointandto adjust it. The displayvalue then flashes in the temperature display; useautomatically returns to normal operating mode 30 seconds after the last key entry or afterscrolling through both available functions and parameters.Thermo Scientific Revco Laboratory RefrigeratorsInstallation and Operation11
Control Panel6.4 Service ModeParametersWhen the key switch is not turned to third (alarm) position, you can accessservice parameters by entering programming mode and pressing Scan for anadditional 5 seconds. On release of the button, the display will go blank,then display “SEr” with the service wrench icon illuminated. Then thefirmware checksum (read-only) will be displayed for about 4 seconds.Pressing Scan repeatedly scrolls through the available service functions.While you are in service mode, the wrench icon is illuminated. For anyflashing parameter you can use andto adjust the value.Note Resetting any of the following parameter values could adverselyaffect the performance of your refrigerator. These settings very rarelyneed to be changed for normal operation. Be sure to call Service beforemaking any adjustments to parameter values.Table 3: Programming ParametersParameterDisplayNotes1. OffsetValueCenter air temperature calibration. Default value is 0(maximum 2.9).2. Cut onCut (2 sec.); On (2 sec.); then valueCabinet temperature at which compressor starts to cooldown to setpoint. Default value is 6ºC.3. DifferentialdIF (2 sec.); then valueCut on – differential temperature at which compressorstops after achieving cabinet temperature setpoint. Defaultvalue is 3.4. Defrost intervaldEF (2 sec.); Int (2 sec.); then valueRange 1 to 12 hours; default value is 01.5. Defrost durationdEF (2 sec.); dur (2 sec.); then valueRange 5 to 30 minutes; default value is 15.6. Defrost high-tempterminationdEF (2 sec.); HI (2 sec.); then valueTemperature at evaporator at which defrost cycleterminates; default value is 4ºC.7. Short cycle delaySHO (2 sec.); Cyc (2 sec.); then valueRange 0 to 15 minutes; default value is 0.8. Control probetemperatureCnt (2 sec.); Prb (2 sec.); then valueDisplay only.9. Network addressnEt (2 sec.); Adrt (2 sec.); then valueCan only be modified by RS-485 communicationssoftware.10. Defrost probe temperaturedEF (2 sec.); Prb (2 sec.); then valueDisplay only.12Installation and OperationThermo Scientific Revco Laboratory Refrigerators
Operation7 Operation7.1 Start UpTo start up the refrigerator, complete the following steps:1. Plug in the power cord.2. All refrigerators (except undercounter and sliding door models) have adouble pole circuit breaker switch located next to the power inlet.Make sure that it is in the ON (“1”) position.3. Insert the key in the switch and turn the power on.4. Rotate the power switch to the ALARM ON position when thetemperature drops below the warm alarm setpoint.5. Allow the unit to reach operating temperature before loading it withany product. To stabilize the temperature profile, a 24-hour waitingperiod is recommended.6. After the unit has pulled down to the desired operating temperature,turn the three position key switch one turn further clockwise to theAlarm On position. (Space Saver units have a separate alarm keyswitch.)7. If you have a remote alarm, hook it up at this point (refer to Section 8.3).8. Whether you have a built-in alarm or a customer-installed remotealarm, you should test it following the instructions in Section 8.4.Alarm setpoints are factory pre-set for 5.5 C (warm) and 1.5 C (cold)for factory settings of 4 C operation.7.2 Product LoadingGuidelinesWhen loading your refrigerator, take care to observe the followingguidelines:Thermo Scientific Revco Laboratory Refrigerators Never load the refrigerator beyond capacity. Distribute the load as evenly as possible. Temperature uniformitydepends on air circulation, which could be impeded if wire baskets(drawers) are overfilled, particularly at the top of the cabinet. For critical applications, be sure that the alarm systems are workingand active before you load any product.Installation and Operation13
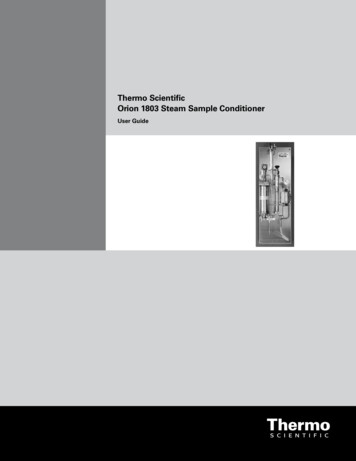
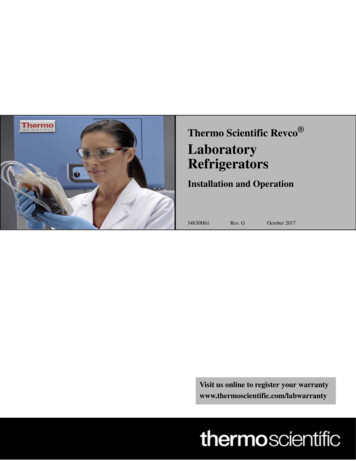
Operation7.3 Automatic DefrostThe defrosting process on all models is primarily accomplished by aircirculated during off-cycle periods.Under normal conditions, the temperature warm-up during defrost isvirtually unnoticeable. However, an occasional 2 C warm-up is possible ifusage is heavy and ambient conditions are extreme.7.4 TemperatureSetpoint ControlYour individual unit has been adjusted and factory tested to maintain astable cabinet temperature. For laboratory refrigerators, cabinet temperaturesetpoint is a computed value based on the service parameters Cut On andDifferential (refer to Table 3).For most applications, however, you will not need to change thetemperature setpoint.7.5 Interior Light Switch(Glass Door Units Only)To the right of the control panel is a light switch which operatesindependently of the door switch.If you leave the panel switch in the OFF position, the door switch willautomatically turn on the lights when the door is opened and turn them offwhen the door is closed.If you leave the panel switch in the ON position, the lights will remain oneven when the door is closed.WARNING: If you are loading your refrigerator with light-sensitiveproduct, be sure to leave the light switch on the control panel in the OFFposition.7.6 Convenience Outlet(ChromatographyRefrigerators Only)Chromatography Refrigerators are equipped with a convenience outletlocated in the back wall. Power to the outlet is protected by a circuit breaker.The breaker is located just below and to the right of the outlet. Pressing thebreaker button resets the breaker after a fault.The total load to the convenience outlet should not exceed 4 amps.The GFCI has a standard self-test feature with color indicators for status:A solid red light - indicates the breaker has opened the circuit. If this occurs,unplug the equipment, check the circuit and reset the circuit breakerinstruction.A flashing red LED - indicates “End of Life” and signifies that the receptacleneeds to be replaced.A solid green LED - indicates that the receptacle is functional.14Installation and OperationThermo Scientific Revco Laboratory Refrigerators
OperationRed (Solid/Flashing)GreenFigure 4. Receptacle with LightsWARNING: The convenience outlet is LIVE when the unit is connectedto an electrical power source, regardless of the position of the key switch.Thermo Scientific Revco Laboratory RefrigeratorsInstallation and Operation15
Alarm Systems8 Alarm Systems8.1 Operating the AlarmThe alarm system is designed to provide visual and audible warning signalsfor both power failure and rise in temperature. The alarm is equipped with abattery backup.The factory d efault warm alarm setpoint is 5.5 C; the default cold alarmsetpoint is 1.5 C for factory settings of 4 C operation.The alarm system is activated only when the key switch is turned to theAlarm On position. The audible warning signal sounds when there is apower failure or temperature alarm condition, or when the door is ajar formore than 2 minutes.The Mute function (pressing the Scan button) allows you to turn off theaudio warning without turning off the visual indicators.To turn off and reset flashing visual alarms, pressandsimultaneously.There is also a ringback function after approximately 6 minutes if any alarmcondition remains active.8.2 Local and RemoteAlarmsRefrigerators can have either a factory-installed local alarm or an optionaluser-installed remote alarm. Operating and testing procedures are the samefor both types of alarm.The maximum distance between a refrigerator and a remote alarm dependson the wire gauge used. Refer to Table 4 below:Table 4: Wire Gauges and Distance to Remote Alarm16Installation and OperationWire GaugeTotal Wire Length(feet)Distance to Alarm 1/2Wire Length 01,685Thermo Scientific Revco Laboratory Refrigerators
Alarm Systems8.3 Installing a RemoteAlarm (Optional)Remote alarm terminals are located at the rear of the machine compartment.The terminals are: Common, Open on Fail (Normally Closed), and Closeon Fail (Normally Open).1. The remote alarm system has two keyhole slots on the back to hangthe alarm system on the wall. Insert two screws, no longer than a #12truss-head type and spaced two inches apart, into a wall and mountthe alarm.2. Make the following connections:a. Connect the common terminal on the cabinet switch to the purplewire on the alarm.b. Connect the normally closed terminal on the cabinet to the black(“open on fail”) wire on the alarm. This connection gives an alarmwhen the switch contacts open.3. Plug the alarm system service cord into an electrical outlet. This alarmis designed for 115V/60 Hz, 115V/50 Hz, or 100V/50 Hz operation.Note If you want the alarm signal to sound when the switch contacts close,connect the normally open terminal on the cabinet to the red/white (“close onfail”) wire on the alarm. The purple and red/white wires must be tied together inthis application.The wiring diagram is attached to the inside of the alarm back cover.8.4 Alarm TestNote It is important to test your alarm system after any maintenance operationor temperature control adjustment.8.4.1 Theory of OperationThis test procedure applies to both factory
Thermo Scientific Revco Laboratory Refrigerators Installation and Operation 1 1 Introduction Thermo Scientific (Revco) Laboratory Refrigerators described in this manual are sample storage devices, designed for storage of samples between 1 C and 8 C. The devices are not intended to store flammable inventory, nor for use in a