Transcription
Installation andUser's Manual forModular CuberModels: CME256, CME506, CME656and CME806
CME256, 506, 656, 806: AutoIQ CubersIntroduction:This product manual contains the informationneeded for the setup, installation, initial start up,sanitation and maintenance of this ice machine.Keep it for future reference.Be certain that the information applies to themodel in question. If no model is listed, theinformation applies to all models, including Athrough F series.All series of these 4 models are covered in thismanual:This manual is organized in the same way as theexpected use of the machine, it begins withspecifications, goes thru unpacking and setup, CME256, a 115 volt, single evaporatorshows where everything is; continues with initialmachinestart up, then describes how it works. After that isthe sanitation section, followed by service CME506, a 115 volt, dual evaporatormachine (115 volt if 60 Hz, 230 volt if 50 Hz) diagnosis and repair. CME656 and CME806, 230 volt, dualevaporator machinesTable of ContentsIntroduction:. . . . . . . . . . . . . . . . . . . . . . . . . . . . . . . . . . . . . . . . . . . . . . . page 2Specifications: . . . . . . . . . . . . . . . . . . . . . . . . . . . . . . . . . . . . . . . . . . . . . . page 3Pre-Installation . . . . . . . . . . . . . . . . . . . . . . . . . . . . . . . . . . . . . . . . . . . . . . page 4Location & Assembly:. . . . . . . . . . . . . . . . . . . . . . . . . . . . . . . . . . . . . . . . . . page 5Plumbing: . . . . . . . . . . . . . . . . . . . . . . . . . . . . . . . . . . . . . . . . . . . . . . . . . page 6Electrical: . . . . . . . . . . . . . . . . . . . . . . . . . . . . . . . . . . . . . . . . . . . . . . . . . page 7After Utility Connections: . . . . . . . . . . . . . . . . . . . . . . . . . . . . . . . . . . . . . . . . . page 8Initial Start Up: . . . . . . . . . . . . . . . . . . . . . . . . . . . . . . . . . . . . . . . . . . . . . . page 9Adjustments: . . . . . . . . . . . . . . . . . . . . . . . . . . . . . . . . . . . . . . . . . . . . . . . page 10How To Operate The AutoIQ Controller . . . . . . . . . . . . . . . . . . . . . . . . . . . . . . . . . page 11Sanitation and Cleaning . . . . . . . . . . . . . . . . . . . . . . . . . . . . . . . . . . . . . . . . . page 12Additional Maintenance. . . . . . . . . . . . . . . . . . . . . . . . . . . . . . . . . . . . . . . . . page 13Additional Maintenance: Bin Controls, Condenser . . . . . . . . . . . . . . . . . . . . . . . . . . . . page 14Before Calling for Service . . . . . . . . . . . . . . . . . . . . . . . . . . . . . . . . . . . . . . . . page 15Parts lists are in the center section.January 2007Page 2Printed on Recycled Paper.
CME256, 506, 656, 806: AutoIQ CubersSpecifications:These ice machines are designed to be installedindoors, in a controlled environment. They canoperate satisfactorily under a wide variety ofconditions. However, Do NOT operate themachine where it has not been designed for. DoNOT operate the machine in temperatures it hasnot been designed for. Do NOT operate themachine above or below the voltage limits for theparticular model. Do NOT operate the machinewith too little or too much water pressure.CME256 or CME506 Operational LimitsAir TemperatureWater TemperatureWater PressureVoltage (115 volt model)Voltage (208-230 volt mdl)Voltage (230 volt model)Minimum50oF.40oF.20 psi103198207Maximum100oF.100oF.80 psi126253253CME656 or CME806 Operational LimitsAir TemperatureWater TemperatureWater PressureVoltage (60 Hz model)Voltage (50 Hz model)Minimum50oF.40oF.20 psi198207Maximum100oF.100oF.80 psi253253All models will fit a standard, 30" wide ScotsmanIce Storage Bin. Some examples are: BH550; HTB555; HTB350; HTB250The CME256 and CME506 are the typical modelsused in hotel applications and they fit theScotsman HD30 dispenser without an adapter. Allmodels fit the ID200 or ID250 dispensers whichrequire a KBT44 adapter. Check Scotsman’s salesliterature for other application information.Note: These machines fill the bin very full, up tothe base of the ice machine. Bin Model BH800may need kit KBaffle2 and Bin Model BH550 mayneed kit KBaffle1. In some cases the ice level inthe bin may be too high for a customer's needs. Athermostat kit is available to lower the ice level, itspart number is A37749-001.A stacking kit, for like models, is KSCME6-30.Scotsman reserves the right to make designchanges and/or improvements at any time.Specifications and designs are subject to changewithout notice.Scotsman assumes no liability or responsibility ofany kind for products manufactured by Scotsmanthat have been altered in any way, including theuse of any parts and/or other components notspecifically approved by Scotsman.BASIC INFORMATIONCurrent S-6HCME806WS-6HDimensionsW" x D" x H"(w/o bin)30 x 24 x nimum CircuitAmpacityMaximum 0/60/1208-230/60/1230/50/1230/50/1Air CooledWater CooledAir CooledAir CooledWater CooledAir CooledWater CooledAir CooledAir CooledWater CooledAir CooledWater CooledAir CooledWater CooledAir CooledWater CooledAir CooledWater January 2007Page 3
CME256, 506, 656, 806: AutoIQ CubersPre-InstallationLocation of NameplateOther Applications:(on the back, plus a serial plateis behind the front panel)Models CME256 or CME506 may be placed oncertain Ice Dispensers, including Scotsmanmodels: HD30, ID200 and ID250.Check with other dispenser manufacturers forrecommendations regarding application.Check the nameplate for electrical requirements.The nameplate is located on the back of the icemachine. While the model and serial number areon the nameplate, a serial number plate is locatedat the front of the machine, below the metal controlbox.NameplateWater:There is no such thing as pure water. There aretwo ways water can contain impurities: insuspension or in solution. Suspended solids canbe filtered out. In solution or dissolved solids mustbe diluted or treated. Water filters arerecommended to remove suspended solids. Somefilters have treatment in them for suspendedsolids. Check with a water treatment service for arecommendation.Cube Ice machines use more water than whatends up in the bin as ice. While most water is usedduring ice making, a portion is designed to “rinse”out the water system to keep hard water scalefrom clogging up the machine. That water rinse,combined with water filters, prolongs the timesbetween needed water system cleaning.Note: All Scotsman CM3 models, like thosedescribed in this manual, feature Scotsman’sAutoIQ control system and ReliaClean watersystem cleaning process.Back View Diagram (air cooled)Service Technicians: All models are set by thefactory at a “standard” water rinse, which iscompatible with typical water conditions. TheReliaClean water system provides anadjustment method so to the amount of waterrinsed per cycle can be changed. If the prior icemachine worked acceptably well with the localwater conditions, leave the machine at the factorysetting. If severe water conditions are present, andwater filters do not solve the problem acceptably,adjust the machine to use more water. If waterconditions are excellent, adjust the machine to useless water. See the Adjustments section.Note: Water use adjustments are customerconvenience adjustments; they are NOT factorydefects and are NOT covered by warranty.Top View DiagramNote: Although the machine will function, ice capacity ofair cooled machines will be significantly reduced withonly 6 inches of clearance at the sides, back and top.January 2007Page 4
CME256, 506, 656, 806: AutoIQ CubersLocation & Assembly:Air cooled models take room temperature air infrom the left and right sides, and discharge warmair out the back. If installed in a corner or withanother cabinet next to the right side, an air bafflecould be installed on the back of the cabinet tominimize air re-circulation.A 6 inch minimum clearance on the back, left andright sides is required for operation and service ofthis machine.Cabinet Panel Removal:Note: The top panel holds the upper edges of theside panels in place.1. Front Panel: Remove top two screws, and pullthe bottom of the panel away from the machine tounsnap it from the machine.RemoveSecondAir Flows in the Sidesand Out the BackRemoveFirstNote: Although the machine will function, icecapacity of air cooled machines will besignificantly reduced with only 6 inches ofclearance at the sides, back and top.Unpacking and Assembly:Begin with unpacking the ice storage bin. Removethe carton, and using part of the carton as acushion, tip the bin on its back to remove the skidand attach the legs or casters. Note: Stackedapplications may not use casters.Removal of Panels2. Remove 2 screws at the front edge of the toppanel, and pull the top panel forward until itreleases from the tabs connecting it to the backpanel.3. Remove the screws at the front edge of eachside panel, and pull them forward until theyReturn the bin to an upright position. Check the bin release from the tabs connecting them to the backpanel.top gasket for gaps and tears, fill any in with foodgrade sealant prior to placing the ice machine onthe bin.If the ice machine has not been unpacked, do sonow. Remove the carton from the skid. Lift the icemachine off the skid directly onto the bin.Note: The machine is heavy! Use a mechanicalhoist if necessary.Secure the ice machine to the bin with thehardware provided (two metal straps and 4 bolts).January 2007Page 5
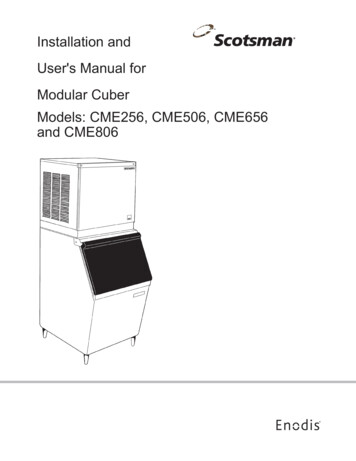
CME256, 506, 656, 806: AutoIQ CubersPlumbing:All models require an adequate potable watersupply and a gravity drain. The recommendationsfor tubing are: Water supply to be 3 8“ OD. Drain tobe ¾ “ OD.Air cooled models have 1 gravity drain connection,a ¾ “ FPT fitting at the back of the cabinet.It must be vented at the back of the cabinet.Supply:Air cooled models have 1 water supply connection,a 3 8“ male flare at the back of the cabinet. Watercooled models have an additional 3 8” FPTcondenser inlet connection at the back of thecabinet.Potable WaterInletDrain:Water cooled models have an additionalcondenser drain, it is a ½ “ FPT fitting at the backof the cabinet. Do not vent this drain.The ice storage bin will have a drain out the backor base, depending upon the model. Note:Scotsman HTB555 (shown in this manual) may beWater Cooled drained either out the back or the base.PlumbingConnectionsCondenserWater InletCondenserDrainPotableWater InletHTB555DrainsPlumbingConnectionsInsulation is recommended for the ice machinereservoir and bin drains.Follow all applicable codesOptionalFilterReservoirDrain, MustBe VentedSeparateDrains forBin andMachineJanuary 2007Page 6
CME256, 506, 656, 806: AutoIQ CubersElectrical:All models must be installed with the correct wiresize and type per the National Electric Code.Locate the nameplate on the back of the cabinetand find the numbers for Voltage, Phase, MinimumCircuit Ampacity and Maximum Fuse Size. Eitherfuses or HACR type circuit breakers may be used.Electrical connections are made in the junction boxin the back of the cabinet.1. Remove the junction box cover.2. Knock out 1 hole for a field supplied strain relief.3. Install wires and strain relief per code.4. Connect to wires and secure ground wire toground screw inside junction box.Junction BoxElectrical AccessFollow all Local, State and National codes.Electrical ConnectionJanuary 2007Page 7
CME256, 506, 656, 806: AutoIQ CubersAfter Utility Connections:1. Level the cabinet, use the leg levelers on theend of the legs to adjust the cabinet height.2. Wash out the bin. If desired, the interior of thebin could be sanitized.3. Locate the ice scoop (if supplied) and have itavailable for use when needed.Final Check List:1. Is the unit located indoors in a controlledenvironment?2. Is the unit located where it can receiveadequate cooling air?3. Has the correct electrical power been suppliedto the machine?4. Have all the water supply connections beenmade?5. Have all the drain connections been made?6. Has the unit been leveled? The unit must beleveled at the water reservoir.7. Have all unpacking materials been removed?8. Is the water pressure adequate?9. Have the drain connections been checked forleaks?10. Has the bin interior been wiped clean orsanitized?11. Have any water filter cartridges beenreplaced?January 2007Page 8
CME256, 506, 656, 806: AutoIQ CubersInitial Start Up:1. Remove the front panel.2. Locate the AutoIQ Controller.3. Switch on the electrical power. Note that theindicator lights all flashed on briefly.4. Open the water supply valve.5. Push and release the Freeze cycle push button(the Freeze indicator light will blink until thecompressor starts). The next several operationsare automatic.Initial Start Sequence The Freeze light is blinking. The Hot Gas Solenoid valve is open. The inlet water valve opens to fill thereservoir. The inlet water valve will shut offwhen the reservoir is full. The water pump starts to pump water. The inlet water valve opens again to refill thereservoir. After 30 seconds the compressor starts. After 5 seconds the hot gas valve closes.6. Machines are shipped from the factory with thepurge level set to accommodate average waterconditions. See page 13 for purge adjustmentinstructions.24 hours of run time may be need to attain full icemaking capacity.7. The machine’s correct cube size should result inice falling from the evaporator in vertical strips of 8- 10 cubes; the top 2 cubes might fall individually.8. After a few minutes the machine will return to afreeze cycle.9. Fill out the Customer Evaluation and WarrantyRegistration. Send it to Scotsman.10. Replace the front panel.11. Inform the user of the location and telephonenumber of the local service company. Also informthe user of the required maintenance of themachine.Notes On Operation:1. The electric eyes signal the ice machine to shutoff whenever the bin becomes full. After the eyesFreeze Cycle:sense that there is ice between them, the ice The Freeze indicator light will come on. The machine will shut off at the end of the next harvestmachine will stay in a Freeze cycle for many cycle. This last harvest cycle will be longer thanminutes. Slush may appear in the reservoir, the rest.it is temporary and normal.2. After the bin has filled the ice machine will not Under certain conditions, the pump maybe able to restart for 4 minutes. However, ifstop for a few seconds. After that the inletneeded, the Freeze button may be pushed and thewater valve will refill the reservoir.unit will restart. The fan motor (of air cooled models) willFor example: If ice is removed from the binbegin to turn and soon warm air will beimmediately after the machine has filled up andforced out the back of the cabinet.shut off, the machine will not restart for 4 minutes. The freeze cycle will continue until the water3. If the bin controls sense a bin full signal beforelevel in the reservoir drops to its factory setany water is used (float stem up), the machine willpoint, then the Harvest Cycle will begin.shut off on bin full.Harvest Cycle: The Harvest indicator light will be ON, The hot gas valve will open. The water pump will stop. It will restart inless than a minute. The Inlet water valve will open. The machinewill fill the reservoir and overflow it for aspecified number of seconds then shut off.The harvest cycle may still be in progress. The Bin Full indicator light will go on and offas ice falls from the evaporators.January 2007Page 9
CME256, 506, 656, 806: AutoIQ CubersAdjustments:If there was a problem during Initial StartUp:If an error light came on, check the following.1. Water error.How to Adjust the Amount of Water PurgeAdjustment is done by use of the control buttonson the AutoIQ Controller. Examine the next sectionto become familiar with the Controller beforebeginning.A water error could have been determined by the1. If the machine is on, push and hold the OFFSystem Controller if the inlet water valve does not button for more than 3 seconds, then release it.fill the reservoir, or if the water pump does not start This switches the machine Off.and lower the water level.2. Push and hold the OFF button for more than 32. Refrigeration error.seconds (just until all lights flash on) then releaseit. Do not hold it in it too long.A refrigeration error could have been determinedby the System Controller if the water temperature 3. Examine the green lights. They should have alldid not drop during the freeze cycle. The controller flashed once, then certain ones will have turned onto indicate which purge level the machine is set at.will next check the compressor dischargeThere are 5 levels of purge available:temperature, If the discharge temperature is toolow, the refrigerant error light will be switched on, 1. Maximum Purge is when All 5 lights areand the machine will Shut Down.ON. Use for extreme water conditions. Note:Note: Reset and restart the machine by pushingThis setting may extend the Harvest cycleand releasing the Off push button switch, and thenand reduce capacity.pushing and releasing the freeze push button 2. Heavy Purge is when these 4 lights areswitch.ON: Freeze, Harvest, Clean, Off. Use forsevere water conditions. 3. Standard Purge (factory setting) is whenthese 3 lights are ON: Harvest, Clean, Off.Use for moderate to severe waterconditions. 4. Moderate Purge is when these 2 lightsare ON: Clean, Off. This is for typical waterconditions. 5. Minimum Purge is when this light is ON:Off. For excellent water conditions.Adjust by pushing and releasing the Freezebutton. Pushing and releasing the Freeze buttonincreases the purge one level up to the maximum,then it goes to the minimum.4. The machine will automatically restart after 60seconds of no switch inputs, or restart the machineby pushing in and holding the Off button for morethan 3 seconds, then releasing it. The unit will thenbe Off. From there the machine may be placed ina freeze cycle by pushing and releasing theFreeze button.January 2007Page 10
CME256, 506, 656, 806: AutoIQ CubersHow To Operate The AutoIQ ControllerThe AutoIQ Controller is amicroprocessor based device thatreceives input from several sourcesand switches various componentson and off.Its manual control is thru the use ofthe Push Button Control Switches1. Freeze Button. Pushing andreleasing this button starts orrestarts the machine. The SystemController remembers what cycle itwas last in and returns to that cycle.2. Harvest Button: Pushing andreleasing this button will cause themachine to go directly to a HarvestCycle. Can be done from Freeze orOff. The machine will switch Off atthe end of the Harvest cycle.3. Clean Button: Pushing andreleasing this button will cause themachine to only power the waterpump for circulation of ice machinecleaner. After the ice machinecleaner has circulated for about 10minutes a second push of this buttonwill switch on the rinsing system toflush out the dissolved scale and icemachine cleaner.4. Off Button: Pushing andreleasing this button will switch themachine OFF at the end of the nextcycle. If the button is pushed andHELD for more than 3 seconds, theunit will switch off immediately.897Push Buttons65Indicator LightsBIN FULL4FREEZE3HARVESTCLEAN2OFFDiagnostic Lights:WATER1REFRIGERATIONController Indicator Light DescriptionTo Reset Machine (machine off,error light on): First push andrelease the Off button, then pushand release the Freeze button.To Recall the last two diagnostic codes: Pushand hold the Off button until the machine shuts off.Then push and hold the Off button again until thegreen lights flash on. Push and release theHarvest button to recall the most recent diagnosticcode. Push and release the Harvest button againto recall the second to last diagnostic code (the binfull light will be on when the second to last code isdisplayed). If no code is displayed, there was nonerecorded. Push and release the off button again toreturn to the normal setting.January 2007Page 11
CME256, 506, 656, 806: AutoIQ CubersSanitation and CleaningIt is the User’s responsibility to keep the ice machine and ice storage bin in a sanitary condition.Without human intervention, sanitation will not be maintained. Ice machines also require occasionalcleaning of their water systems with a specifically designed chemical. This chemical dissolves mineralbuild up that forms during the ice making process.Sanitize the ice storage bin as frequently as local health codes require, and every time the ice machineis cleaned and sanitized.The ice machine’s water system should be cleaned and sanitized a minimum of twice per year.In Place Cleaning of the Ice Machine WaterSystem:1. Remove all ice from the bin. Either save it in asanitary container or discard it. If the cleaning wasplanned, the ice machine could be switched off thenight before to minimize waste.9. After the ice machine cleaner has circulated for10 minutes, push and release the Clean button.This starts the rinsing process. The Clean indicatorlight will be ON. Note: The rinse process flushesany residual cleaner out of the ice machine’s watersystem.2. Remove the front panel.10. Continue the rinsing process for 20 minutes,then push the off button to switch the machine off.3. Push and release the Harvest button (thisreleases any ice that may be on the evaporatorsand warms them up).11. Go to the next step to sanitize the machine orgo to step 19 to finish the cleaning process.4. Wait for the machine to finish the Harvest cycle(the machine will stop).5. Remove the cube deflector, the evaporatorcover, the cascading shield (if used) and the bincontrol sensors. Place the cascading shield andthe cube deflector in a separate container. Placethe bin controls in the reservoir.6. Push and release the Clean button. The Cleanindicator light will be blinking, and the pump willrestart.7. Pour 12 ounces of Scotsman Clear 1 scaleremover into the reservoir water. Return theevaporator cover to its normal position.Scotsman Ice MachineCleaner contains acids.Acids may cause burns.12. Mix 2 gallons of Sanitizer solution. Follow localcodes for Sanitizer.Note: A possible sanitizing solution may be madeby mixing 1 ounce of liquid household bleach with2 gallons of warm (95-115oF.) potable water.13. Push and release the Clean button again.14. Pour 16 ounces of Sanitizer solution into thereservoir water.15. After the solution has circulated for 10 minutespush and release the Clean button. This starts therinse process. Sanitize the ice storage bin whilewaiting.16. Continue the rinsing process for 20 minutes,then push the off button to switch the machine off.17. Remove the evaporator cover and spray orwash all interior surfaces of the freezingcompartment including the evaporator cover withsanitizer solution.If concentrated cleanercomes in contact with skin, 18. Thoroughly immerse the cascading shield andflush with water.cube deflector in the sanitizing solution.If swallowed, do NOTinduce vomiting. Givelarge amounts of water ormilk. Call Physicianimmediately. Keep out ofthe reach of children.19. Return the bin controls, cascading shield andcube deflector to their original positions.20. Return the evaporator cover to its originalposition. Push and release the Freeze button.21. Return the front panel to its normal position8. Mix a solution of 8 ounces of Scotsman scaleand secure it to the machine with the originalremover and 1 gallon of warm (95-115oF.) water. screws.Use the solution to scrub the cascading shield andcube deflector in the separate container.January 2007Page 12
CME256, 506, 656, 806: AutoIQ CubersAdditional MaintenanceTo Sanitize the Ice Storage Bin5. Push the two water distributors to the right untilthe left end clears its retaining slot, then pull theleft end up.1. Remove all ice.2. Remove baffle.3. Switch ice machine OFF or wait for it to be in acleaning cycle.4. Mix a 1 gallon solution of warm (95-115 oF.)water and sanitizer. Follow local codes forsanitizer.6. If there are two evaporators, repeat for the backone.7. Examine the top of the evaporators. The WaterDistribution Channels must be free from mineralbuild up. If build up is evident, scrub the channelswith scale remover and a plastic bristle brush.Check That WaterChannels are Clear5. Wash or spray the entire interior of the icestorage bin with the sanitizer solution. Thisincludes the bottom of the ice machine and theinside of the door, the door gaskets (if any) anddoor frame.6. Pour excess sanitizer into the bin to flush thedrain system.7. If the approved sanitizer requires a rinse, rinseall interior surfaces with potable water.Water DistributorsIt may become necessary to remove the waterdistributors from the top of the evaporator andclean (de-mineralize) them outside of the icemachine.Water Distributor8. Examine the water distributors. Although theyare made of a material that is resistant to mineralbuild up, some may be present. Soak or scrub thedistributors in or with a solution of Scotsman IceMachine Cleaner and warm potable water.9. Return the water distributors to their normalinstalled position.9a. Snap the two distributors onto the watermanifold. Place them on the back evaporator, rightend first. Push the distributors far enough to theright until the left end clears the retaining slot, thenrelease. Check that the distributors are seatedproperly.9b. Place the water hose onto the back waterdistributors.Removal of Water Distributor9c. Repeat for the front evaporator, if there is one.1. Remove front panel.10. Push and release the clean button to flush thewater system.2. Push and release the OFF button.Single Unit Installation:11. After the machine stops, push and release theFreeze button.3. Remove the evaporator covers.4. Reach over the water distributors and pull thehose off.12. Replace the evaporator cover.13. Replace the front panel.January 2007Page 13
CME256, 506, 656, 806: AutoIQ CubersAdditional Maintenance: Bin Controls, CondenserThe bin controls use a system of infrared emitting Air Filter Replacementand receiving components to sense the build up ofice in the bin. They are located at the bottom of theice outlet port. They must be free of mineral buildup to function properly. To check:1. Remove front panel.2. Push and release the off button.3. Remove top and right side panels.4. Remove the evaporator cover (on models withone)5. Remove the cube deflector.6. Pull up to remove the cascading shield (onmodels with one)Bin ControlSensor, ElectricEye AreaAir FilterReplacementTo Clean the Air Cooled CondenserContact a refrigeration service technician if the aircooled condenser coil needs to be cleaned.Bin Controlsin ReservoirCleaning of Bin Controls7. Push into the freezing compartment the electriceye brackets.8. Examine the bottom of the brackets, there aretwo sensors in each bracket, check that they areclear of mineral build up. They may be wiped cleanwith ice machine cleaner to assist in removal ofthe build up. Be sure to drain the reservoir or gothru a Clean cycle to remove residual cleaner.Note: Do NOT use abrasive materials or cleaneron the bin sensor lenses. A soft toothbrush is aneffective tool for cleaning these sensors.January 2007Page 14
CME256, 506, 656, 806: AutoIQ CubersBefore Calling for ServiceCheck the following:1. Has the water supply to the ice machine or building been shut off? If it has, the ice machine willautomatically restart within 25 minutes after water begins to flow to it.2. Has power been shut off to the ice machine? If yes, the ice machine will automatically restart whenpower is restored.To Manually Reset the machine:1. Remove the front panel.2. Locate the AutoIQ Controller. If a red diagnostic light is glowing, note which one and its blink rate.Then push and release the off button.3. Push and release the Freeze button.894. The machine should begin to operate. If there is alack of water it will shut off again soon.5. Return the front panel to its normal position.If the machine shuts down again, call for service.To Shut the Machine Off:76541. Remove the front panel.32. Locate the controller.23. Push and hold the Off button for 3 seconds or untilthe machine stops.1Push ButtonsIndicator LightsBIN FULLFREEZEHARVESTCLEANJanuary 2007Page 15OFFDiagnostic Lights:WATERREFRIGERATION
SCOTSMAN ICE SYSTEMS775 Corporate Woods Parkway, Vernon Hills, IL 60061800-533-6006www.scotsman-ice.com17-3173-01
Scotsman HTB555 (shown in this manual) may be drained either out the back or the base. Insulation is recommended for the ice machine reservoir and bin drains. Follow all applicable codes CME256, 506, 656, 806: AutoIQ Cubers January 2007 Page 6 HTB555 Drains Water Cooled Plumbing Connections Potable Water Inlet Condenser Water Inlet Condenser .