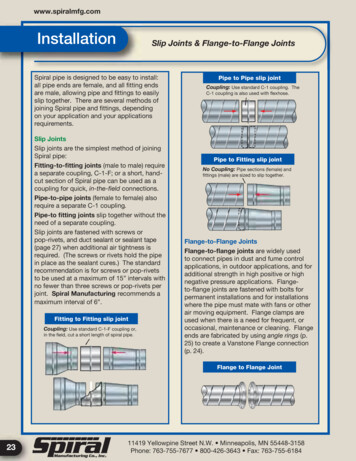
Transcription
The Project Gutenberg eBook of Woodwork Joints, by Unknown.Page 1 of 173The Project Gutenberg EBook of Woodwork Joints, by William FairhamThis eBook is for the use of anyone anywhere at no cost and withalmost no restrictions whatsoever. You may copy it, give it away orre-use it under the terms of the Project Gutenberg License includedwith this eBook or online at www.gutenberg.orgTitle: Woodwork JointsHow they are Set Out, How Made and Where Used.Author: William FairhamRelease Date: May 19, 2007 [EBook #21531]Language: EnglishCharacter set encoding: ISO-8859-1*** START OF THIS PROJECT GUTENBERG EBOOK WOODWORK JOINTS ***Produced by Chris Curnow and the Online DistributedProofreading Team at http://www.pgdp.netTranscriber's Note:The Table of Contents has been changed tomatch the actual chapter headings.A few hyphenations have been changed tomake them consistent.Minor typographic errors have been corrected.WOODWORK JOINTS(THE WOODWORKER SERIES)file://E:\Torrents Complete\Craft Hobby Books\21531-h\21531-h\21531-h.htm4/14/2008
The Project Gutenberg eBook of Woodwork Joints, by Unknown.Page 2 of 173REVISED EDITIONWOODWORKJOINTSHOW THEY ARE SET OUT, HOW MADE ANDWHERE USED; WITH FOUR HUNDREDILLUSTRATIONS AND INDEXREVISED EDITIONfile://E:\Torrents Complete\Craft Hobby Books\21531-h\21531-h\21531-h.htm4/14/2008
The Project Gutenberg eBook of Woodwork Joints, by Unknown.Page 3 of 173LONDONEVANS BROTHERS, LIMITEDMONTAGUE HOUSE, RUSSELL SQUARE, W.C.1THEWOODWORKER SERIESWOODWORK JOINTS.CABINET CONSTRUCTION.STAINING AND POLISHING.WOODWORK TOOLS.PRACTICAL UPHOLSTERY.WOOD TURNING.WOODCARVING.TIMBERS FOR WOODWORK.FURNITURE REPAIRING AND RE-UPHOLSTERY.HOUSEHOLD REPAIRS AND RENOVATIONS.CARPENTRY FOR BEGINNERS.KITCHEN FURNITURE DESIGNS.BUREAU AND BOOKCASE DESIGNS.LIGHT CARPENTRY DESIGNS.DOORMAKING.EVANS BROTHERS, LIMITED,MONTAGUE HOUSE, RUSSELL SQUARE,LONDON, W.C.1.file://E:\Torrents Complete\Craft Hobby Books\21531-h\21531-h\21531-h.htm4/14/2008
The Project Gutenberg eBook of Woodwork Joints, by Unknown.Page 4 of 173EDITORIAL FOREWORDTo be successful in woodwork construction the possession of two secrets isessential—to know the right joint to use, and to know how to make that joint in theright way. The woodwork structure or the piece of cabinet-work that endures is theone on which skilful hands have combined to carry out what the constructive mindplanned. And it is just here that the present Volume will help, not alone thebeginner who wishes preliminary instruction, but also the expert who desiresguidance over ground hitherto unexplored by him.In the preparation of this new edition the Publishers have secured the services ofMr. William Fairham, by whom the chapters have been carefully revised and reillustrated. Although intended for the practical man, and not professing to be agraded course of "educational woodwork," the Volume is one which HandicraftInstructors will find of the greatest value in conducting woodwork classes. No bookhitherto published contains such a variety of illustrations of joints, almost all ofwhich will form suitable exercises of practical educational importance in awoodworking course.J. C. S. B.file://E:\Torrents Complete\Craft Hobby Books\21531-h\21531-h\21531-h.htm4/14/2008
The Project Gutenberg eBook of Woodwork Joints, by Unknown.Page 5 of 173Old Oak Chests, showing the Method of Structure which forms the origin of most of our English(From The Woodworker, January, 1927.)CONTENTSPAGETHE GLUED JOINT1THE HALVED JOINT13THE BRIDLE JOINT35THE TONGUED AND GROOVED JOINT48THE MORTISE AND TENON JOINT64THE DOWELLING JOINT93THE SCARF JOINT103THE HINGED JOINT109SHUTTING JOINTS127THE DOVETAIL JOINT132DOVETAIL GROOVING160THE MITRED JOINT163file://E:\Torrents Complete\Craft Hobby Books\21531-h\21531-h\21531-h.htm4/14/2008
The Project Gutenberg eBook of Woodwork Joints, by Unknown.Page 6 of 173JOINTS FOR CURVED WORK172MISCELLANEOUS JOINTS176PUZZLE JOINTS189INDEX209Staircase of the Second Half of Seventeenth Century.(From The Woodworker, September, 1929.)THE GLUED JOINT[Pg 1]The glued joint in its various forms is in use in every country in the world, and isfile://E:\Torrents Complete\Craft Hobby Books\21531-h\21531-h\21531-h.htm4/14/2008
The Project Gutenberg eBook of Woodwork Joints, by Unknown.Page 7 of 173frequently met with in mummy cases and other examples of ancient woodwork.Alternative names under which it is known are the butt joint, the rubbed joint, theslipped joint, whilst in certain localities it is known as the slaped (pronouncedslayped) joint.Fig. 1.—Simplest Form of Glued or Rubbed Joint.The glued joint is made by planing two pieces of timber so that when placedtogether they are in contact with each other at every point; they are then usuallyunited with glue. Fig. 1 shows a sketch of a butt joint in its simplest form. In Fig. 2is indicated the method of holding the joint whilst being glued; the upright portionis held rigid in the bench vice, thus leaving the left hand to hold the piece which isto be jointed, whilst the right hand operates the glue brush. The pieces of woodwhich form a butt joint may be glued together with or without the aid of cramps orartificial pressure. If the joint is to be made without cramping, the two surfaces ofthe timber are warmed so as not to chill the glue. The surfaces are then glued and [Pg 2]put together and rubbed backwards and forwards so as to get rid of the superfluousglue. They are then put aside to dry.Glueing.—The better the glue penetrates into the pores of the wood, the strongerthe joint will be; for this reason timber of the loose-fibred variety, such as pine,etc., will hold up at the joint better than hardwoods like teak and rosewood. Theglue used for jointing should be neither too thick nor too thin; the consistency ofcream will be found suitable for most purposes. It should be nice and hot, and berapidly spread over the surface of the wood.Fig. 2.—How the Wood is held whilst Glueing.If light-coloured woods, such as pine, satinwood, sycamore, etc., have to be jointed,a little flake white should be procured and mixed into the liquid glue. This willprevent the glue showing a thin black line on the joint.Broad surfaces of close-grained hardwood having a shiny surface are usuallycarefully roughened with a fine toothing plane blade previous to glueing.Supporting the Joint.—The jointed boards should not be reared up against a"bench leg" or wall without having any support in the centre, as dotted line at Fig.5, because in all probability they will fracture before the glue has time to set; and,file://E:\Torrents Complete\Craft Hobby Books\21531-h\21531-h\21531-h.htm4/14/2008
The Project Gutenberg eBook of Woodwork Joints, by Unknown.Page 8 of 173when we go to take them up to renew working operations, we shall be annoyed to [Pg 3]find that they have assumed a position similar to that at Fig. 5 (shown exaggerated),and this will, of course, necessitate re-jointing.Fig. 3.—Correct Jointing.Fig. 4.—Faulty Jointing.Fig. 7.—(A) Glued Slip, (B)Glued Moulding.Fig. 5.—Boardsunsupported.Fig. 6.—Boardssupported.Fig. 8.—Grainalternating.A correct method to adopt is seen at Fig. 6. Here we have supported the joint byrearing up against the wall a couple of pieces of batten, one at each end of the [Pg 4]board, thus supporting it throughout its entire width until the glue is thoroughly set.The two or more pieces of timber in a butt joint adhere by crystallisation of the glueand atmospheric pressure. A well-fitted joint made with good quality glue is sostrong that, when boards of 3 feet and upwards are jointed together by this method,the timber in most cases will break with the grain sooner than part at the joint.Butt joints may be cramped up, if desired, and it is customary to warm them aspreviously stated. In the absence of the usual iron cramp, the amateur may make anexcellent wooden arrangement out of any odd pieces of timber that happen to behandy. Two blocks of hardwood are screwed on the base board at a suitablefile://E:\Torrents Complete\Craft Hobby Books\21531-h\21531-h\21531-h.htm4/14/2008
The Project Gutenberg eBook of Woodwork Joints, by Unknown.Page 9 of 173distance for the work in hand; the boards to be jointed are glued and placed inposition between the blocks; and the two hardwood wedges are inserted andhammered in opposite directions to each other, thus exerting the desired pressure.An example of this method of cramping is shown in Fig. 25, which also indicatesthe use of iron "dogs."When jointing, care should be taken to first plane up the boards true on one side—i.e., take them out of winding. The method of testing for this is shown at Fig. 9, andit may with advantage be used when jointing the edges of the boards. Two laths orstrips of wood are planed up to exactly the same width, having their edges straightand parallel. One edge of each lath may, if desired, be bevelled a little. The methodof using these "twist sticks" or "winding laths" is to put them on the board asindicated, and sight along their top edges. The winding laths, being much longer[Pg 5]than the width of the board, show up the irregularity greatly pronounced.The Tools generally used for making the butt joints are:—The jack plane, for roughing the edges, etc.The wooden trying plane (or iron jointing plane) for trueing up the work.The try square for testing purposes.The winding laths and straight edge.The Method of Work is as follows: Each board is in turn put in the vice andplaned straight lengthwise; it is then tested with winding laths and a try square (thelatter method is shown at Fig. 22).Fig. 9.—Testing Surface with Winding Laths.The boards are then put on the top of one another as at Fig. 1 and tested with astraight edge; they should appear true as shown at Fig. 3; if they show faulty as atFig. 4 the joints must be again fitted until the required degree of accuracy isobtained. Difficulties may be avoided by care in selecting timber suitable forjointing, and it must be remembered that timber shrinks circumferentially (the heartside becoming curved) as dotted lines in Fig. 10. If the timber be jointed with allthe heart side one way as at Fig. 10, the tendency will be for it to cast as shown bythe dotted line. If the timber be alternated as at Fig. 11, the tendency will be to cast [Pg 6]wavy, whereas if quartered timber can be obtained it will stand practically straightas the tendency to shrink is in thickness only. The grain of quartered timber isshown in Fig. 12.file://E:\Torrents Complete\Craft Hobby Books\21531-h\21531-h\21531-h.htm4/14/2008
The Project Gutenberg eBook of Woodwork Joints, by Unknown.Page 10 of 173Fig. 10.—Showing Heart side of Timber one way.Fig. 11.—Heart side of Timber shown alternated.Fig. 12.—Grain of Quartered Timber.Fig. 13.—Boards showing uniformity of Grain.Judgment should also be exercised to avoid jointing in which one piece of timber iswild and large in the grain, and the adjoining piece of a mild-grained nature.Jointed boards should always be glued up with the grain running in the same [Pg 7]direction if possible; this we show at Fig. 13, and nothing looks worse than adressing chest end or similar piece of work in which the grain runs haphazard.When jointing thin timber (say, 1 4-in., 3 8-in., 1 2-in. and 5 8-in. boards) the bestmethod is to use a shooting board (Fig. 26). It must be noted, however, that ashooting board and plane practically never give a true right angle, owing to wearand the grinding of the blade. Therefore, the boards should not all be laid with the"face mark" on the shooting board whilst the edges are shot, because any inequalitywould be multiplied by the number of pieces jointed. A better method is to alternatethe boards, face side up, then face side down, whilst shooting the edges; this willprevent convexity or concavity on the face of the jointed board, because any slighterror in the angle is neutralised (see Fig. 8).Applications of the Joint.—The following show various applications of the butt orglued joint:—file://E:\Torrents Complete\Craft Hobby Books\21531-h\21531-h\21531-h.htm4/14/2008
The Project Gutenberg eBook of Woodwork Joints, by Unknown.Page 11 of 173Fig. 14.—Carcase Wing-pieces Glued on.Fig. 7A shows a mahogany or other hardwood slip glued on the edge of a cheaperwood, such as pine or whitewood, as is the case on bookcase shelves when only thefront edge is seen and polished.Fig. 7B shows a moulding glued on a shelf, both mould and shelf in this instancebeing of polished hardwood. A shelf of this type might be used in a recess, theobject of the overhanging moulding being to hide a small 3 8-in. iron rod whichwould carry the curtain rings and heading of the curtain which covers the recess. [Pg 8]The shelf would be fixed about 3 ft. 9 ins. to 4 ft. 3 ins. from the floor.Fig. 14 shows the wing pieces glued on the top bearer of carcase work. Theapplication of this bearer in its position will be shown in the chapter onDovetailing.Fig. 15 shows a butt joint planed at an angle of 45 degrees (commonly called amitre), used for box feet, etc.Fig. 16 shows jointing up of an ogee-shaped panel. The dotted lines indicate thethickness of the timber previous to its being worked up to the finished shape. Bowfronted and semicircular panels are jointed in a similar manner.Fig. 15.—Butting Mitred Angle Joint.Fig. 16.—Jointing Ogee-shaped Panel.Fig. 17 shows timber jointed at right angles to the upright piece, and at an angle of[Pg 9]30 degrees.Fig. 18 indicates quarter-circle jointing, as used in round-cornered chests ofdrawers, wardrobes, cupboards, etc.Fig. 19 is similar to Fig. 18, but with hollow (or concave) corners.file://E:\Torrents Complete\Craft Hobby Books\21531-h\21531-h\21531-h.htm4/14/2008
The Project Gutenberg eBook of Woodwork Joints, by Unknown.Page 12 of 173Fig. 18.—Convex Corner.Fig. 19.—Concave Corner.Fig. 17.—Jointed Timber at 30 and 90 angles.[Pg 10]Fig. 21.—Building up Case ofPiano Front.F
CARPENTRY FOR BEGINNERS. KITCHEN FURNITURE DESIGNS. BUREAU AND BOOKCASE DESIGNS. LIGHT CARPENTRY DESIGNS. DOORMAKING. The Project Gutenberg eBook of Woodwork Joints, by Unknown. Page 3 of 173 file://E:\Torrents Complete\Craft Hobby Books\21531-h\21531-h\21531-h.htm 4/14/2008. EDITORIAL FOREWORD To be successful in woodwork construction the