Transcription
User ManualThis is a CLIA waived system.XS Prof UM 04837991001 08 USA d3 170721.indd 130.07.2017 18:02:17
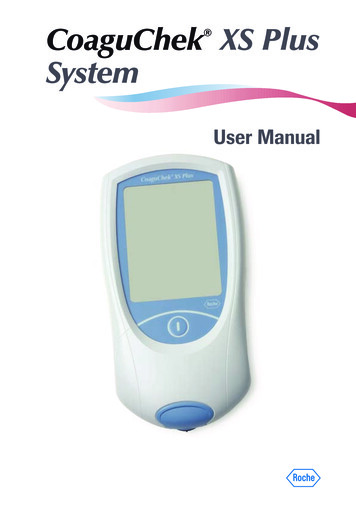
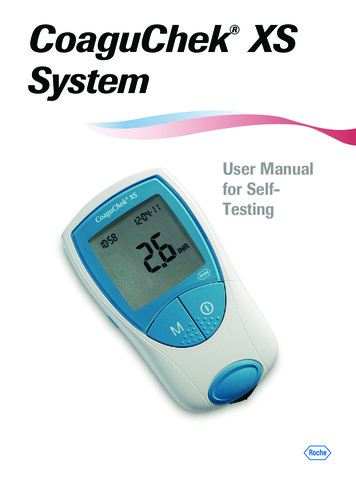
XS Prof UM 04837991001 08 USA d3 170721.indd 2CoaguChek XS SystemUser ManualVersion 8.00 4837991001 (08) 2017-06 USA30.07.2017 18:02:17
The contents of this manual, including all graphics and photographs, are the property ofRoche Diagnostics. No part of this document may be reproduced or transmitted in any formor by any means, electronic or mechanical, for any purpose, without the express writtenpermission of Roche Diagnostics.Roche Diagnostics has made every reasonable effort to ensure that all the informationcontained in this manual is correct at the time of printing. However, Roche Diagnosticsreserves the right to make any changes necessary without notice as part of ongoing productdevelopment.Caution: Federal law restricts this device to sale by or on the order of a physicianThis manual was created by the Roche Diagnostics Engineering Operations department.Direct questions or concerns regarding the contents of this document to:Roche DiagnosticsEngineering Operations Department9115 Hague RoadP.O. Box 50457Indianapolis, IN 46250-0457USAACCU-CHEK, COAGUCHEK and SAFE-T-PRO are trademarks of Roche.All other trademarks are property of their respective owners. 2011-2017, Roche Diagnostics.US Order Number: 0 4837991001 (08) 2017-06 USADistribution in USA by: Roche Diagnostics, Indianapolis, INThis document is available electronically at www.coaguchek-usa.comRevisions to this document are provided by Roche Diagnostics when necessary. No part of this documentmay be reproduced in any form or by any means without prior written consent.XS Prof UM 04837991001 08 USA d3 170721.indd 1i30.07.2017 18:02:17
Manual versionRevision dateChangesVersion 3.0November 2009New documentVersion 4.0March 2011Revised to update meter pictures,remove patent information, adddisposal information, and updateproduct specifications section.Version 5.0September 2013Revised ERROR 6 verbiage.Version 6.0February 2016Revised for additional test stripmaterial numberVersion 7.0August 2016Added GTIN information and revisedsection “Out of Range Values”Version 8.0June 2017Revised to add pictures of Accu-ChekSafe-T-Pro Plus lancing device; addedinformation on display check; minoreditorial revisions.iiXS Prof UM 04837991001 08 USA d3 170721.indd 230.07.2017 18:02:17
Tableof HeadContentsSectionAbout this Manual.1Symbols and Abbreviations.1User Resources.2Video.2Getting Started.2User Manual.2Test Strip Package Inserts.2The CoaguChek XS System.3Anticoagulation Medication.3Blood-clotting Time.3How the System Works.4The CoaguChek XS Meter.5Operating Conditions.6Getting Started.7Batteries.7Installing (or Replacing) Batteries.8Meter Setup.9Setting the Date and Time.9Code Chip. 12Inserting a New Code Chip. 12Integrated Quality Controls. 14Testing a Blood Sample. 15Tips for a Good Fingerstick. 15Important Notes about Blood Testing. 16Always. 16Never. 16Infection Control. 17Preparing for a Test. 18Performing a Test. 20Out of Range Values. 24Optional Testing Methods. 25Using Capillary Tubes. 25Using Venous Blood. 28iiiCoaguChek XS System User Manual, version 8.0 USAXS Prof UM 04837991001 08 USA d3 170721.indd 330.07.2017 18:02:17
Section HeadMemory. 30Storing Test Results in Memory. 30Reviewing Stored Test Results. 30Erasing Stored Test Results. 32Cleaning the Meter. 34Cleaning the Exterior. 34Cleaning the Test Strip Guide. 35Advanced Features. 37Setting Advanced Features. 38The Meter’s Display. 39Error Messages. 40Error Messages You May See After You Apply Blood. 44Other Information. 48Ordering Information for Health Care Professionals. 48Product Limitations. 48Product Specifications. 49Support/Services. 50Symbols. 51Disposal of the Meter, Test Strips, Lancets, and Batteries. 54Warranty. 55ivXS Prof UM 04837991001 08 USA d3 170721.indd 4CoaguChek XS System User Manual, version 8.0 USA30.07.2017 18:02:17
AboutManualSectionthisHeadSymbols and AbbreviationsThe test strip insert, the label on the back of the meter, the UserManual, and other packaging material may contain the followingsymbols or abbreviations:Use byBatch code/Lot numberIn vitro diagnostic medical deviceCatalog numberConsult instructions for useCaution, consult accompanying documents.Refer to safety-related notes in the manualaccompanying this instrumentManufacturerDate of manufactureTemperature limitation (Store at)The system fulfills the Canadian and U.S. safetyrequirements (UL LISTED, in accordance with UL61010A-1:02 and CAN/CSA-C22.2 No.61010-1-04).Rx OnlyCaution: Federal law restricts this device to sale by oron the order of a physicianGlobal Trade Item Number1CoaguChek XS System User Manual, version 8.0 USAXS Prof UM 04837991001 08 USA d3 170721.indd 130.07.2017 18:02:17
UserResourcesSectionHeadSeveral resources are available to help you use and maintain theCoaguChek XS System.Video (DVD Format)The CoaguChek XS System Video is for new users of theCoaguChek XS System. The video will help you get comfortablewith the CoaguChek XS Meter and the testing procedure.Getting StartedThe Getting Started guide shows you how to perform your firstcoagulation test on the CoaguChek XS Meter.User ManualThis CoaguChek XS System User Manual is a comprehensive guideto the meter and test strips. It is designed to provide answers toyour questions about the meter’s operation and use. Read thisentire manual carefully, and refer to it as necessary.Test Strip Package InsertsBe sure to read the test strip package insert for importantupdates and keep the insert from your current test strip packagefor future reference.2XS Prof UM 04837991001 08 USA d3 170721.indd 2CoaguChek XS System User Manual, version 8.0 USA30.07.2017 18:02:17
TheCoaguChekSectionHead XS SystemThe CoaguChek XS System is intended for use by professionalhealthcare providers for quantitative prothrombin time testing forthe monitoring of warfarin therapy. The CoaguChek XS System usesfresh capillary or nonanticoagulated venous whole blood.Anticoagulation MedicationAnticoagulation medications, also known as blood thinners, areprescribed to avoid unwanted clots. Blood-clotting time must bemonitored to ensure that a patient’s medication dosage is correct.Blood-clotting TimeThe rate at which blood clots is measured in units called INR. It isvery important for patients to stay within their target INR range. Ifthe INR is too low, the risk of blood clots increases. If the INR is toohigh, the risk for internal bleeding increases.Everyone’s INR is different. The patient’s doctor determines the bestINR range for the patient, depending on why the patient is takinganticoagulants and how the patient reacts to them. The doctor alsodetermines how often the patient’s blood should be tested. Thedoctor needs to know the patient’s blood-clotting time in order tosuccessfully treat the patient.3CoaguChek XS System User Manual, version 8.0 USAXS Prof UM 04837991001 08 USA d3 170721.indd 330.07.2017 18:02:17
Section HeadHow the System WorksThe CoaguChek XS System includes a meter and CoaguChek XS PTtest strips. Each box of test strips has its own code chip that youinsert into the meter. The code chip contains important informationabout the test strips such as their expiration dateand lot number. The meter and test strips work together toprovide a safe and reliable system for testing blood-clotting time.The CoaguChek XS System makes measuring blood-clotting timeeasy. The display on the meter guides you through the testingprocess. With the code chip inserted in the meter, you simply inserta test strip and apply a blood sample. The meter displays the resultin about a minute. The meter automatically stores the result inmemory so that you can easily recall results.The CoaguChek XS PT test strip contains various ingredients.When a blood drop is applied, the meter starts the test and theblood mixes with the ingredients on the test strip. When the meterdetermines that the blood has clotted, it stops the measurementand calculates the result.4XS Prof UM 04837991001 08 USA d3 170721.indd 4CoaguChek XS System User Manual, version 8.0 USA30.07.2017 18:02:18
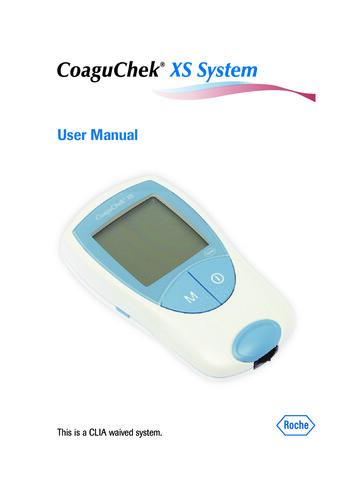
Section HeadThe CoaguChek XS MeterABCDEDisplayM (Memory) ButtonON-OFF ButtonTest Strip Guide CoverTest Strip GuideFGHIBattery Compartment CoverCode Chip SlotSET ButtonData PortAFBGCDEHI5CoaguChek XS System User Manual, version 8.0 USAXS Prof UM 04837991001 08 USA d3 170721.indd 530.07.2017 18:02:18
Section HeadOperating ConditionsTo ensure that the CoaguChek XS Meter functions correctly,follow these guidelines: Use the meter at room temperature, between 59 F and 90 F(15 C and 32 C). Use the meter at a relative humidity of less than 85%,without condensation. When testing, keep the meter level. If you store the meter for a period of time, remove the batteries. Do not use the meter at an altitude higher than 14,000 feet(4,300 meters). Do not use the meter near a strong magnetic field, such asa microwave oven, as this may interfere with the meter’sproper operation.Note: The CoaguChek XS Meter automatically shuts off after3 minutes if no buttons have been pushed.6XS Prof UM 04837991001 08 USA d3 170721.indd 6CoaguChek XS System User Manual, version 8.0 USA30.07.2017 18:02:18
GettingSection StartedHeadRefer to the Getting Started guide to learn how to set up the meterand prepare for and run your first blood-clotting-time test.BatteriesThe CoaguChek XS Meter uses 4 AAA batteries. The recommendedbatteries, alkaline-manganese batteries, shouldlast for approximately 300 tests.When you power the meter on, the display brieflyshows the battery symbol. The battery symbolis divided into 4 segments. With new, freshbatteries in the meter, the battery symbol showsall 4 segments.When only 1 segment appears, replace thebatteries. When only 1 segment appears you canstill access results stored in the meter’s memory.If you insert new batteries within 1 minute ofremoving the old batteries, the date and time settings will remain inmemory. But if you do need to reset the date and time, refer to theMeter Setup section in this manual.The meter saves battery power by automatically powering off after3 minutes, unless you press a button or insert a test strip. Evenwhen the batteries are removed, the test results are saved inmemory.7CoaguChek XS System User Manual, version 8.0 USAXS Prof UM 04837991001 08 USA d3 170721.indd 730.07.2017 18:02:18
Section HeadInstalling (or Replacing) BatteriesHave ready 4 AAA batteries.1. Open Battery Compartment2. Insert New Batteries3. Power OffWith the meter poweredoff, turn it over. Press thelatch gently inward and liftthe cover. Remove the oldbatteries, if necessary.Position the batteriesaccording to the diagraminside the batterycompartment. Replacethe cover. Turn the meterback over.Power the meter off.8XS Prof UM 04837991001 08 USA d3 170721.indd 8CoaguChek XS System User Manual, version 8.0 USA30.07.2017 18:02:18
Section HeadMeter SetupThe CoaguChek XS Meter is preset with the U.S. date format(month-day-year) and U.S. time format (12-hour as opposed to24-hour).Before you use the meter for the first time—or if there is no batterypower for more than 1 minute—you’ll have to set the current dateand time. In addition, the meter has certain advanced features thatyou can set up if you plan to use them. See the Advanced Featuressection in this manual to learn more about the advanced featuresand how to set them up.Setting the Date and TimeThe date and time settings are important. Each time you run a test,the meter compares its date with the test strip’s expiration date. Ifthe test strips are expired, the meter displays an error message andprevents you from running a test.Whenever you put batteries in the meter, it automatically goes toSetup mode (where you set the date and time). You can also go to.Setup mode at any time by pressing the SET buttonTo set the date and time, you’ll use these buttons: to change a setting. to accept a setting.9CoaguChek XS System User Manual, version 8.0 USAXS Prof UM 04837991001 08 USA d3 170721.indd 930.07.2017 18:02:18
Section Head1. Go to Setup ModeIf the meter is not already inSetup mode, press the SET.buttonThe date format flashes in theupper-right corner.2. Set Today’s DatePress the SET button.Press the M buttontochange the year. Press the SETbutton.Press the M buttontochange the month. Press theSET button.Press the M buttontochange the day. Press theSET button.10XS Prof UM 04837991001 08 USA d3 170721.indd 10CoaguChek XS System User Manual, version 8.0 USA30.07.2017 18:02:18
Section HeadThe time format flashes in theupper-left corner.3. Set Current TimePress the SET button.Press the M buttontochange the hour. Press the SETbutton.toPress the M buttonchange the minutes. Press theSET button.4. Power OffPower the meter off.11CoaguChek XS System User Manual, version 8.0 USAXS Prof UM 04837991001 08 USA d3 170721.indd 1130.07.2017 18:02:18
Section HeadCode ChipEach box of test strips comes with its own code chip. The codechip provides the meter with information such as the lot numberand expiration date of the test strips.Before each test, make sure the correct code chip is in the meter.Each time you open a new box of test strips, replace the old codechip with the new one.Protect the code chip from moisture and also from equipment thatproduces magnetic fields, such as a microwave oven.Inserting a New Code ChipHave the correct code chip ready.1. Remove Old Code ChipWith the meter powered off,remove the old code chip andthrow it away.12XS Prof UM 04837991001 08 USA d3 170721.indd 12CoaguChek XS System User Manual, version 8.0 USA30.07.2017 18:02:19
Section Head2. Match CodesMake sure that the threenumber code on the new teststrip container matches thethree-number code on thenew code chip.3. Insert New Code ChipSlide the new code chip intothe code chip slot until itsnaps into place.13CoaguChek XS System User Manual, version 8.0 USAXS Prof UM 04837991001 08 USA d3 170721.indd 1330.07.2017 18:02:19
Section HeadIntegrated Quality ControlsThe CoaguChek XS System has quality control functions integratedinto the meter and test strips, so you never have to run qualitycontrol tests with liquid quality controls. The meter automaticallyruns its own quality control test as part of every blood test.When the quality control test runs, the letters QC flash onthe meter’s display. When the quality control test completes, acheckmark (P) appears following the letters QC. Then the metercontinues to run the blood test.If the quality control test fails, the meter displays the followingerror message. See the Error Messages section in this manual foran explanation of this (and other) error messages and what to dowhen they occur.14XS Prof UM 04837991001 08 USA d3 170721.indd 14CoaguChek XS System User Manual, version 8.0 USA30.07.2017 18:02:19
TestingBlood SampleSection aHeadTips for a Good FingerstickFor fingerstick blood testing, increasing the blood flow in the fingerwill help you get a good drop of blood. Before you prick the finger,try the following techniques until you see that the fingertip hasgood color: Warm the hand by havingthe patient hold it under hisor her armpit, use a handwarmer, and/or wash thehand with warm water. Have the patient hold his orher arm down to the side,so that the hand is belowthe waist. Massage the finger fromits base.If needed, immediately afterpricking, gently squeezethe finger from the base toencourage blood to flow.15CoaguChek XS System User Manual, version 8.0 USAXS Prof UM 04837991001 08 USA d3 170721.indd 1530.07.2017 18:02:19
Section HeadImportant Notes About Blood TestingAlways Operate the meter at temperatures between 59 F and 90 F(15 C and 32 C). Refer to the test strip package insert for proper use andhandling of test strips. Keep the test strip guide and meter clean. You may occasionallyneed to clean them. See the Cleaning the Meter section in thismanual for more information.Never Store the meter in damp or humid conditions (greater than85% humidity). Remove or insert the code chip while the meter isperforming a test. Use a code chip from a box of test strips other than theone in use. Open a container of test strips or touch a test strip with wethands or wet gloves. Touch or remove the test strip during a test. Wait more than 15 seconds after sticking the fingertip beforeapplying the blood. Add more blood after the test has begun. Touch any buttons while a test is in progress. Perform a test with a drop of blood from a previous fingerstick.16XS Prof UM 04837991001 08 USA d3 170721.indd 16CoaguChek XS System User Manual, version 8.0 USA30.07.2017 18:02:19
Section HeadInfection ControlFollow appropriate infection control guidelines. Use gloves. Use a separate lancet for each person. Dispose of used lancets and test strips in a stable container witha lid according to infection control guidelines. Follow all other hygiene and safety procedures applicable.Caution: There is a potential risk of infection. Medical staff andother persons using the CoaguChek XS Meter to perform tests onmore than one patient must be aware that any object coming intocontact with human blood is a potential source of infection. (See:National Committee for Clinical Laboratory Standards: Protectionof Laboratory Workers from Instrument Biohazards and InfectiousDisease Transmitted by Blood, Body Fluids, and Tissue. ApprovedGuideline, NCCLS document M29-A, 1997.) Dispose of used itemsaccording to the disposal policy of your facility.17CoaguChek XS System User Manual, version 8.0 USAXS Prof UM 04837991001 08 USA d3 170721.indd 1730.07.2017 18:02:19
Section HeadPreparing for a Test1. Gather ItemsGather the following items: CoaguChek XS Meter Container of test strips Test strip code chip Accu-Chek Safe-T-Pro Pluslancing device2. Match CodesMake sure the code numberon the test strip container andthe code chip match.Each box of test strips comeswith a matching code chip.Every time you open a new boxof test strips, you must replacethe code chip.18XS Prof UM 04837991001 08 USA d3 170721.indd 18CoaguChek XS System User Manual, version 8.0 USA30.07.2017 18:02:19
Section Head3. Insert Code ChipMake sure the meter ispowered off. With the codenumber facing up, insert thecode chip into the code chipslot until it snaps into place.4. Wash HandsHave the patient wash his orher hands in warm, soapywater. Or, clean the fingertipwith an alcohol wipe.Make sure the fingertip isthoroughly dry.19CoaguChek XS System User Manual, version 8.0 USAXS Prof UM 04837991001 08 USA d3 170721.indd 1930.07.2017 18:02:19
Section HeadPerforming a Test1. Get ReadyTake a test strip out of thecontainer.Close the container tightly.Do not open a container oftest strips or touch a test stripwith wet hands or wet gloves.This may damage the teststrips.You have 10 minutes to use atest strip once you remove itfrom the container.2. Insert StripSlide the test strip into the teststrip guide in the direction ofthe arrows until it stops.The meter powers on.The code number of theinserted code chip flasheson the display.20XS Prof UM 04837991001 08 USA d3 170721.indd 20CoaguChek XS System User Manual, version 8.0 USA30.07.2017 18:02:19
Section Head3. Match the CodeConfirm that the numberdisplayed matches the numberon the test strip container,then press .If the numbers are different,make sure you are using thecode chip that came with thetest strips you are using.An hourglass appears as themeter warms up, which takesabout thirty seconds.When the meter is warmed upa flashing test strip appears andthe meter begins a countdown.You have 180 seconds to applyblood to the test strip.4. Collect the BloodTwist the protective cap off theAccu-Chek Safe-T-Pro Pluslancing device.Massage the finger until you seeincreased color in the fingertip.Keeping the hand down,press the tip of the lancetfirmly against the side of thefingertip. Press the blue triggerbutton.Gently squeeze from the baseof the finger to develop ahanging drop of blood.21CoaguChek XS System User Manual, version 8.0 USAXS Prof UM 04837991001 08 USA d3 170721.indd 2130.07.2017 18:02:19
Section Head5. Identify the Target AreaFind the target area on the teststrip.You can dose the target areaby bringing the patient’s fingerto the top of the test strip orby bringing the meter to thepatient’s finger so that the sideof the test strip touches theblood drop.6. Apply the BloodWithin 15 seconds ofsticking the fingertip, applythe blood to the target area ofthe test strip—either from thetop or side of the test strip.Hold the blood drop to thetest strip until you hear a beep.The flashing blood drop symboldisappears.Do not add more blood tothe test strip. Do not touchthe test strip.The result appears in about1 minute.22XS Prof UM 04837991001 08 USA d3 170721.indd 22CoaguChek XS System User Manual, version 8.0 USA30.07.2017 18:02:20
Section Head7. Record ResultRecord the result according toyour facility’s guidelines.8. Clean UpPlace the used test stripand lancet in an approvedcontainer. Power the meteroff .If the meter is dirty, wipe it cleanwith a recommended cleaner.23CoaguChek XS System User Manual, version 8.0 USAXS Prof UM 04837991001 08 USA d3 170721.indd 2331.07.2017 19:25:28
Section HeadOut of Range ValuesThe CoaguChek XS PT test strips provide test results if the INRvalue is 0.8 and 8.0. If the result falls outside of this range, themeter displays (less than) 0.8 or (greater than) 8.0. If themeter indicates an out-of-range value, refer to the test strippackage insert and repeat the test.In rare cases, an “error 7” message can occur in patients withlong coagulation times ( 8 INR). If this error message appearsagain when the test is repeated, the result must be checked usinganother method.ORIf a “c” is displayed along with the result, the hematocrit value mightbe very low or the blood sample might not have been collectedproperly (e.g., wet hands). Repeat the measurement and make surethat the patient’s hands are dry. If the message persists, perform ahematocrit check.24XS Prof UM 04837991001 08 USA d3 170721.indd 24CoaguChek XS System User Manual, version 8.0 USA31.07.2017 19:25:28
Section HeadOptional Testing MethodsUsing Capillary TubesYou may use capillary tubes to collect the blood from a fingerstickand to dose the test strip. Use only CoaguChek Capillary Tubes/Bulbs, REF 11621173001. Do not use glass capillary tubes orcapillary tubes that contain anticoagulants.The following steps are optional to the fingerstick blood sampleinstructions in the Preparing for a Test and Performing a Testsections of this manual.1. Prepare the Capillary TubeFirmly insert the end of thecapillary tube into the capillarybulb. Completely insert thetube into the bulb to break thebulb diaphragm.Do not push the capillary tubein so far that it extends beyondthe top of the bulb.25CoaguChek XS System User Manual, version 8.0 USAXS Prof UM 04837991001 08 USA d3 170721.indd 2531.07.2017 19:25:28
Section Head2. Fill the Capillary TubeWhen the flashing test stripappears on the meter’s display,stick the fingertip. Then touchthe capillary tube to the blooddrop. Keep the tube level,and allow it to fill by capillaryaction. Fill the tube onlyhalfway.Avoid getting air bubbles intothe sample. Do not touch thehole at the top of the bulb. Ifblood gets into the bulb duringsample collection, discard thebulb and repeat the test with anew test strip and fingerstick.3. Dose the Test StripWithin 15 seconds ofsticking the fingertip, applythe blood to the test strip. Putyour finger over the hole at theend of the capillary tube. Holdthe capillary tube directly overthe target area of the test strip.Squeeze the bulb to dispenseone hanging drop of blood.Do not touch the test strip,move the meter, or add moreblood during testing.26XS Prof UM 04837991001 08 USA d3 170721.indd 26CoaguChek XS System User Manual, version 8.0 USA30.07.2017 18:02:20
Section Head4. Record ResultRecord the result according toyour facility’s guidelines.5. Dispose of BloodCollection ItemsAfter testing, discard thecapillary tube along with theused test strip and lancetaccording to infection controlguidelines.27CoaguChek XS System User Manual, version 8.0 USAXS Prof UM 04837991001 08 USA d3 170721.indd 2730.07.2017 18:02:20
Section HeadUsing Venous BloodYou may use the CoaguChek XS Meter to test venous blood. Bloodmay be collected directly using a butterfly or a needle and syringe.Do not clean the syringe tip with alcohol or water prior to dosingthe test strip. Use only a plastic syringe free of anticoagulant. Donot use glass. The syringe needle should be 23 gauge or larger. A21 gauge or larger needle is recommended.Note: Refer to the Preparing for a Test and Performing a Testsections of this manual for fingerstick blood testing instructions.1. Collect the Venous SampleWhen the flashing test stripappears on the meter’s display,collect the venous bloodsample.Do not perform venipunctureuntil the flashing test stripis displayed.28XS Prof UM 04837991001 08 USA d3 170721.indd 28CoaguChek XS System User Manual, version 8.0 USA30.07.2017 18:02:20
Section Head2. Dose the Test StripDiscard the first 4 drops ofblood. Then immediatelyplace 1 hanging drop of blooddirectly onto the target area ofthe test strip. Completely coverthe target area.Do not touch the test strip.Do not introduce air bubbles,move the meter, or add moreblood during testing.3. Record ResultRecord the result according toyour facility’s guidelines.4. Dispose of BloodCollection ItemsAfter testing, discard theneedle, syringe, or butterfly,and used test strip accordingto infection control guidelines.29CoaguChek XS Sys
CoaguChek XS System User Manual, version 8.0 USA Operating Conditions To ensure that the CoaguChek XS Meter functions correctly, follow these guidelines: Use the meter at room temperature, between 59 F and 90 F (15 C and 32 C). Use the meter at a relative humidity of less than 85%,