Transcription
CoaguChek XS PlusSystem User Manual
The contents of this manual, including all graphics and photographs, are the property of Roche Diagnostics.No part of this document may be reproduced or transmitted in any form or by any means, electronic ormechanical, for any purpose, without the express written permission of Roche Diagnostics.Roche Diagnostics has made every reasonable effort to ensure that all the information contained in this manualis correct at the time of printing. However, Roche Diagnostics reserves the right to make any changes necessarywithout notice as part of ongoing product development.This training manual was created by the Roche Diagnostics Technical Publications department. Directquestions or concerns regarding the contents of this document to:Roche DiagnosticsTechnical Publications Department9115 Hague RoadP.O. Box 50457Indianapolis, IN 46250-0457USAThe following U.S. Patents have been granted for the CoaguChek XS Plus System (meter and test strips):6,645,368; 6,662,439; 7,073,246; 7,386,937; 7,407,811; 7,429,865; 7,049,131; 7,084,251; 5,625,036; 6,881,378;6,207,000. Additional U.S. Patents pending.COAGUCHEK is a trademark of Roche. All other trademarks are the property of their respective owners.On the packaging and on the identification plate of the instrument you may encounter the following symbols,shown here with their meaning:Caution (consult accompanying documents). Refer to safety-related notes in the manual accompanyingthis instrument.Temperature limitation (Store at)Use byManufacturerBatch code/ Lot numberCatalog numberIn vitro diagnostic medical deviceThis product fulfills the requirements of the European Directive 98/79/EC forin vitro diagnostic medical devices.Consult instructions for use 2007-2009, Roche Diagnostics.US Order Number: 0 5021464001 (02) 2009-11 USADistribution in USA by: Roche Diagnostics, Indianapolis, INThis document is available electronically at www.poc.roche.com.
Revisions to this document are provided by Roche Diagnostics when necessary. No part of thisdocument may be reproduced in any form or by any means without prior written consent.Manual versionRevision dateChanges05021464001 (01)June 2009New document05021464001 (02)November 2009Revised for new firmware,claims changes, and newcleaning recommendations
The CoaguChek XS Plus SystemThe CoaguChek XS Plus SystemThe CoaguChek XS Plus System is used to monitor coagulation (blood-clotting) values(prothrombin time, PT, Quick value) with CoaguChek XS PT test strips.Please note: This manual contains the information you need to operate and care forthe CoaguChek XS Plus System. Please read this entire manual carefully before you usethe meter.
The CoaguChek XS Plus SystemIntroduction. 7The CoaguChek XS Plus System.7Test principle.8Contents of the pack.8Safety information.9Operating conditions.10Quality control.11About this manual. 12Manual format.12The CoaguChek XS Plus meter. 14Meter elements overview.15Power supply.16Operating the instrument. . 17Inserting the batteries.18Meter setup. 19Display field and symbols .20Settings summary .23Conventions used in this manual.27Screen setup .28Contrast .28Units . .29Language Selection .30Setting the date .32Setting the time .33Setting the display options for date and time .34Options setup .35Sort .35Beeper .36Auto off . .38Computer .39ID setup.40System Administrator (Admin.) .41Operator .45Patient .46Lockouts setup .48Operator lockout .49QC (Quality Control) lockout . .51
Testing a capillary blood sample. 53Important notes .53Getting a good capillary blood sample .54Getting a good test with venous whole blood .54Preparing to test .55Test strip code chip .56Inserting the code chip .56Switching on the meter .58Performing a test .60Quality control. 69Preparing to run a liquid quality control test .70Performing a liquid quality control test .72Review Results. 79Viewing test results .79Display Patient Result memory .81Display QC (Quality Control) memory .82Cleaning/Disinfecting. . 83Cleaning/Disinfecting the Exterior .83Cleaning/Disinfecting the Test Strip Guide .84Error messages. 86Error messages overview .86Troubleshooting error messages after turning the meter on .90Troubleshooting error messages when preparing to test .91Troubleshooting error messages during or after blood application .92Troubleshooting other error messages .94Further information. . 97Ordering .97Product limitations .97Disposing of the instrument .97Information about the software license .97Product specifications. 105Operating conditions and technical data . 105Sample material . 106Storage and transport conditions . 106Support/Services . 106Repairs . 106Warranty . 107
IntroductionIntroductionThe CoaguChek XS Plus SystemThe CoaguChek XS Plus System measures blood-clotting time (prothrombin time) forpeople who are taking anticoagulation medications, such as Coumadin or warfarin. TheCoaguChek XS Plus System measures blood-clotting time using blood from the fingertip orwhole blood from a vein (nonanticoagulated venous whole blood).The CoaguChek XS Plus System quantitatively measures prothrombin (blood-clotting) time(PT/Quick value/INR). INR is a measure of the rate at which blood clots. A low INR canincrease the risk of blood clots, while a high INR can increase the risk for internal bleeding.The patient’s physician will determine the best INR range for that patient, depending on whythe patient is taking anticoagulants and how the patient reacts to them. The doctor will alsodetermine how often the patient needs blood testing.The system includes the CoaguChek XS Plus meter and CoaguChek XS PT test strips.Optional liquid CoaguChek XS Plus PT Controls are also available. The meter guides youthrough the test step by step using the symbols and instructions on the display. Each box oftest strips has its own code chip that you insert into the meter. This code chip contains lotspecific information about its test strips, such as the expiration date and calibration data.The CoaguChek XS Plus System makes coagulation testing easy. You only need to insertthe code chip, turn the meter on, insert the test strip, and apply a blood sample. The bloodmixes with the ingredients on the test strip, and the meter determines when the blood isclotted. The meter displays the result in about one minute. After the measurement, themeter automatically stores the results in memory so you can easily recall them. The patient’sphysician will use these results to successfully treat the patient’s condition.The CoaguChek XS Plus System also includes data management with security features, suchas the QC (quality control) lockout for use with optional liquid quality controls.Please note: Before you use the meter for the first time (after you have first insertedthe batteries), you must set the date and time correctly to allow you to carry outmeasurements properly.Each time you replace the batteries you need to check (and, if necessary, adjust) thedate and time.If you need technical help, call Roche Diagnostics Technical Service Centerat 1-800-428-4674, 24 hours a day, 7 days a week, 365 days a year.7
IntroductionTest principleThe CoaguChek XS PT Test, used as directed with the CoaguChek XS Plus Meter, willprovide an electrochemical measurement of prothrombin time following activation of bloodcoagulation with human recombinant thromboplastin. In simple terms, blood works with thechemicals in the test strip to make a small electric current in the test strip that measuresblood-clotting time.Contents of the packn CoaguChek XS Plus metern Power adaptern User manualn Training DVDn Getting Started Guiden Warranty Cardn Policy and Procedure CDn 4 AA Batteriesn 5 CoaguChek Lancets8
The CoaguChek XS Plus SystemSafety InformationProtection against infectionMedical staff using the CoaguChek XS Plus System to perform tests onpatients must be aware that any contact with human blood is a potentialsource of infection.n Use gloves.n Use a separate lancet and lancing device for each person.n Dispose of used lancets and test strips in a sturdy sharps containerwith a lid.n Follow all health and safety regulations applicable to your laboratoryor practice.9
IntroductionOperating conditionsTo be sure that your CoaguChek XS Plus System functions properly, please observe thefollowing guidelines:n Only use the meter at a room temperature between 59 F and 90 F (15 C and 32 C).n Only use the meter at a relative humidity between 10 and 85 percent.n When operating the meter using the power adapter, use only a voltage of 100 V to240 V ( 10%), 50/60 Hz.n A touch screen makes the meter easier to operate. To use the touch screen, simply useyour finger (even when wearing gloves) or special pens designed for use with handhelddevices to select a screen prompt. Pointed or sharp objects can damage the touch screen.Touch lightly, holding until the prompt is selected.n When testing, place the meter on a level, vibration-free surface, or hold it so it is roughlyhorizontal.Electromagnetic interferenceDo not use the meter near strong electromagnetic fields, which could interferewith the proper operation of the meter.10
IntroductionQuality controlThe CoaguChek XS Plus System has a number of built-in quality-control functions.n A check of the electronic components and functions every time the meter is turned on.n A check of the test strip temperature while a test is in progress.n A check of the expiration date and lot information on the test strip carried out by thecode chip.n A two-level, on-board quality control test and patient result determination within a singletest chamber.Roche Diagnostics has available optional liquid quality controls for the CoaguChek XS PlusSystem. These controls are provided to assist with regulatory compliance requirements asapplicable to your facility.11
About this manualAbout this manualManual formatThe layout of this operator’s manual has been specially designed to help you locate the mostimportant information quickly and easily.All instructions that require you to actively do something, as well as very importantinformation, appear on a blue background.This symbol draws attention to the possible risk of injury or of harm to your health.Example 1:The left column contains an illustrationof the display screen.The right column states what you shoulddo at this point.1 Touch PATIENT TEST.12
About this manualExample 2:This column contains an illustration of thedisplay screen.This column contains information linked tothe display screen. The main menu of the CoaguChek XS Plus09:15 amMain MenuSystem contains buttons for the followingfunctions:Patient Testn Patient Test for performing a testControl TestReview ResultsSetupn Control Test for performing an optionalliquid quality control testn Review Results to recall results from thememoryn Setup to edit settings09/16/200913
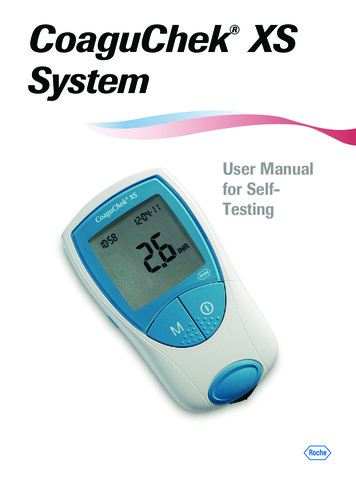
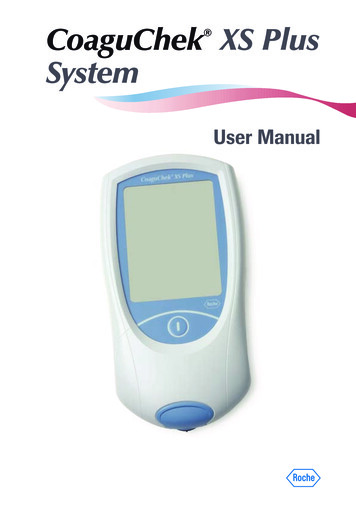
The CoaguChek XS Plus meterThe CoaguChek XS Plus meterABCFEDIFGHJ14
The CoaguChek XS Plus meterMeter elements overviewA Touch screen Shows results, information, symbols andresults recalled from memory. To selectany of the screen prompts, touch theprompt lightly, holding until the promptis selected.B On/Off button Press and hold this button until themeter turns on or off.C Test strip guide cover Remove this cover to clean the test stripguide. (REF 05039657001)D Test strip guideInsert the test strip here.E Battery coverF Battery cover tabPress tab to slide cover off.G Code chip slot withcode chipInsert the code chip here.H Connection socket forpower adapter Plug in the power adapter here.I Contacts for optionalbase unit Charges battery pack when connectedto base unit.J Infrared interfaceUsed for data communication. Covers the battery compartment(four standard AA batteries or arechargeable battery pack).15
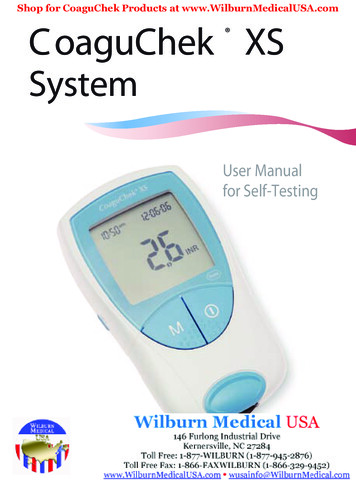
The CoaguChek XS Plus meterPower supplyThe CoaguChek XS Plus meter can operate with either the power adapter provided, batteries,or a special rechargeable battery pack (REF 04805640001). The CoaguChek XS Plus Systemuses four AA batteries. The batteries should last for about 60 tests, depending on the type ofbattery used. You should insert the batteries or optional rechargeable battery pack even whenyou use the power adapter. This ensures that you will not lose the date and time settings ifthe power goes out.To save power, the CoaguChek XS Plus meter has the option to automatically turn itself offbased on your setup selections, unless a screen prompt has been pressed or a new test striphas been inserted. The default setting is set to OFF. When the meter turns itself off, all resultsobtained up to that point remain in memory and the settings will still be there when youpower the meter back on. (Refer to Auto off in the chapter entitled Options setup.) During battery operation, the meter always09:15 amMain Menudisplays the battery power level.Patient TestControl TestReview ResultsSetup09/16/2009When replacing the batteries, you mustinsert the new batteries within 10 minutesof removing the old ones, to keep thedate and time settings. If you take longerthan this, you may need to re-enter thedate and time. To make sure that youdo not lose your date and time settings,connect the power adapter while youchange the batteries.The meter retains results in memory even when no batteries are inserted. All other settings,other than date and time after 10 minutes, are retained as well.16
Operating the instrumentOperating the instrumentBefore using the meter for the first time, carry out the following steps:1 Insert batteries* and/or connect the power adapter.2 Set the current date and time.3 Enter the settings of choice (language, unit of measure, user administration if applicable, etc.).* Instead of batteries, you can use a special rechargeable battery pack. If you choose thisoption, order the pack separately from Roche Diagnostics. To recharge, connect the poweradapter to the CoaguChek XS Plus meter.17
Operating the instrumentInserting the batteries1 With the meter turned off, press thebattery compartment cover release taband slide the cover off.2 Insert the four batteries in the batterycompartment as indicated. (The CoaguChek XS Plus System usesAA batteries. The batteries should lastabout 60 tests, depending on the typeof battery used.)3 Slide the battery compartment backonto the meter and close it. The meter turns itself on after thebatteries have been inserted.18
Meter setupMeter setupPlease note: If you have not set the date and time (after turning the meter on forthe first time or because the batteries were removed from the meter for more than10 minutes), you cannot perform a test. In that case, turning on the meter takes youimmediately to the Setup mode, where you must set the date and time.Once the date and time are set, the meter automatically moves to the main menu, whereyou can start a test or enter more settings. The next time you turn the meter on, the dateand time will remain and you will automatically go to the main menu. ou can call up any displayed function byYtouching the screen prompt for it with yourfinger (or a special pen for this purpose).Touch the screen lightly, holding until theprompt is selected.I f the meter did not automatically enter theSETUP mode (e.g., after the batteries werereplaced), you can call up the SETUP menufrom the main menu.1 T ouch the SETUP screen prompt tocall up the meter settings.2 Select the group of settings of choice.Main Menu09:15 amPatient TestSetup MenuScreenControl TestOptionsReview ResultsSetupID SetupLockouts09/16/200909/16/200909:15 amThe following screen prompts are used in theSetup menus:n SCREEN for changing the way thedisplay looksn OPTIONS for setting SORT, BEEPER,AUTO OFF, and COMPUTER optionsn ID SETUP for user management andpatient management optionsn LOCKOUTS for optional liquid qualitycontrol options19
Meter setupDisplay field and symbolsThe screen prompts that appear during normal operation are shown here, along with theirmeaning. Error messages and the description of the symbols linked to them are provided inthe chapter entitled Error messages.SymbolMeaningOK, Save settingCancel, discard settingReturn (to previous menu)Reduce/increase the value displayedMove screen contentsList of tests of a specific patientScroll through the listOperator must wait until the meter has completed an action.Test stripInsert test stripRemove test strip20
Meter setupSymbolMeaningApply blood sample (the time left to apply sample is counteddown in the display)180 SECApply QC sample (the time left to apply sample is counted downin the display)180 SECInsert the code chipQC%QSecINRAutomatic quality control completed successfullyResults are displayed as a Quick percentage value.Results are displayed in seconds.Results are displayed in INR units.Result in the chosen unit of measure is above themeasuring range. esult in the chosen unit of measure is below theRmeasuring range.Quality control: Result is above/below the specified range.21
Meter setupSymbolMeaningBattery status: When the batteries still have their full charge, all segmentsare lit. Individual segments disappear one by one as the batteriesbecome weaker. When there is no segment remaining, you can nolonger perform a test. However, test results are stillsaved in memory.Operation with power supply adapteramTime between midnight and noon (in 12-hour time format)pmTime between noon and midnight (in 12-hour time format)Reports a warning messageReports an error (see: Error messages)Reports a serious error (see: Error messages)Room or meter temperature is outside the acceptable range.The cover on the test strip guide is open.Communication is taking place via the infrared interface22
Meter setupSettings summaryThe diagram below shows all of the SETUP areas that can be accessed on the tBeeperAuto OffComputerOptionsID SetupAdmin.OperatorPatientLockoutsOperator LockoutQC Lockout23
Meter setupGroupSubgroupSettingValues *SCREENContrast0 - 10 (5 *)RESULT UnitsINR *INR/SECINR/%QLanguageDanskDeutschEnglish sSvenskaDate/TimeSET Date01/01/2005 *SET Time12:00 am *Date formatsDay.Month.Year (12.06.2006)Month/Day/Year (06/12/2006) *Year-Month-Day (2006-06-12)Time formats 24-hour time format (24h)12-hour time format (12h),with am/pm ** Settings that are in the meter when it leaves the factory are labeled with an asterisk (*).24
Meter lues *Date/Time *Patient ID NUMBEROffLOWMEDIUM *HIGHOff *Key clickAuto Off[minutes]OnOff *1 (5)* 1015202530405060ComputerActiveInactive ** Settings that are in the meter when it leaves the factory are labeled with an asterisk (*).25
Meter setupGroupSubgroupSettingValues *ID SETUPAdmin. (Administrator)Blank (off) *Operator (Operator list is optional)Blank (off) *PatientNoOptional *MANDATORYlockoutSOPerator lockout (only if the OperatorOff *option is set to Action and an operator listWeeklyis available)MonthlyEvery 3 monthsEvery 6 monthsyearlyQC lockoutNew codeYesNo *No *GeneralDailyWeeklyMonthly* Settings that are in the meter when it leaves the factory are labeled with an asterisk (*).26
Meter setupConventions used in this manualThis manual refers to all the various operations of the meter. When discussing a particularoperation, a picture guide will appear at the top of the page. This guide shows how tonavigate to this particular operation from the meter’s main menu.For example: This picture guide shows you how to get from the main menu to the date/timesetup section.Main Menu09:15 amPatient TestControl TestReview ResultsSetup09/16/2009Setup Menu09:15 amScreenOptionsID SetupLockouts09/16/2009Date/TimeSet DateDate09:15 amYear:09:15 am2009Set TimeMonth:1Day:1Format09/16/200909/16/200927
Meter setupScreen setupThe Screen setup area contains the options for changing the way the display looks.ContrastUse this setup option to make the screen display easier to see, depending on the lightingconditions where you are.Main Menu09:15 am1 F rom the main menu screen, touch Setupto call up the meter settings.Patient Test2 F rom the Setup menu screen, touchScreen.Control TestReview ResultsSetup09/16/2009Setup Menu3 F rom the Screen menu screen, touchContrast.09:15 amor4 T ouchto your liking.ScreenOptionsID SetupScreen09:15 amContrastLockoutsResult Units09/16/2009Language SelectionDate / Time09/16/2009Contrast09:15 amContrast (0-10):509/16/200928to change the contrast5 W hen you have set the contrast to yourliking, touch(OK) to save, or touch(Cancel) to cancel this procedure.The program automatically returns to theScreen menu.
Meter setupUnitsUse this setting to select the unit(s) of measure to be displayed with the results.Main Menu09:15 am1 F rom the main menu screen, touchSetup.Patient Test2 F rom the Setup menu screen, touchScreen.Control TestReview ResultsSetup09/16/2009Setup Menu3 F rom the Screen menu screen, touchResult Units.09:15 amScreenOptionsID SetupScreen09:15 amContrastLockoutsResult Units09/16/2009Language SelectionThe current unit of measure settingis shown with white type on a blackbackground. You can select either:n INRn INR and secondsn INR and Quick value in %Date / Time09/16/2009Units09:15 amINRINR/SECINR/%Q09/16/20094 T ouch the screen prompt to selectthe unit of measure of choice. Yourselection is now displayed with a blackbackground.5 After you make your selection, touch(OK) to save, or touch(Cancel)to cancel this procedure. The programautomatically returns to the Screenmenu.29
Meter setupLanguage SelectionUse this setting to select the language for all displays (that contain text).Main Menu1 Touch Setup in the main menu.09:15 am2 From the Setup menu screen, touch Screen.Pat
The CoaguChek XS Plus System is used to monitor coagulation (blood-clotting) values (prothrombin time, PT, Quick value) with CoaguChek XS PT test strips. Please note: This manual contains the information you need to operate and care for the CoaguChek XS Plus System. Please read this entire manual carefully before you use the meter. The .