Transcription
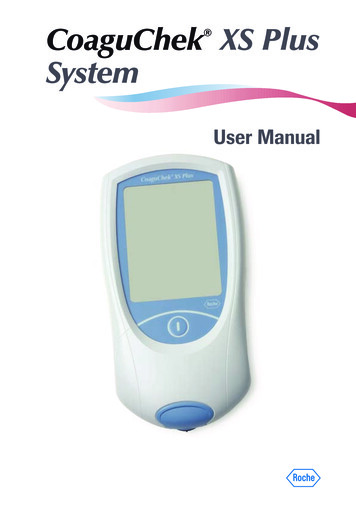
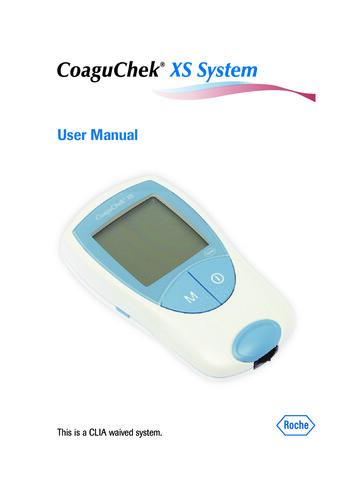
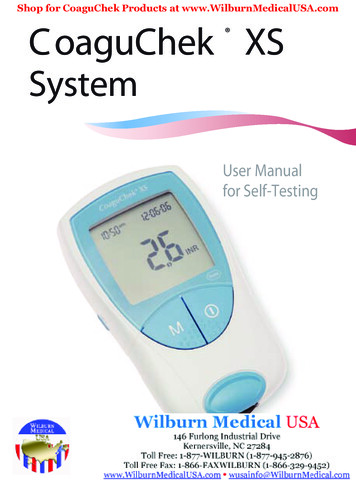
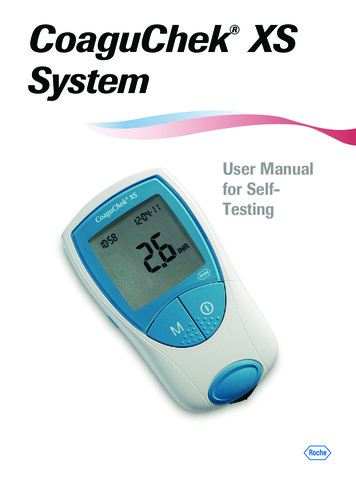
CoaguChek XSSystem User Manualfor SelfTesting
The contents of this manual, including all graphics and photographs, are the property ofRoche Diagnostics. No part of this document may be reproduced or transmitted in any formor by any means, electronic or mechanical, for any purpose, without the express writtenpermission of Roche Diagnostics.Roche Diagnostics has made every reasonable effort to ensure that all the informationcontained in this manual is correct at the time of printing. However, Roche Diagnosticsreserves the right to make any changes necessary without notice as part of ongoing productdevelopment.This training manual was created by the Roche Diagnostics Technical Publicationsdepartment. Direct questions or concerns regarding the contents of this document to:Roche DiagnosticsTechnical Publications Department9115 Hague RoadP.O. Box 50457Indianapolis, IN 46250-0457USACOAGUCHEK, ACCU-CHEK and SOFTCLIX are trademarks of Roche. All other trademarks are the property of their respective owners. 2007-2013, Roche Diagnostics.US Order Number: 04999045001 (04)-0713Distribution in USA by: Roche Diagnostics, Indianapolis, INThis document is available electronically at www.poc.roche.com.i
Revisions to this document are provided by Roche Diagnostics when necessary. No partof this document may be reproduced in any form or by any means without prior writtenconsent.iiManual versionRevision dateChangesVersion 2.0November 2009New documentVersion 3.0March 2011Revised to update meter images, adddisposal information and updateproduct specifications section.Version 4.0July 2013Revised ERROR 6 and ERROR 7verbiage.
Table of ContentsAbout this Manual. 1Symbols and Abbreviations.1User Resources. 2Training DVD.2Getting Started.2User Manual.2Test Strip Package Inserts.3Lancet Device Package Inserts.3The CoaguChek XS System. 4Anticoagulation Medication.4Blood-clotting Time.4How the System Works.5The CoaguChek XS Meter.6Operating Conditions.7Getting Started. 8Batteries.8Installing (or Replacing) Batteries.9Meter Setup. 10Setting the Date and Time. 11The Meter’s Display. 14Code Chip. 14Inserting a New Code Chip. 15Integrated Quality Controls. 16iii
ivTesting a Blood Sample.17Tips for a Good Fingerstick. 17Important Notes About Blood Testing. 18Always. 18Never. 18Infection Control. 19Preparing for a Test. 20Performing a Test. 22Very Low or Very High Test Results. 27Memory.28Storing Test Results in Memory. 28Reviewing Stored Test Results. 28Erasing Stored Test Results. 30Cleaning the Meter.32Cleaning the Exterior. 32Cleaning the Test Strip Guide. 33Error Messages.35Other Information.43Product Limitations. 43Product Specifications. 43Support/Services. 44Symbols. 45Disposal of the Meter, Test Strips, Lancets, andBatteries . 50Warranty.51
About this ManualSymbols and AbbreviationsThe test strip insert, the label on the back of the meter, the UserManual, and other packaging material may contain the followingsymbols or abbreviations:Use by123123Batch code/Lot number123123In vitro diagnostic medical deviceCatalog number123123123Consult instructions for useCaution, consult accompanying documents.Refer to safety-related notes in the manualaccompanying this instrumentManufacturerTemperature limitation (Store at)The system fulfills the Canadian and U.S. safetyrequirements (UL LISTED, in accordance with UL61010A-1:02 and CAN/CSA-C22.2 No.61010-1-04).1
User ResourcesSeveral resources are available to help you use andmaintain the CoaguChek XS System.Training DVDThe CoaguChek XS System DVD is for new users ofthe CoaguChek XS System. This program will help youget comfortable with the CoaguChek XS Meter and thetesting procedure.Getting StartedThe Getting Started guide shows you how to performyour first coagulation test on the CoaguChek XS Meter.User ManualThis CoaguChek XS System User Manual is acomprehensive guide to the meter and test strips.It is designed to provide answers to your questionsabout the meter’s operation and use. Read this entiremanual carefully, and refer to it as necessary.2
Test Strip Package InsertsBe sure to read the test strip package insert forimportant updates and keep the insert from yourcurrent test strip package for future reference.Lancet Device Package InsertsBe sure to read the lancet device package insert tolearn how to use the lancet device and for importantupdates. Keep the insert from your current lancetdevice package for future reference.3
The CoaguChek XS SystemThe CoaguChek XS System measures blood-clottingtime (Prothrombin Time) for people who are takinganticoagulation medications such as Coumadin orwarfarin. The CoaguChek XS System measures bloodclotting time using blood from the fingertip.Anticoagulation MedicationAnticoagulation medications, also known as bloodthinners, are prescribed to avoid unwanted clots. Yourblood-clotting time must be monitored to ensure thatyour medication dosage is correct.Blood-clotting TimeThe rate at which blood clots is measured in unitscalled INR. It is very important that you stay withinyour target INR range. If your INR is too low, the risk ofblood clots increases. If your INR is too high, the riskfor internal bleeding increases.Everyone’s INR is different. Your doctor determinesthe best INR range for you, depending on why you aretaking anticoagulants and how you react to them. Yourdoctor also determines how often your blood should betested. Your doctor needs to know your blood-clottingtime in order to successfully treat you.4
How the System WorksThe CoaguChek XS System includes a meter andCoaguChek XS PT test strips. Each box of test strips hasits own code chip that you insert into the meter. Thecode chip contains important information about the teststrips such as their expiration date and lot number.The CoaguChek XS System makes measuring bloodclotting time easy. The display on the meter guidesyou through the testing process. With the code chipinserted in the meter, you simply insert a test strip andapply a blood sample when the meter is ready. Themeter displays the result in about a minute. The meterautomatically stores the result in memory so that youcan easily recall results.The CoaguChek XS PT test strip contains variousingredients. When a blood drop is applied, the meterstarts the test and the blood mixes with the ingredientson the test strip. When the meter determines thatthe blood has clotted, it stops the measurement andcalculates the result.5
The CoaguChek XS MeterABCDEDisplayM (Memory) ButtonON-OFF ButtonTest Strip Guide CoverTest Strip GuideF Battery CompartmentCoverG Code Chip SlotH SET ButtonI Data PortAFBGCDEHI6
Operating ConditionsTo ensure that the CoaguChek XS Meter functionscorrectly, follow these guidelines: Use the meter at room temperature, between 59 Fand 90 F (15 C and 32 C). Use the meter at a relative humidity of less than85%, without condensation. When testing, keep the meter level. If you store the meter for a period of time, removethe batteries. Do not use the meter at an altitude higher than14,000 feet (4,300 meters). Do not use the meter near a strong magnetic field,such as a microwave oven, as this may interfere withthe meter’s proper operation.Note: The CoaguChek XS Meter automatically shuts offafter 3 minutes if no buttons have been pushed.7
Getting StartedRefer to the Getting Started guide to learn how to setup the meter and prepare for and run your first bloodclotting time test.BatteriesThe CoaguChek XS Meter uses 4 AAA batteries. Therecommended batteries, alkaline-manganese batteries,should last for approximately 300 tests.When you turn the meter on, the displaybriefly shows the battery symbol. Thebattery symbol is divided into 4 segments.With new, fresh batteries in the meter, thebattery symbol shows all 4 segments.When only 1 segment appears, replace thebatteries. When only 1 segment appearsyou can still access results stored in themeter’s memory.If you insert new batteries within 1 minute of removingthe old batteries, the date and time settings will remainin memory. But if you do need to reset the date andtime, refer to the Meter Setup section in this manual.The meter saves battery power by automatically turningoff after 3 minutes, unless you press a button or insert atest strip. Even when the batteries are removed, the testresults are saved in memory.8
Installing (or Replacing) BatteriesHave ready 4 AAA batteries.1. O pen BatteryCompartmentWith the meter turnedoff, turn it over. Press thelatch gently inward andlift the cover. Removethe old batteries, ifnecessary.2. Insert New BatteriesPosition the batteriesaccording to the diagraminside the batterycompartment. Replacethe cover. Turn the meterback over.Whenever you putbatteries in the meter,it automatically goes toSetup mode.9
3. Turn OffTurn the meter off.Meter SetupThe CoaguChek XS Meter is preset with the U.S. dateformat (month-day-year) and U.S. time format (12-houras opposed to 24-hour).Before you use the meter for the first time—or if thereis no battery power for more than 1 minute—you’ll haveto set the current date and time.10
Setting the Date and TimeThe date and time settings are important. Each time yourun a test, the meter compares its date with the teststrip’s expiration date. If the test strips are expired, themeter displays an error message and prevents you fromrunning a test.Whenever you put batteries in the meter, itautomatically goes to Setup mode (where you set thedate and time). You can also go to Setup mode at anytime by pressing the SET button ().To set the date and time, you’ll use these buttons: to change a setting. (SET) to accept a setting.11
1. Go to Setup ModeIf the meter is not alreadyin Setup mode, press theSET button.The date format flashesin the upper-right corner.2. Set Today’s Date12Press the SET buttonPress the M buttonto change the year.Press the SET buttonPress the M buttonchange the month.Press the SET buttonPress the M buttonchange the day.Press the SET button.to.to.
3. Set Current TimePress the SET button.Press the M buttonto change the hour.Press the SET button.Press the M buttonto change the minutes.Press the SET button.4. Power OffPower the meter off .If, in the future, you needto change the date andtime, press the SET buttonto re-enter Setupmode. After you changethe date and time, justturn the meter off .Other set-up choices inthe meter must be set orchanged by your doctor.13
The Meter’s DisplayWhen you turn the meter on, it briefly shows all thedisplay’s letters, numbers, and symbols. Regularly checkthat all segments of each letter, number, and symbolappear. Please compare your meter’s display to themeter display shown here on this page.You can display allthe letters, numbers, andsymbols for a longer timeto allow comparison. To dothis, turn the meter onand then hold down theON-OFF button .The full display shouldappear as shown at left.Code Chip14Each box of test strips comes with its own code chip.The code chip provides the meter with information suchas the lot number and expiration date of the test strips.Before each test, make sure the correct code chip is inthe meter. Each time you open a new box of test strips,replace the old code chip with the new one.Protect the code chip from moisture and also fromequipment that produces magnetic fields, such asa microwave oven.
Inserting a New Code ChipHave the correct code chip ready.1. Remove Old Code ChipWith the meter turned off,remove the old code chipand throw it away.2. Match Code NumbersMake sure that the3-digit code numberon the new test stripcontainer matches the3-digit code number onthe new code chip.3. Insert New Code ChipSlide the new code chipinto the code chip slotuntil it snaps into place.15
Integrated Quality ControlsThe CoaguChek XS System has built-in quality controlfunctions in the meter and test strips. The meterautomatically runs its own quality control test as partof every blood test, so you never have to run qualitycontrol tests with liquid quality controls.When the quality control test runs, the letters QC flashon the meter’s display. When the quality control test isfinished, a checkmark (3) appears following the lettersQC. Then the meter continues to run the blood test.If the quality control test fails, themeter displays this error message.See the Error Messages section inthis manual for an explanation ofthis and other error messages andwhat to do when they occur.16
Testing a Blood SampleTips for a Good FingerstickFor fingerstick blood testing, increasing the bloodflow in your finger will help you get a good drop ofblood. Before you stick your finger, try the followingtechniques until you see that your fingertip hasgood color: Warm your handby holding it underyour arm, use a handwarmer, and/or washyour hand with warmwater. Hold your arm downby your side, so thatyour hand is belowyour waist. Massage your fingerfrom its base.If needed, immediatelyafter pricking, gentlysqueeze your finger fromthe base to encourageblood to flow.17
Important Notes About Blood TestingAlways Operate the meter at temperatures between 59 F and90 F (15 C and 32 C). Refer to the test strip package insert for proper useand handling of test strips. Keep the test strip guide and meter clean. SeeCleaning the Meter section in this manual for moreinformation.Never Store the meter in extreme temperatures below 59 For above 90 F (below 15 C or above 32 C). Store the meter in damp or humid conditions (greaterthan 85% humidity). Remove or insert the code chip while the meter isperforming a test. Use a code chip from a box of test strips other thanthe one in use. Touch or remove the test strip during a test. Wait more than 15 seconds after sticking yourfingertip before applying the blood.18
Add more blood after the test has begun. Touch any buttons while a test is in progress. Perform a test with a drop of blood from a previousfingerstick.Infection ControlThe ACCU-CHEK Softclix lancet device is intended foruse by a single person and is not suitable for use wheretesting different persons with the same device may leadto infections.19
Preparing for a Test1. Gather ItemsGather the followingitems: CoaguChek XS Meter Container of test strips Test strip code chip ACCU-CHEK Softclixlancet device andlancetEach box of test stripscomes with a matchingcode chip. Every time youopen a new box of teststrips, you must replacethe code chip.2. Match Code Numbers20Make sure the 3-digitcode number on the teststrip container and thecode chip match.
3. Insert Code ChipMake sure the meter isturned off. With the codenumber facing up, insertthe code chip into thecode chip slot until itsnaps into place.4. Prepare Lancet DevicePull off the cap of thelancet device. Insert anew lancet. Twist off thelancet’s protective cap.Put the cap back on thelancet device. Line up thenotches for the cap tofit. Select the penetrationdepth.Press the plunger. Ayellow dot appears inthe release button.5. Wash HandsWash your hands inwarm, soapy water.Make sure your fingertipis thoroughly dry.21
Performing a Test1. Get ReadyTake a test strip out ofthe container.Close the containertightly.You have 10 minutesto use a test strip onceyou remove it from thecontainer.2. Insert StripSlide the test strip intothe test strip guide in thedirection of the arrowsuntil it stops.The meter turns on.The code number of theinserted code chip flasheson the display.22
3. M atch the CodeNumbersConfirm that the numberdisplayed matches thenumber on the test stripcontainer, then press theM button .If the numbers aredifferent, make sure youare using the code chipthat came with the teststrips you are using.An hourglass appearsas the meter warms up,which takes about 30secondsWhen the meter iswarmed up a flashing teststrip appears and themeter begins acountdown. You have 180seconds to apply blood tothe test strip.23
4. Collect the BloodMassage your finger untilyou see increased colorin your fingertip.Keeping your hand down,press the tip of the lancetfirmly against the side ofyour fingertip. Press therelease button.Gently squeeze from thebase of your finger todevelop a hanging dropof blood.5. Identify the TargetArea24Find the target areaon the test strip.To prevent errormessages, the metermust be on a table freeof vibrations.
6. Apply the BloodWithin 15 seconds ofsticking your fingertip,apply the blood to thetarget area of the teststrip—from the side ofthe test strip.Hold the blood drop tothe test strip until youhear a beep. The flashingblood drop symboldisappears.Do not add more bloodto the test strip. Do nottouch the test strip.The result appearsin about 1 minute.25
7. Record ResultRecord the result on theCoaguChek XS SystemProthrombin Time SelfTesting Log Book.Call your doctor and/orthe service provider thatprovides your test stripsand the handling of yourtest results.8. Clean UpRemove the lancet fromthe lancet device. Placethe used test strip andlancet in a punctureproof container with a lid.Turn the meter off .If the meter is dirty, wipeit clean with a lint-freetissue and an approvedcleaning solution. SeeCleaning the Metersection of this manual.26
Very Low or Very High Test ResultsThe CoaguChek XS PT test strips provide test resultsif the INR value is between 0.8 and 8.0. If the meterdisplays (less than) 0.8 or (greater than) 8.0,repeat the test. If, when you repeat the test, you getthe same result (either 0.8 or 8.0), call theRoche Diagnostics Technical Service Center at1-800-428-4674.ORIf you see “error 7,” this means the meter was unable todetect a clot. Repeat the test. Be sure to carefully followthe steps on the previous pages. For example, makesure the fingertip is thoroughly dry, use the meter on asurface free of vibrations, and apply the blood dropwithin 15 seconds of stickingthe fingertip. If you still get“error 7,” call your doctorimmediately to arrange fortesting using another method.27
MemoryStoring Test Results in MemoryThe CoaguChek XS Meter automatically stores upto 300 test results and their dates and times in itsmemory. If the memory is full when you perform a test,the oldest result is automatically deleted. The mostrecent result is always saved.Note: All test results remain in memory even when themeter is without batteries.Reviewing Stored Test ResultsYou can review stored test results even when themeter’s battery power is low.To review results in memory:1. Access the Memory28Press the M button .The meter turns on,if it is not already on, andgoes to Memory mode.
2. V iew Most RecentResultThe most recent testresult appears. Theletters mem indicate thatyou are viewing a resultin memory. The timeand date of the test alsoappear.If there are no results inmemory, a 0 appears inthe display’s top-rightcorner.3. View Earlier ResultsTo view earlier results,press the M buttonagain.After you have viewed allthe results in the memory,3 dashes appear.29
Erasing Stored Test ResultsYou can erase all of the test results that are storedin the meter’s memory. You cannot, however, eraseindividual test results.To erase all stored results:1. Go to Erase mode.With the meter turned off,press and hold downthe M button . Whileyou are holding down theM button, press theON-OFF button andthen hold down bothbuttons for at least 5seconds.The meter displays mem(flashing) and clr. Thenumber of results inmemory is shown in thetop-right corner of thedisplay.30
2. ConfirmPress the M buttontoconfirm that you want toerase the entire memory.The hourglass symbolflashes while the testresults are being erased.Then, the counter is set to0 and 3 dashes appear.Note: To exit Erase modewithout erasing theresults, press the ON-OFFbutton instead.31
Cleaning/Disinfecting the MeterPlease follow the procedures below to clean anddisinfect the meter. Failure to follow these proceduresmay cause malfunction of the meter. Clean the meter only when contaminated with blood. Do not use sprays of any sort. Ensure that swab or cloth is only damp, not wet.Useful tip: To prevent contamination, apply blood viaside-dosing directly from fingertip.32
Cleaning/Disinfecting the exterior Use 10% bleach solution (1 part bleach and 9 partswater) or 70% isopropyl alcohol (rubbing alcohol) toclean and disinfect the meter housing (the exterior ofthe meter). E nsure that the blue test strip guide cover remainstightly closed while cleaning the housing.1. Clean/Disinfect theExteriorWith the meter turnedoff, wipe the meter’sexterior clean. Do not let liquidaccumulate near anyopening. Make surethat no liquid entersthe meter.2. Dry the Exterior With a lint-free tissue,wipe away residualmoisture and fluids aftercleaning the housing. Allow wiped areasto dry for at least10 minutes beforeperforming a test.33
Cleaning/Disinfecting the Test Strip Guide Use 10% bleach solution (1 part bleach and 9 partswater) or 70% isopropyl alcohol (rubbing alcohol)to clean the test strip guide.1. Open the Cover34With the meter turnedoff, use your thumbnailto open the cover ofthe test strip guide bypressing its front edgeupward.
2. C lean/Disinfect the TestStrip Guide Hold the meter uprightwith the test strip guidefacing down. Clean the easilyaccessible areas witha cotton swab. Be sure the swab isonly damp, not soakingwet, to ensure excessfluid does not enterthe meter. Wipe away residualmoisture and fluids.Caution: Do not insertany objects into thetest strip guide. Doingso could damage theelectrical contactsbehind the test stripguide.35
363. Allow to DryWith the cover off, allowthe test strip guide to dryfor at least 10 minutesbefore re-attaching thetest strip guide cover andtesting again.4. Close the CoverClose the cover, andmake sure it snaps intoplace.
Error MessagesYou may see the following error messages while usingthe CoaguChek XS Meter. If you see an error message,first try to correct the problem using the solutiondescribed below. If the problem persists, call theRoche Diagnostics Technical Service Center at1-800-428-4674.Error: Test StripPossible causes: A test strip was alreadyinserted when the meterwas turned on. The meter timed outafter you inserted thetest strip. The test strip isunusable. The test strip is not aCoaguChek XS PT teststrip.Solution:Remove the test strip.Then repeat the test witha new CoaguChek XS PTtest strip.37
38Error: MeterTemperatureThe meter is too cold ortoo warm to measurecorrectly.Solution:Turn the meter off andallow it to stand for about30 minutes at roomtemperature between59 F and 90 F (15 C and32 C).Error: BatteryThe battery level is toolow.Solution:Replace the batteries.See the Batteries sectionof this manual.
Error: Test Strip GuideCoverThe test strip guide coveris not properly closed.Solution:Close the test strip guidecover.Error: Code ChipThe code chip is missing,not properly inserted, ordamaged.Solution:Check to see if youhave the correct codechip properly insertedinto the meter. For moreinformation, see theCode Chip section ofthis manual.If the code chip isdamaged, call the RocheDiagnostics TechnicalService Center at1-800-428-4674.39
Error: Test Strip ExpiredSolution:The test strip has expired.Check the meter’s datesetting. If it is not correct,set the correct date. Formore information, see theMeter Setup section ofthis manual.If the date is correct, turnthe meter off and removethe code chip and thetest strip. Then use thecode chip and a test stripfrom a new box of teststrips.Error: Test StripUnusableThe test strip is unusable.40Solution:Turn the meter off,remove the test strip, andthen re-insert it. If theerror message reappears,discard the unusable teststrip and use a new one.
Error: Time ExceededYou did not apply bloodto the test strip within 180seconds after the blooddrop symbol appeared.Solution:Turn the meter off andremove the test strip.Repeat the test usinga new test strip andblood taken from anew fingerstick from adifferent finger.Error: Blood ApplicationError applying blood tothe test strip.Solution:Turn the meter off andremove the test strip.Repeat the test usinga new test strip andblood taken from anew fingerstick from adifferent finger.41
Error: Test StripInterferenceThe test strip wastouched or removedduring the test.42Solution:Turn the meter off andremove the test strip.Repeat the test usinga new test strip andblood taken from anew fingerstick from adifferent finger.Do not touch or removethe test strip when a testis in progress.NOTE: For meters withserial number UP0910000and lower, sporadicallyoccurring ERROR 6 aregenerally due to anactivation of the systemfail safe mechanisms thatare designed to preventthe release of wrongmeasurement results.However, in rare cases,“ERROR 6” may bereceived by patients whoare under treatment withwarfarin in combination
with antibiotics and/or chemotherapeuticsleading to extremely highcoagulation times ( 10INR, 5% Quick). In thiscase, and if “ERROR 6”is displayed repeatedly,please contact yourphysican without delay.Error: Quality ControlFailureThe test strip failed theinternal quality controlcheck. The test strip isunusable.Solution:Turn the meter off andremove the test strip.Repeat the test usinga new test strip andblood taken from anew fingerstick from adifferent finger.43
Error: MeasurementErrorMeasurement errorcaused by the bloodsample.44Solution:If you see “error 7,” thismeans the meter wasunable to detect a clot.Repeat the test. Be sureto carefully follow thesteps on the previouspages. For example,make sure the fingertipis thoroughly dry, use themeter on a surface freeof vibrations, and applythe blood drop within 15seconds of sticking thefingertip. If you still get“error 7,” call your doctorimmediately to arrangefor testing using anothermethod.
For meters with serialnumber UP0910000and lower, is the meterdisplaying “ERROR 7”?In rare cases, patientswith abnormal or unusallylong clotting times mayreceive an “ERROR 7”message. If you stillreceive this messagewhen you repeat thetest, you must use analternative test methodto confirm the result.Contact your physicianwithout delay.45
Error: Internal ErrorAn error occurredduring the internaldiagnostic test.Error: Internal Error46Solution:Turn the meter off and removethe batteries. Wait at least 1minute before re-insertingthe batteries into the batterycompartment. Re-set the dateand time as described in theMeter Setup section of thismanual.Caution: The date and timemust be set correctly.Repeat the test. If you see thesame error message again, themeter has a defect. Call theRoche Diagnostics TechnicalService Center at 1-800-4284674.Solution:Because this error indicatespossible damage to the heaterplate contacts, call the RocheDiagnostics Technical ServiceCenter at 1-800-428-4674 tohave the meter replaced.
Other InformationProduct LimitationsPlease read the information packaged with the teststrips regarding up-to-date product specifications andlimitat
This CoaguChek XS System User Manual is a comprehensive guide to the meter and test strips. It is designed to provide answers to your questions about the meter's operation and use. Read this entire manual carefully, and refer to it as necessary. User Resources. 3 Test Strip Package Inserts