Transcription
RED DOT SIGHT OWNER’S GUIDEModel #: TRDPCC12-19
Thank you for purchasing your new Tasco TRDPCC ProPoint Red Dot Sight (illuminated optical sight).This manual will help you optimize your viewing experience by explaining how to utilize the sight’s features and how to carefor it. Read the instructions carefully before using your sight.WARNING! : DO NOT LOOK AT THE SUN THROUGH THE OPTICS, AS PERMANENT EYE DAMAGE OR EVENBLINDNESS MAY RESULT.ABOUT THE TASCO TRDPCC RED DOT REFLEX SIGHTThe TRDPCC is a dynamic red dot in a compact 3.9” package (less sunshade). It features a 3 MOA red dot reticle, with 6brightness level settings. This versatile sight is also very rugged, with waterproof, shockproof and fogproof construction.Battery life is approx. 1000 hours at a brightness setting of “3” (mid-level). The included sunshade may be screwed ontothe threaded section at the front of the sight to reduce lens flare when the sun is in front of your position. A high rise mountis preinstalled, but the spacer can be removed if you prefer direct mounting to a rail (see “Mounting Your TRDPCC Sight”).*Note: battery life in use will vary depending on the brightness settings used, freshness and quality of the battery, ambienttemperature, and other factors.Your sight’s illuminated reticle has been pre-focused so the aiming point always appears in focus on the target. By comparison,open sights force you to focus on the rear sight, front sight and target at the same time and bring the target into focus.Your sight can be easily used with both eyes open (eye relief is unlimited), increasing the shooter’s awareness of thesurrounding environment. Faster target acquisition is provided due to the parallax free design, as the dot follows themovement of the user’s eye while remaining fixed on the target. Engineered for greater speed and accuracy, the sight allowsyou to focus on the target rather than a reticle, thus increasing accuracy. The Tasco TRDPCC sight’s electronic illuminated dothas been pre-focused so the point of aim always appears against the target.About Red Dot Lens PositioningAll red dot sights have an objective lens at the front of the unit that is spherical in shape.However, unlike a conventional riflescope with all lenses mounted perpendicular (at a 90degree angle) to the axis of the tube, the objective lens in a red dot sight is positioned offaxis and appears to be tilted when looking at the sight (right). This angle of the front lensallows the light generated by the battery powered LED light source inside the unit to bereflected back into the sight. The reflected light becomes the “dot” or aiming referencethat the shooter sees when a red dot sight is switched on. This engineered “bending” oflight is what makes today’s red-dot sights so popular and easy to use.MOUNTING YOUR TRDPCC SIGHTWARNING! : BEFORE MOUNTING YOUR SIGHT, REPLACING ITS BATTERY, OR REMOVING OR PERFORMINGMAINTENANCE ON THE SIGHT, BE SURE ACTION IS OPEN, CLIP OR MAGAZINE IS REMOVED AND A ROUNDIS NOT IN THE CHAMBER. DO NOT ATTEMPT ANY WORK UNTIL THE GUN HAS BEEN CLEARED ANDDETERMINED TO BE SAFE.WARNING: IF THE SIGHT IS NOT MOUNTED FAR ENOUGH FORWARD, ITS REARWARD MOTION MAYINJURE THE SHOOTER WHEN THE RIFLE RECOILS.Your new scope, even with its technologically advanced design and features, will not perform at its best if not properlymounted. One of the most important contributing factors to the accuracy of your scope and rifle is the quality of the mountand the care with which mounting is done. The TRDPCC is provided with a Weaver style mount which fits Weaver or Picatinnyrails, attaching your scope solidly to the rifle to provide dependability and consistent accuracy. The base or bases you usewith your sight should be manufactured specifically for your pistol, rifle or shotgun and should create a uniform horizontaland vertical mounting platform. Be sure they are properly installed and securely fastened according to the manufacturer’sinstructions for your safety.There is no set eye relief for your TRDPCC sight; therefore, you should provide at least three inches of clearance between theviewing lens and your eye when in the shooting position. Note that firearms with adjustable length-of-pull (“LOP”) buttstockscan affect or limit the amount of usable eye relief.Loosen the two cross-bolts in the sight mount using the provided Torx L-key, so that the locking bar can clamp aroundthe rail. Position the mount on your base rail so that the crossbolts are seated into slots. Forward load the mount, so thatthe crossbolts engage the rear of the related recoil lugs and clearance is removed. Tighten the bolts. CAUTION: Do not3
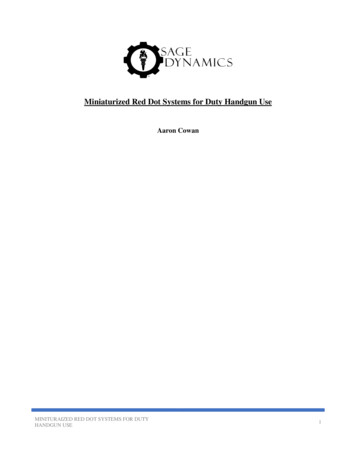
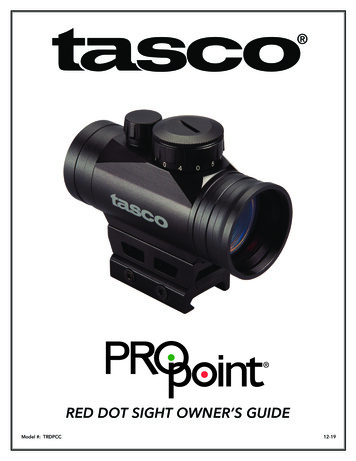
PARTS GUIDE1.2.3.4.5.6.7.4Battery CompartmentMount (w/Hi Rise Block installed)Objective LensElevation Adjustment (remove cap to access)Windage Adjustment (remove cap to access)Brightness Control (rheostat dial)Sunshade (screws onto threads at objective end)1653Positive ( ) side facing up,negative (-) facing down72overtighten. Torque should be set to 15 lbf*in for the four mount-to-sight screws,and 30 lbf*in for the two clamp-to-rail screws on the mount. Tasco recommendsapplying a thread-locking product (removable type) after tightening all bolts.If you would prefer a lower profile mounting, the spacer block can be removedbefore mounting the sight. To change the mount from hi-rise to standard height:1. Turn the sight over (a). Using the provided hex key (b), removelong bolts (c) from bottom of standard mount (d).2. Remove hi-rise block (e) and set it aside along with the longbolts.3. Use short bolts (f) to attach standard mount directly to reddot sight (tighten to 15 in-lbs if using torque wrench, do notover tighten).Remember, not all scopes are compatible with all mounts onall rifles. If there is any doubt in your mind, you should seek theadvice of your local retailer or gunsmith.ACTIVATING THE BATTERYBefore powering on your sight for the first time, you will need toopen the battery compartment and remove the protective stickeror plastic disc from the battery.aedafbcREPLACING THE BATTERYShould your reticle grow dim or not light at all, replace the battery. To install a new battery, unscrew the round batterycompartment cover, using a coin. Insert a new CR2032 lithium battery, noting the position of the positive and negative sides(see photo, right). Replace battery cover.CAUTION: When replacing the battery cover, be sure that the O-ring is present and not damaged. Failure to do so couldresult in water leakage into the battery compartment.Verify that red dot is present by switching the power on and increasing the brightness if necessary (see next page).4
SWITCHING POWER ON/OFFTo turn the sight’s power on and off, activate the illuminated dot by turning the rheostat knob to any numbered position.To switch off the sight, select the “0” (illumination level zero) between any two numbers.ADJUSTING DOT BRIGHTNESSTo adjust the brightness level of the dot reticle, turn the rheostat knob clockwise to increase brightness, orcounterclockwise to decrease brightness. With the “1” lined up with the index mark, the dot will be the dimmest, and with asetting of “6”, the dot is at the brightest illumination level.SIGHTING IN/ZEROING YOUR TRDPCC SIGHTWARNING! : SINCE THIS PROCEDURE INVOLVES LIVE FIRE, IT SHOULD BE DONE AT AN APPROVED RANGEOR OTHER SAFE AREA. CHECK BORE FOR OBSTRUCTIONS. AN OBSTRUCTED BORE MAY CAUSE INJURYTO YOU AND OTHERS NEAR BY. EYE & EAR PROTECTION IS RECOMMENDED.Initial sighting in of the TRDPCC can be done using a bore sighter per the manufacturer’s directions, or by visual boresighting through a rifle’s barrel with the bolt removed as follows, referencing a target at a 25 to 50 yard distance (7-15 yardsfor handgun). Boresighting should be done at your local shooting range rather than at home due to safety concerns, as wellas the convenience of being able to confirm final sight-in with live fire while you are there.1. With the sight mounted, rest the gun on a solid support. Switch on the sight’s power and adjust brightness as neededuntil dot is easily visible.2. Start by sighting along the barrel and aim at a target 25 to 50 yards away (7-15 yards for handgun). View through yourTRDPCC sight and gently rotate the windage and/or elevation adjustments, using the supplied tool to align the red dotwith the target as seen along the barrel.3. You should then fire a test shot to determine the point of impact of your weapon. If you are not hitting your aimingpoint (the center of the target) make an adjustment by turning the windage or elevation screw(s) in the direction youwant the bullet to move.Final sighting in can then be done, once the TRDPCC has been bore sighted as described above. Make sure you load thesame ammo you plan to use most often with the sight.4. Fire a few shots at your chosen zero distance to make sure you’re roughly on target. If you aren’t, use the windage and/or elevation adjustments to place the dot close to the center of the target.5. Fire a 3 shot group, keeping the firearm as steady as possible. Make any needed corrections with the windage and/orelevation adjustments (turn dials in the direction you want the group to move, referencing the dial’s arrows).6. Fire another 3 shot group to verify the ProPoint has now been sighted in accurately. Repeat the process if necessary.OPERATION UNDER EXTREME CONDITIONS Extreme heat (moist or dry): no special procedures required. Avoid prolonged exposure if possible. Extreme cold: extreme low temperature may shorten battery life. It could also make the rotary dial (brightness control) a little harderto turn than at normal temperatures.Salt air: similar to a firearm, ensure a light film of oil is maintained on all exposed steel components (e.g. fasteners). After exposure tosalt air, treat the steel screws/bolts as you would for any steel firearm parts.Sea spray, water, mud and snow: ensure that battery cap and the two adjustment caps (if present) are tightened before exposing thesight to sea spray, mud, snow or before immersing the sight in water. Hand tighten only. Keep lens covers closed when sight is notbeing used. Clean lenses with lens paper/cloth (see caution note below) and wipe the sight dry as soon as possible after exposure towater, sea spray, mud or snow.Dust storms and sand storms: keep lens covers closed when sight is not being used.CAUTION: The lenses shall never be cleaned with fingers but with lens paper/cloth, to avoid scratching the glass.Use a soft brush or “canned air” to remove any loose debris (sand, grass, etc.) prior to using the lens paper or soft clean cloth.TROUBLE SHOOTINGProblem: Red Dot Does Not AppearPossible Causes/Solutions: Discharged battery: Replace battery with a new CR2032 lithium cell. Battery installed incorrectly: Remove and reinstall battery, referring to the Parts Guide battery compartment image. Battery not making good contact: Clean contact surfaces and reinstall battery. Defective Rotary Switch: Contact Tasco customer service (1-800-423-3537).Problem: Impossible To ZeroPossible Causes/Solutions: Adjustment screw is at its limit: Check alignment of mount to barrel. Impact point is moving: Check mount and weapon rail stability.5
ONE YEAR LIMITED WARRANTYYour Tasco electronic product is warranted to be free of defects in materials and workmanship forone year after the date of purchase. In the event of a defect under this warranty, we will, at ouroption, repair or replace the product, provided that you return the product postage prepaid. Thiswarranty does not cover damages caused by misuse, improper handling, installation, or maintenanceprovided by someone other than a Tasco Authorized Service Department.Any return in the U.S. or Canada made under this warranty must be accompanied by the items listedbelow:1. A check/money order in the amount of 10.00 to cover the cost of postage and handling.2. Name, address and daytime phone # for product return.3. An explanation of the defect.4. Copy of your dated proof of purchase.Do not send in accessories (batteries, SD cards, lens caps), only the product for repair.Product should be well packed in a sturdy outside shipping carton to prevent damage in transit, and shipped tothe address listed below:IN U.S.A. Send To: IN CANADA Send To:Tasco TascoAttn.: Repairs Attn.: Repairs9200 Cody140 Great Gulf Drive, Unit BOverland Park, Kansas 66214Vaughan, Ontario L4K 5W1For products purchased outside the United States or Canada please contact your local dealer forapplicable warranty information.This warranty gives you specific legal rights.You may have other rights which vary from country to country.Tasco, TM, , 2019 B.O.P.ReticleClick ValueAdjustment RangeMOA per RevParallax FreeDistance (Yds)# of BrightnessSettingsEye Relief &Field or ViewLength (inches)Weight (oz )TRDPCCMag x Obj. Diam.SKUTechnical Specifications1x30 (Tube)3 MOA Dot1 MOA 120 MOA48506Unlimited3.9*8.3*** length with shade installed is 4.4 in.** weight including hi-rise spacer block6
FCC StatementThis device complies with part 15 of the FCC Rules. Operation is subject to the following two conditions: (1) This device may not cause harmful interference, and (2) thisdevice must accept any interference received, including interference that may cause undesired operation.This equipment has been tested and found to comply with the limits for a Class B digital device, pursuant to Part 15 of the FCC Rules. These limits are designed toprovide reasonable protection against harmful interference in a residential installation.This equipment generates, uses and can radiate radio frequency energy and, if not installed and used in accordance with the instructions, may cause harmfulinterference to radio communications. However, there is no guarantee that interference will not occur in a particular installation.If this equipment does cause harmful interference to radio or television reception, which can be determined by turning the equipment off and on, the user is encouragedto try to correct the interference by one or more of the following measures: Reorient or relocate the receiving antenna. Increase the separation between the equipment and receiver. Connect the equipment into an outlet on a circuit different from that to which the receiver is connected. Consult the dealer or an experienced radio/TV technician for help.Shielded interface cable must be used with the equipment in order to comply with the limits for a digital device pursuant to Subpart B of Part 15 of FCC Rules.Specifications and designs are subject to change without any notice or obligation on the part of the manufacturer.Industry Canada Statement :This device complies with ISED’s license-exempt RSSs. Operation is subject to the following two conditions: (1) This device may not cause harmful interference, and (2) this device mustaccept any interference received, including interference that may cause undesired operation.Le présent appareil est conforme aux CNR d’ ISED applicables aux appareils radio exempts de licence. L’exploitation est autorisée aux deux conditions suivantes: (1) le dispositif nedoit pas produire de brouillage préjudiciable, et (2) ce dispositif doit accepter tout brouillage reçu, y compris un brouillage susceptible de provoquer un fonctionnement indésirable.Radiation Exposure Statement / Déclaration d’exposition aux radiations :This device complies with the Industry Canada portable RF exposure limit set forth for an uncontrolled environment and is safe for the intended operation as described in this manual.Further RF exposure reduction can be achieved if the product can be kept as far as possible from the user’s body or if the device is set to a lower output power if such function is available.Le produit est conforme aux limites d’exposition pour les appareils portables RF pour les Etats-Unis et le Canada établies pour un environnement non contrôlé.Le produit est sûr pour un fonctionnement tel que décrit dans ce manuel. La réduction aux expositions RF peut être augmentée si l’appareil peut être conservé aussi loin que possibledu corps de l’utilisateur ou que le dispositif est réglé sur la puissance de sortie la plus faible si une telle fonction est disponible.Disposal of Electric and Electronic Equipment(Applicable in the EU and other European countries with separate collection systems)This equipment contains electric and/or electronic parts and must therefore not be disposed of as normal household waste. Instead, itshould be disposed at the respective collection points for recycling provided by the communities. For you, this is free of charge.If the equipment contains exchangeable (rechargeable) batteries, these too must be removed before and, if necessary, in turn bedisposed of according to the relevant regulations (see also the respective comments in this unit’s instructions).Further information about the subject is available at your community administration, your local waste collection company, or in thestore where you purchased this equipment.WARNING: This product uses a Lithium based battery. Lithium batteries can overheat and causedamage if physically abused. Do not use batteries that are damaged or show signs of physical wear.7
Merci d'avoir acheté votre nouveau viseur point rouge Tasco TRDPCC ProPoint (viseur optique lumineux).Ce manuel vous aidera à optimiser votre expérience visuelle en vous expliquant comment prendre soin du viseur et enutiliser les fonctionnalités. Lisez attentivement les instructions avant d'utiliser votre viseur.AVERTISSEMENT ! : NE PAS REGARDER EN DIRECTION DU SOLEIL À TRAVERS LES LENTILLES AU RISQUED'ENDOMMAGER L'ŒIL OU MÊME D'ENTRAÎNER UNE CÉCITÉ.À PROPOS DU VISEUR POINT ROUGE RÉFLEX TASCO TRDPCCLe TRDPCC est un viseur point rouge dynamique dans un boîtier compact de 3,9 "(sans parasoleil). Il comporte un réticulepoint rouge de 3 minutes d'arc (MOA), avec 6 réglages de niveau de luminosité. Ce viseur polyvalent est également trèsrobuste, avec une construction résistante à l’eau, aux chocs et à la buée. La durée de vie de la pile est d’environ 1000 heuresavec la luminosité réglée à « 3 » (niveau moyen). Le parasoleil fourni peut être vissé sur la section filetée à l'avant du viseurpour réduire les reflets parasites lorsque le soleil est en face de vous. Une monture grande hauteur est préinstallée, maisl'entretoise peut être retirée si vous préférez un montage direct sur un rail (voir la section « Montage de votre viseur TRDPCC »).*Remarque : l'autonomie de la pile varie en fonction des paramètres de luminosité utilisés, de l'âge et de la qualité de la pile,de la température ambiante et d'autres facteurs.Le réticule éclairé du viseur a été pré-focalisé afin que le point de repère apparaisse toujours net contre la cible. Encomparaison, les viseurs ouverts vous obligent à vous focaliser en même temps sur le viseur arrière, le viseur avant et la cibleet mettent en évidence la cible.Votre viseur peut être facilement utilisé avec les deux yeux ouverts (le dégagement oculaire est illimité), ce qui permet autireur d'être plus conscient de l'environnement qui l'entoure. L'acquisition de la cible est plus rapide grâce à sa conceptionsans parallaxe qui permet au point de suivre le mouvement de l'œil de l'utilisateur tout en restant fixé sur la cible. Conçupour une plus grande vitesse d'acquisition et une plus grande précision, ce viseur permet de vous concentrer sur la cibleplutôt que sur le réticule, améliorant ainsi votre précision. Le point rouge lumineux du viseur Tasco TRDPCC a subi une miseau point préalable de sorte que le point de visée apparaît toujours contre la cible.À propos du positionnement de la lentille point rougeTous les viseurs point rouge dispose d'un objectif de forme sphérique à l'avant del'unité. Cependant, contrairement à une lunette conventionnelle dont toutes les lentillessont montées perpendiculairement (à un angle de 90 degrés) par rapport à l'axe dutube, l'objectif dans un viseur point rouge est positionné hors de l'axe et semble inclinélorsque l'on regarde le viseur (droite). Cet angle de la lentille avant permet à la lumièregénérée par la source lumineuse LED alimentée par la pile à l'intérieur de l'unité d'êtreréfléchie dans le viseur. La lumière réfléchie forme le « point » ou référence de ciblageque le tireur voit lorsqu'un viseur point rouge est en marche. Cette « courbure » volontairede la lumière est ce qui rend les viseurs point rouge actuels aussi populaires et faciles à utiliser.MONTAGE DE VOTRE VISEUR TRDPCCAVERTISSEMENT ! : AVANT DE MONTER VOTRE VISEUR, DE REMPLACER SA PILE, DE LE DÉMONTER OUD'EFFECTUER SON ENTRETIEN, ASSUREZ-VOUS QUE LE MÉCANISME EST OUVERT, QUE LE MAGASIN OU LECHARGEUR EST RETIRÉ ET QUE LA CHAMBRE EST VIDE. N'EFFECTUEZ AUCUNE OPÉRATION AVANT DE VOUSASSURER QUE L'ARME EST VIDE ET SÛRE.AVERTISSEMENT : SI LE VISEUR N'EST PAS MONTÉ SUFFISAMMENT EN AVANT, SON MOUVEMENT VERSL'ARRIÈRE PEUT BLESSER LE TIREUR AU MOMENT DU RECUL DE L'ARME.Votre nouvelle lunette, malgré sa conception et ses caractéristiques technologiquement avancées, ne fonctionnera pas demanière optimale si elle n'est pas correctement montée. L’un des facteurs les plus importants contribuant à la précision devotre viseur et de votre fusil réside dans la qualité de la monture et le soin avec lequel le montage est effectué. La monturede style Weaver fournie avec le TRDPCC s’adapte aux rails Weaver ou Picatinny, fixant solidement votre viseur au fusilpour fournir une fiabilité et une précision constantes. La base ou les bases que vous utilisez avec votre viseur doivent êtrefabriquées spécifiquement pour votre pistolet, votre carabine ou votre fusil et créer une plateforme de montage horizontaleet verticale uniforme. Pour votre sécurité, assurez-vous de les installer convenablement et de les fixer fermement selon lesinstructions du fabricant.Étant donné qu'il n'y a pas de dégagement oculaire prévu pour votre viseur TRDPCC, un espace d'au moins 7 cm doit êtreobservé entre la lentille et l'œil lorsque vous êtes en position de tir. Notez que les armes à feu avec crosses à longueur de tir(« LOP ») ajustable peuvent affecter ou limiter la valeur de dégagement oculaire utilisable.Desserrez les deux boulons transversaux de la monture du viseur à l'aide de la clé Torx en L fournie, de sorte que la barrede verrouillage puisse se serrer autour du rail. Placez la monture sur votre rail de base de façon à ce que les boulonstransversaux se logent dans les fentes. Chargez la monture vers l'avant, de sorte que les boulons transversaux s'engagentà l'arrière des tenons de recul correspondants et que le jeu soit supprimé. Serrez les boulons. ATTENTION : ne serrez pas8
GUIDE DES PIÈCES1.2.3.4.5.6.7.4Compartiment à pileMonture (avec bloc élévateur installé)Lentille de l'objectifRéglage de l'élévation (retirer le cache pour y accéder)Réglage de la dérive (retirer le cache pour y accéder)Contrôle de la luminosité (bouton du rhéostat)Parasoleil (vissez-le sur les filetages à l'extrémité de l'objectif)1653Côté positif ( ) tourné vers le haut,côté négatif (-) tourné vers le bas72trop les boulons. Le couple de serrage doit être réglé à 1,69 N m (15 livres-forcepar pouce) pour les quatre vis de fixation de la monture au viseur et à 3,39 N m(30 livres-force par pouce) pour les deux vis de fixation du bloc de serrage au rail.Tasco recommande d'appliquer un produit frein filet (type retirable) après avoirserré tous les boulons.Si vous préférez un montage basse hauteur, vous pouvez retirer l'entretoise avantde monter le viseur. Pour changer la hauteur de la monture dehauteur élevée à hauteur standard :1. Retourner le viseur (a). À l'aide de la clé hexagonale fournie (b),retirez les boulons longs (c) du bas de la monture standard (d) .2. Retirez le bloc élévateur (e) et mettez-le de côté avec leslongs boulons.3. Utilisez des boulons courts (f) pour fixer la monture standarddirectement au viseur point rouge (serrez à 1,69 N m (15 livresforce par pouce) si vous utilisez une clé dynamométrique,mais ne serrez pas trop).N'oubliez pas que les lunettes de visée ne sont pas toutescompatibles avec toutes les montures de fusil. Si vous avez lemoindre doute, demandez conseil à votre détaillant ou à votrearmurier.ACTIVATION DE LA PILEaedafbcAvant de mettre sous tension votre viseur pour la première fois,vous devrez ouvrir le compartiment de la pile et retirer les autocollants de protection ou le disque en plastique de la pile.REMPLACEMENT DE LA PILESi votre réticule s'assombrit ou ne s'allume plus, remplacez la pile. Pour installer une nouvelle pile, dévissez le couvercle ronddu compartiment de la pile à l'aide d'une pièce de monnaie. Insérez une pile neuve au lithium CR2032, en tenant compte dela position des côtés positif et négatif (voir la l'image à droite). Remettez le couvercle de la pile en place.ATTENTION : lors de la remise en place du couvercle de la pile, assurez-vous que le joint torique est présent et nonendommagé. Le non-respect de ces instructions peut provoquer une fuite dans le compartiment de la pile.Vérifiez que le point rouge est présent en mettant le viseur sous tension et en augmentant la luminosité si nécessaire(voir page suivante).9
MISE EN MARCHE/ARRÊTPour allumer et éteindre le viseur, activez le point lumineux en tournant le bouton du rhéostat sur n’importe quelle positionnumérotée. Pour éteindre le viseur, sélectionnez le « 0 » (niveau d'éclairage zéro) entre deux nombres quelconques.RÉGLAGE DE LA LUMINOSITÉPour régler le niveau de luminosité du réticule à point, tournez le bouton du rhéostat dans le sens horaire pour augmenter laluminosité ou dans le sens antihoraire pour diminuer la luminosité. Lorsque le « 1 » est aligné avec le repère, la luminosité dupoint sera minimale et en position « 6 », le point est au niveau de luminosité le plus élevé.ZÉROTAGE/MISE À ZÉRO DE VOTRE VISEUR TRDPCCAVERTISSEMENT ! DANS LA MESURE OÙ CETTE PROCÉDURE IMPLIQUE LE TIR, ELLE DOIT ÊTRE EFFECTUÉE À UNEDISTANCE AUTORISÉE OU DANS TOUT AUTRE ESPACE SÉCURISÉ. VÉRIFIEZ QUE L'ÂME N'EST PAS OBSTRUÉE. UNEÂME OBSTRUÉE PEUT VOUS BLESSER OU BLESSER D'AUTRES PERSONNES À PROXIMITÉ. UNE PROTECTION DESYEUX ET DES OREILLES EST RECOMMANDÉE.La toute première mise à zéro du TRDPCC peut se faire à l’aide d’un correcteur de pointage selon les instructions du fabricant,ou par simbleautage visuel à travers le canon du fusil avec le boulon retiré comme suit, en visant une cible à une distance de 23 à46 mètres (environ 7 à 14 mètres pour une arme de poing). Pour des raisons de sécurité et pour des raisons de commodité, il estpréférable d'effectuer simbleautage au champ de tir local plutôt qu'à la maison, et de pouvoir confirmer le zérotage final par un tirréel pendant que vous y êtes.1.2.3.Une fois le viseur monté, posez l'arme sur un support solide. Mettez le viseur en marche et réglez la luminosité si nécessairejusqu'à ce que le point soit facilement visible.Commencez par viser le long du canon et visez une cible à une distance de 23 à 46 mètres (7 à 14 mètres pour une arme depoing). Visez à travers votre viseur TRDPCC et tournez doucement les réglages la dérive et/ou l'élévation à l'aide de l'outilfourni pour aligner le point rouge avec la cible, comme vous la voyez le long du canon.Faites ensuite un tir d'essai pour déterminer le point d'impact de votre arme. Si vous ne touchez pas le point visé (le centrede la cible), ajustez en tournant les vis de dérive ou d'élévation dans le sens de la correction souhaitée.Une fois le TRDPCC simbleauté comme décrit ci-dessus, le zérotage final peut alors être effectué sur le champ de tir. Assurezvous de charger les munitions que vous prévoyez d’utiliser le plus souvent avec le viseur.4.5.6.Exécutez quelques tirs à la distance zéro choisie pour vous assurer d’être à peu près sur la cible. Si ce n’est pas le cas, utilisezles réglages de la dérive et/ou de l’élévation pour placer le point aussi proche que possible du centre de la cible.Exécutez un groupement de 3 tirs en maintenant l’arme à feu aussi stable que possible. Effectuez toutes les correctionsnécessaires en tournant les réglages de la dérive et/ou de l’élévation dans le sens des cadrans.Exécutez un autre groupement de 3 tirs pour vérifier que le ProPoint est maintenant bien zéroté. Répétez le processus sinécessaire.UTILISATION DANS DES CONDITIONS EXTRÊMES Chaleur extrême (humide ou sèche) : aucune procédure spéciale requise. Si possible, évitez une exposition prolongée. Froid extrême : des températures très froides peuvent réduire la durée de vie de la pile. Cela peut également rendre le boutonrotatif (commande de luminosité) un peu plus difficile à tourner qu'à des températures normales. Air salin : comme pour une arme à feu, assurez-vous qu'un léger film d'huile est maintenu sur tous les composants en acierexposés (par exemple les attaches). Après une exposition à l'air salin, traitez les vis/boulons en acier comme vous le feriez pourtoute pièce d'arme à feu en acier. Projection d'eau de mer, eau, boue et neige : vérifiez que le couvercle de la pile et les deux capuchons de réglage (le caséchéant) sont serrés avant d'exposer le viseur à des projections d'eau de mer, à de la boue, de la neige ou avant d'immerger leviseur dans de l'eau. Serrez à la main uniquement. Laissez les caches des lentilles fermés si le viseur n'est pas utilisé. Nettoyezles lentilles avec du papier/un chiffon pour lentille (voir la remarque Attention ci-dessous) et essuyez le viseur dès que possibleaprès exposition à l'eau, à des projections d'eau de mer, de la boue ou de la neige. Tempêtes de poussière et de sable : laissez les caches des lentilles fermés lorsque le viseur n'est pas utilisé.ATTENTION : les lentilles ne doivent jamais être nettoyées avec les doigts mais avec du papier/un chiffon pour lentilles pouréviter de rayer le verre.Utilisez une brosse douce ou de « l'air comprimé » pour retirer les débris (sable, herbe, etc.) avant d'utiliser le papier pour lentilleo
ABOUT THE TASCO TRDPCC RED DOT REFLEX SIGHT The TRDPCC is a dynamic red dot in a compact 3.9" package (less sunshade). It features a 3 MOA red dot reticle, with 6 brightness level settings. This versatile sight is also very rugged, with waterproof, shockproof and fogproof construction.