Transcription
RED DOT SIGHT OWNER’S GUIDEModel #: RXS10010-21
Thank you for purchasing your new Bushnell RXS-100 Red Dot Reflex Sight (illuminated optical sight).This manual will help you optimize your viewing experience by explaining how to utilize the sight’s features and how to carefor it. Read the instructions carefully before using your sight.WARNING! : DO NOT LOOK AT THE SUN THROUGH THE OPTICS, AS PERMANENT EYE DAMAGE OR EVENBLINDNESS MAY RESULT.GDFCEAIncluded:A. Battery Door ToolB. W/E Adjustment ToolC. 3mm Hex Wrench for Mounting ScrewsD. CR2032 Lithium BatteryE. Weaver Style Low-profile Mounting BaseF. Microfiber Cleaning ClothG. Protective Shroud CoverB
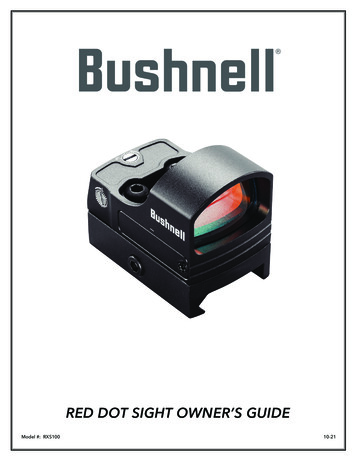
ABOUT THE BUSHNELL RXS-100 RED DOT REFLEX SIGHTThe RXS-100 is a state-of-the-art reflex sight, designed for hunting, plinking and target shooting with pistols, rifles, andshotguns. It may be directly mounted to compatible pistol slides (or accessory mounts) with the Leupold DeltaPoint footprintor it may be mounted to accessory rails using the included low-profile Weaver style mount. It features a battery life of morethan 5,000 hours (at a typical brightness level of “3”)*, a 1-hour auto-timeout feature to prolong battery life (timer countdownresets if any button is pressed), battery access without unmounting, and a 4 MOA dot with 8 brightness settings.*Note: battery life in use will vary depending on the brightness settings used, freshness and quality of the battery, ambienttemperature, and other factors.Your sight’s illuminated reticle has been pre-focused so the aiming point always appears in focus on the target. By comparison,open sights force you to choose to focus your eye on only the rear sight, front sight or target-or settle for a blurry compromise.Your sight can be easily used with both eyes open (eye relief is unlimited), increasing the shooter’s awareness of thesurrounding environment and providing faster target acquisition due to the limited parallax design, as the dot follows themovement of the user’s eye while remaining fixed on the target. Engineered for greater speed and accuracy, the sight allowsyou to focus on the target rather than a reticle, thus increasing accuracy. The Bushnell RXS-100 sight’s electronic illuminateddot has been pre-focused to be parallax free at 50 yards. Parallax error is minimized, from close range up to 100 yds.MOUNTING YOUR RXS-100 SIGHTWARNING! : BEFORE MOUNTING YOUR SIGHT, REPLACING ITS BATTERY, OR REMOVING OR PERFORMINGMAINTENANCE ON THE SIGHT, BE SURE ACTION IS OPEN, CLIP OR MAGAZINE IS REMOVED AND A ROUNDIS NOT IN THE CHAMBER. DO NOT ATTEMPT ANY WORK UNTIL THE FIREARM HAS BEEN CLEARED ANDDETERMINED TO BE SAFE.WARNING: IF THE SIGHT IS NOT MOUNTED FAR ENOUGH FORWARD, ITS REARWARD MOTION MAYINJURE THE SHOOTER WHEN THE FIREARM RECOILS.Your new sight, even with its technologically advanced design and features, will not perform at its best if not properly mounted. Oneof the most important contributing factors to the accuracy of your firearm and sight combination is the quality of the mount and caretaken during its installation. The RXS-100 will fit all bases compatible with Leupold DeltaPoint Pro sights*. It also includes a lowprofile base for mounting on Weaver or Picatinny style accessory rails. Make sure the base you use is manufactured specifically foryour pistol, rifle or shotgun. Be sure the base is properly installed and securely fastened according to the manufacturer’s instructionsfor your safety.The included hold-down mounting screws (2) are intended to be used with indirect mounting adapter plates like what is utilized forGLOCK M.O.S.** There are other types of optics-ready plate systems from pistol manufacturers (e.g. TAURUS TORO) that utilize apass-through plate system, which requires the user to utilize screws provided from the pistol manufacturer. If this is the case, additionalcare must be taken to ensure the red dot sight is adequately clamped. Some screws may bottom out into the slide and seem to be tight,but in fact are not adequately clamping the sight onto the slide. The potential resulting looseness can cause lens fracture and potentialrisk to the user. Always follow user-manual guidance and/or seek assistance from the respective manufacturers or a qualified gunsmith.Always wear approved eye-protection.The base should create a uniform horizontal and vertical mounting platform. Be sure it is properly installed and securely fastenedaccording to the manufacturer’s instructions for your safety. There is no set eye relief for your RXS-100 sight; therefore, you shouldprovide at least three inches of clearance between the viewing lens and your eye when in the shooting position. While 1X power/magnification sights have unlimited eye-relief, always ensure there is an adequate amount of space between your face and the opticto account for firearm recoil.If mounting directly to an adapter plate (common for optics ready pistols), follow the manufacturer’s instructions for attaching theadapter plate. Unless otherwise specified by the 3rd party manufacturer, be sure to remove any clearance by gently forward loadingthe plate during fastening. When attaching the red dot sight to the adapter plate, gently forward load the sight body while fastening.This both removes clearances that may otherwise shift under recoil and improves the chances of repeatable mounting should the reddot sight need to be removed for any reason such as maintenance.If using the included mount, loosen the socket head hex screw on the mount of the sight using the provided tool, so that the lockingbar can clamp around the rail. Position the mount on your base rail so that the cross-bolt engages a slot. Forward load the mount, sothat the crossbolt engages the forward face of the slot and clearance is removed. Tighten the hex bolt. CAUTION: Do not overtighten.Torque should be set to 15 lbf*in (pound-force inch) for the two sight-to-base screws and 20 lbf*in for the base cross-bolt.Remember, not all sights or scopes are compatible with all mounts on all firearms. If there is any doubt in your mind, you should seekthe advice of your local retailer or gunsmith.Leupold and DeltaPoint are registered trademarks of Leupold & Stevens, Inc.GLOCK and M.O.S. are registered trademarks of GLOCK, Inc.3
PARTS GUIDE1.2.3.4.5.6.7.Battery Compartment CoverMountLensElevation AdjustmentWindage AdjustmentSight-to-Base ScrewsBrightness Up/Down Buttons4635172Negative (-) side facing up,Positive ( ) facing downINSTALLING THE BATTERYBefore powering on your sight for the first time, you will need to activate the installed CR2032 lithium battery by removingthe protective plastic disc covering the battery. Loosen the screw on the right side of the battery cover (see photo, right). Thescrew is retained by an O-ring to help keep it in place. Note: Screw and mating door hole has a machined countersink to holdscrew flush to the cover. When reinstalling cover after activating or changing battery, ensure the cover’s tab end (opposite ofscrew end) is seated into the sight’s mating pocket before attempting to engage the screw. Remove plastic disc. Replacebattery cover, replace and tighten screw. Verify that red dot is on and functional by switching the power on and increasingthe brightness if necessary (see “Switching Power On/Off”, and “Adjusting Dot Brightness” below).REPLACING THE BATTERYShould your reticle grow dim or not light at all, replace the battery, following the installation procedure described above.SWITCHING POWER ON/OFFTo turn the sight’s power on, press either the Brightness “Up” or “Down” button (7, Parts Guide) for 1 second, then release.To switch off the sight, hold the Brightness “Down” button for 3 seconds.ADJUSTING DOT BRIGHTNESSTo adjust the intensity level of the dot reticle, press the Brightness “Up” button to increase brightness, or the Brightness“Down” to decrease brightness. The RXS-100 provides 8 levels of brightness from the dimmest to the brightest setting. Eachsingle press of the Up or Down button will increase or decrease brightness by one level. The highest two settings are visibleeven in bright daylight conditions. Please note that the highest settings are often too bright for indoor or dark ambientconditions and will produce some stray reflections from the LED package. This is normal and if experienced, the brightnessshould be reduced to compensate.4
SIGHTING IN/ZEROING YOUR RXS-100 SIGHTWARNING! : SINCE THIS PROCEDURE INVOLVES LIVE FIRE, IT SHOULD BE DONE AT AN APPROVED RANGEOR OTHER SAFE AREA. CHECK BORE FOR OBSTRUCTIONS. AN OBSTRUCTED BORE MAY CAUSE INJURY TOYOU AND OTHERS NEAR BY. ENSURE THE CONDITION OF THE FIREARM AND CONFIRM IT IS UNLOADEDBEFORE MAKING ADJUSTMENTS OR INSPECTING THE BORE. EYE & EAR PROTECTION IS RECOMMENDED.Initial sighting in of the RXS-100 can be done using a bore sighter per the manufacturer’s directions, or by visual bore sightingthrough a rifle’s barrel with the bolt removed as follows, referencing a target at a 25 to 50 yard distance (7-15 yards for handgun.An alternative for pistol mounted applications is to use the iron sights as reference for initial/rough dot alignment). Boresightingshould be done at your local shooting range rather than at home due to safety concerns, as well as the convenience of being ableto confirm final sight-in with live fire while you are there.Provided care is taken to ensure all mounting adapters and red dot sight are forward mounted, and fastened according to instruction,undesired point-of-aim shift from mounting will be negligible.1. With the sight mounted, rest the firearm on a suitable support. Switch on the sight’s power and adjust brightness asneeded until dot is easily visible.2. Start by sighting along the barrel and aim at a target 25 to 50 yards away (7-15 yards for handgun). View through your RXS100 sight, and gently rotate the windage and/or elevation adjustments, using the supplied tool to align the red dot with thetarget as seen along the barrel. The adjustments are detented, with 1 MOA per click and 30 MOA per full revolution.3. You should then fire a test shot to determine the point of impact of your weapon. If you are not hitting your aiming point(the center of the target) make an adjustment by turning the windage and/or elevation screw(s) in the direction you wantthe impact to move.Final sighting in can then be done, once the RXS-100 has been bore sighted as described above. Make sure you load the sameammo you plan to use most often with the sight.4. Repeat step 3, making adjustments as needed, to bring the point-of-impact into alignment with the point-of-aim.5. Once satisfied with basic alignment, it is recommended to repeat step #3 again except with using the center of 3 or 5 shotgroups as the overall estimate for alignment confirmation.OPERATION UNDER EXTREME CONDITIONS Extreme heat (humid or dry): no special procedures required. Avoid prolonged exposure if possible. Extreme cold: extreme low temperature may shorten battery life.Salt air: similar to a firearm, ensure a light film of oil is maintained on all exposed steel components (e.g. fasteners).Dust storms and sand storms: keep the sight covered when it is not being used.Ensure that battery cover is securely fastened in place-hand tighten only. Clean lens with lens paper/cloth (see caution notebelow) and wipe the sight dry as soon as possible after exposure to any form of moisture. The sight is not waterproof orsprayproof.CAUTION: The lenses shall never be cleaned with fingers but with lens paper/cloth, to avoid scratching the glass. Use a soft brush or “canned air” to remove any loose debris (sand, grass, etc.) prior to using the lens paper or soft clean cloth.TROUBLE SHOOTINGProblem: Red Dot Does Not AppearPossible Causes/Solutions: Discharged battery: Replace battery with a new CR2032 lithium cell. B attery installed incorrectly: Remove and reinstall battery with correct polarity orientation, referring to the “negative up/positivedown” marks above and below the battery compartment cover (see Parts Guide photo). Battery not making good contact: Clean contact surfaces and reinstall battery. Defective Brightness Buttons: Contact Bushnell customer service (1-800-423-3537).Problem: Impossible To ZeroPossible Causes/Solutions: Adjustment screw is at its limit: Inspect alignment of mount to barrel. Note that some aftermarket (bolt-on / no gunsmithing)rails position the sight too high relative to the bore and can sometimes cause issues. This has been observed on some revolverapplications. Impact point is moving: Inspect all sight and accessory mating connections. Ensure the firearm and ammunition is otherwiseperforming as expected.5
*Note: Weight listed is with battery, but not the included base.The low-profile base weighs about 0.8 oz.6SKUMagnificationReticleAdjustment RangeMOA per RevParallax FreeDistance (Yds)# of BrightnessSettingsEye Relief &Field or ViewLength (inches)Weight (oz )Technical SpecificationsRXS1001x4 MOA Dot100 MOA30508Unlimited1.81.3*
COVERAGE YOU CAN COUNT ONAll Bushnell products are engineered to deliver to your expectation and manufactured to withstand the rigors of the outdoorsfor the lifetime of the product. In the event that our product fails you, we will stand behind it and repair it at no cost to you.If we can’t repair it then we will replace it with a product of equal or better value. No receipt required and fully transferable.All Bushnell products carry a product lifetime warranty against defects in workmanship or materials. Product lifetime isdefined as 30 years for riflescopes, 20 years for binoculars and spotting scopes, 5 years for electro-optics (laser rangefinders,red dot sights, reflex sights, speed gun radars, night vision, GPS) and electronic components (illuminated reticles) and 2 yearsfor trail cams. Coverage period start date is determined by proof of purchase or manufacturing date of the product. Thiswarranty does not cover cosmetic damage; damage caused by failing to properly maintain the product; loss; theft; damageas a result of unauthorized repair, modification, or disassembly; intentional damage, misuses, or abuse. This Warranty will bevoid if the date stamp or other serialization codes have been removed from the Product. We may replace your product with aproduct of equal or better physical condition.To view the full warranty and download the details of the warranty, click this link: https://www.bushnell.com/bu-warranty.htmlTo submit a repair request or check the status of a repair ticket: https://service.bushnell.com/s/Alternatively, you can request a copy of the warranty by calling us at 1-800-423-3537 or writing to us at one of the followingaddresses:IN U.S.A. Send To: IN CANADA Send To:Bushnell Holdings, Inc.Bushnell Holdings, Inc.Attn.: RepairsAttn.: Repairs9200 Cody140 Great Gulf Drive, Unit BOverland Park, Kansas 66214Vaughan, Ontario L4K 5W1CanadaFor products purchased outside the United States or Canada, please contact your local dealer for applicable warrantyinformation.This warranty gives you specific legal rights and you may also have other rights, which vary from state to state.We warrant that during the warranty period, with proper use and care, the product will be free from defects in materials and workmanshipand will meet represented performance standards as defined by the warrantor in its sole discretion.The remedies described herein are your sole and exclusive remedies and our entire liability for any breach of this warranty. Our liability shallunder no circumstances exceed the actual amount paid by you for the defective product, nor shall we under any circumstances be liable forany consequential, incidental, special or punitive damages or losses, whether direct or indirect.Some states do not allow the exclusion or limitation of incidental or consequential damages, so the above limitation or exclusion may notapply to you.Our responsibility for defective goods is limited to repair or replacement as described in this warranty statement. 2021 Bushnell Outdoor Products7
FCC StatementThis device complies with part 15 of the FCC Rules. Operation is subject to the following two conditions: (1) This device may not cause harmful interference, and (2) thisdevice must accept any interference received, including interference that may cause undesired operation.This equipment has been tested and found to comply with the limits for a Class B digital device, pursuant to Part 15 of the FCC Rules. These limits are designed toprovide reasonable protection against harmful interference in a residential installation.This equipment generates, uses and can radiate radio frequency energy and, if not installed and used in accordance with the instructions, may cause harmfulinterference to radio communications. However, there is no guarantee that interference will not occur in a particular installation.If this equipment does cause harmful interference to radio or television reception, which can be determined by turning the equipment off and on, the user is encouragedto try to correct the interference by one or more of the following measures: Reorient or relocate the receiving antenna. Increase the separation between the equipment and receiver. Connect the equipment into an outlet on a circuit different from that to which the receiver is connected. Consult the dealer or an experienced radio/TV technician for help.Shielded interface cable must be used with the equipment in order to comply with the limits for a digital device pursuant to Subpart B of Part 15 of FCC Rules.Specifications and designs are subject to change without any notice or obligation on the part of the manufacturer.Industry Canada Statement :This device complies with ISED’s license-exempt RSSs. Operation is subject to the following two conditions: (1) This device may not cause harmful interference, and (2) this device mustaccept any interference received, including interference that may cause undesired operation.Le présent appareil est conforme aux CNR d’ ISED applicables aux appareils radio exempts de licence. L’exploitation est autorisée aux deux conditions suivantes: (1) le dispositif nedoit pas produire de brouillage préjudiciable, et (2) ce dispositif doit accepter tout brouillage reçu, y compris un brouillage susceptible de provoquer un fonctionnement indésirable.Radiation Exposure Statement / Déclaration d’exposition aux radiations :This device complies with the Industry Canada portable RF exposure limit set forth for an uncontrolled environment and is safe for the intended operation as described in this manual.Further RF exposure reduction can be achieved if the product can be kept as far as possible from the user’s body or if the device is set to a lower output power if such function is available.Le produit est conforme aux limites d’exposition pour les appareils portables RF pour les Etats-Unis et le Canada établies pour un environnement non contrôlé.Le produit est sûr pour un fonctionnement tel que décrit dans ce manuel. La réduction aux expositions RF peut être augmentée si l’appareil peut être conservé aussi loin que possibledu corps de l’utilisateur ou que le dispositif est réglé sur la puissance de sortie la plus faible si une telle fonction est disponible.Disposal of Electric and Electronic Equipment(Applicable in the EU and other European countries with separate collection systems)This equipment contains electric and/or electronic parts and must therefore not be disposed of as normal household waste. Instead, itshould be disposed at the respective collection points for recycling provided by the communities. For you, this is free of charge.If the equipment contains exchangeable (rechargeable) batteries, these too must be removed before and, if necessary, in turn bedisposed of according to the relevant regulations (see also the respective comments in this unit’s instructions).Further information about the subject is available at your community administration, your local waste collection company, or in thestore where you purchased this equipment.WARNING: This product uses a Lithium based battery. Lithium batteries can overheat and causedamage if physically abused. Do not use batteries that are damaged or show signs of physical wear.8
2021 Bushnell Outdoor ProductsBushnell, , , denote trademarks of Bushnell Outdoor Productswww.bushnell.com9200 Cody, Overland Park, KS 66214
Thank you for purchasing your new Bushnell RXS-100 Red Dot Reflex Sight (illuminated optical sight). This manual will help you optimize your viewing experience by explaining how to utilize the sight’s features and how to care . If there is any doubt in your mind, you sho