Transcription
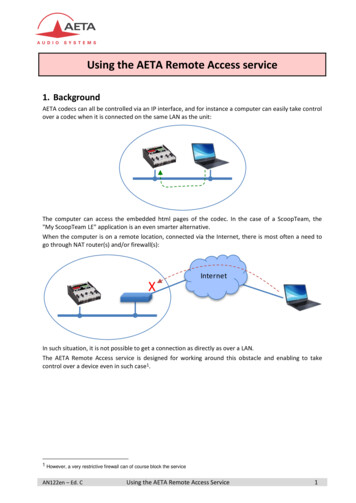
P LATINUM T E C HN OL OGYRemote ControlGuidefor PowerRise , PowerGlide and PowerTilt Systems
Control Like Never BeforeThis guide shows you how to set up and operate Hunter Douglasmotorized products using the Platinum Technology remotecontrol. In this guide, you’ll learn the two methods to operate yourwindow coverings. All control features can be used with eithermethod. Choose the method that works best for you.Two Methods of OperationInfrared Control Line-of-sight operation (likea flashlight) Control window coveringsindividually One-button operationRadio Control No aiming necessary (likea garage-door opener) Control window coveringsindividually or in groups Two-button operationContentsGetting Started .1Sensor Eye Locations .2Basic Operation .3Radio Control .4Intermediate Stops .8Express Mode .9Applause and Duette Shades .10Roller, Screen and Vignette Shades .12Nantucket , Pirouette and Silhouette Window Shadings .13Luminette and Skyline Products .14Horizontal Blinds .16Troubleshooting .17Group Assignment Worksheet .23Product Feature Summary .24Technical Information . Back Cover
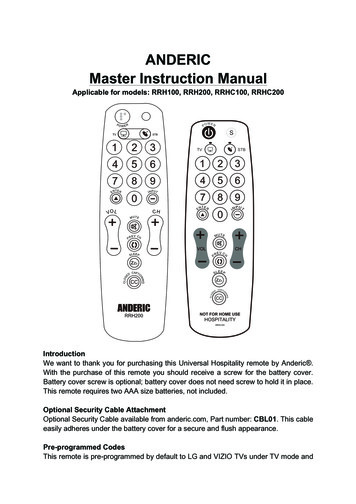
Getting StartedInstall batteries inthe Platinum remote.Platinum orSetupOPENGroup 1Group 2CLOSEGroup 3Group 4AllGroupsMasterResetBatteryCompartmentThis guide is intended for use with Hunter Douglas PlatinumTechnology products manufactured after September 2012. Forproducts manufactured before this date, please contact your dealeror call our Customer Information Center at 1-888-501-8364.1
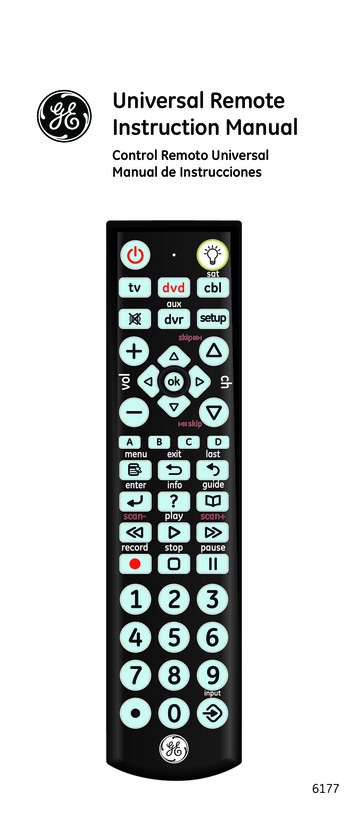
Sensor Eye LocationsSensor eyes can be found in the following locations(depending on product and installation optionschosen):In the HeadrailOn a Satellite EyeBelow the HeadrailNOTE: The manual control button, used for operating a windowcovering without a remote, is usually adjacent to the sensor eye.2
Basic OperationIn its default mode, the Platinum remote sends an infraredsignal:1 Aim the Remote at the Sensor Eye.NOTE: For more information about the locations of sensoreyes, see Sensor Eye Locations on page 2.2 Press and release the OPENCLOSEcovering.orbutton to operate the windowNOTE: Press and release the oppositestop a moving window covering.orbutton toTry Radio ControlIn addition to the default method of operation,Platinum remotes can be set up to use radiocontrol. When you want the convenience of radiocontrol and the ability to control multiple windowcoverings at the same time, see Getting Startedwith Radio Control on page 4.Brand-Specific FeaturesFor more information about the features of your specific windowcovering, see the appropriate brand section on pages 10–16.3
Radio ControlGetting Started with RadioControlRadio control gives you the ability to control individualwindow coverings or multiple window coverings at thesame time, even if they are in another room.Group AssignmentTo use radio control, each window covering must first be assignedto a group. (A window covering can be a member of more thanone group.)NOTE: If your remote has already been set up, skip to the RadioControl Operation section on page 6.There are four unique assignable groups to use. A group can be asingle window covering or multiple window coverings.Before beginning, think about how you will group your windowcoverings. For example, you might create a group for all windowcoverings in a single room or a group for all window coverings onone wall. You can use the Group Assignment Worksheet onpage 23 to help you plan.NOTE: Hunter Douglas recommends that only similar windowcoverings be included in a group (e.g., Duette honeycomb shadesassigned to Group 1 and Silhouette window shadings assigned toGroup 3) because of differences in product features and operation.4
Radio ControlGroup Addition or RemovalBefore you begin, operate the window coveringusing infrared control to make sure that you arecommunicating with only one window covering andthat the window covering is working properly.TIP: Move the remote as close as possible (2"– 3") to the sensoreye when assigning groups.1. With apaperclip, press1and releasethe recessedSETUP buttonon the back ofthe remote. TheIndicator Lighton the frontof the remoteflashes green for approximately 30 seconds.122. While the Indicator Light is flashing green, press thegroup button for the group to which you plan to assign thewindow covering.3. Point theremote at thesensor eye of4the windowcovering and3press theOPENbutton to addthe windowcovering to thegroup or the CLOSE button to remove the window coveringfrom the group. The window covering moves slightly (or“jogs”) to indicate that it has been added to or removed fromthe group.4. Exit setup mode by pressing and releasing the SETUP buttona second time. The remote saves any changes made and theIndicator Light stops flashing.5
Radio ControlRadio Control OperationOperating your window coverings using radio control is much likeusing infrared control, except that you can control multiple windowcoverings at the same time, even if they are in another room, andyou do not have to aim the remote at the sensor eye.1. Press the group button assignedto the window coverings.2. Press the OPEN button toopen the window covering or theCLOSE button to close thewindow covering.12NOTE: To stop a windowcovering while it is moving,press the assigned group button,then press the oppositeor button.NOTE: To operate all window coverings assigned to theremote, press the ALL button before pressing OPENor CLOSE .NOTE: Operational distances using radio control may varydepending on common household construction differences.Brand-Specific OperationFor more information about the operation of your specific windowcovering, see the appropriate brand section on pages 10–16.6
Radio ControlSetting Up a Duplicate RemoteIf you want a backup for your primary remote orwireless wall switch, you can quickly duplicate thecurrent transmitter. When this procedure is complete,any change made with any of the transmitters alsoaffects the operation of the other remotes and wirelesswall switches. Follow this procedure:1. Mark the original transmitter.2. Remove the battery cover from the duplicate remote.3. With a paperclip,press and hold theMASTER RESETbutton on the backupremote forapproximately 10seconds. TheIndicator Light on thefront of the remotestarts flashing red.MASTERRESET4. Place the marked original remote or wireless wall switchwithin 18" of the backup remote and press the OPENbutton on the marked original. The Indicator Light on thebackup remote stops flashing.18" or Less5. Replace the battery cover on the backup remote. It is nowready for use.7
Intermediate StopsThis section includes information on intermediate stops forPowerRise and PowerGlide products. The PowerTilt systemfor horizontal blinds does not offer the intermediate stop feature.Setting Intermediate StopsAn intermediate stop allows a window covering to be preset sothat it will stop at the same “intermediate” position each time it isopened or closed.1. Open and close the window covering fully, then move it to thedesired intermediate position.22. Press and hold the ALL button for6 seconds. The Indicator Lighton the front of the remote startsflashing green.13. Point the remote at the sensoreye and press the OPEN buttonto set the intermediate stop. The2window covering moves slightly(or “jogs”) to indicate that theintermediate stop has been added.344. Press the ALL button to save the stop. The Indicator Lightstops flashing.NOTE: One intermediate stop can be set for each windowcovering. If you set a new intermediate stop, it replaces theprevious stop.NOTE: Reset the window covering to clear an intermediatestop. See Resetting a Window Covering on page 21.Why Set an Intermediate Stop?Intermediate stops can be used to align opening height to mullionsor other architectural features of the window. They are also used toalign the opening height of different window coverings in the sameroom. In addition, with Silhouette , Nantucket and Pirouette window shadings, intermediate stops can be used to achieve aspecific degree of vane tilt every time the vanes are operated.8
Express ModeExpress ModeWhen the window covering is in anyposition, you can open or close it fully(bypassing the intermediate stop) asfollows:1. Press the appropriate groupbutton.122. Press and hold the OPEN orCLOSE button for 2 seconds.The window covering opens orcloses fully.NOTE: The express mode feature is only available withPowerRise products. It is not offered with PowerGlide orPowerTilt products.NOTE: With Silhouette , Nantucket and Pirouette windowshadings, in addition to bypassing the intermediate stop, theexpress mode also bypasses the shading’s “transition point.”The transition point is where the shading is fully loweredwith the vanes fully closed. Normally, the shading stopsautomatically at this position; but with express mode, whenthe shading is lowered, the vanes open all the way before themotor stops.The express mode can be used to bypass the shading’stransition point even if no intermediate stop has been set.9
Applause and Duette ShadesApplause and DuetteThis section includes additional operatinginformation for the following PowerRise products: Applause honeycomb shades Duette honeycomb shadesRadio Control OperationSee Radio Control Operation on page 6 for information aboutusing the remote to operate a window covering.Top-Down ShadesFor shades with the Top-Down design option, only the middle railmoves and remote operation is reversed (e.g., to open a shade,press the CLOSE button on the remote). Setup procedures arethe same as for standard shades.Top-Down/Bottom-Up and Duolite ShadesShades with the Top-Down/Bottom-Up and Duolite design optionshave two moving rails; see the drawings below.You can operate these shades as described in this section.NOTE: The bottom rail must be in the fully lowered position tooperate the middle rail.NOTE: The middle rail must be in the fully raised position tooperate the bottom 10
Applause and Duette ShadesLower the Bottom Railbutton to lower the bottom rail and cover2. Press the CLOSEthe window.Lower the Middle Rail1. With the bottom rail fully lowered, press the group buttonassigned to the shade.2. Press the CLOSE button to lower the middle rail while thebottom rail remains in the fully lowered position.NOTE: On a Top-Down/Bottom-Up shade, the shade willuncover the window. On a Duolite shade, the top fabricpanel will cover the window.Raise the Middle Rail1. With the bottom rail fully lowered, press the group buttonassigned to the shade.2. Press the OPEN button to raise the middle rail while thebottom rail remains in the fully lowered position.NOTE: On a Top-Down/Bottom-Up shade, the shade willcover the window. On a Duolite shade, the bottom fabric panelwill cover the window.Raise the Bottom Rail1. With the middle rail fully raised, press the group buttonassigned to the shade.2. Press the OPENthe window.button to raise the bottom rail and uncoverInfrared ControlAll features can be enjoyed using either infrared orradio control. See Basic Operation on page 3 formore information about infrared control.11Applause and Duette1. With the middle rail fully raised, press the group buttonassigned to the shade.
Roller, Screen and Vignette ShadesNo additional operating information is needed forthe following PowerRise products: Alustra Woven Textures and Screen Shades Designer Roller and Screen Shades Vignette Modern Roman ShadesRoller, Screen and VignetteRadio Control OperationSee Radio Control Operation on page 6 for information aboutusing the remote to operate a window covering.Infrared ControlAll features can be enjoyed using either infrared orradio control. See Basic Operation on page 3for more information about infrared control.12
Nantucket , Pirouette and Silhouette Window ShadingsThis section includes additional operatinginformation for the following PowerRise products: Nantucket window shadings Pirouette window shadings Silhouette window shadingsRadio Control OperationSee Radio Control Operation on page 6 for information aboutusing the remote to operate a window covering.Opening Vanes2. Press and release the CLOSE button. The shading remainsclosed while the vanes open to allow more light.Closing Vanes1. When the shading is in the fully closed position with the vanesopen, press and release the assigned group button.2. Press and release the OPEN button. The shading remainsclosed while the vanes close for increased privacy.Adjusting Vanes1. Press the assigned group button.2. Press the OPENthe vanes.3. Press the oppositedesired position.or CLOSEorbutton to start adjustingbutton to stop the vanes in theNOTE: Vane alignment between shadings may not be exact.Infrared ControlAll features can be enjoyed using either infrared orradio control. See Basic Operation on page 3 formore information about infrared control.13Nantucket, Pirouette and Silhouette1. When the shading is in the fully closed position with the vanesclosed, press and release the assigned group button.
Luminette and Skyline ProductsThis section includes additional operatinginformation for the following PowerGlide products: Luminette Privacy Sheers andModern Draperies Skyline Gliding Window PanelsTraversing Luminette and Skyline ProductsTraversing Closed1. Press and release the assignedgroup button.Luminette and Skyline2. Press and release theCLOSE button. Theproduct traverses to its fullyclosed position.NOTE: After traversingLuminette Privacy Sheersclosed, you must wait at least4 seconds before tiltingthe vanes.ClosedTraversing Open1. Press and release the assignedgroup button.2. Press and release the OPENbutton. The product tilts itsvanes to a fully open position(if applicable) and traverses toits fully open position.Stopping the Traverse1. Press and release the assignedgroup button2. Press the opposite14orbutton.Open
Luminette and Skyline ProductsTilting Luminette Privacy Sheers VanesLuminette Privacy Sheers have a sheer face fabric to let light inand integrated soft fabric vanes that tilt to keep light out.NOTE: Luminette Modern Draperies Full Panel and Skyline Gliding Window Panels do not have tilting vanes.1. Press and release the assigned group button, then pressand release the CLOSE button to traverse the sheers fullyclosed.NOTE: The vanes will not tilt unless the Luminette PrivacySheers are fully traversed closed.NOTE: After traversing Luminette Privacy Sheers closed, youmust wait at least 4 seconds before tilting the vanes.2. Press and release the assigned group button, then press andhold the OPEN or CLOSE button. After one second, thevanes begin to tilt.3. When you are satisfied with the position, release the button.Luminette and SkylineNOTE: After tilting the vanes, you must wait at least fourseconds before you can traverse the sheers open.Infrared ControlAll features can be enjoyed using either infrared orradio control. See Basic Operation on page 3for more information about infrared control.15
Horizontal BlindsThis section includes additional operatinginformation for the following PowerTilt products: Chalet Woods wood blindsCountry Woods wood blindsEverWood Collection alternative wood blindsModern Precious Metals aluminum blindsTilting the Slats1. Press and release the assigned group button.2. Press and hold the OPEN or CLOSE button. After onesecond, the slats begin to rotate. Release the button when theslats have reached the desired position.Infrared ControlHorizontal BlindsAll features can be enjoyed using either infrared orradio control. See Basic Operation on page 3 formore information about infrared control.16
TroubleshootingProblemSolutionWindow1. Make sure the Indicator Light on the remotecoveringcomes on when you try to operate thedoes notwindow covering.operate with If the Indicator Light does not come on,the remotereplace the batteries in your remote.2. Operate the window covering using itsmanual control button. If the windowcovering doesn’t operate, make sure ithas power:NOTE: The manual control button is usuallynext to the sensor eye of the windowcovering. If the window covering is batterypowered, replace the batteries in thebattery wand or satellite battery pack. If the window covering is powered froma DC power supply, make sure it isplugged in and the wall outlet has power.3. If the batteries in the remote are good andthe window covering works when you usethe manual control button, do one of thefollowing: If the Indicator Light is red when youpress the OPEN or CLOSE button,go to No infrared operation onpage 18. If the Indicator Light is a steady greenwhen you press the OPEN or CLOSEbutton, go to No radio controloperation on page 18. If the Indicator Light is flashing green,you are in setup mode. Wait 30 secondsor use a paperclip to press and releasethe SETUP button to exit setup mode.17
TroubleshootingProblemNo infraredoperationSolution Make sure that you are pointing the remoteat the sensor eye. Make sure that you are close enough to thesensor eye. Make sure that the sensor eye is not coveredor obstructed. Make sure that there is no direct sunlightor bright, focused light shining on thesensor eye. Make sure that the correct channel isselected on the remote. Most windowcoverings are set to Channel A, but ifChannel A does not work, move the InfraredChannel Selector switch to Channel B.No radiocontroloperation Make sure you have added the windowcovering to a group. For more information,see Group Assignment on page 4. Make sure you have pressed the groupbutton for the group to which the windowcovering has been assigned. If you needto add a window covering to a group, seeGroup Addition or Removal on page 5. Make sure you press the OPEN orCLOSE button within 5 seconds afterchoosing and pressing a group button. Afterthat time, the green Indicator Light turns offand the remote reverts to infrared control. If you have just replaced a satellite eye, youmust reassign the window covering to agroup; see Group Assignment on page 4.NOTE: Due to differences in householdconstruction, radio control operation mayvary within a home. Try operating the windowcovering from different locations.18
TroubleshootingProblemWindowcoveringoperateswhen youdo not wantit to operateSolution If the Indicator Light on your remote is redwhen you press the OPEN or CLOSEbutton, go to Unexpected infrared operationbelow. If the Indicator Light on your remote is asteady green when you press the OPENor CLOSE button, go to Unexpected radiocontrol operation on page 20. If you are not pressing the OPEN orCLOSE button when the window coveringis operating, make sure no one else is usinga backup remote or wireless wall switch tocontrol the window covering.UnexpectedinfraredoperationThe infrared signal of the remote spreads andreflects off of surfaces. If other sensor eyes arewithin the area affected by the infrared signal,you might control those window coveringsunexpectedly. To solve this problem: Move closer to the sensor eye on the windowcovering you intend to operate. Aim the remote slightly away from thewindow coverings you do not intendto operate.NOTE: If you still have problems withunexpected operation, you can switch toradio control operation. See Getting Startedwith Radio Control on page 4.19
TroubleshootingProblemSolutionUnexpected Make sure you have chosen the correctradio controlgroup to operate. If you need to remove aoperationwindow covering from a group, see GroupAddition or Removal on page 5. If the Indicator Light on the remote is not asteady green when you press theOPEN or CLOSE button, the remote isusing infrared. To make sure you are usingradio control, press a group button not morethan five seconds before you press the OPENor CLOSE button. Make sure the operation of the windowWindowcovering is not obstructed.coveringdoes not Reset the window covering as described inopen orResetting a Window Covering on page 21.close fullyor has anintermediatestop that isno longerwanted Motorized window coverings built beforeCannot setMay 2010 cannot set an intermediate stopintermediateposition using the Platinum remote. Forstop withinformation about how to set an intermediateremotestop on these window coverings, refer to theInstallation, Operation and Care instructionsfor the window covering.If youcannotresolve yourproblemwith theseguidelines:20 Check the Troubleshooting section of theInstallation, Operation and Care instructionsfor the window covering. If you still cannot resolve the problem,contact the Hunter Douglas CustomerInformation Center at 1-888-501-8364.
TroubleshootingResetting a Window Covering Alustra Woven Textures and Screen ShadesApplause honeycomb shadesDesigner Roller and Screen ShadesDuette honeycomb shadesLuminette Privacy Sheers and Modern DraperiesNantucket window shadingsPirouette window shadingsSilhouette window shadingsSkyline Gliding Window PanelsVignette Modern Roman ShadesTo clear all stops and reset the window covering:1. Open the window covering completely.2. Aim the remote at the sensor eye on the window covering.3. Press and hold the OPEN button for 6 seconds. Thewindow covering moves slightly (or “jogs”) to indicate that allstops are now cleared.4. Close the window covering completely (this sets the CLOSEDmotor limit).5. Open the window covering completely (this sets the OPENmotor limit).The intermediate stop position is now cleared and the motor limitsare now reset.21
TroubleshootingChanging the Infrared Channel of a WindowCoveringPlatinum Technology window coverings can operate on either oftwo infrared channels. While many installations work well whenall window coverings are on the same infrared channel, it cansometimes be convenient to change the infrared channel for somewindow coverings to reduce inadvertent operation.If you need to change the infrared operating channel of a windowcovering:1. With the window covering opened completely, set theinfrared channel selector switch on the remote to thedesired channel (A or B).2. Point the remote at the sensor eye.3. Press and hold the manual control button on the windowcovering.button while holding the manual4. Press and hold the OPENcontrol button. The window covering moves slightly (“jogs”) toindicate the operating channel has been accepted.22
Group Assignment WorksheetBefore assigning window coverings to groups,Hunter Douglas recommends that you plan yourgroup assignments. For example, you might create agroup for all window coverings in a single room or agroup just for all window coverings on one wall.NOTE: A window covering can be a member of more thanone group.NOTE: Hunter Douglas recommends that only similar windowcoverings be included in a group (e.g., Duette honeycomb shadesassigned to Group 1 and Silhouette window shadings assigned toGroup 3) because of differences in product features and operation.NOTE: All window coverings in a group should either have nointermediate stop or have similar intermediate stop settings.Group #Location of Window Covering23
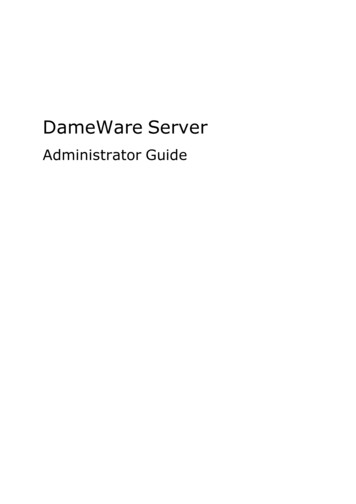
Product Feature SummaryFeatureRaises andLowersPowerRise Alustra Woven Textures and Screen Shades Applause Honeycomb Shades Designer Roller and Screen Shades Duette Honeycomb Shades* Nantucket Window Shadings Pirouette Window Shadings Silhouette Window Shadings* Vignette Modern Roman Shades* PowerGlide Luminette Privacy Sheers*Luminette Modern DraperiesSkyline Gliding Window Panels*PowerTilt Chalet Woods Wood BlindsCountry Woods Wood BlindsEverWood Collection Alternative Wood BlindsModern Precious Metals Aluminum Blinds*Includes applicable Alustra Collection products.24
Product Feature SummaryTraverses Vane or SlatOperationIntermediateStopExpress Mode 25
Technical InformationRemote Control Batteries: 2 AAA Operating Frequencies: IR: 40 kHz RF: 2.4 GHzRadio Frequency FCC ComplianceThis device complies with Part 15 of the FCC Rules. Operation is subject to the following twoconditions: (1) this device may not cause harmful interference, and (2) this device must acceptany interference received, including interference that may cause undesired operation.This equipment has been tested and found to comply with the limits for Class B DigitalDevice, pursuant to Part 15 of the FCC Rules. These limits are designed to provide reasonableprotection against harmful interference in a residential installation. This equipment generatesand can radiate radio frequency energy and, if not installed and used in accordance withthe instructions, may cause harmful interference to radio communications. However, thereis no guarantee that interference will not occur in a particular installation. If this equipmentdoes cause harmful interference to radio or television reception, which can be determined byturning the equipment off and on, the user is encouraged to try to correct the interference byone or more of the following measures. Reorient or relocate the receiving antenna. Increase the separation between the equipment and receiver. Connect the equipment into an outlet on a circuit different from that to which the receiveris connected. Consult the dealer or an experienced radio/TV technician for help.Any changes or modifications not expressly approved by the party responsible for compliancecould void the user’s authority to operate the equipment.Industry CanadaUnder Industry Canada regulations, this radio transmitter may only operate using an antennaof a type and maximum (or lesser) gain approved for the transmitter by Industry Canada.To reduce potential radio interference to other users, the antenna type and its gain shouldbe so chosen that the equivalent isotropically radiated power (e.i.r.p.) is not more than thatnecessary for successful communication.This device complies with Industry Canada licence-exempt RSS standard(s). Operation issubject to the following two conditions: (1) this device may not cause interference, and (2)this device must accept any interference, including interference that may cause undesiredoperation of the device. 2012 Hunter Douglas. All rights reserved. All trademarks used herein are the property of Hunter Douglas.51105400549/12
This guide is intended for use with Hunter Douglas Platinum Technology products manufactured after September 2012. For products manufactured before this date, please contact your dealer or call our Customer Information Center at 1-888-501-8364.