Transcription
GETTING STARTED GUIDE:BillQuickBillQuick GettingStarted Guide 2017BillQuick Power Up Your Business(866) 945-1595 www.bqe.com info@bqe.com
GETTING STARTED GUIDE:BillQuickCONTENTSINTRODUCTIONBILLQUICK SETUP CHECKLISTSYSTEM REQUIREMENTSHARDWARE REQUIREMENTSSOFTWARE REQUIREMENTSINSTALLATIONINSTALLING ON A COMPUTER SYSTEMINSTALLING IN A NETWORK ENVIRONMENTPEER-TO-PEER NETWORK ENVIRONMENTNETWORK SERVER ENVIRONMENTINSTALLING WITH MICROSOFT SQL SERVER EXPRESS OR SQL SERVER STANDARDINSTALLING AN UPGRADESTART-UPSETTING UP BILLQUICK DATABASEACTIVATING PRODUCTEVALUATING BILLQUICKLICENSING AND REGISTERINGBILLQUICK BASICS34555681010101112131316171821STARTING UPLOGGING INNAVIGATING BILLQUICK212124MASTER INFORMATION26ENTERING COMPANY INFORMATIONENTERING EMPLOYEE INFORMATIONENTERING CLIENT INFORMATIONENTERING PROJECT INFORMATIONENTERING ACTIVITY CODES2728293031TIME AND BILLING33ENTERING TIME33BILLINGREVIEWING INVOICESRECORDING PAYMENTSREPORTSREPORTINGBillQuick Power Up Your Business(866) 945-1595 www.bqe.com info@bqe.com3536373838
GETTING STARTED GUIDE:BillQuickINTRODUCTIONWelcome to BillQuick from BQE Software!BillQuick is a time tracking, billing, and business management software. It offers an easy and efficient way toreduce the overhead of your business. BillQuick also accurately track professional hours, and increase yourrevenue. BillQuick incorporates flexible and robust features that adjust to fit your business the way you runit. The BillQuick Family is continuously updated, implementing your ideas for inspired new features to makeit more beneficial to your business.The goal of this BillQuick Getting Started Guide is to help you get started and become comfortableinteracting with the BillQuick program. It explains the concepts and procedures involved in setting up ofBillQuick, focusing on its installation, activation, registration, basic and main functionalities such as masterinformation and the flow of data throughout the program, time and expense tracking, project management,billing and reporting. By the end this guide, you will be able to run and utilize BillQuick effectively andefficiently.Depending upon your business type, BillQuick adjusts its terminology and activity codes to your industry:Industry-Specific TerminologyArchitects ndorBudgetIT and anyVendorBudgetAccountants nyConsultantBudgetAttorneys ltantEstimateBillQuick Getting Started Guide is not a complete training solution. It is a guided tour designed to setup and familiarize you with BillQuick. After completing the guide, we recommend that you explore theBillQuick Help and the How Do I help items. You can choose self-learning or guided learning. Guidedlearning utilizes role-based and custom training courses. Check out our trainings for more. You can alsocheck BillQuick Implementation Path to familiarize yourself with the process of implementing BillQuick.BillQuick Power Up Your Business(866) 945-1595 www.bqe.com info@bqe.com3
GETTING STARTED GUIDE:BillQuickBillQuick Setup ChecklistInstallationPre-InstallationTaskResources and ReferencesDecide what BillQuick edition/flavor you want to installEdition Comparison ChartCheck our system requirementsHardware RequirementsSoftware RequirementsDownload BillQuick setupDownloadsLog in as an administrator and install BillQuickRead InstallationExisting Users:Upgrade to BillQuick 2017Install BillQuick 2017 and convert your existing data to the newStart-UpversionStart BillQuickStarting Up BillQuickCreate or open your company fileBillQuick DatabaseSet up BillQuick company and preferencesBillQuick Startup InterviewSync or import your company dataBillQuick Initial Setup ChecklistData IntegrationData Conversion ServicesActivate and license BillQuickProduct ActivationLicense and RegistrationSet up company and other master profilesMaster InformationDeploymentGlobal SettingsUser PreferencesSync or import company data and start using BillQuickTime and BillingReportsBillQuick Help or PDF HelpManualBillQuick TrainingsBillQuick Power Up Your Business(866) 945-1595 www.bqe.com info@bqe.com4
GETTING STARTED GUIDE:BillQuickSYSTEM REQUIREMENTSFor successful installation and implementation of your BillQuick software, be sure your computer systemsmeet or exceed the requirements mentioned below.Mac and Unix Operating Systems require Web Suite.Hardware Requirements 2.0 GHZ Intel Pentium IV-class processor or faster 2 GB RAM or more 1 GB or more of free hard disk space, plus 350 MB additional free hard disk space for installation 1024 x 768 screen resolution or moreBe sure your network server contains sufficient memory and other resources for efficient, high speedoperation.Software RequirementsHere are the operating system and other software requirements for BillQuick.Operating System Requirements Microsoft Windows 10/Windows 8/Windows 7 Microsoft Windows Server 2016/2012/2008, Small Business Server 2011Windows Server 2012 Essentials/R2 Essentials editions do not support SQL Server and hence BillQuick2017 cannot run on those operating systems. 32-bit or 64-bit operating system (dual compatibility) Microsoft .NET Framework 4.5Be sure to install the latest Windows service packs and critical updates. Check the Microsoft website forthe latest updates to Windows, .Net Framework, and Data Access Components. Some versions of Windowsinclude an automatic update option.BillQuick Power Up Your Business(866) 945-1595 www.bqe.com info@bqe.com5
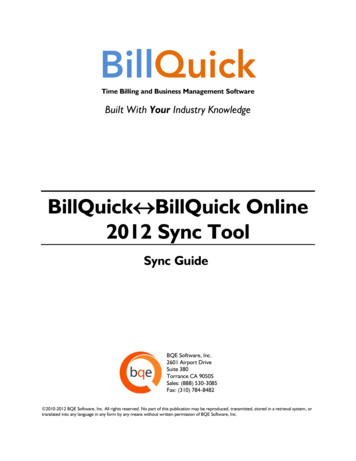
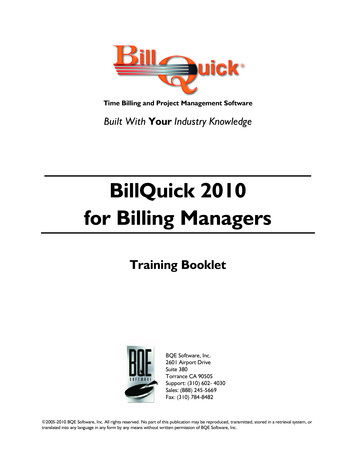
GETTING STARTED GUIDE:BillQuickOther System Requirements Microsoft .NET Framework 4.5 or later (automatically installed with BillQuick) Microsoft SQL Server 2008 or later (for BillQuick Enterprise edition) Microsoft Data Access Components 2.8 or later (automatically installed with BillQuick) Microsoft Windows Installer 3.0 or later (typically installed or updated with Windows) Microsoft Internet Explorer 9 or later (for accessing BillQuick Online) An Internet connection with a 256 KBps or faster modem, DSL, cable modem or other broadbandconnection (for accessing BillQuick Online and for Automatic Updates)INSTALLATIONA ‘BillQuick Supervisor’ is responsible for planning and implementing the initial setup and deployment ofBillQuick. To install BillQuick, you should be logged in as an administrator. Basic start-up procedures forBillQuick are:Install BillQuick.Create a BillQuick database.Activate and license BillQuick.Before installing the software, please read the End User License Agreement (EULA).You can see the basic steps in the flowchart below.BillQuick Power Up Your Business(866) 945-1595 www.bqe.com info@bqe.com6
GETTING STARTED GUIDE:BillQuickBillQuick Power Up Your Business(866) 945-1595 www.bqe.com info@bqe.com7
GETTING STARTED GUIDE:BillQuickInstalling on a Computer SystemBillQuick can be installed on a single-user system or a network environment. BillQuick operates in a networkenvironment, both peer-to-peer networks and networks with servers. In either scenario, the BillQuickdatabase will be located in a folder on a personal computer or shared drive.Follow the steps below to install BillQuick on a personal computer.Download a copy of BillQuick from http://www.bqe.com/products/billquick/downloads. Save thefile on your local machine where you can access it easily, preferably your desktop. Unzip thecontents of the file to your desktop.The downloaded copy of BillQuick is in a Zip format. You will need a Zip archiving or extractionprogram such as WinZip (from a shareware website or a software store).Right-click on the setup icon on your desktop and click Open.When the BillQuick installation screen appears, read the information and follow the instructions oneach screen by clicking Next.BillQuick Power Up Your Business(866) 945-1595 www.bqe.com info@bqe.com8
GETTING STARTED GUIDE:BillQuickRead the License Agreement and select the ‘I accept ’ option. Click Next.Accept or modify the User Name and Organization. Click Next.Choose a destination for BillQuick. Accept the default directory path by clicking Next. To changethe path, click Change.After the installation begins, a progress bar displays. When the Finished screen appears, clickFinish.When prompted, restart your computer to complete the installation.Double-click on the BillQuick icon on your desktop to start the program.Previous users of BillQuick will be prompted to upgrade the database. Click Yes to upgrade. Firsttime users, click No and move to step 13.BillQuick will now convert your previous database to BillQuick 2017.After finishing, BillQuick will display the Welcome screen where you can choose to create a newdatabase (Access or SQL) or select an existing one. See BillQuick Database for more.New databases will be prompted with the BillQuick Startup Interview and then the ProductActivation screen.BillQuick Power Up Your Business(866) 945-1595 www.bqe.com info@bqe.com9
GETTING STARTED GUIDE:BillQuickInstalling in a Network EnvironmentIn a network environment, you will add more users in BillQuick. We do not recommend installing theBillQuick program to a network drive. Only the database should be on the network drive. BillQuick needs tobe installed on the computer of each person who needs to access it.To install BillQuick on a network environment:Install BillQuick (see above).Make sure the BillQuick database is in a shared folder. You can place your company database on anetwork directory or company server. Please make sure that all users have Read and Write access tothat directory.Start BillQuick.Select File menu, Open Company and navigate to the shared folder.Select your BillQuick database. BillQuick remembers the location each time you open it.BillQuick also works in other network scenarios. Contact BillQuick Support for more information (310602-4030).Peer-to-Peer Network EnvironmentTo install BillQuick on a peer-to-peer network:On the computer used by your primary BillQuick user (BillQuick Supervisor), complete the steps forinstalling BillQuick (as mentioned above), creating a database (see BillQuick Database), andactivating BillQuick (see Product Activation below).Start BillQuick.Select File menu, Open Company and navigate to the shared folder.Select your BillQuick database. BillQuick remembers the location each time the user opensBillQuick.Network Server EnvironmentTo install BillQuick in a network server environment, you can:Install BillQuick, point to the database, and register the computer ( follow the same steps as for aBillQuick Power Up Your Business(866) 945-1595 www.bqe.com info@bqe.com10
GETTING STARTED GUIDE:BillQuickpeer-to-peer network above).Utilize Active Directory Services on a domain network. With this capability, you can ‘push’ BillQuickto the workstations.For more information, see the BillQuick Knowledge Base article How to Install BillQuick on Workstationsusing Active Directory Services.BillQuick installs as a separate program. You can upgrade from your current version of BillQuick oruninstall it. When upgrading, BillQuick database conversion makes a backup of your database prior toconverting it. However, the personal settings and report mappings are not retained.Installing with Microsoft SQL Server Express or SQL Server StandardBillQuick installation does not require SQL Scripts or special items to create a SQL Server Standard or SQLServer Express database for your company. All logic is built into BillQuick.Support for full SQL Server as a backend is available in the BillQuick Enterprise edition only.Install and configure Microsoft SQL Server Express or SQL Server Standard before installingBillQuick. Specifically: Make sure to enable TCP/IP and Named Pipes for the SQL instance to which you areconnecting. Make sure SQL browser is running. If you receive a message with Error 5, it is possibly a network or firewall issue. Please checkall firewalls (including Windows) and make sure to add either port 1433 or BillQuick as anexception.You can check our Installation Guides for SQL Server 2008 or SQL Server 2012 for details.Install BillQuick on the primary computer that is accessed by the Supervisor. ( See above.)Start BillQuick and go to File menu, New Company, SQL Server Database.Enter the Server Name, User ID, Password and Database Name. Typically, the database name issimilar to the company name.BillQuick Power Up Your Business(866) 945-1595 www.bqe.com info@bqe.com11
GETTING STARTED GUIDE:BillQuickClick OK to create the database.If your Server Name and SQL Instance Name do not display, go to My Computer, right-click and selectProperties. On the Computer Name tab, find the Full Computer Name. In the Server Name field here, enterthat name, backslash, and the instance name (default is ‘SQLEXPRESS’).If you receive error messages or have any other trouble connecting to the SQL Server during BillQuickinstallation, please look up our Knowledge Base for related issues. Else, contact our Technical Support at(310)602-4030.Installing an UpgradeAn upgrade contains significantly more new features, new reports, new functionality, and perhaps new userinterface elements. When upgrading from one version of BillQuick to another, it does not retain yourpersonal settings and report mappings. Upon starting, you will be asked to locate your database.If you have been using a MSDE or SQL Server database, BillQuick will create a newly converted database,with the same name as the existing one, but with ‘2017' added on at the end. It will leave the previousdatabase as a backup in the pre-2017 format. In the case of Microsoft Access database, BillQuick willautomatically make a copy of your database that is compatible with your current version. In addition to yourmain database, BillQuick will upgrade your archive file.BillQuick Power Up Your Business(866) 945-1595 www.bqe.com info@bqe.com12
GETTING STARTED GUIDE:BillQuickPlease check the Upgrade to BillQuick 2017 whitepaper for details.START-UPIn order to start BillQuick and create a company file, please follow the steps below. At this point BillQuickshould already be installed on your computer.Setting up BillQuick DatabaseFor previous users, BillQuick will automatically open the last used database. First time users you will receivea prompt to select a company file and database type. In order to create a BillQuick database you will needsystem administrative privileges. Typically, a BillQuick Supervisor (or an IT administrator) handles this taskand then informs the other users about its location, User ID and Password (if applicable).You can create a new company file in either a Standard database (Microsoft Access) or an SQL database(Microsoft SQL Server Express or SQL Server Standard). Your options depend on the edition of BillQuick youpurchase: Basic, Pro or Enterprise. For trial version users, you have BillQuick Enterprise Edition by default.For evaluation purposes, most users choose the Standard option. After you purchase BillQuick and ‘go live’a Standard database can be converted to a SQL database with only a click.Click on the ‘Create a New Company File’ option (make sure the radio button is on Use StandardDatabase).BillQuick Power Up Your Business(866) 945-1595 www.bqe.com info@bqe.com13
GETTING STARTED GUIDE:BillQuickNavigate to the folder where you want to store your company database. If you are in a networkenvironment, this should be a shared folder. Place this file in a safe location such as My Documentsor Program Files\BillQuick2017 folder.Enter a name for the file (for example, your company name) and click Open.You will receive a message confirming that your database was created successfully. Click OK andmove on.Next, you will be prompted with the BillQuick Startup Interview wizard to provide basic information for yourBillQuick company file. To do so, please follow these steps:Select your Business Type. Depending upon your selection, pre-defined activity codes will beloaded into your database.BillQuick Power Up Your Business(866) 945-1595 www.bqe.com info@bqe.com14
GETTING STARTED GUIDE:BillQuickBased on your business type, BillQuick adjusts its terminology and labels. You can accept thoselabels or choose your own Custom Labels from the drop-down list.In the Company Name field, please enter your company name exactly as you would like it to appearon your invoices to be printed from BillQuick.Step through the other options and complete it to the best of your ability using the Next button.Click Help to check out the explanations where needed.You do not require License and Registration keys in order to complete the Interview.Click Finish and then close.All of the settings that you choose in the Start-Up Interview can be edited later.The BillQuick Initial Setup Checklist wizard displays. You can walk through a few of the wizards toset up master information or click Close. We will cover each major type of master information laterin the Guide.BillQuick Power Up Your Business(866) 945-1595 www.bqe.com info@bqe.com15
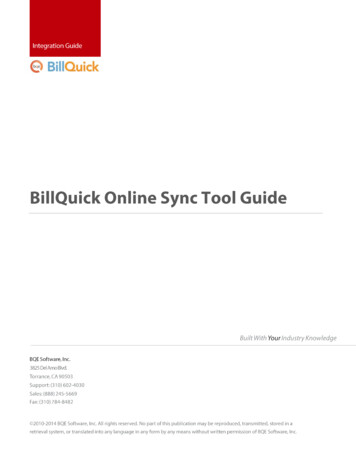
GETTING STARTED GUIDE:BillQuickAfter you have successfully created your company database, you can activate and register your product.Activating ProductThe Product Activation screen displays when BillQuick is not activated or is in evaluation mode. The screenprovides four options. Activate Now – Enter a key to continue your free 15-day trial. Activate Later – Continue your free 7-day period of review. Ready to Buy – Go to www.BillQuick.com to subscribe and purchase the software license. Already Purchased – Enter your license and registration keys to activate BillQuick.BillQuick Power Up Your Business(866) 945-1595 www.bqe.com info@bqe.com16
GETTING STARTED GUIDE:BillQuickEvaluating BillQuickIf you are evaluating BillQuick, you may choose Activate Now or Activate Later. Click Activate Now toprovide your details to BQE Software and obtain an evaluation key. Activate Later allows you to continueworking with BillQuick during a 7-day free trial. After this period, you must obtain an evaluation key orsubscribe to a full software license.Please enter valid information in the screen. This is how BQE Software will contact you with yourevaluation, license and registration keys. When all the information is entered, click Next to continue.Within a few minutes, you will receive your 15-day evaluation key via email. Alternatively, you cangenerate an evaluation key via the web or by calling BQE Software at (310) 602-4020.Enter this Evaluation Key in the space provided. Click Activate.BillQuick will now open with a reminder message stating that you are using an evaluation copy andto continue beyond 15 days, you need to subscribe and purchase the software.While in evaluation mode, continue to use BillQuick. All of the information entered now will be saved andBillQuick Power Up Your Business(866) 945-1595 www.bqe.com info@bqe.com17
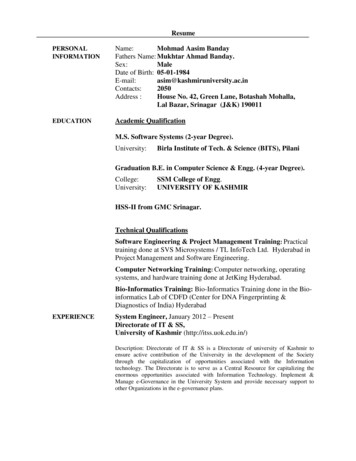
GETTING STARTED GUIDE:BillQuickmade available after switching from evaluation to licensed mode.Licensing and RegisteringBQE Software provides various options for licensing and registering your copy of BillQuick. You can use theProduct Activation, Company or Product Licensing and User Management screen in BillQuick to do so. TheBillQuick Supervisor usually subscribes and registers the BillQuick software.Follow these steps to proceed:When you are ready to purchase and license BillQuick, click ‘I Am Ready to Buy’ option on theProduct Activation screen. Purchase your subscription from the BillQuick website or call BQESoftware at (310) 602-4020 to speak with a BillQuick Account Rep.You will receive your license and registration keys via email at the email address that you provide.After subscribing to a full software license, click ‘Already Purchased’ on the Product Activationscreen. It asks for your company name, license and registration keys.Using the email you received, enter or cut-and-paste the information. It should be the same as youBillQuick Power Up Your Business(866) 945-1595 www.bqe.com info@bqe.com18
GETTING STARTED GUIDE:BillQuicksee in the email (if you want to make a change, contact your BillQuick Account Rep.).Click Register. BillQuick is now licensed for the subscribed period.When you evaluate other modules in the BillQuick Family, you can run the evaluation software andlicensed software together.Alternatively, you can do the same thing using the Company screen. To do so:Select Company from the View menu.Enter your company name on its General tab. It should be exactly as printed on the email youreceived. Click Save.On the License tab, enter or cut-paste the License Key from the email.Click Tools and select Validate License Key.Click Save. It displays the Edition and Number of Licenses purchased by you.BillQuick Power Up Your Business(866) 945-1595 www.bqe.com info@bqe.com19
GETTING STARTED GUIDE:BillQuickClick Tools and select RegisterSoftware.Enter or cut-paste theRegistration Key from your email.Click OK.You have successfully subscribed andregistered your BillQuick!In a networked environment, the supervisor or IT administrator needs to repeat the same procedureon each computer.To license BillQuick using the Console:Open the Product Licensing and User Management screen from the File menu.Enter the License Key against the relevant product (BillQuick) on the Licenses tab.Click Update to save the license information.Move to the Users tab. You can grant employees and vendors access to BillQuick and other add-onmodules by marking the check box in the appropriate column.Alternatively, you can select rows and use the shortcut menu or button panel to Assign or Un-Assign a userto the relevant programs.Choose the desired Security profile for an employee or vendor from the list, for example, FullAccess, Time and Expense Only, Billing Only and so on. If you prefer to select individual securitypermissions for employees or vendors, click Security to do so from the Security screen.When you have finished, click Close.BillQuick Power Up Your Business(866) 945-1595 www.bqe.com info@bqe.com20
GETTING STARTED GUIDE:BillQuickBILLQUICK BASICSAfter installing BillQuick, you need to have an understanding of the basic options and procedures related tologin, navigation and other general features. This section focuses on the basics of the BillQuickenvironment: Starting Up BillQuick Logging into BillQuick Navigating BillQuickStarting UpTo start up BillQuick, do one of the following: In Windows, click Start and select Programs from the menu. From the program list, choose BillQuick2017. On your desktop, double click the BillQuick desktop icon.If you have previously worked with BillQuick on your computer, BillQuick will automatically open thedatabase that you were in the last time you used the software. You can skip to Logging In below.When you start BillQuick for the first time, it prompts you with the BillQuick Startup Interview in order to setup your company file. After you have successfully created your company database and the security is turnedon, you will be prompted for a login.Logging InWhen security is turned on, the Supervisor and other BillQuick Users – employees and vendors – aresupposed to log into the program to access its functions and features. Only employees and vendorsdesignated as BillQuick Users (in their profiles) can access the software.By default, the Employee ID (or Vendor ID) of a user is also its login user ID and password. If you change theEmployee ID of a user, the User ID is also changed. You can change the login password as needed andmake them case-sensitive (from Global Settings screen).BillQuick allows you to have a separate Employee ID and Login ID, thus letting you customize your loginname. For example, a user ‘Curtis James’ may have an Employee ID ‘CJ’ and Login ID ‘Curtis’. The newLogin ID supports Windows Authentication, allowing you to bypass the BillQuick Login screen completely.BillQuick Power Up Your Business(866) 945-1595 www.bqe.com info@bqe.com21
GETTING STARTED GUIDE:BillQuickThis ID can be set in the Employee or Vendor screen.You can choose between the following login options: Logging into Standard Database Logging into SQL DatabaseLogging into Standard DatabaseThe BillQuick Login dialog box displays the company name and database location. To log into a BillQuickstandard (Microsoft Access) database, note the following:For the BillQuick Supervisor, the default User ID and Password is ‘supervisor’ (without quotes).Please change the Supervisor password before deploying BillQuick in your company.Enter your User ID and Password provided by the Supervisor.When only one person uses a particular computer, mark the Remember check box to make yourUser ID the default.Check the Windows Authentication option if you want to bypass the BillQuick login in future. Youraccess to the BillQuick database is controlled by your Windows NT account or group, which isauthenticated when you log on to the Windows operating system on your system (client machine).Click OK to access BillQuick.Logging into SQL DatabaseIf you are using a SQL Server database, you have to log in with correct User ID, Password and otherinformation. The SQL Server will not complete a connection unless it has verified your login ID.BillQuick Power Up Your Business(866) 945-1595 www.bqe.com info@bqe.com22
GETTING STARTED GUIDE:BillQuickSupport for full SQL Server as a backend is available in the BillQuick Enterprise edition only.When BillQuick Enterprise creates or up-sizes a database on the SQL Server, it creates two logins: BillQuickSQL with password ‘admin’ BillQuickGuest with password ‘Guest’You can change the password of BillQuickSQL User using Global Settings from the Settings menu.BillQuick allows you to connect to the SQL Server via Windows Authentication (Trusted Connection): establishes connection to the SQL Server using theWindows Logon credentials (that is, Windows User ID and Password). It does not need your loginID; or SQL Server Authentication (Standard Security): establishes connection to the SQL Server using yourassigned SQL Server login ID and password.See BillQuick Help for more on SQL Login and Authentication.After logging in, the default or role-based navigator appears.BillQuick Power Up Your Business(866) 945-1595 www.bqe.com info@bqe.com23
GETTING STARTED GUIDE:BillQuickNavigating BillQuickAnyone familiar with Microsoft Windows and Microsoft Office will find BillQuick easy to use. Role-based andstandard navigators, menu bar, sidebar, icon toolbars, action buttons, screen layouts, spreadsheet-likegrids, shortcut keys, and other user interface elements look and feel like these programs.Security permissions determine what features, functions, and information a user can view and access onthe navigators, toolbars, menu bar and screens. BillQuick disables or grays out unavailable items.There are actually four ways to navigate and use the program: Menu Bar Toolbar Sidebar NavigatorsMenu BarLike all Windows applications, BillQuick has a menu bar at the top, from where you can access the followingmenus:ToolbarThe toolbar allows you to access BillQuick functions quickly. You can turn it on or off from the UserPreferences screen or by right clicking on the menu bar.SidebarOn the left side of the BillQuick desktop, you can conveniently access major functions from the Sidebar. Thebar is divided into four panels, grouping the common functions together under each.BillQuick Power Up Your Business(866) 945-1595 www.bqe.com info@bqe.com24
GETTING STARTED GUIDE:BillQuickMainBilling Company navigator Management navigator Time & Expense Home (Billingnavigator) Billing Reviewnavigator Manual Invoice Billing navigator Invoice Review Accounting navigator Payments Client Project DashboardWizardsTime and Expenses Home (Time & Expensenavigator) Time Entry (Sheet View) Calendar View Timer Expense LogNavigators BillQuick Interview Employee Client Project Phased Invoice Activity Expense SFS EFS InvoiceBillQuick navigators let you easily understand the workflow and quickly access important features andmodules of the program. BillQuick provides you with a default role-based navigator and five function-basednavigators. You can choose to make any of them your default navigator.The function-based navigators include: Company, Business Management, Time and Expense Workflow,Billing and Accounting. You can choose a navigator from the Sidebar or from the corresponding menu.The role-based navigator is a customized navigator giving you easy access to the most often used functionsaccording to your role. Since you have logged in as the Supervisor, it would display the Default navigator(home page). Other roles include: Time and Expense, Billing and Principal/Management.BillQuick Power Up Your Business(866) 945-1595 www.bqe.com info@bqe.com25
GETTING STARTED GUIDE:BillQuickYou can find other easy options for navigation within various BillQuick screens. You can access relatedscreens from the ‘View’ drop-down menu as in case of Sheet View, Expense Log, and so on. Alternatively,screens may contain links to other related screens; for example, you can directly access the Invoice Reviewscreen from the Billing Review screen and Payment screen from the Invoice Review screen.Besides this, you can quickly switch between open screens by using Ctrl Alt Tab. BillQuick also supportsvarious keyboard shortcuts.MASTER INFORMATIONMaster information is the foundation of any time and billing system. This section covers the basics of masterinformation maintained in BillQuick.BillQuick Power Up Your Business(866) 945-1595 www.bqe.com info@bqe.com26
GETTING STARTED GUIDE:BillQuickBasic master information can be set up using BillQuick wizards via the View menu, Wizards. Blue fieldlabels on the scree
BillQuick. To install BillQuick, you should be logged in as an administrator. Basic start-up procedures for BillQuick are: Install BillQuick. Create a BillQuick database. Activate and license BillQuick. Before installing the software, please read the End User License Agreement (EULA). You can see the basic steps in the flowchart below.