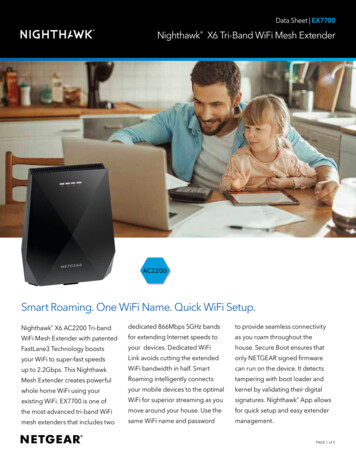
Transcription
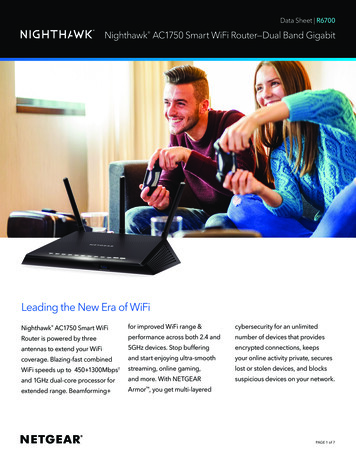
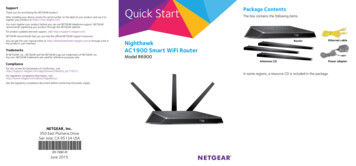
SupportThank you for purchasing this NETGEAR product.After installing your device, locate the serial number on the label of your product and use it toregister your product at https://my.netgear.com.Quick StartPackage ContentsThe box contains the following items.You must register your product before you can use NETGEAR telephone support. NETGEARrecommends registering your product through the NETGEAR website.For product updates and web support, visit http://support.netgear.com.NETGEAR recommends that you use only the official NETGEAR support resources.You can get the user manual online at http://downloadcenter.netgear.com or through a link inthe product’s user interface.Trademarks NETGEAR, Inc., NETGEAR and the NETGEAR Logo are trademarks of NETGEAR, Inc.Any non‑NETGEAR trademarks are used for reference purposes only.RouterNighthawkAC1900 Smart WiFi RouterModel R6900Antennas (3)ComplianceEthernet cablePower adapterFor the current EU Declaration of Conformity, /a id/11621/.For regulatory compliance information, visithttp://www.netgear.com/about/regulatory/.See the regulatory compliance document before connecting the power supply.NETGEAR, Inc.350 East Plumeria DriveSan Jose, CA 95134 USAJune 2015In some regions, a resource CD is included in the package.
You can use this diagram to connect your router or follow the detailed instructions in this booklet.1. Remove the antenna caps.Remove the antenna caps from theantenna posts on the router.6. Connect a computer.You can use an Ethernet cable or connectwith WiFi.To connect with WiFi, use the WiFinetwork name and password on theproduct label.2. Attach and position the antennas.Attach the antennas on the threadedantenna posts.Position the antennas for the bestWiFi performance.Antenna posts3. Prepare your modem.Unplug your modem’s power. If it uses abattery backup, remove the battery.Ethernet cable4. Connect your modem.Plug in your modem. Put the battery backin. Then cable the modem to the yellowInternet port on the router.5. Power on the router.lightsThe Power LEDamber and then turnswhite when the router isready.Access your router and change its settings or diagnose andrepair network issues. Make a printer AirPrint compatible so that you can print froman iPad or iPhone.If you do not see genie, enterwww.routerlogin.net in the addressfield of the web browser. When prompted,enter admin for the user name andpassword for the password. Use MyMedia to find and play media files in your network. Use Turbo Transfer to quickly send files from your computer orsmartphone to another device on the network. Set up parental controls.Follow the genie steps to connect to theInternet. Connect your smartphones and tablets to your home WiFi byscanning the WiFi QR code from genie.8. Get the genie app.Download the free genie app Download the free genie app from www.NETGEAR.com/genie.Easily share media, files, and printerson the network from your smartphone,tablet, or laptop.InternetDSL orcableThe free NETGEAR genie app lets you easily monitor, connect, andcontrol your home network from a Windows or Mac computer,tablet, or smartphone. You can share and stream music or videos,diagnose and repair network issues, set up parental controls, andmore: 7. Log in to the router.Launch a web browser.NETGEAR genie displays.NETGEAR recommends that thecenter antenna be vertical and thatyou aim the others outward at45-degree angles as shown.Download the NETGEAR genie AppPoweradapter9. Get the user manual.You can get the user manual online athttp://downloadcenter.netgear.comor through a link in the product’s userinterface.21
LEDsThe LEDs on the top of the router light to indicate router activity:Power LEDInternet LED2.4 GHz WiFi LED5 GHz WiFi LEDGuest WiFi LEDUSB 3.0 port LEDEthernet ports 1–4 LEDsWiFi On/Off button with LEDWPS button with LED1
Install Your RouterMake sure that your Internet service is active before you installyour router.¾¾ To install your router:1. Remove the antenna caps.Remove the antenna caps from the antenna posts on therouter.2. Attach and position the antennas.Antenna postsa. Align the antennas with the antenna posts on the router.b. Attach the antennas on the threaded antenna posts.c. Position the antennas for the best WiFi performance.NETGEAR recommends that the center antenna be verticaland that you aim the others outward at 45-degree angles,as shown.2
3. Prepare your modem.InternetDSL orcableModema. Unplug your modem’s power.b. If the modem uses a battery backup, remove its batteries.c. If your modem was already connected to another router,disconnect the cable between your modem and that router.Make sure that your modem is turned off and is cabled only tothe wall jack for your Internet service.4. Connect your modem.InternetRouterDSL orcableModemEthernet cablea. Plug in, then turn on your modem.b. If you removed the batteries, replace them.c. With the yellow Ethernet cable that came with the router,connect your modem to the yellow Internet port on yourrouter.3
5. Add power to the router.InternetRouterDSL orcableEthernetcableModemPoweradaptera. Connect the power adapter to the router and plug thepower adapter into an outlet.on the front panel to lightb. Wait for the Power LEDamber and turn white.If no LEDs are lit, press the Power On/Off button on therear panel of the router.6. Connect a computer.EthernetcableInternetDSL orcableEthernetcableModemRouterPoweradapterYou can use an Ethernet cable or connect with WiFi: To connect your computer to the router with an Ethernetconnection, use an Ethernet cable (not included) to connectyour computer to an Ethernet port on the router. To connect with WiFi, use the WiFi settings on the productlabel.4
7. Launch a web browser.The first time that you connect to the router, the genie pagedisplays. Follow the genie steps to connect to the Internet.If the genie page does not display, try the following: Close and reopen the browser. Make sure that your computer is connected to one of thefour Ethernet ports on the router or that you are connectedto your WiFi network. Make sure that the router is receiving full power and thatits Power LEDis lit. If your computer is set to a static or fixed IP address (thisis uncommon), change it to obtain an IP address from therouter automatically.If you still do not see the genie page, log in to the router so thatgenie can detect your Internet connection.¾¾ To log in to the router:1. Launch a web browser.2. Enter www.routerlogin.net in the address field of thebrowser.A login window displays.3. Enter admin for the user name and password for thepassword.The BASIC Home page displays. If your Internet connectionis not set up yet, genie automatically detects your Internetconnection.5
WiFi Network Name and PasswordThe preset WiFi network name (SSID) and password (network key)are unique to your router, like a serial number. Because the routerautomatically uses WiFi security, you don’t need to set it up. TheWiFi settings are on the product label.NETGEAR recommends that you use the preset WiFi settingsbecause you can check the product label if you forget them.NETGEAR genie lets you change these settings. If you do so, writedown the new WiFi settings and store them in a safe place.You can write the WiFi settings from your product label in this spacefor easy reference.WiFi network name (SSID):Network key (password):If you change the WiFi settings, write the new settings here foreasy reference and store this booklet in a safe place.WiFi network name (SSID):Network key (password):6
Join the WiFi NetworkYou can either use Wi-Fi Protected Setup (WPS) or select your WiFinetwork and type its password. For help with the WPS button onyour computer or WiFi device, check the instructions or online helpthat came with that computer or device. Some older equipmentcannot use WPS.¾¾ To join the network using WPS:on the router for three to five1. Press the WPS buttonseconds.The WPS LED on the router blinks white.2. Within two minutes, on your computer or WiFi device, press itsWPS button or click its onscreen WPS button.The WPS LED on the router lights solid white when thecomputer or WiFi device connects to your router.3. Repeat this process to add other computers or WiFi devices.¾¾ To select your network and enter its password:1. Open the software utility that manages your WiFi connectionson the computer or WiFi device that you want to connect toyour router.This utility scans for WiFi networks in your area.2. Find and select your router’s WiFi network name (SSID).The SSID is on the product label.3. Enter the router’s password (or your custom password if youchanged it) and click the Connect button.The password is on the product label.4. Repeat Step 1 through Step 3 to add other computers or WiFidevices.7
View or Change the Router SettingsAfter you use genie to set up the router, you can log in to the routerto view or change its settings.Log In to the Router¾¾ To log in to the router:1. Connect a computer or WiFi device to the router.You can use an Ethernet cable or connect with WiFi. For a wired connection, use an Ethernet cable (not included)to connect your computer to a black Ethernet port on yourrouter. To connect with WiFi, select and join your WiFi network.2. Launch a web browser.3. Enter www.routerlogin.net in the address field of thebrowser.A login window displays.4. Enter admin for the user name and password for thepassword.The BASIC Home page displays.Change the admin Password¾¾ To change the admin password:1. Launch a web browser.2. Enter www.routerlogin.net in the address field of thebrowser.A login window displays.8
3. Enter admin for the user name and password for thepassword.The BASIC Home page displays.4. Select ADVANCED Administration Set Password.5. Type your old password and type the new password twice.6. To be able to recover the password, select the EnablePassword Recovery check box.NETGEAR recommends that you enable password recovery.7. Select two security questions and provide answers to them.8. Click the Apply button.Your changes are saved.Recover a Forgotten admin PasswordThe default password for the admin user name is password. If youchanged the password and enabled the password recovery feature,you can retrieve this password.¾¾ To retrieve a forgotten admin password:1. Launch a web browser.2. Enter www.routerlogin.net in the address field of thebrowser.A login window displays.3. Click the Cancel button.If password recovery is enabled, you are prompted to enter theserial number of the router. The serial number is on the productlabel.4. Enter the serial number of the router.The serial number is on the product label.5. Click the Continue button.9
A page displays requesting the answers to your securityquestions.6. Enter the saved answers to your security questions.7. Click the Continue button.A page displays your recovered password.8. Click the Login again button.A login window displays.9. With your recovered password, log in to the router.Find a Forgotten WiFi Security PasswordThe preset WiFi password is on the product label. If you changedyour WiFi password and forgot what it is, log in to the router toview its current WiFi password.¾¾ To connect to the router and view its WiFi password:1. Launch a web browser.2. Enter www.routerlogin.net in the address field.A login window displays.3. Enter the router user name and password.The default user name is admin and the default password ispassword. You can use the default credentials if you did notchange them.The BASIC Home page displays.4. Select Wireless Settings.The Security Options section of the page displays your WiFipassword.10
Prioritize with Quality of ServiceYou can use Quality of Service (QoS) to assign a high priority togaming and streaming videos from the Internet.Downstream QoS(video streaming)InternetUpstream QoS(gaming)To set up QoS, log in to the router and enable Downstream QoS andUpstream QoS.Downstream QoS prioritizes Internet traffic from the Internet toyour network. This delivers better performance when you streamInternet video, such as when you watch YouTube videos.Upstream QoS prioritizes network traffic from local devices likeyour Xbox to the Internet. This allows a lag-free online gamingexperience.11
Prioritize Internet Video StreamingTo set up QoS to assign a high priority to Internet video streaming,log in to the router and enable Downstream QoS.¾¾ To enable Downstream QoS:1. Launch a web browser.2. Enter www.routerlogin.net in the address field of thebrowser.A login window displays.3. Enter the router user name and password.The default user name is admin and the default password ispassword. You can use the default credentials if you did notchange them.The BASIC Home page displays.4. Select ADVANCED Setup QoS Setup DownstreamQoS.The QoS Setup page displays.5. Select the Enable Downstream QoS (Improved VideoStreaming) check box.6. (Optional) Select the Streaming Database Auto Upgradecheck box.The router automatically checks for updates for the streamingdatabase and downloads and installs them.7. Click the Apply button.The router assigns a high priority to video streaming from theInternet.12
Prioritize Internet GamingTo set up QoS to assign a high priority to Internet traffic from yourgaming system, log in to the router and enable Upstream QoS.¾¾ To enable Upstream QoS:1. Launch a web browser.2. Enter www.routerlogin.net in the address field of thebrowser.A login window displays.3. Enter the router user name and password.The default user name is admin and the default password ispassword. You can use the default credentials if you did notchange them.The BASIC Home page displays.4. Select ADVANCED Setup QoS Setup Upstream QoS.The QoS Setup page displays.5. Select the Enable Upstream QoS (Optimized for Gaming)check box.6. Specify the maximum uplink bandwidth for your Internetconnection: If you know what your uplink bandwidth is, type it in theUplink bandwidth Maximum field. If you are not sure, click the Speedtest button.Speedtest verifies the upstream speed of your Internetconnection. The Uplink bandwidth Maximum fielddisplays the result of the test.7. Click the Apply button.The router assigns a high priority to Internet traffic from yourgaming devices to the Internet.13
Share a USB Drive on the NetworkReadySHARE lets you access and share a USB drive connected tothe router USB port. (If your USB drive uses special drivers, it is notcompatible.)¾¾ To access the USB drive from a Windows computer:1. Connect your USB storage device to the USB port on therouter.2. If your USB storage device uses a power supply, connect it.You must use the power supply when you connect the USBstorage device to the router.When you connect the USB drive to the router USB port, itmight take up to two minutes before it is ready for sharing. Bydefault, the USB drive is available to all computers on your localarea network (LAN).3. On a Windows computer that is connected to the network,select Start Run, enter \\readyshare in the dialog box, andclick the OK button.A window displays the files and folders on the device.14
¾¾ To access the USB drive from a Mac:1. Connect your USB storage device to the USB port on therouter.2. If your USB storage device uses a power supply, connect it.You must use the power supply when you connect the USBstorage device to the router.When you connect the USB drive to the router USB port, itmight take up to two minutes before it is ready for sharing. Bydefault, the USB drive is available to all computers on your localarea network (LAN).3. On a Mac that is connected to the network, launch Finder andselect Go Connect to Server.The Connect to server page displays.4. Enter the smb://readyshare in the Server Address field andclick the Connect button.5. When prompted, select the Guest radio button.If you set up access control on the router and you allowed yourMac to access the network, select the Registered User radiobutton and enter admin for the name and password for thepassword. For more information about access control, see theuser manual, which is available online athttp://downloadcenter.netgear.com or through a link in therouter’s user interface.6. Click the Connect button.A window displays the files and folders on the device.15
Back Up with ReadySHARE VaultYour router comes with free backup software for all the Windowscomputers in your home. Connect a USB hard disk drive (HDD)to the USB port on your router for centralized, continuous, andautomatic backup.Note: The following operating systems support ReadySHARE Vault:Windows XP SP3, Windows 7, Windows 8, and Windows 8.1.¾¾ To back up your Windows computer:1. Connect a USB HDD to a USB port on the router.2. Install the genie app on each Windows computer.3. Download ReadySHARE Vault fromwww.netgear.com/readyshare and install it on each Windowscomputer.4. Launch ReadySHARE Vault.The ReadySHARE Vault home page displays.5. Use the dashboard or the Backup tab to set up and run yourbackup jobs.16
Print Wirelessly with ReadySHARE PrinterYou can connect a USB printer to a USB port on the router and printwirelessly.¾¾ To set up ReadySHARE Printer:1. Connect the USB printer to a USB port on the router with a USBprinter cable.2. On each computer that will share the printer, do the following:a. Install the current USB printer driver software (availablefrom the printer manufacturer).b. Download the NETGEAR USB Control Center utility fromwww.netgear.com/readyshare.c. Select the language.3. If prompted, select the printer and click the Connect buttonfor each computer.When the first computer connects, the status changes toManually connected by xxx.For each computer, when you complete Step 3, the printerstatus displays as Available.17
More Premium FeaturesYour router lets you do the following and more: Play music from a USB drive with iTunes Server. Set up a secure VPN service connection to your home network. Create a personal FTP server with a custom URL.iTunes ServeriTunes Server lets you play music with your Windows or Mac iTunesapp from a USB drive that is connected to the router USB port.You can also use the Apple Remote app from an iPhone and iPadto play music on any AirPlay devices, such as Apple TV or AirPlaysupported receivers.¾¾ To specify iTunes Server settings:1.2.3.4.On your iPhone or iPad, find and connect to the WiFi network.Download the Remote app from the Apple App Store.Launch the Remote app from your iPhone or iPad.Click the Add a Device button.A passcode displays.5. Specify the passcode in the router:a. Launch a web browser.b. Enter www.routerlogin.net in the address field of thebrowser.A login window opens.c. Enter the router user name and password.The default user name is admin and the default passwordis password. You can use the default credentials if you didnot change them.18
The BASIC Home page displays.d. Select ADVANCED USB Functions ReadySHAREStorage.The USB Storage (Advanced Settings) page displays.e. Select the Media Server tab.The Media Server (Settings) page displays.Select the Enable iTunes Server (Music Only) check boxand click the Apply button.g. Enter the passcode and click the Allow Control button.Your changes take effect.f.On your iPhone or iPad, the ReadySHARE music library displaysin the Remote app. You can play this music on any Airplaydevices.VPN ServiceVPN service allows remote access to your home network with asecure connection. After you set up VPN service, you can use VPNto access the router’s USB drive and media and to access yourInternet service at home. To set up VPN service, follow these highlevel steps:1. Specify the VPN service.2. Install OpenVPN software on your computer.3. Use a VPN tunnel.These steps are explained in detail in the user manual, which isavailable online at http://downloadcenter.netgear.com or through alink in the router’s user interface.19
Personal FTP ServerWith your customized free URL, you can use FTP to access yournetwork when you aren’t home through Dynamic DNS. To set upyour FTP server, follow these high-level steps:1. Register for a free NETGEAR Dynamic DNS (DDNS) serviceaccount.2. Provide the account settings to your router.3. Connect a USB hard disk to your router and set up FTP accessthrough the Internet.These steps are explained in detail in the user manual, which isavailable online at http://downloadcenter.netgear.com or through alink in the router’s user interface.20
diagnose and repair network issues, set up parental controls, and more: Access your router and change its settings or diagnose and repair network issues. Make a printer AirPrint compatible so that you can print from an iPad or iPhone. Use MyMedia to find and play media files in your network.