Transcription
Nighthawk X6S AC4000Tri-Band WiFi RouterUser ManualModel R8000PJuly 2017202-11714-01350 E. Plumeria DriveSan Jose, CA 95134USA
Nighthawk X6S AC4000 Tri-Band WiFi RouterSupportThank you for purchasing this NETGEAR product. You can visit www.netgear.com/support to register yourproduct, get help, access the latest downloads and user manuals, and join our community. We recommend thatyou use only official NETGEAR support resources.ConformityFor the current EU Declaration of Conformity, visit http://kb.netgear.com/app/answers/detail/a id/11621.ComplianceFor regulatory compliance information, visit http://www.netgear.com/about/regulatory.See the regulatory compliance document before connecting the power supply.Trademarks NETGEAR, Inc., NETGEAR and the NETGEAR Logo are trademarks of NETGEAR, Inc. Any non NETGEARtrademarks are used for reference purposes only.2
ContentsChapter 1 Hardware SetupUnpack Your Router.9Top View.9LEDs and Buttons on the Top Panel.10Rear Panel.11Label.12Position Your Router.12Cable Your Router.13Turn the LEDs On or Off or Disable LED Blinking.14Turn the LEDs On or Off Using the LED On/Off Switch.14Disable or Enable LED Blinking or Turn Off LEDs.14Chapter 2 Connect to the Network and Access the RouterConnect to the Network.17Wired Connection.17WiFi Connection.17WiFi Connection Using WPS.17Types of Logins.18Use a Web Browser to Access the Router.18Automatic Internet Setup.18Log In to the Router.19Install the Router With the NETGEAR Up App.20Change the Language.20Access the Router With the NETGEAR genie App.21Chapter 3 Specify Your Internet SettingsUse the Internet Setup Wizard.23Manually Set Up the Internet Connection.23Specify an Internet Connection Without a Login.23Specify an Internet Connection That Uses a Login.24Specify IPv6 Internet Connections.25Requirements for Entering IPv6 Addresses.26Use Auto Config for an IPv6 Internet Connection.27Use Auto Detect for an IPv6 Internet Connection.28Set Up an IPv6 6to4 Tunnel Internet Connection.29Set Up an IPv6 6rd Internet Connection.30Set Up an IPv6 Pass Through Internet Connection.31Set Up an IPv6 Fixed Internet Connection.32Set Up an IPv6 DHCP Internet Connection.33Set Up an IPv6 PPPoE Internet Connection.34Change the MTU Size.353
Nighthawk X6S AC4000 Tri-Band WiFi RouterChapter 4 Control Access to the InternetSet Up Parental Controls.39Allow or Block Access to Your Network.40Use Keywords to Block Internet Sites.41Block Services From the Internet.42Delete Keywords From the Blocked List.43Avoid Blocking on a Trusted Computer.43Manage Network Access Control Lists.44Schedule When to Block Internet Sites and Services.44Set Up Security Event Email Notifications.45Chapter 5 Network SettingsView or Change WAN Settings.48Set Up a Default DMZ Server.49Change the Router’s Device Name.49Change the LAN TCP/IP Settings.50Specify the IP Addresses That the Router Assigns.51Disable the DHCP Server Feature in the Router.52Manage Reserved LAN IP Addresses.53Reserve an IP Address.53Edit a Reserved IP Address.54Delete a Reserved IP Address Entry.54Use the WPS Wizard for WiFi Connections.55Specify Basic WiFi Settings.55Change the WiFi Mbps Settings.57Change the WiFi Password or Security Level.57Set Up a Guest WiFi Network.58Control the WiFi Radios.59Use the WiFi On/Off Button.59Enable or Disable the WiFi Radios.59Set Up a WiFi Schedule.60Specify WPS Settings.60Use the Router as a WiFi Access Point.61Set Up a Bridge for a Port Group or VLAN Tag Group.62Set Up a Bridge for a Port Group.62Set Up a Bridge for a VLAN Tag Group.63Set Up an IPTV Port to Lease an Intranet Port.64Custom Static Routes.65Set Up a Static Route.66Edit a Static Route.67Delete a Static Route.67Ethernet Port Aggregation.68Set Up Ethernet Port Aggregation.68View Ethernet Port Aggregation Status.69Change the Router Configuration for Ethernet Port Aggregation.69Improve Network Connections With Universal Plug and Play.704
Nighthawk X6S AC4000 Tri-Band WiFi RouterChapter 6 Manage Your NetworkUpdate the Router Firmware.73Check for New Firmware and Update the Router.73Manually Upload Firmware to the Router.74Change the admin Password and Enable Password Recovery.74Set Up admin Password Recovery.75Recover the admin Password.76View Router Status.76Display Internet Port Statistics.77Check the Internet Connection Status.78View and Manage Logs of Router Activity.78View Devices Currently on the Network.79Monitor Internet Traffictraffic metering.80Manage the Router Configuration File.81Back Up Settings.81Erase the Current Configuration Settings.81Restore Configuration Settings.82Remote Access.82Set Up Remote Management.83Use Remote Access.83Remotely Access Your Router Using the genie App.84Chapter 7 Share USB Storage Devices Attached to the RouterUSB Device Requirements.86Connect a USB Storage Device to the Router.86Access a Storage Device Connected to the Router From a Windows Computer.87Map a USB Device to a Windows Network Drive.87Access a Storage Device That Is Connected to the Router From a Mac.88Back Up Windows Computers With ReadySHARE Vault.88Back Up Mac Computers With Time Machine.89Set Up a USB Hard Drive on a Mac.89Prepare to Back Up a Large Amount of Data.89Use Time Machine to Back Up Onto a USB Hard Disk.90Use FTP Within the Network.91View or Change Network Folders on a Storage Device.92Add a Network Folder on a USB Storage Device.92Edit a Network Folder on a USB Storage Device.93Safely Remove a USB Storage Device.94Chapter 8 Use Dynamic DNS to Access USB Storage Devices Through the InternetSet Up and Manage Dynamic DNS.96Set Up FTP Access Through the Internet.96Your Personal FTP Server.97Set Up Your Personal FTP Server.97Set Up a New Dynamic DNS Account.97Specify a DNS Account That You Already Created.98Change the Dynamic DNS Settings.995
Nighthawk X6S AC4000 Tri-Band WiFi RouterAccess USB Storage Devices Through the Internet.100Remotely Access a USB Device Using ReadyCLOUD.100Create a ReadyCLOUD Account.100Register Your Router With ReadyCLOUD.100Chapter 9 Use the Router as a Media ServerSpecify ReadyDLNA Media Server Settings.103Play Music From a Storage Device With iTunes Server.103Set Up the Router’s iTunes Server With iTunes.104Set Up the Router’s iTunes Server With the Remote App.105Set Up the Router to Work With TiVo.106Chapter 10 Share a USB PrinterInstall the Printer Driver and Cable the Printer.108Download the ReadySHARE Printer Utility.108Install the ReadySHARE Printer Utility.109Print Using the NETGEAR USB Control Center.110Chapter 11 Use VPN to Access Your NetworkSet Up a VPN Connection.112Specify VPN Service in the Router.112Install OpenVPN Software.113Install OpenVPN Software on Your Windows Computer.113Install OpenVPN Software on Your Mac Computer.116Install OpenVPN Software on an iOS Device.116Install OpenVPN Software on an Android Device.117Use a VPN Tunnel on Your Windows Computer.118Use VPN to Access the Router’s USB Device and Media.120Use VPN to Access Your Internet Service at Home.120Set Up VPN Client Internet Access in the Router.121Block VPN Client Internet Access in the Router.121Use a VPN Tunnel to Access Your Internet Service at Home.122Chapter 12 Customize Internet Traffic Rules for PortsPort Forwarding to a Local Server.124Set Up Port Forwarding to a Local Server.124Add a Custom Port Forwarding Service.125Edit a Port Forwarding Service.125Delete a Port Forwarding Entry.126Application Example: Make a Local Web Server Public.126How the Router Implements the Port Forwarding Rule.127Port Triggering.127Add a Port Triggering Service.128Enable Port Triggering.129Application Example: Port Triggering for Internet Relay Chat port triggering.129Chapter 13 TroubleshootingQuick Tips.1326
Nighthawk X6S AC4000 Tri-Band WiFi RouterSequence to Restart Your Network.132Check Ethernet Cable Connections.132WiFi Settings.132Network Settings.132Troubleshoot With the LEDs.132Standard LED Behavior When the Router Is Powered On.133Power LED Is Off or Blinking.133LEDs Never Turn Off.133Internet or Ethernet Port LEDs Are Off.133WiFi LED Is Off.134You Cannot Log In to the Router.134You Cannot Access the Internet.134Troubleshoot Internet Browsing.136Changes Are Not Saved.136Troubleshoot WiFi Connectivity.136Troubleshoot Your Network Using the Ping Utility.137Test the LAN Path to Your Router.137Test the Path From Your Computer to a Remote Device.138Troubleshoot 404 Error Message When Trying to Log In to Plex Account.138Chapter 14 Supplemental InformationFactory Settings.140Technical Specifications.1417
Hardware Setup1This chapter contains the following sections: Unpack Your Router on page 9 Top View on page 9 LEDs and Buttons on the Top Panel on page 10 Rear Panel on page 11 Label on page 12 Position Your Router on page 12 Cable Your Router on page 13 Turn the LEDs On or Off or Disable LED Blinking on page 14For more information about the topics covered in this manual, visit the support website at netgear.com/support.8
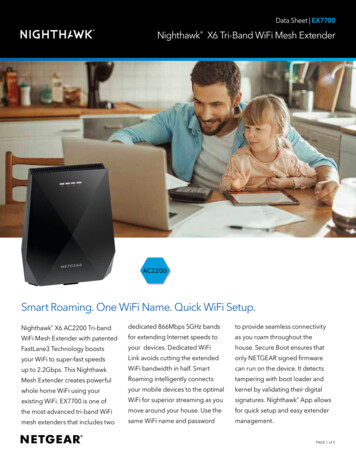
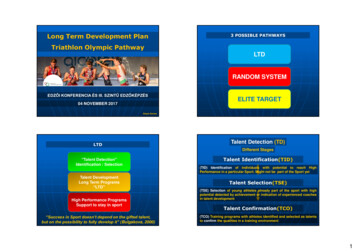
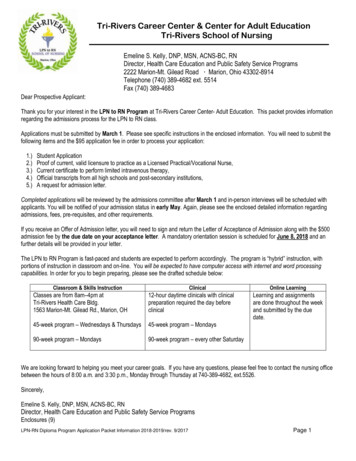
Nighthawk X6S AC4000 Tri-Band WiFi RouterUnpack Your RouterYour package contains the router, the power adapter, and an Ethernet cable.Figure 1. Package contentsTop ViewThe status LEDs, WiFi On/Off button, and WPS button are located on the top of the router.Figure 2. Router LEDs and buttonsHardware Setup9
Nighthawk X6S AC4000 Tri-Band WiFi RouterLEDs and Buttons on the Top PanelThe status LEDs are located on the top of the router.Table 1. LED descriptionsLEDDescriptionPower Solid white. The router is ready. Blinking white. The router is not ready, firmware is upgrading, or the Reset button waspressed. Off. Power is not supplied to the router. Solid white. An Ethernet connection is established. Blinking white. The port is sending or receiving traffic. Off. No Ethernet cable is connected between the router and the modem. Solid white. The 2.4 GHz WiFi radio is operating. Blinking. The router is sending or receiving WiFi traffic. Off. The 2.4 GHz WiFi radio is off. Solid white. The 5 GHz 1 WiFi radio is operating. Blinking. The router is sending or receiving WiFi traffic. Off. The 5 GHz 1 WiFi radio is off. Solid white. The 5 GHz 2 WiFi radio is operating. Blinking. The router is sending or receiving WiFi traffic. Off. The 5 GHz 2 WiFi radio is off.Internet2.4 GHz WiFi5 GHz 1 WiFi5 GHz 2 WiFiUSB 3.0 portThe USB 3.0 LED is for the USB 3.0 USB port. The USB 2.0 LED is for the USB 2.0 port.USB 2.0 port Solid white. A USB device is connected and is ready. Blinking. A USB device is plugged in and is trying to connect. Off. No USB device is connected, or someone clicked the Safely Remove Hardware buttonand it is now safe to remove the attached USB device.Hardware Setup10
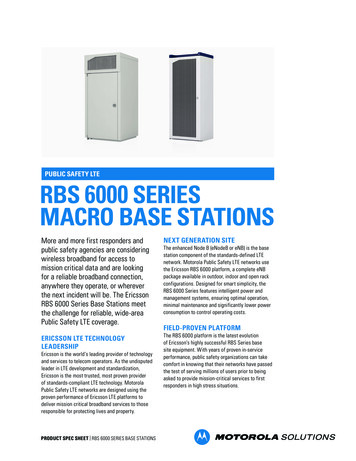
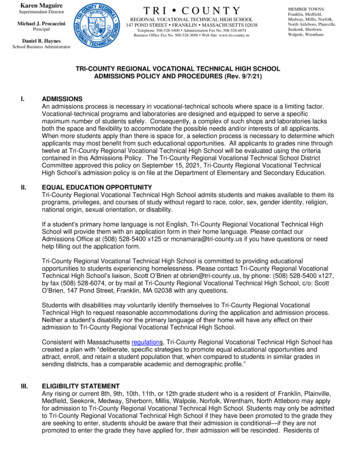
Nighthawk X6S AC4000 Tri-Band WiFi RouterTable 1. LED descriptions (Continued)LEDDescriptionEthernet ports 1–4The LED color indicates the speed: white for Gigabit Ethernet connections and amber for 100Mbps or 10 Mbps Ethernet connections. Solid. A powered-on device is connected to the Ethernet port. Blinking. The port is sending or receiving traffic. Off. No device is connected to this Ethernet port.WiFi On/Off button with LED Pressing this button for two seconds turns the 2.4 GHz, 5 GHz 1, and 5 GHz 2 WiFi radios onand off.If this LED is lit, the WiFi radios are on. If this LED is off, the WiFi radios are turned off and youcannot use WiFi to connect to the router.WPS button with LEDThis button lets you use WPS to join the WiFi network without typing the WiFi password. TheWPS LED blinks white during this process and then lights solid white.Note If the LED On/Off switch is moved to the Off position, all the LEDs except the PowerLED are turned off.Rear PanelThe rear panel connections and buttons are shown in the following figure.Figure 3. Rear panelViewed from left to right, the back panel contains the following components: USB 2.0 port. One USB 2.0 port to connect USB storage devices. LED On/Off switch. If this switch is in the Off position, all the router’s LEDs, including the LEDs on thefour active antennas, but not the Power LED, are turned off. Ethernet ports. Four Gigabit Ethernet RJ-45 LAN ports to connect the router to LAN devices. Ethernetport aggregation is enabled by default. Use Ethernet aggregate ports 1 and 2 to cable a device thatsupports Ethernet port aggregation to the router. Ethernet ports 3 and 4 are nonaggregate Ethernetports. USB 3.0 port. One USB 3.0 port to connect USB storage devices.Hardware Setup11
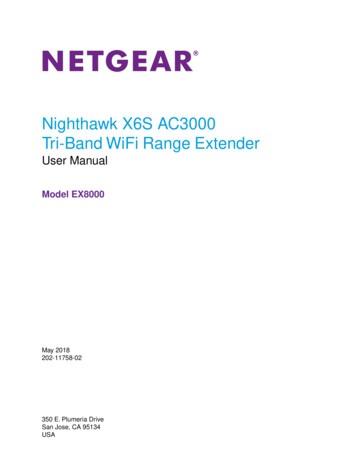
Nighthawk X6S AC4000 Tri-Band WiFi Router Reset button. Pressing the Reset button resets the router. If the Reset button is pressed for at leastseven seconds and the Power LED blinks white, the router returns to its factory settings. DC power connector. Connect the power adapter that came in the product package to the DC powerconnector. Power On/Off button. Press the Power On/Off button to provide power to the router.LabelThe label on the router shows the login information, WiFi network name and network key (password), MACaddress, and serial number.Figure 4. Product labelPosition Your RouterThe router lets you access your network anywhere within the operating range of your WiFi network. However,the operating distance or range of your WiFi connection can vary significantly depending on the physicalplacement of your router.To take full advantage of the 11ad advanced feature, your router must be placed within 20 feet and withinline-of-sight of the 11ad enabled device that you are connecting to itIn addition, position your router according to the following guidelines: Place your router near the center of the area where your computers and other devices operate, andwithin line of sight to your WiFi devices. Make sure that the router is within reach of an AC power outlet and near Ethernet cables for wiredcomputers. Place the router in an elevated location, minimizing the number walls and ceilings between the routerand your other devices. Place the router away from electrical devices such as these:-Ceiling fans-Home security systemsHardware Setup12
Nighthawk X6S AC4000 Tri-Band WiFi Router -Microwaves-Computers-Base of a cordless phone-2.4 GHz cordless phonePlace the router away from large metal surfaces, large glass surfaces, insulated walls, and items suchas these:-Solid metal door-Aluminum studs-Fish tanks-Mirrors-Brick-ConcreteThe following factors might limit the range of your WiFi: The thickness and number of walls the WiFi signal passes through. Other WiFi access points in and around your home might affect your router’s signal.WiFi access points are routers, repeaters, WiFi range extenders, and any other device that emits a WiFisignal for network access.Cable Your RouterPower on your router and connect it to a modem.To cable your router:1. Unplug your modem’s power, leaving the modem connected to the wall jack for your Internet service.If your modem uses a battery backup, remove the battery.2. Plug in and turn on your modem.Hardware Setup13
Nighthawk X6S AC4000 Tri-Band WiFi RouterIf your modem uses a battery backup, put the battery back in.3. Connect your modem to the Internet port of your router with the Ethernet cable that came with yourrouter.4. Connect the power adapter to your router and plug the power adapter into an outlet.5. Press the Power On/Off button on the rear panel of the router.Turn the LEDs On or Off or Disable LED BlinkingYou can turn off the router LEDs using the LED On/Off switch on the rear panel of the router. You can alsolog in to the router to disable or enable LED blinking or turn off the LEDs.Turn the LEDs On or Off Using the LED On/Off SwitchUse the LED On/Off switch on the rear panel of the router to turn off the LEDs, including the LEDs on thefour active antennas. Note that the Power LED stays lit even if the LED On/Off switch is in the Off position.To turn the LEDs on or off using the LED On/Off switch:Move the LED On/Off switch on the rear panel to the On or Off position.Disable or Enable LED Blinking or Turn Off LEDsLog in to the router to disable or enable LED blinking. You can also turn off the LEDs.To disable LED blinking or turn off the LEDs using the router’s web interface:1. Launch a web browser from a computer or mobile device that is connected to the network.2. Enter http://www.routerlogin.net in the address field.A login window opens.3. Enter the router user name and password.The user name is admin. The default password is password. The user name and password arecase-sensitive.The BASIC Home page displays.4. Select ADVANCED Advanced Setup LED Control Settings.The LED Control Settings page displays.5. Select an LED control setting:Hardware Setup14
Nighthawk X6S AC4000 Tri-Band WiFi Router Enable blinking on Internet LED, LAN LED, Wireless LED and USB LED when data traffic isdetected. Allows standard LED behavior. This setting is enabled by default. Disable blinking on Internet LED, LAN LED, Wireless LED and USB LED when data traffic isdetected. Blinking is disabled when data traffic is detected. Turn off all LEDs except Power LED. All the LEDs, except the Power LED, are turned off.6. Click the Apply button.Your settings are saved.Hardware Setup15
Connect to the Network and Access theRouter2You can connect to the router’s WiFi networks or use a wired Ethernet connection. This chapter explains theways you can connect and how to access the router and log in.The chapter contains the following sections: Connect to the Network on page 17 Types of Logins on page 18 Use a Web Browser to Access the Router on page 18 Install the Router With the NETGEAR Up App on page 20 Change the Language on page 20 Access the Router With the NETGEAR genie App on page 2116
Nighthawk X6S AC4000 Tri-Band WiFi RouterConnect to the NetworkYou can connect to the router’s network through a wired or WiFi connection. If you set up your computer touse a static IP address, change the settings so that it uses Dynamic Host Configuration Protocol (DHCP).Wired ConnectionYou can connect your computer to the router using an Ethernet cable and join the router’s local area network(LAN).The router has four Ethernet ports. Ports 1 and 2 can be used as Ethernet LAN ports or as aggregationports to connect to a NAS or Smart Switch that supports port aggregation (LACP).To connect your computer to the router with an Ethernet cable:1. Make sure that the router is receiving power (its Power LED is lit).2. Connect an Ethernet cable to an Ethernet port on your computer.3. Connect the other end of the Ethernet cable an Ethernet port on the router.Your computer connects to the local area network (LAN).WiFi ConnectionTo find and select the WiFi network:1. Make sure that the router is receiving power (its Power LED is lit).2. On your computer or WiFi device, find and select the WiFi network.The WiFi network name is on the router’s label.3. Join the WiFi network and enter
Your package contains the router, the power adapter, and an Ethernet cable. Figure 1. Package contents Top View The status LEDs, WiFi On/Off button, and WPS button are located on the top of the router. Figure 2. Router LEDs and buttons Hardware Setup 9 Nighthawk X6S AC4000 Tri-Band WiFi Router