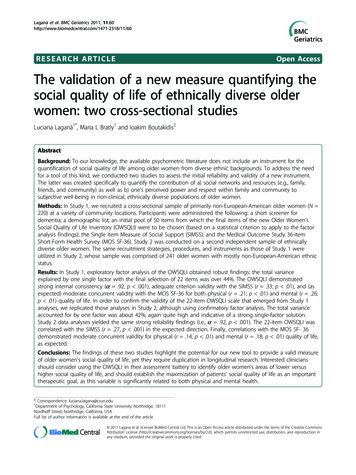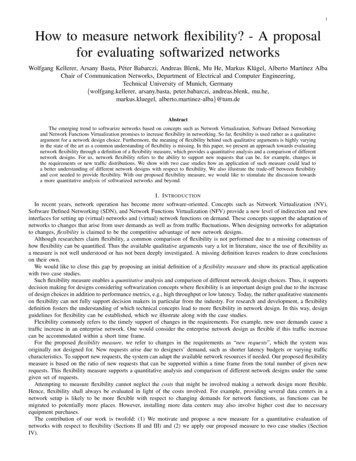
Transcription
3DS.COM/SOLIDWORKS Dassault Systèmes Confidential Information 2/3/2016 ref.: 3DS Document 20141How to Measure GD&T Thomas Allsup July 2015Thomas Allsup, CSWPCo-Chair of the North TexasSolidWorks User GroupManaging Partner of AnidaTechnologies
3DS.COM/SOLIDWORKS Dassault Systèmes Confidential Information 2/3/2016 ref.: 3DS Document 2014Previously at SolidWorks World 2Check the archives 2009 How to Spell GD&T - Introduced FOPRL Chart2010 The Revenge of the Circled Letters - Modifiers2013 Hitchhiker’s Guide to GD&T - Tolerance Zones and Shapes2014 The Big GD&T Theory - Datums and Basic Dimensions2015 I Know Everything About GD&T Except Exceptions
3DS.COM/SOLIDWORKS Dassault Systèmes Confidential Information 2/3/2016 ref.: 3DS Document 2014So Far Everything Has Been About GD&T Drawings3MetrologyEvery presentation, I have to mention at least once that this isn’t about metrology.ASME Y14.5 states it is a drafting standard and doesn’t cover measuring.This presentation changes that trend so let’s talk about measuring
3DS.COM/SOLIDWORKS Dassault Systèmes Confidential Information 2/3/2016 ref.: 3DS Document 2014Reference to Gaging4 ASME Y14.5 is a drawing standard, not a gaging standard. Section 1.1.6 states that any gaging discussed is for illustration purposes only ASME Y14.43 Dimensioning and Tolerancing Principles for Gagesand Fixtures tells you how to make gages and fixtures ASME B89 is collection of metrology standards that tell you how tomeasure B89.3.1 RoundnessB89.3.4 Axes of RotationB89.3.7 Surface PlatesB89.7.2 Measurement Planning
3DS.COM/SOLIDWORKS Dassault Systèmes Confidential Information 2/3/2016 ref.: 3DS Document 2014METROLOGY5 The science of measurement. International Bureau of Weights and Measures (BIPM)defines Metrology as "the science of measurement,embracing both experimental and theoreticaldeterminations at any level of uncertainty in any field ofscience and technology."
3DS.COM/SOLIDWORKS Dassault Systèmes Confidential Information 2/3/2016 ref.: 3DS Document 2014BEST TEXTBOOK6 One of many books in my library. This is a little dated from 1987 butit is clearly one of the best bookson measurement particularlyGD&T topics. Easier to read than ASME B89measurement documents.
3DS.COM/SOLIDWORKS Dassault Systèmes Confidential Information 2/3/2016 ref.: 3DS Document 2014PRECISION MACHINIST CERITICATE MANUAL MILL MANUAL LATHE DRILLING / GRINDING BLUEPRINT READING OSHA 10 METROLOGY 16 hours of instructionSomething to fall back on if thisengineering thing doesn’t work out 7
3DS.COM/SOLIDWORKS Dassault Systèmes Confidential Information 2/3/2016 ref.: 3DS Document 2014COORDINATE MEASURING MACHINE8 Step 1: Buy a 250,000 pieceof equipment that will measureeverything for you. ASME/ANSI B89.4.1-1997 Methods for PerformanceEvaluation of CoordinateMeasuring Machines
3DS.COM/SOLIDWORKS Dassault Systèmes Confidential Information 2/3/2016 ref.: 3DS Document 2014VISION SYSTEM9Step 2: Ok, you only have 125,000 so buy one of these:.
3DS.COM/SOLIDWORKS Dassault Systèmes Confidential Information 2/3/2016 ref.: 3DS Document 2014MEASUREMENT ARM10 Step 3: Buy a measurementarm for 25,000. Visit the partner pavilion for a fewvery good examples. ASME B89.4.22-2004 Methods for PerformanceEvaluation of Articulated ArmCoordinate Measuring Machines
3DS.COM/SOLIDWORKS Dassault Systèmes Confidential Information 2/3/2016 ref.: 3DS Document 2014How About More Traditional GD&T Measurements?11Inspection on a budget This presentation details the traditional measurement techniques.We’ll look at the five types of GD&T tolerance zone measurements.I am going to skip measuring non-GD&T tolerance zones.
3DS.COM/SOLIDWORKS Dassault Systèmes Confidential Information 2/3/2016 ref.: 3DS Document 2014AGENDA12 Equipment Planar Measurements Straightness – Flatness – Orientation of planes Roundness Circularity – Cylindricity Profile Runout Cylindrical Tolerance Zone
3DS.COM/SOLIDWORKS Dassault Systèmes Confidential Information 2/3/2016 ref.: 3DS Document 2014Humor #113Don’t discuss infinity with anpart inspector, you’ll never hearthe end of it.Ok, there isn’t a lot of metrology humor.
3DS.COM/SOLIDWORKS Dassault Systèmes Confidential Information 2/3/2016 ref.: 3DS Document 2014METROLOGY EQUIPMENT LIST14 Granite SlabDial IndicatorJack Screws (3X)Sine PlateAngle Plate (90 degrees)Gage Blocks / PinsVee BlockClamps Adjustable ParallelsParallelsCamel hair brushCalipersMicrometer(s)
3DS.COM/SOLIDWORKS Dassault Systèmes Confidential Information 2/3/2016 ref.: 3DS Document 2014A GOOD START 15
3DS.COM/SOLIDWORKS Dassault Systèmes Confidential Information 2/3/2016 ref.: 3DS Document 2014RULE OF TEN16 If you want to measure a feature accurately,you need a tool that is capable of measuring1/10 the smallest dimension or tolerance. Example: To measure a /-.001” toleranceyou need to .0001” resolution caliper. The same thing goes for datums and graniteslabs.
3DS.COM/SOLIDWORKS Dassault Systèmes Confidential Information 2/3/2016 ref.: 3DS Document 2014GRANITE SLABS17 Granite materials are black, grey, and crystal pink, each offered inthree grades: AA-Laboratory for precision operation in constant temperature gagingrooms and metrology departments - 25 millionths A-Inspection Grade for general quality control applications - 50millionths B-Tool room for general production checking work throughout the shop- 100 millionths
3DS.COM/SOLIDWORKS Dassault Systèmes Confidential Information 2/3/2016 ref.: 3DS Document 2014GRANITE SLABS DO WHAT?18 Dimensionally stable overlarge temperature range Can be made very flat Surface is hard Heavy
3DS.COM/SOLIDWORKS Dassault Systèmes Confidential Information 2/3/2016 ref.: 3DS Document 2014DIAL INDICATOR19
3DS.COM/SOLIDWORKS Dassault Systèmes Confidential Information 2/3/2016 ref.: 3DS Document 2014DIAL INDICATOR ERROR20
3DS.COM/SOLIDWORKS Dassault Systèmes Confidential Information 2/3/2016 ref.: 3DS Document 2014HEIGHT GAUGE21
3DS.COM/SOLIDWORKS Dassault Systèmes Confidential Information 2/3/2016 ref.: 3DS Document 2014CALIPERS22
3DS.COM/SOLIDWORKS Dassault Systèmes Confidential Information 2/3/2016 ref.: 3DS Document 2014PARTS OF A CALIPER23
3DS.COM/SOLIDWORKS Dassault Systèmes Confidential Information 2/3/2016 ref.: 3DS Document 2014The “Caliper” Check24Things that you are measure with a pair of calipers are featuresof size: Inside Jaws Outside Jaws Depth Gauge Step Gauge
3DS.COM/SOLIDWORKS Dassault Systèmes Confidential Information 2/3/2016 ref.: 3DS Document 2014Now Put Your Calipers Away25Wonderful Tool That is Useless for All GD&T MeasrementsThere is absolutely no GD&T measurement that can be performed withany pair of calipers regardless of the size or quality.
3DS.COM/SOLIDWORKS Dassault Systèmes Confidential Information 2/3/2016 ref.: 3DS Document 2014MICROMETER26
3DS.COM/SOLIDWORKS Dassault Systèmes Confidential Information 2/3/2016 ref.: 3DS Document 2014PARTS OF THE MICROMETER27
3DS.COM/SOLIDWORKS Dassault Systèmes Confidential Information 2/3/2016 ref.: 3DS Document 2014THREE POINT CONTACT MICROMETER28
3DS.COM/SOLIDWORKS Dassault Systèmes Confidential Information 2/3/2016 ref.: 3DS Document 2014Why Three Point Micrometers?29Lobed Circles A very common issue with roundobjects either round posts(shafts) or holes. Two point contact will notaccurately measure odd numberlobed shapes. The lobed parts spin around thetwo parallel surfaces but won’tgo into the round hole.
3DS.COM/SOLIDWORKS Dassault Systèmes Confidential Information 2/3/2016 ref.: 3DS Document 2014Lobe Cylindrical Surface30Everything Works Fine?
3DS.COM/SOLIDWORKS Dassault Systèmes Confidential Information 2/3/2016 ref.: 3DS Document 2014Lobe Cylindrical Surface31On No
3DS.COM/SOLIDWORKS Dassault Systèmes Confidential Information 2/3/2016 ref.: 3DS Document 2014TUBE THICKNESS MICROMETER32
3DS.COM/SOLIDWORKS Dassault Systèmes Confidential Information 2/3/2016 ref.: 3DS Document 2014MULTI-ANVIL MICROMETER33
3DS.COM/SOLIDWORKS Dassault Systèmes Confidential Information 2/3/2016 ref.: 3DS Document 2014GAUGE PINS34
3DS.COM/SOLIDWORKS Dassault Systèmes Confidential Information 2/3/2016 ref.: 3DS Document 2014GAUGE BLOCKS35
3DS.COM/SOLIDWORKS Dassault Systèmes Confidential Information 2/3/2016 ref.: 3DS Document 2014PARALLELS36
3DS.COM/SOLIDWORKS Dassault Systèmes Confidential Information 2/3/2016 ref.: 3DS Document 2014ADJUSTABLE PARALLELS37
3DS.COM/SOLIDWORKS Dassault Systèmes Confidential Information 2/3/2016 ref.: 3DS Document 2014SINE PLATE38More on this a little later
3DS.COM/SOLIDWORKS Dassault Systèmes Confidential Information 2/3/2016 ref.: 3DS Document 2014Machinist jacks39
3DS.COM/SOLIDWORKS Dassault Systèmes Confidential Information 2/3/2016 ref.: 3DS Document 2014Definitions40 Full Indicator Movement Wring a gage block stack Gauge versus gage Units Precision vs Accuracy
3DS.COM/SOLIDWORKS Dassault Systèmes Confidential Information 2/3/2016 ref.: 3DS Document 2014FULL INDICATOR MOVEMENT41 FIM is the difference in themaximum and minimum arrowmovement. In the old days this wassometimes called TotalIndicator Movement (TIM),Total Indicator Reading (TIR),or Full Indicator Reading (FIR).
3DS.COM/SOLIDWORKS Dassault Systèmes Confidential Information 2/3/2016 ref.: 3DS Document 2014WRINGING GAUGE BLOCKS42
3DS.COM/SOLIDWORKS Dassault Systèmes Confidential Information 2/3/2016 ref.: 3DS Document 2014WRINGING GUAGE BLOCKS43
3DS.COM/SOLIDWORKS Dassault Systèmes Confidential Information 2/3/2016 ref.: 3DS Document 2014GAUGE VERSUS GAGE44 Gauge is American Gage is Britain There is absolutely no difference in the two spellings orconnotations.
3DS.COM/SOLIDWORKS Dassault Systèmes Confidential Information 2/3/2016 ref.: 3DS Document 2014HOW MUCH IS A SHOT of WHISKEY?45
3DS.COM/SOLIDWORKS Dassault Systèmes Confidential Information 2/3/2016 ref.: 3DS Document 2014Humor #246No one asks the toughquestions like, why are drugdealers on the metric system?
3DS.COM/SOLIDWORKS Dassault Systèmes Confidential Information 2/3/2016 ref.: 3DS Document 2014PRECISION VERSUS ACCURACY47
3DS.COM/SOLIDWORKS Dassault Systèmes Confidential Information 2/3/2016 ref.: 3DS Document 2014GD&T MEASUREMENTS48 Let us know look at some techniques for measuring various itemsparticularly GD&T items.
3DS.COM/SOLIDWORKS Dassault Systèmes Confidential Information 2/3/2016 ref.: 3DS Document 2014STRAIGHT EDGE GUESTIMATE49 Lay edge against granite slab Use a flashlight and look for light between edge and slab. Not scientific but it will tell you about how close something is to straight.
3DS.COM/SOLIDWORKS Dassault Systèmes Confidential Information 2/3/2016 ref.: 3DS Document 2014STRAIGHT EDGE INSPECTION50 Set part on two (or three) machinist jacks on a granite slab Zero the dial indicator on one end above one machinist jack Move indicator to other end above one of the other machinist jack Adjust machinist jack until other end reads zero Go back to original position and verify it is still zero Drag indicator along length of part noting “Full Indicator Movement”.
3DS.COM/SOLIDWORKS Dassault Systèmes Confidential Information 2/3/2016 ref.: 3DS Document 2014Straightness Setup51
3DS.COM/SOLIDWORKS Dassault Systèmes Confidential Information 2/3/2016 ref.: 3DS Document 2014PLANAR MEASUREMENTS52 Set part on three machinist jacks on a granite slab Zero the dial indicator on one end above one machinist jack (#1) Move indicator to another position opposite a machinist jack (#2) Adjust machinist jack (#2) until it reads zero Move indicator to another position opposite a machinist jack (#3) Adjust machinist jack (#3) until it reads zero Go back to original position (#1) and verify it is still zero Drag indicator along length and width of surface noting “Full Indicator Movement”.
3DS.COM/SOLIDWORKS Dassault Systèmes Confidential Information 2/3/2016 ref.: 3DS Document 2014Flatness Setup53 Anyone have an issue thatwe are measuring one sideand holding in place on theback side? It shouldn’t bother you sincethe three jacks are allindependently set for height.
3DS.COM/SOLIDWORKS Dassault Systèmes Confidential Information 2/3/2016 ref.: 3DS Document 2014PLANAR MEASUREMENT ALTERNATIVES54 Measure from bottom side PRO: Fast set up time All three jacks are exact same height CON: access Optical Flats – uses fringe patterns PRO: Fast reading CON: You must have the correct size and becareful.
3DS.COM/SOLIDWORKS Dassault Systèmes Confidential Information 2/3/2016 ref.: 3DS Document 2014FAMOUS AMERICAN INDIAN55 SOA-CAH-TOA Don’t believe he was Cherokee, Sequoyah had already developedthe only alphabet for us so I assume he was from one of the otherfive civilized tribes. No wait, that’s the trigonometry acronym .
3DS.COM/SOLIDWORKS Dassault Systèmes Confidential Information 2/3/2016 ref.: 3DS Document 2014SITTING UP A SINE PLATE56 SINE of an angle is the opposite side over the hypotenuse Using a calculator, take the sin of the angle and multiply by the hypotenuse My sine plate is 5” between the pins (that’s the hypotenuse) Remember, sometimes you will need to take the complimentary angle (90 minus theangle). Wring a set of gauge blocks to math that value. Place those gauge blocks under the pin Some sine plates have a locking screw to secure it’s po
How to Measure GD&T Thomas Allsup July 2015 Thomas Allsup, CSWP Co-Chair of the North Texas SolidWorks User Group Managing Partner of Anida Technologies. S s 2013 6 4 2 Check the archives 2009 How to Spell GD&T - Introduced FOPRL Chart 2010 The Revenge of the Circled Letters - Modifiers Hitchhiker’s Guide to GD&T - Tolerance Zones and Shapes 2014 The Big GD&T Theory - Datums and .
