Transcription
CYUSB3KIT-001EZ-USB FX3 Development Kit GuideDoc. #: 001-70237 Rev. *ACypress Semiconductor198 Champion CourtSan Jose, CA 95134-1709Phone (USA): 800.858.1810Phone (Intnl): 408.943.2600http://www.cypress.com
CopyrightsCopyrights Cypress Semiconductor Corporation, 2011. The information contained herein is subject to change without notice. CypressSemiconductor Corporation assumes no responsibility for the use of any circuitry other than circuitry embodied in a Cypressproduct. Nor does it convey or imply any license under patent or other rights. Cypress products are not warranted norintended to be used for medical, life support, life saving, critical control or safety applications, unless pursuant to an expresswritten agreement with Cypress. Furthermore, Cypress does not authorize its products for use as critical components in lifesupport systems where a malfunction or failure may reasonably be expected to result in significant injury to the user. Theinclusion of Cypress products in life-support systems application implies that the manufacturer assumes all risk of such useand in doing so indemnifies Cypress against all charges.Any Source Code (software and/or firmware) is owned by Cypress Semiconductor Corporation (Cypress) and is protected byand subject to worldwide patent protection (United States and foreign), United States copyright laws and international treatyprovisions. Cypress hereby grants to licensee a personal, non-exclusive, non-transferable license to copy, use, modify, createderivative works of, and compile the Cypress Source Code and derivative works for the sole purpose of creating custom software and or firmware in support of licensee product to be used only in conjunction with a Cypress integrated circuit as specified in the applicable agreement. Any reproduction, modification, translation, compilation, or representation of this SourceCode except as specified above is prohibited without the express written permission of Cypress.Disclaimer: CYPRESS MAKES NO WARRANTY OF ANY KIND, EXPRESS OR IMPLIED, WITH REGARD TO THIS MATERIAL, INCLUDING, BUT NOT LIMITED TO, THE IMPLIED WARRANTIES OF MERCHANTABILITY AND FITNESS FOR APARTICULAR PURPOSE. Cypress reserves the right to make changes without further notice to the materials describedherein. Cypress does not assume any liability arising out of the application or use of any product or circuit described herein.Cypress does not authorize its products for use as critical components in life-support systems where a malfunction or failuremay reasonably be expected to result in significant injury to the user. The inclusion of Cypress’ product in a life-support systems application implies that the manufacturer assumes all risk of such use and in doing so indemnifies Cypress against allcharges.Use may be limited by and subject to the applicable Cypress software license agreement.EZ-USB is a registered trademark of Cypress Semiconductor Corp. All other trademarks or registered trademarks referenced herein are property of the respective corporations.Flash Code ProtectionCypress products meet the specifications contained in their particular Cypress PSoC Data Sheets. Cypress believes that itsfamily of PSoC products is one of the most secure families of its kind on the market today, regardless of how they are used.There may be methods, unknown to Cypress, that can breach the code protection features. Any of these methods, to ourknowledge, would be dishonest and possibly illegal. Neither Cypress nor any other semiconductor manufacturer can guarantee the security of their code. Code protection does not mean that we are guaranteeing the product as ‘unbreakable’.Cypress is willing to work with the customer who is concerned about the integrity of their code. Code protection is constantlyevolving. We at Cypress are committed to continuously improving the code protection features of our products.2CYUSB3KIT-001 EZ-USB FX3 Development Kit Guide, Doc. #: 001-70237 Rev. *A
Contents1. Introduction1.11.21.31.4Kit Contents .5Additional Learning Resources.5Document History .6Documentation Conventions .62. Getting Started2.157Development Board .72.1.1 Power Supply .82.1.2 USB Receptacle.82.1.3 Crystal Oscillator .82.1.4 GPIF II Connector .92.1.5 Reset Circuit.152.1.6 I2C Interface.152.1.7 Booting Options.162.1.8 Low Performance Peripherals (LPP).17CYUSB3KIT-001 EZ-USB FX3 Development Kit Guide, Doc. #: 001-70237 Rev. *A3
Contents4CYUSB3KIT-001 EZ-USB FX3 Development Kit Guide, Doc. #: 001-70237 Rev. *A
1.IntroductionThe Cypress EZ-USB FX3 Development Kit (DVK) is a combination of hardware, software, and documentation that enables customers to evaluate the FX3 device. You can use this DVK to start hardware/software integration and then move to the final systems after the integration phase is complete.This guide only targets the hardware. The software development kit (SDK) documentation comeswith the SDK installation. It is located in the folder: Cypress\FX3 SDK\doc, where 'FX3 SDK' isthe custom installation folder name.1.1Kit ContentsThe Cypress EZ-USB FX3 DVK includes the following:1.2 Development kit PCB USB3.0 A to Micro B cable Quick Start Guide Kit CD 5-V DC adapterAdditional Learning ResourcesVisit www.cypress.com for additional learning resources in the form of data sheets, technical reference manual and application notes.CYUSB3KIT-001 EZ-USB FX3 Development Kit Guide, Doc. #: 001-70237 Rev. *A5
Introduction1.3Document History**PDF CreationDate06/23/2011Origin ofChangeMRKA*A08/11/2011MRKARevision1.4Description of ChangeInitial version of kit guideUpdated figures and table in section 2.1.4; added section 2.1.4.1.Updated Table 2-3 and Figure 2-11. Added Figure 2-12.Documentation ConventionsTable 1-1. Document Conventions for GuidesConventionCourier NewItalics[Bracketed, Bold]File OpenBoldTimes New RomanText in gray boxes6UsageDisplays file locations, user entered text, and source code:C:\ .cd\icc\Displays file names and reference documentation:Read about the sourcefile.hex file in the PSoC Designer User Guide.Displays keyboard commands in procedures:[Enter] or [Ctrl] [C]Represents menu paths: File Open New ProjectDisplays commands, menu paths, and icon names in procedures:Click the File icon and then click Open.Displays an equation: 2 2 4Describes cautions or unique functionality of the product.CYUSB3KIT-001 EZ-USB FX3 Development Kit Guide, Doc. #: 001-70237 Rev. *A
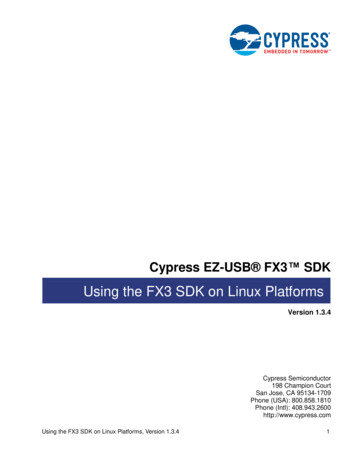
2.2.1Getting StartedDevelopment BoardFigure 2-1. FX3 DVK Board Block DiagramPMODE [2:0]Samtec expansionconnectorReset signal from external processorMictorGPIF IIPMODE [2:0]dip switchI2C interfacePMODE [2:0]SCLEEPROMSDAXTAL IN19.2 MHzcrystalResetpushbuttonResetJ72Voltage selection jumpers(1.2V, 1.8V, 2.5V and 3.3V)XTAL OUTEZ-USB FX3VIO1SPI RTconnectorREG VBATTLPPblockCVDDQU portI2SI2S headersJTAGJTAGheadersVBUS power5V DCpowerinputUSB3.0SW9USB3.0receptacleCYUSB3KIT-001 EZ-USB FX3 Development Kit Guide, Doc. #: 001-70237 Rev. *A7
Getting Started2.1.1Power SupplyThe board can be powered either from a 5-V DC external power or from the USB host (VBUS line).Use the SW9 toggle switch on the board to select an option. If VBUS is used to power the board,populate J53 with jumpers. The voltage for FX3 I/O power domains can be selected using on-boardselection jumpers. These domains include VIO1, VIO2, VIO3, VIO4, VIO5, REG VBATT, andCVDDQ. All other power domains are tied to 1.2 V.The following table shows the power domain selection option through jumpers.Table 2-1. Power Supply DomainsPower Domain2.1.2DescriptionHeadersVoltage LevelsVIO1IO1 domainJ1361.8 V, 2.5 V, 3.3 VVIO2IO2 domainJ1441.8 V, 2.5 V, 3.3 VVIO3IO3 domainJ1451.8 V, 2.5 V, 3.3 VVIO4IO4 domainJ1461.8 V, 2.5 V, 3.3 VVIO5IO5 domainJ1341.2 V, 1.8 V, 2.5 V, 3.3 VREG VBATTVBATT power domainJ1432.5 V, 3.3 V, 5 VCVDDQCrystal power domainJ1351.8 V, 3.3 VUSB ReceptacleA standard Micro B receptacle is used on the FX3 DVK board. VBUS power also comes from thehost through this connector. The USB3.0 and USB2.0 lines go through an ESD protection device foradditional ESD protection.Figure 2-2. USB3.0 Micro B Connector and ESD Device2.1.3Crystal OscillatorThe clock for the FX3 device is provided through an on-board 19.2 MHz crystal that is connected tothe XTALIN and XTALOUT pins of FX3. The FSLC[2:0] lines of FX3 are tied to ground; this meansthat the device is configured to only use the 19.2 MHz crystal for clocking.CYUSB3KIT-001 EZ-USB FX3 Development Kit Guide, Doc. #: 001-70237 Rev. *A8
Getting StartedFigure 2-3. Crystal CircuitFigure 2-4. FSLC [2:0] Lines Pulled to GroundNote Pull-up resistors R37, R38, and R39 are not loaded on the board.2.1.4GPIF II ConnectorFX3 offers a high-performance general programmable interface, GPIF II. This interface enablesfunctionality similar to but more advanced than FX2LP's GPIF. The GPIF II is a programmable statemachine that enables a flexible interface, which functions either as a master or slave in industrystandard or proprietary interfaces. Both parallel and serial interfaces are implemented with GPIF II.The DVK board consists of a samtec expansion connector to interface with external processors,ASICs, DSPs, or FPGAs. The GPIF II lines going out to the samtec connector also come out on amictor for probing purposes.The following figures show the samtec expansion connector with GPIF II signals.CYUSB3KIT-001 EZ-USB FX3 Development Kit Guide, Doc. #: 001-70237 Rev. *A9
Getting StartedFigure 2-5. Samtec Expansion Connector Circuit 1CYUSB3KIT-001 EZ-USB FX3 Development Kit Guide, Doc. #: 001-70237 Rev. *A10
Getting StartedFigure 2-6. Samtec Expansion Connector Circuit 2The following table shows the pinout of the GPIF II interface on the samtec expansion connector.Table 2-2. FX3 GPIF II Signal Pinout on Samtec ConnectorConnector J77 Pin Nos.68747670508032426689617971FX3 SignalsD0D1D2D3D4D5D6D7D8D9D10D11D12CYUSB3KIT-001 EZ-USB FX3 Development Kit Guide, Doc. #: 001-70237 Rev. *AGPI/Op gpio[0]p gpio[1]p gpio[2]p gpio[3]p gpio[4]p gpio[5]p gpio[6]p gpio[7]p gpio[8]p gpio[9]p gpio[10]p gpio[11]p gpio[12]11
Getting StartedConnector J77 Pin 8573877775696778726358386240649593FX3 D16D17D18D19D20D21D22D23D24D25D26D27D28 UART-RTSD29 UART-CTSD30 UART-TXD31 UART-RXI2S-CLKI2S-SDGPI/Op gpio[13]p gpio[14]p gpio[15]p gpio[16]p gpio[17]p gpio[18]p gpio[19]p gpio[20]p gpio[21]p gpio[22]p gpio[23]p gpio[24]p gpio[25]p gpio[26]p gpio[27]p gpio[28]p gpio[29]p gpio[30]p gpio[31]p gpio[32]int#reset#s0 gpio[33]s0 gpio[34]s0 gpio[35]s0 gpio[36]s0 gpio[37]s0 gpio[38]s0 gpio[39]s0 gpio[40]s0 gpio[41]s0 gpio[42]s0 gpio[43]s0 gpio[44]s1 gpio[46]s1 gpio[47]s1 gpio[48]s1 gpio[49]s1 gpio[50]s1 gpio[51]91908886I2S-WSI2S-MCLKI2C-SCLI2C-SDAs1 gpio[52]L gpio[57]i2c gpio[58]i2c gpio[59]CYUSB3KIT-001 EZ-USB FX3 Development Kit Guide, Doc. #: 001-70237 Rev. *A12
Getting StartedAs shown in Figure 2-6, J125 can be used to enable the VIO1 power going out on the samtec connector, if populated. Similarly, J156 can be used to enable the 5 V power going out on the samtecconnector, if populated.The CTRL 4 line on the GPIF II interface is also used to enable or disable the on-board USB switchfor OTG power. This selection can be made on J100. Figure 2-7 shows how the selection forCTRL 4 is made.Figure 2-7. CTRL 4 Selection JumperAs shown in Figure 2-7, if 1 and 2 are connected on J100 through a jumper, the CTRL 4 line goes tothe GPIF II interface on the samtec connector. If 2 and 3 are connected, the CTRL 4 line routes tothe USB switch for OTG power control.2.1.4.1Interconnecting to the GPIF II ConnectorYou can connect external processor boards to the FX3 device using an interconnection board thathooks up to the Samtec expansion connector J77. The mating connector to the J77 connector is aQTH-060 series Samtec connector. The following figures show the clearances and location of theSamtec connector on the FX3 DVK board. All dimensions are given in mils. Note that these dimensions apply only to Rev 02 and later releases of the DVK board.Figure 2-8. Clearance to Samtec ConnectorCYUSB3KIT-001 EZ-USB FX3 Development Kit Guide, Doc. #: 001-70237 Rev. *A13
Getting StartedFigure 2-8 shows the clearances to the Samtec connector from the near by components. The whitecolored outline on the J77 connector is the outline of the actual physical connector.Figure 2-9. Distance from Center of Pin 1 to Top Edge of BoardCYUSB3KIT-001 EZ-USB FX3 Development Kit Guide, Doc. #: 001-70237 Rev. *A14
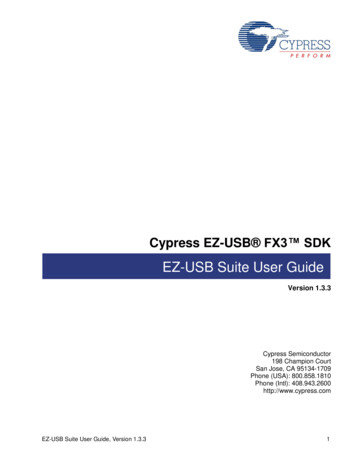
Getting StartedFigure 2-10. Distance from Center of Pin 1 to Left Edge of Board2.1.5Reset CircuitThe FX3 device can either be reset from the external processor hooked up to the samtec connectoror from an on-board push button. This selection can be made on J72; see Figure 2-11.Figure 2-11. Reset Circuit and Selection HeadersBased on the selection made on J72, either this reset signal goes to the FX3 device (pins 1 and 2connected on J72) or a signal from the external processor resets the FX3 device (pins 2 and 3 connected on J72).2.1.6I2C InterfaceThe I2C interface lines on the FX3 device come out to headers for probing and expansion, and alsoconnect to an on-board EEPROM device. The EEPROM address bits A2, A1, and A0 can be setusing the on-board dip switches on SW40.CYUSB3KIT-001 EZ-USB FX3 Development Kit Guide, Doc. #: 001-70237 Rev. *A15
Getting StartedFigure 2-12. EEPROM and Address Selection Switches2.1.7Booting OptionsEZ-USB FX3 can load boot images from various sources selected by the configuration of thePMODE pins. The boot options for FX3 are as follows: Boot from USB Boot from I2C Boot from GPIF II Async ADMUX mode Boot from GPIF II Sync ADMUX mode Boot from GPIF II Asynch SRAM modeThe following table shows the different booting options for the FX3 device based on the setting of thePMODE pins:Table 2-3. PMODE Signal Settings for Different FX3 Booting OptionsPMODE [2:0]Boot fromF00Sync ADMUX (16-bit)F01Async ADMUX (16-bit)F11USB bootF0FAsync SRAM (16-bit)F1FI2C; on failure, USB boot is enabled1FFI2C only0F1SPI; on failure, USB boot is enabledNote F floatingThe FX3 device can boot from the EEPROM connected to its I2C interface. To enable I2C EEPROMboot, the PMODE [2:0] signals need to be set based on Table 2-3. A brief description on how to setthe PMODE [2:0] signals is given here.Figure 2-13. PMODE [2:0] Signal SelectionCYUSB3KIT-001 EZ-USB FX3 Development Kit Guide, Doc. #: 001-70237 Rev. *A16
Getting StartedHeaders J96, J97, and J98 are used to select whether the PMODE [2:0] signals are set externally(from the external processor) or on the board. PMODE 0, PMODE 1, and PMODE 2 on the FX3device are connected to pin 2 of each header, J96, J97, and J98. Place a jumper on 1 and 2 to control the PMODE signals from the external processor, or on 2 and 3 to control the PMODE signalsfrom the dip switch SW25 on the board.If the PMODE [2:0] signals are set to F1F or 1FF, the FX3 device will boot from the EEPROM connected to the I2C interface. The EEPROM must contain the correct boot data for the FX3 device toboot from it.The PMODE [2:0] signals can be set on the dip switch SW25 as shown in Figure 2-14.Figure 2-14. PMODE [2:0] Selection Dip SwitchesFigure 2-15. Dip SwitchONOFFIf the bit is set towards the 'ON' text, the corresponding signal line is connected to ground. If the bit isset towards the numeric text (away from the 'ON' text), the corresponding signal line is pulled high toVIO1.2.1.8Low Performance Peripherals (LPP)EZ-USB FX3 consists of the following low performance peripherals: JTAG I2S SPI and UARTCYUSB3KIT-001 EZ-USB FX3 Development Kit Guide, Doc. #: 001-70237 Rev. *A17
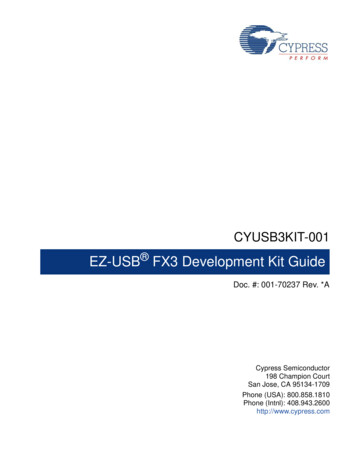
Getting Started2.1.8.1JTAGFX3's JTAG interface provides a standard five-pin interface for connecting to a JTAG debugger. Thisenables to debug the firmware through the CPU core's on-chip debug circuitry. Industry standarddebugging tools for the ARM926E-J-S core can be used for FX3 application development. The JTAGpins of FX3 come out on J51. See the SDK documentation for details on the debugger.2.1.8.2I2SEZ-USB FX3 has an I2S port to support external audio codec devices. FX3 functions as an I2S master (transmitter only). The I2S interface consists of four signals: clock line (I2S CLK), serial data line(I2S SD), word select line (I2S WS), and master system clock (I2S MCLK). FX3 can generate thesystem clock as an output on the I2S MCLK line or accept an external system clock input on thesame line. All four I2S lines come out on header J20.2.1.8.3SPI and UARTEZ-USB FX3 supports an SPI master interface on the serial peripherals port. The SPI GPIOs areshared with the UART GPIOs on the FX3 device. Even though the data sheet shows that SPI andUART can be used simultaneously in a non 32-bit data path situation, the FX3 DVK design does notallow that. Selection between UART and SPI is made on the board to be able to use either the SPIinterface or the UART interface.Figure 2-16. SPI/UART Selection HeadersIf 1 and 2 are shorted on J101, J102, J103, and J104, then the FX3 device will be connected to anRS-232 connector for UART operation. If 2 and 3 are shorted on these four jumpers, the SPI interface of FX3 will come out to J34 only. In this case, the RS-232 connector is disconnected from theFX3 device.The SPI lines also connect to an on board SPI EEPROM. If J34 is used to expand the SPI interfaceexternally, the SPI EEPROM should be disconnected from these lines by removing the zero ohmresistors R59, R60, R61, and R62.Figure 2-17. SPI FlashCYUSB3KIT-001 EZ-USB FX3 Development Kit Guide, Doc. #: 001-70237 Rev. *A18
Getting StartedCYUSB3KIT-001 EZ-USB FX3 Development Kit Guide, Doc. #: 001-70237 Rev. *A19
This guide only targets the hardware. The software development kit (SDK) documentation comes with the SDK installation. It is located in the folder: Cypress\FX3 SDK\doc, where 'FX3 SDK' is the custom installation folder name. 1.1 Kit Contents The Cypress EZ-USB FX3 DVK includes the following: Development kit PCB USB3.0 A to Micro B cable