Transcription
CYUSB3KIT-001EZ-USB FX3 Development Kit GuideDoc. #: 001-70237 Rev. *CCypress Semiconductor198 Champion CourtSan Jose, CA 95134-1709Phone (USA): 1.800.858.1810Phone (Intnl): 1.408.943.2600http://www.cypress.comDownloaded from Arrow.com.
CopyrightsCopyrights Cypress Semiconductor Corporation, 2011-2014. The information contained herein is subject to change without notice.Cypress Semiconductor Corporation assumes no responsibility for the use of any circuitry other than circuitry embodied in aCypress product. Nor does it convey or imply any license under patent or other rights. Cypress products are not warrantednor intended to be used for medical, life support, life saving, critical control or safety applications, unless pursuant to anexpress written agreement with Cypress. Furthermore, Cypress does not authorize its products for use as critical componentsin life-support systems where a malfunction or failure may reasonably be expected to result in significant injury to the user.The inclusion of Cypress products in life-support systems application implies that the manufacturer assumes all risk of suchuse and in doing so indemnifies Cypress against all charges.Any Source Code (software and/or firmware) is owned by Cypress Semiconductor Corporation (Cypress) and is protected byand subject to worldwide patent protection (United States and foreign), United States copyright laws and international treatyprovisions. Cypress hereby grants to licensee a personal, non-exclusive, non-transferable license to copy, use, modify, createderivative works of, and compile the Cypress Source Code and derivative works for the sole purpose of creating custom software and or firmware in support of licensee product to be used only in conjunction with a Cypress integrated circuit as specified in the applicable agreement. Any reproduction, modification, translation, compilation, or representation of this SourceCode except as specified above is prohibited without the express written permission of Cypress.Disclaimer: CYPRESS MAKES NO WARRANTY OF ANY KIND, EXPRESS OR IMPLIED, WITH REGARD TO THIS MATERIAL, INCLUDING, BUT NOT LIMITED TO, THE IMPLIED WARRANTIES OF MERCHANTABILITY AND FITNESS FOR APARTICULAR PURPOSE. Cypress reserves the right to make changes without further notice to the materials describedherein. Cypress does not assume any liability arising out of the application or use of any product or circuit described herein.Cypress does not authorize its products for use as critical components in life-support systems where a malfunction or failuremay reasonably be expected to result in significant injury to the user. The inclusion of Cypress’ product in a life-support systems application implies that the manufacturer assumes all risk of such use and in doing so indemnifies Cypress against allcharges.Use may be limited by and subject to the applicable Cypress software license agreement.EZ-USB is a registered trademark and EZ-USB FX3 is a trademark of Cypress Semiconductor Corp. All other trademarks orregistered trademarks referenced herein are property of the respective corporations.Flash Code ProtectionCypress products meet the specifications contained in their particular Cypress PSoC Data Sheets. Cypress believes that itsfamily of PSoC products is one of the most secure families of its kind on the market today, regardless of how they are used.There may be methods, unknown to Cypress, that can breach the code protection features. Any of these methods, to ourknowledge, would be dishonest and possibly illegal. Neither Cypress nor any other semiconductor manufacturer can guarantee the security of their code. Code protection does not mean that we are guaranteeing the product as ‘unbreakable’.Cypress is willing to work with the customer who is concerned about the integrity of their code. Code protection is constantlyevolving. We at Cypress are committed to continuously improving the code protection features of our products.CYUSB3KIT-001 EZ-USB FX3 Development Kit Guide, Doc. #: 001-70237 Rev. *CDownloaded from Arrow.com.2
Contents1. Introduction1.11.21.31.41.5Kit Contents .51.1.1 FX3 Software .51.1.2 Tools Not Included.51.1.3 Other Suggested Tools.6Additional Learning Resources.6Document History .6Documentation Conventions.6Abbreviations .72. Getting Started2.12.22.32.42.52.62.758FX3 DVK Software Installation .8FX3 SDK Installation.12Rolling Back to a Previous Version of FX3 SDK.13FX3 SDK Installation on Linux OS.13Eclipse IDE Quick Tour.142.5.1 Start Eclipse .142.5.2 Import a Project.152.5.3 Tweak Eclipse IDE Settings .17Example 1: Blinking LED and push button .182.6.1 FX3 Firmware Download and Debug Methods .202.6.2 Code Structure .33Importing All of the Cypress Examples .343. Kit Operation353.13.23.33.4Default Jumper Settings on DVK Board .35Bus-Power Mode .36Self-Power Mode .36First Time USB Enumeration .383.4.1 Manual Installation of Cypress Driver .393.5 Boot Options .413.6 USB Boot .433.6.1 Download Firmware Image to FX3 RAM.433.7 I2C Boot.453.7.1 Download Firmware Image to I2C EEPROM .453.7.2 Booting from I2C EEPROM.483.7.3 Choosing the Correct I2C EEPROM Configuration.483.8 SPI Boot.503.8.1 Download Firmware Image to SPI Flash.503.8.2 Booting from SPI Flash .533.9 ADMUX Boot .543.10 USB 3.0 Enumeration .54CYUSB3KIT-001 EZ-USB FX3 Development Kit Guide, Doc. #: 001-70237 Rev. *CDownloaded from Arrow.com.3
Contents3.11 Example 2: Loopback of Data over Bulk Endpoints.553.12 Modify the Bulkloop Firmware Example .573.13 Example 3: Measurement of Throughput Using USB 3.0 Bulk Transfers.624. Hardware4.14.24.34.44.54.6A. Appendix - TroubleshootingA.1A.2A.3A.4A.5A.6A.7A.886Assembly Top .86Assembly Bottom .87CYUSB3KIT-001 EZ-USB FX3 Development Kit Guide, Doc. #: 001-70237 Rev. *CDownloaded from Arrow.com.81Self-Power Mode .81Bus-Power Mode .81USB 2.0 Enumeration .82USB Driver Installation.82USB Boot .83I2C Boot.84SPI Boot.84USB3.0 Enumeration .85B. Appendix - PCB LayoutB.1B.265Power Supply.65USB Receptacle .66Clocking Mechanism for FX3 .67GPIF II Connector.694.4.1 Interconnecting to the GPIF II Connector.734.4.2 FX3 DVK Interconnect Boards .76Reset Circuit .76Serial Interfaces.774.6.1 I2C Interface.774.6.2 I2S.774.6.3 SPI and UART.774.6.4 JTAG .804
1.IntroductionThe Cypress EZ-USB FX3 Development Kit (DVK) is a combination of hardware, software, anddocumentation that enables customers to evaluate the FX3 device. This document describes how toinstall the software related to the FX3 DVK and operate the DVK board. A simple project to blink anLED helps verify correct installation and operation of the integrated development environment (IDE).The guide introduces different types of firmware download and debug methods with detailedinstructions on how to use them. Two more example projects (USBBulkLoopAuto on page 55 andUSBBulkSourceSink on page 62) serve to explain the use of software host applications provided forFX3. This document also briefly explains different hardware interfaces available on the DVK board.In addition, Appendix A provides a troubleshooting guide, which helps to isolate the root cause oferrors while operating the DVK board along with a corresponding solution.1.1Kit ContentsThe Cypress EZ-USB FX3 DVK includes the following: Development kit board USB 3.0 A to Micro B cable Quick Start Guide 5-V AC-DC adapterVisit http://www.cypress.com/shop for more information. Inspect the contents of the kit. If any partsare missing, contact your nearest Cypress sales office for further assistance.1.1.11.1.2FX3 Software FX3 Development Kit (DVK) Installer: It installs documentation, such as user guide and releasenotes, and DVK hardware files, such as schematic, PCB Layout, and Gerber. FX3 Software Development Kit (SDK) Installer: It installs the Eclipse IDE and GCC tool chain, afirmware library with code samples, and a Cypress USB suite including a Windows driver andsample Visual Studio applications. After installation, a Cypress Update Manager insures that allmodules are up to date.Tools Not Included Microsoft Visual C and C# software required for editing and building USB PC applicationsource code. Free Visual Studio Express editions are available on the Microsoft web site. USB 3.0 capable PC host: The FX3 DVK firmware examples can work in either USB 2.0 or USB3.0 speeds.To achieve maximum performance with FX3 hardware, use a PC with USB 3.0 hostcontroller ports.CYUSB3KIT-001 EZ-USB FX3 Development Kit Guide, Doc. #: 001-70237 Rev. *CDownloaded from Arrow.com.5
Introduction1.1.3Other Suggested ToolsYou can use the following USB protocol analyzers to analyze the traffic between the PC host and theFX3 device. 1.2Hardware analyzers Ellisys USB Explorer 280 Lecroy USB Voyager M3i Beagle USB 5000 SuperSpeed Protocol AnalyzerSoftware protocol analyzers SourceQuest SourceUSB SysNucleus USBTraceAdditional Learning ResourcesVisit http://www.cypress.com/fx3 for additional learning resources in the form of datasheets, atechnical reference manual, and application notes.1.3Document History**PDF CreationDate06/23/2011Origin ofChangeMRKA*A08/11/2011MRKAInitial version of kit guideUpdated figures and table in section 2.1.4; added section 2.1.4.1.Updated Table 2-3 and Figure 2-11. Added Figure 2-12.Updated Getting Started chapter.*B12/22/2012NMMAAdded the Hardware chapter.RevisionDescription of ChangeAdded the Appendix chapter.Explained three firmware example projects.*C03/30/2014RSKVAdded information on debugging using UART and JTAG.Added information on the GPIF II interconnect boards.1.4Documentation ConventionsTable 1-1. Document Conventions for GuidesConventionCourier NewItalics[Bracketed, Bold]File OpenBoldTimes New RomanText in gray boxesUsageDisplays file locations, user entered text, and source code:C:\ .cd\icc\Displays file names and reference documentation:Read about the sourcefile.hex file in the PSoC Designer User Guide.Displays keyboard commands in procedures:[Enter] or [Ctrl] [C]Represents menu paths: File Open New ProjectDisplays commands, menu paths, and icon names in procedures:Click the File icon and then click Open.Displays an equation: 2 2 4Describes cautions or unique functionality of the product.CYUSB3KIT-001 EZ-USB FX3 Development Kit Guide, Doc. #: 001-70237 Rev. *CDownloaded from Arrow.com.6
Introduction1.5AbbreviationsTable 1-2. List of AbbreviationsAbbreviationACMeaningAlternating CurrentADMUXAddress Data MultiplexingASICApplication-Specific Integrated CircuitCOM portCommunication PortCTSUART Clear To SendDCDirect CurrentDSPDigital Signal ProcessorDVKDevelopment KitEEPROMElectrically Erasable Programmable Read-only memoryEPEndpointESDElectrostatic dischargeFMCFPGA Mezzanine CardFPGAField-Programmable Gate ArrayGCCGNU Compiler CollectionGDBGNU DebuggerGPIFGeneral Programmable InterfaceGPIOGeneral Purpose Input/OutputHSMCHigh Speed Mezzanine CardI2CInter-integrated circuitI2SInter-IC SoundIDEIntegrated Development EnvironmentKBKilobyteLEDLight-emitting diodeMBMega ByteOSOperating SystemOTGUSB On-The-GoPCPersonal computerPHYPhysical layerPIDProduct IDRTSUART Ready To SendSCLI2C Serial ClockSDAI2C DataSDKSoftware Development KitSPISerial Peripheral InterfaceUSBUniversal Serial BusUSB-IFUniversal Serial Bus Implementers ForumVIDVendor IDCYUSB3KIT-001 EZ-USB FX3 Development Kit Guide, Doc. #: 001-70237 Rev. *CDownloaded from Arrow.com.7
2.Getting StartedThis chapter guides you through the installation of the Windows versions of the FX3 DVK and FX3Software Development Kit (SDK). After installing the Eclipse-based tools, a simple example confirmsthat the installation is correct and introduces the Eclipse system.2.1FX3 DVK Software InstallationTo install the kit software, follow these steps:1. Download the latest FX3 DVK software from EZ-USB FX3 Development Kit page, which containsthe kit hardware files, Kit documents, FX3 manuals, guides and SDK for Windows and Linux. Ifyour browser does not ask to run the downloaded file, locate the FX3DVKSetup.exe file in yourdownload folder and double-click it to start the Installer (Figure 2-1).Figure 2-1. FX3 DVK Installer ScreenCYUSB3KIT-001 EZ-USB FX3 Development Kit Guide, Doc. #: 001-70237 Rev. *CDownloaded from Arrow.com.8
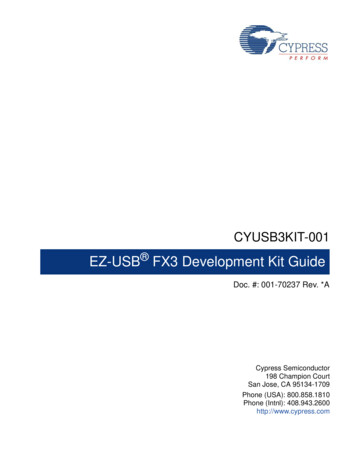
Getting Started2. Select the required Installation Type and click the Next button to start the Installation Wizard(Figure 2-2). For the first time installation it is recommended to Installation Type as Typical.Figure 2-2. Installation WizardCYUSB3KIT-001 EZ-USB FX3 Development Kit Guide, Doc. #: 001-70237 Rev. *CDownloaded from Arrow.com.9
Getting Started3. Accept the license agreements for the various software components and click Next and wait tillthe installation is complete.Figure 2-3. Installation Progress Showing Individual ModulesCYUSB3KIT-001 EZ-USB FX3 Development Kit Guide, Doc. #: 001-70237 Rev. *CDownloaded from Arrow.com.10
Getting Started4. When installation completes you have the option to run the Cypress Update Manager(Figure 2-4), to insure you have the latest SDK. Click the Check for Updates button at thebottom of the Cypress Update Manager window. If No Updates appears against EZ-USB FX3SDK you can click Exit button. If there are updates, click the Update button to download andinstall the latest SDK.Note: You can launch the Update Manager from the Windows Start All Programs Cypress menu.Figure 2-4. Cypress Update Manager5. The installation creates two directories in the Program Files directory (Program Files (x86) forWindows 64-bit Operating System):a. Cypress\EZ-USB FX3 Development Kit contains documentation such as release notes,hardware files, schematics and PC layout files.b. Cypress\EZ-USB FX3 SDK contains the Cypress USBSuite tools, including Eclipse, and several utilities such as the USB Control Center in the bin directory (CyControl.exe). It also contains many Cypress firmware examples. The next section shows how to import theseexamples into Eclipse projects.CYUSB3KIT-001 EZ-USB FX3 Development Kit Guide, Doc. #: 001-70237 Rev. *CDownloaded from Arrow.com.11
Getting Started2.2FX3 SDK InstallationNote: If you ran the Cypress Update Manager after installing the DVK and downloaded the latestversion of the SDK you can skip the steps listed in this section.To install the latest version of FX3 SDK, follow these steps:1. Download the latest FX3 SDK from EZ-USB FX3 Software Development Kit page, which containsWindows and Linux downloads. If your browser does not ask to run the downloaded file, locatethe FX3SDKSetup.exe file in your download folder and double-click it to start the Installer(Figure 2-5).Figure 2-5. FX3 SDK Installer Screen2. Click the Next button to start the Installation Wizard.CYUSB3KIT-001 EZ-USB FX3 Development Kit Guide, Doc. #: 001-70237 Rev. *CDownloaded from Arrow.com.12
Getting Started3. Accept the license agreements for the various software components and click Next and wait tillthe installation is complete.Figure 2-6. Installation Progress Showing Individual Modules2.3Rolling Back to a Previous Version of FX3 SDKYou can roll back to any previous version of FX3 SDK using Cypress Update Manager. Use thesteps given in the Knowledge Base article to install any previous version.2.4FX3 SDK Installation on Linux OSFX3 SDK version 1.2 and later revisions support firmware development with the Eclipse IDE anddebugging using the J-Link JTAG debugger probe on a Linux platform. The EZ-USB FX3 SDK forLinux is released in the form of a gzipped tar archive called “FX3 SDK.tar.gz”. On extraction, this tararchive contains the following gzipped tar archives: FX3 Firmware.tar.gz: The FX3 firmware library and examples. ARM GCC.tgz: Sourcery ARM GNU toolchain to compile firmware examples. eclipse x86.tgz: Eclipse IDE for 32-bit Linux OS. eclipse x64.tgz: Eclipse IDE for 64-bit Linux OS. cyusb linux Build no .tar.gz: The CyUSB Suite provides QT based USB applications tocommunicate with FX3 device.CYUSB3KIT-001 EZ-USB FX3 Development Kit Guide, Doc. #: 001-70237 Rev. *CDownloaded from Arrow.com.13
Getting StartedThe installation procedure involves extracting these archives and setting of environment variables.Refer to the FX3 SDK Linux Support.pdf available in the following extracted folder of the FX3 SDKfor Linux installation: fx3 sdk v1.3 linux\FX3 Firmware\cyfx3sdk\doc.2.5Eclipse IDE Quick Tour2.5.1Start EclipseNavigate to Windows Start All Programs, and then click on the Cypress folder to expand it(Figure 2-7). Installed Cypress software packages appear, including GPIF II Designer, a utility tocreate design files for the FX3 General Programmable Interface (GPIF II) using state machine entry.Click on the Eclipse entry to expand it, then double-click the EZ USB Suite entry.Note: You can make a desktop shortcut by right-clicking EZ USB Suite, dragging it to the desktop,releasing the mouse button, and selecting Create shortcuts here.This launches a first-time startup screen that sets up a workspace folder for all your Cypress Eclipsework. Accept the default path of C:\Users\(username)\Cypress\Workspace. You may want to selectUse this as the default and do not ask again to skip this message every time you start theEZ-USB Suite.Note: You can create more workspaces by clicking File Switch Workspace Other. This can beused to define different workspaces for different projects.Figure 2-7. Launch the EZ-USB SuiteCYUSB3KIT-001 EZ-USB FX3 Development Kit Guide, Doc. #: 001-70237 Rev. *CDownloaded from Arrow.com.14
Getting StartedAn empty Eclipse Workbench appears as in Figure 2-8.Figure 2-8. An Empty Eclipse Workbench2.5.2Import a ProjectAlthough you can create projects from scratch, a better way to write FX3 code is to import anexample project that has functionality similar to your requirements. You can use this project as a fullyoperational starting point for your edits. The SDK installation creates a folder full of example projectsat C:\Program Files\Cypress\EZ-USB FX3 SDK\firmware. For 64-bit systems the first folder in thepath is Program Files(x86).Later in this chapter you will import all of the Cypress examples into your Workbench, but first it ishelpful to learn how an Eclipse project is imported from anywhere, for example from anothercomputer, an email or a colleague.1. For this example the firmware project available on the FX3 DVK web page, First FX3 App, isimported and tested. Download the First FX3 App.zip and extract to a folder.CYUSB3KIT-001 EZ-USB FX3 Development Kit Guide, Doc. #: 001-70237 Rev. *CDownloaded from Arrow.com.15
Getting Started2. In the Eclipse IDE, select File Import General Existing Projects into Workspace(Figure 2-9). Click Next button.Figure 2-9. Import an Eclipse Project3. Select the Browse button next to Select root directory: and browse to your First FX3 Appfolder (Figure 2-10). If you want your own copy of the project, check the Copy projects intoworkspace and the folder will be copied to your Workspace folder. Check the firmwareapplication in the Projects: box, and click the Finish button.Figure 2-10. Browse to the Project Folder4. The added project now appears in the Eclipse Project Explorer. Double-click it to see theunderlying components (Figure 2-11). Double-click the first app.c entry and the C source fileopens in the workspace editing window.Figure 2-11. “First FX3 App” Added to the Project ExplorerCYUSB3KIT-001 EZ-USB FX3 Development Kit Guide, Doc. #: 001-70237 Rev. *CDownloaded from Arrow.com.16
Getting Started5. To build a FX3 project, select the project in the Project Explorer window and click the Buildbutton (hammer) in the Eclipse IDE. You can choose whether you want to build a Debug versionor a Release version of the firmware. The size of the generated image file in the Release versionis smaller than that in the debug version.Figure 2-12. Build an FX3 project2.5.3Tweak Eclipse IDE SettingsMost IDE’s default to automatically saving edited source files before compiling, but the Eclipsedefault is not to do so. If you forget to save a file after editing it before a re-compile and wonder whyyour edits did not “take”, you will want to have Eclipse automatically save your edits before buildingthe project. Navigate to Windows Preferences General Workspace and select Saveautomatically before build (Figure 2-13).Figure 2-13. Tell Eclipse to Automatically SaveCYUSB3KIT-001 EZ-USB FX3 Development Kit Guide, Doc. #: 001-70237 Rev. *CDownloaded from Arrow.com.17
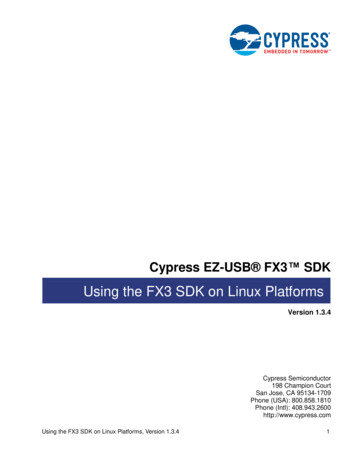
Getting Started2.6Example 1: Blinking LED and push buttonThe first app.c code blinks an LED attached to a GPIO (General-Purpose IO) pin and reads thestate of a GPIO input pin, printing its state on a Windows terminal whenever the state changes. Tosee the results of this application, prepare the small circuit shown in Figure 2-14. A small perf-boardwith a 0.1 inch header is a convenient way to build this circuit as shown in Figure 2-15. J34 is at thetop center of the PCB (red highlight).Figure 2-14. Circuit to test the FX3 First App codeCYUSB3KIT-001 EZ-USB FX3 Development Kit Guide, Doc. #: 001-70237 Rev. *CDownloaded from Arrow.com.18
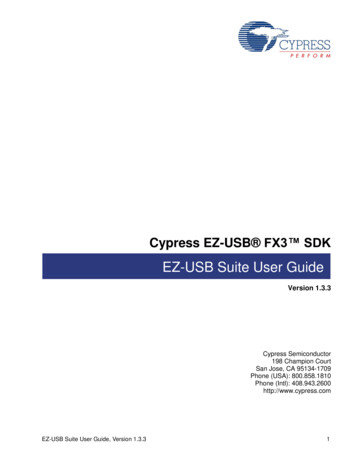
Getting StartedMost FX3 GPIO pins can be programmed to attach an internal pull-up or pull-down resistor toprevent floating inputs. This example uses two GPIO pins that are programmed as a group to serveas UART signals. Because the serial debugger does not use the UART CTS and RTS signals, thesepins can be used for the LED and push button. There is no need for an external pull-up resistor onthe GPIO[53] (UART RTS) signal since an internal pull-up resistor is enabled in the FX3 firmware.Two jumpers need to be in place to connect the GPIO[53] and GPIO[54] signals to the J34 header:Jumpers J101 and J102 should short pins 2–3 (green rectangle in Figure 2-15). Adjacent jumpersJ103 and J104 should short pins 1–2 to connect the RXD and TXD UART signals to the DB-9connector. Jumper J53, just above the power switch (yellow rectangle) must also be in place toenable USB power to the board. Table 3-1 on page 35 gives all the FX3 jumper settings and theirpurposes.Figure 2-15. FX3 SDK board with Added Circuit on J34, Jumpers, Power SwitchCYUSB3KIT-001 EZ-USB FX3 Development Kit Guide, Doc. #: 001-70237 Rev. *CDownloaded from Arrow.com.19
Getting Started2.6.1FX3 Firmware Download and Debug MethodsYou can download and debug FX3 code using following methods:1. Run Code: Download a binary over USB and run it.2. Run Code with Serial Debug: Download a binary over USB and debug it using print statementsand a PC Terminal program.3. Download and debug over JTAG: Plug in an in-circuit emulator and use it to download anddebug code with full debug facility such as breakpoints and single-stepping.2.6.1.1Run CodeFollow these steps to verify correct operation of the example code:1. Plug the FX3 board into a USB host port using the provided cable. You can use any speed USBport, but eventually you will want to plug into a USB 3.0 port to study and test FX3 SuperSpeedapplications.2. Move the slide switch (SW9) in the lower right corner of the board to the UP position. This supplies board power from USB, eliminating the need for an external power unit.3. The board enumerates as a Cypress BootLoader, as seen in the Device Manager tree(Figure 2-16).Figure 2-16. FX3 Board appears as BootLoaderIf the board appears as WestBridge or as an unknown device in the Device Manager, right-clickthe entry, navigate to the bin folder in your EZ-USB FX3 SDK installation, and select youroperating system folder. These steps are shown in Manual Installation of Cypress Driver onpage 39 of this document.CYUSB3KIT-001 EZ-USB FX3 Development Kit Guide, Doc. #: 001-70237 Rev. *CDownloaded from Arrow.com.20
Getting Started4. In the Eclipse IDE, select CY Tools Control Center (Figure 2-17).Figure 2-17. Open the Cypress USB Control CenterThis tool downloads code into FX3 RAM or to a flash memory connected to the FX3 and alsoallows you to schedule USB transfers to a Cypress device. Highlight the Cypress USB BootLoader item, and select Program FX3 RAM (Figure 2-18). This opens a dialog to locate thedownload file.Figure 2-18. Download Code into FX35. Navigate to the Debug folder in your workspace folder and double-click the First FX3 App.img(img code image) file. If your PC has sound turned on, you will hear the USB disconnect sound.The bootloader has loaded the code image and restarted as the First FX3 App program. Thisapplication does not implement a USB device, so the Cypress USB BootLoader itemdisappe
CYUSB3KIT-001 EZ-USB FX3 Development Kit Guide, Doc. #: 001-70237 Rev. *C 5 1. Introduction The Cypress EZ-USB FX3 Development Kit (DVK) is a combination of hardware, software, and documentation that enables customers to evaluat e the FX3 device. This document describes how to install the software related to the FX3 DVK and operate the DVK .