Transcription
L-87TECHNICAL EDUCATION2014 CABRIO TOP LOAD DIRECT DRIVE WASHERWTW8500DW, WTW8500DCJOB AID W10758836
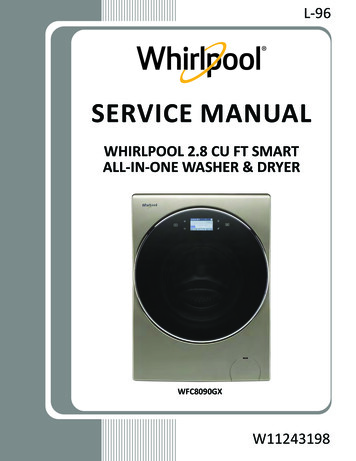
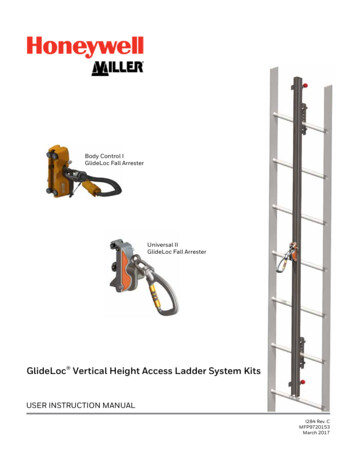
COMPONENT ACCESSRemoving the Console—Method AWARNING1. Unplug washer or disconnect power.2. Turn o water supply to washer.3. Remove two 2 1 4” he -head mounting screws from therear of the console as indicated in Figure .Electrical Shock HazardDisconnect power before servicing.Replace all parts and panels before operating.Failure to do so can result in death orelectrical shock.Removing the Console—Method AFigure 34. Slide the pu y nife down between the console assemblyand top panel. Use your free hand to push bac on thetop of the console while you e and maneuver the pu ynife up and around the screw. See Figures 4.The new slee contoured design of the User Interface ma esaccess of the console a bit of a challenge. Since the console isrecessed into the top panel see Figure 1 , the usual methodof sliding a tool under the console to release the clips can be abit tric y.New recessedconsole designConsole AssemblyTop PanelFigure 4Figure 1Modify the Putty Knife5. Depress the console clip with the pu y nife and li up onthe console to separate from top panel see Figure . Tiltthe console forward for service.A pu y nife can wor , but it should be plastic and modifiedas shown in Figure 2 so that it can be maneuvered around thescrew, which is placed directly in front of the release clips.2½””Shoc Mount ScrewConsole ClipFigure 2Figure 5Whirlpool 2014 CABRIO Direct Drive Washer n 4-3
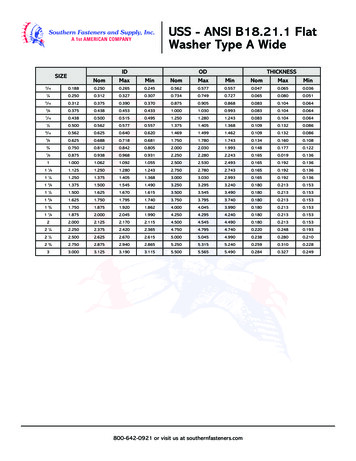
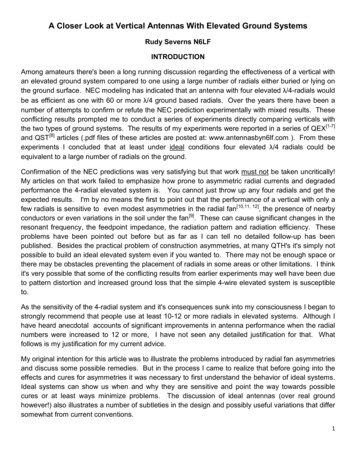
COMPONENT ACCESSRemoving the Console—Method BWARNING¼”¼”Electrical Shock HazardDisconnect power before servicing.Replace all parts and panels before operating.Failure to do so can result in death orelectrical shock.Removing the Console—Method B1.2.3.4.Unplug washer or disconnect power.Turn o water supply to washer.Tape lid down.Remove five1 4” he -head mounting screws fromthe rear of the console as indicated in Figure 1. Removeharness cover and set aside.Figure 3Harness Cover7. Tilt the top up on the rear hinges.8. Using a at blade screwdriver, depress the console clipsidentified by the two arrows to release console from toppanel see Figure 4 .Figure 15. Slide top forward about 1 2” see Figure 2 .Release Console Clips½”Figure 26. Raise the top about 1 4”. Then, while still eeping it li ed,push the top bac about 1 4 “ see Figure .4-4 n Whirlpool 2014 CABRIO Direct Drive WasherFigure 4
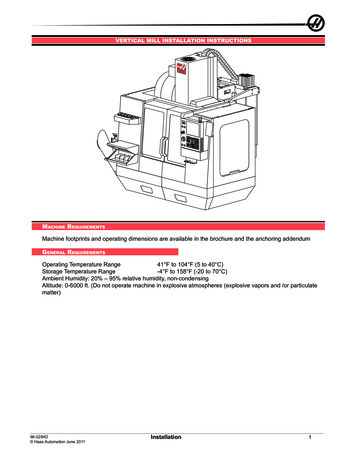
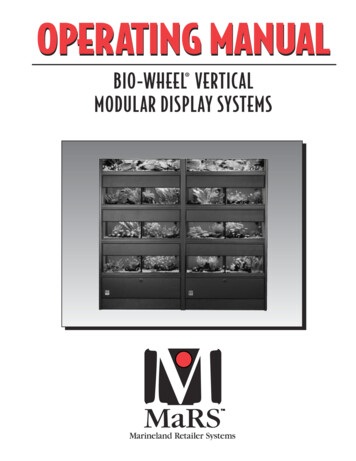
COMPONENT ACCESSRemoving the User Interface (UI)WARNING4. Remove the seven1 4” he -head screws securing theUser Interface to the console see Figure 2 .5. Using a at blade screwdriver, gently, depress the siplastic mounting clips to release the User Interface fromthe console see Figure 2 .6. User Interface should separate and li away from console.REASSEMBLY NOTE: When reinstalling the User Interface tothe console, only hand tighten the seven (7) hex-head screwsuntil snug. Using a power driver will strip the screw holes andstress the capacitive touch user interface.Electrical Shock HazardDisconnect power before servicing.Replace all parts and panels before operating.Failure to do so can result in death orelectrical shock.Removing the User Interface1. Unplug washer or disconnect power.2. Perform the procedures on pages 4- or 4-4, “Removingthe Console” prior to performing the following steps.3. Disconnect the -wire harness from the User Interfacesee Figure 1 .-Wire HarnessFigure 1Plastic Mounting ClipsFigure 2Whirlpool 2014 CABRIO Direct Drive Washer n 4-5
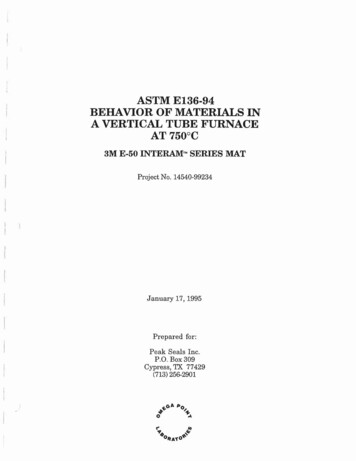
COMPONENT ACCESSRemoving the Water Inlet ValveWARNING6. Using a 1 4” nut driver, remove the two 2 he -headscrews one on each side securing the water inlet valve tothe top panel of the washer. See Figures 2 and .]Electrical Shock HazardDisconnect power before servicing.Replace all parts and panels before operating.Failure to do so can result in death orelectrical shock.Removing the Water Inlet ValveFigure 2NOTE: The water inlet valve is replaced as an assembly, whichincludes all four valves, brac et, and valve assembly harness.1. Unplug washer or disconnect power.2. Turn o water supply to washer.3. Disconnect hot and cold inlet water hoses.4. Perform the procedures on pages 4- or 4-4, “Removingthe Console” prior to performing the following steps.5. Disconnect the Water Inlet alve connector “J2” from theMain Control see Figure 1 .RVICE TECHNICIAN’S USE ONLYonsole Electronics & Valves (Figure ONTROLPressure HoseJ1J2J6J4J18Figure 1User Interfacettom 4-6View– DriveSystemDrain2014CABRIO &DirectDrive PumpWasher (Figure 7)n Whirlpool Recirculation PumpFigure 3
Component Locations – Console Electronics & Valves(FigureACCESS6)COMPONENTBleach/OxiRemoving Fabricthe Main ControlAC CordValveSoftenerMainMAINControlBoardCONTROL(not on allWARNINGJ12ValveJ5models)J1Pressure HoJ2J6J4Electrical Shock HazardDisconnect power before servicing.Pressure HoseReplace all parts and panels before operating.Failure to do so can result in death orelectrical shock.Hot WaterValveRemoving the Main ControlCold WaterValveIMPORTANT: Electrostatic Discharge ESD Sensitive DeviceFailure to follo the ESD recautions outlined at thebeginning of Section 6 Testinga destro , da age, orweaken the main control assembly.1. Unplug washer or disconnect power.2. Turn o water supply to washer.3. Perform the procedures on pages 4- or 4-4, “Removingthe Console” prior to performing the following steps.4. Remove pressure hose from Main Control see Figure 1 .Coversee5. Disconnect all connectors from theMotorMain ControlFigure 1 .6. Using a 1 4” nut driver, remove the two 2 he -headscrews locations circled in Figure 1 securing the maincontrol to the top panel of the washer.J18Figure 4PumpsThermistorsClutch CoilJHeater lementJLid LocJ1User InterfaceCord & Drain Pump (FiguComponent Locations, Bottom View J12– DrivePowerSystemFront of WasherRecirculation PumpMotorBoltWhirlpool 2014 CABRIO Direct Drive Washer n 4-7Drain Pum
COMPONENT ACCESSRemoving the Tub Ring, Impeller, and BasketWARNING¼”¼”Electrical Shock HazardDisconnect power before servicing.Replace all parts and panels before operating.Failure to do so can result in death orelectrical shock.Lifting the Top Panel1.2.3.4.5.Unplug washer or disconnect power.Turn o water supply to washer.Disconnect hot and cold inlet water hoses.Tape lid down.Remove three1 4” he -head mounting screws fromthe rear of the console as indicated in Figure 1. Removeharness cover and set aside.Figure 38. Tilt the top up on the rear hinges.Harness CoverFigure 16. Slide top forward about 1 2” see Figure 2 .½”Figure 27. Raise the top about 1 4”. Then, while still eeping it li ed,push the top bac about 1 4 “ see Figure .4-8 n Whirlpool 2014 CABRIO Direct Drive Washer
Vertical Modular Washer L-87 TECHNICAL EDUCATION 2014 CABRIO TOP LOAD DIRECT DRIVE WASHER JOB AID W10758836 WTW8500DW, WTW8500DC . COMPONENT ACCESS Whirlpool 2014 CABRIO Direct Drive Washer n 4-3 Removing the Console—Method A WARNING Electrical Shock Hazard Disconnect power before servicing. Failure to do so can result in death or electrical shock.