Transcription
AC750 WiFi Range ExtenderModel EX6100User ManualJanuary 2014202-11307-02350 East Plumeria DriveSan Jose, CA 95134USA
AC750 WiFi Range Extender Model EX6100SupportThank you for selecting NETGEAR products.After installing your device, locate the serial number on the label of your product and use it to register your product athttps://my.netgear.com. You must register your product before you can use NETGEAR telephone support. NETGEARrecommends registering your product through the NETGEAR website. For product updates and web support, visithttp://support.netgear.com.Phone (US & Canada only): 1-888-NETGEAR.Phone (Other Countries): Check the list of phone numbers at .aspx.ComplianceFor regulatory compliance information, visit NETGEAR, the NETGEAR logo, and Connect with Innovation are trademarks and/or registered trademarks of NETGEAR, Inc.and/or its subsidiaries in the United States and/or other countries. Information is subject to change without notice. NETGEAR, Inc. All rights reserved.2
AC750 WiFi Range Extender Model EX6100ContentsChapter 1Get to Know Your ExtenderFront Panel and Side Panel LEDs and Buttons . . . . . . . . . . . . . . . . . . . . . . . . . . . . .When to Use Your Extender . . . . . . . . . . . . . . . . . . . . . . . . . . . . . . . . . . . . . . . . . . . .How the Extender Works . . . . . . . . . . . . . . . . . . . . . . . . . . . . . . . . . . . . . . . . . . . . . .Extender as a Booster . . . . . . . . . . . . . . . . . . . . . . . . . . . . . . . . . . . . . . . . . . . . . .Extender as an Access Point . . . . . . . . . . . . . . . . . . . . . . . . . . . . . . . . . . . . . . . . .Support for the 801.11ac Networking Standard. . . . . . . . . . . . . . . . . . . . . . . . . .Chapter 2677789Install Your ExtenderInstall the Extender as a Booster. . . . . . . . . . . . . . . . . . . . . . . . . . . . . . . . . . . . . . . 11Place the Extender . . . . . . . . . . . . . . . . . . . . . . . . . . . . . . . . . . . . . . . . . . . . . . . . 11Connect to an Existing WiFi Network . . . . . . . . . . . . . . . . . . . . . . . . . . . . . . . . 11Find the Best Location . . . . . . . . . . . . . . . . . . . . . . . . . . . . . . . . . . . . . . . . . . . . . 15Extender Performance . . . . . . . . . . . . . . . . . . . . . . . . . . . . . . . . . . . . . . . . . . . . . 15Connect a Computer or Device to the Ethernet Port . . . . . . . . . . . . . . . . . . . 15Install the Extender as an Access Point . . . . . . . . . . . . . . . . . . . . . . . . . . . . . . . . . 17Chapter 3Manage the Extender Network and SettingsLog In to the Extender After Initial Setup . . . . . . . . . . . . . . . . . . . . . . . . . . . . . . . 19Change the admin Password . . . . . . . . . . . . . . . . . . . . . . . . . . . . . . . . . . . . . . . . . . 19Set Up Password Recovery for admin . . . . . . . . . . . . . . . . . . . . . . . . . . . . . . . . . . 20Use the Smart Setup to Connect the Extender to a Network . . . . . . . . . . . . . . 21Use the WPS Wizard for WiFi Connections . . . . . . . . . . . . . . . . . . . . . . . . . . . . . . 23View or Change Advanced Wireless Settings . . . . . . . . . . . . . . . . . . . . . . . . . . . . 24View or Change the WPS Settings . . . . . . . . . . . . . . . . . . . . . . . . . . . . . . . . . . . . . 26Set Up a Wireless Access List . . . . . . . . . . . . . . . . . . . . . . . . . . . . . . . . . . . . . . . . . . 27Manage Profiles . . . . . . . . . . . . . . . . . . . . . . . . . . . . . . . . . . . . . . . . . . . . . . . . . . . . . 28Chapter 4Monitor and Maintain the ExtenderRecover the admin Password. . . . . . . . . . . . . . . . . . . . . . . . . . . . . . . . . . . . . . . . . . 33Back Up the Extender Configuration . . . . . . . . . . . . . . . . . . . . . . . . . . . . . . . . . . . 33Restore Saved Configuration Settings . . . . . . . . . . . . . . . . . . . . . . . . . . . . . . . . . . 34Return the Extender to Its Factory Settings . . . . . . . . . . . . . . . . . . . . . . . . . . . . . 35Use the Factory Reset Button to Restore Factory Settings . . . . . . . . . . . . . . 35Erase the Extender Settings and Return to Factory Settings . . . . . . . . . . . . . 36View Wired and Wireless Network Devices . . . . . . . . . . . . . . . . . . . . . . . . . . . . . . 38Chapter 5FAQs and TroubleshootingFAQs. . . . . . . . . . . . . . . . . . . . . . . . . . . . . . . . . . . . . . . . . . . . . . . . . . . . . . . . . . . . . . . 40Cannot Log In to the Extender . . . . . . . . . . . . . . . . . . . . . . . . . . . . . . . . . . . . . . . . 413
AC750 WiFi Range Extender Model EX6100Cannot Join an Extender WiFi Network . . . . . . . . . . . . . . . . . . . . . . . . . . . . . . . . . 42Appendix A Supplemental InformationFactory Default Settings . . . . . . . . . . . . . . . . . . . . . . . . . . . . . . . . . . . . . . . . . . . . . 444
1.Get to Know Your Extender1This chapter covers the following topics: Front Panel and Side Panel LEDs and Buttons When to Use Your Extender How the Extender Works Support for the 801.11ac Networking StandardFor more information about the topics covered in this manual, visit the support website athttp://support.netgear.com.Firmware updates with new features and bug fixes are made available from time to time ondownloadcenter.netgear.com. Some products can regularly check the site and download newfirmware, or you can check for and download new firmware manually. If the features or behaviorof your product does not match what is described in this guide, you might need to update yourfirmware.5
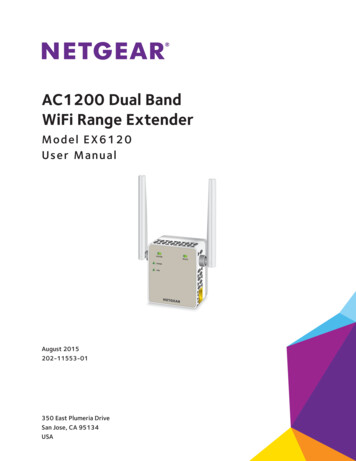
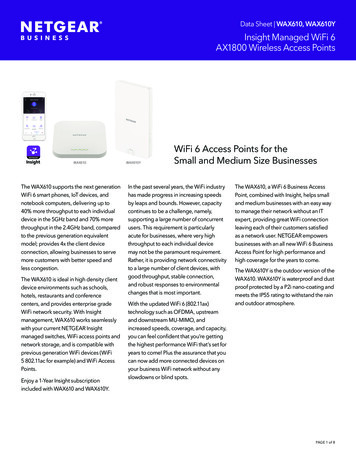
AC750 WiFi Range Extender Model EX6100Front Panel and Side Panel LEDs and ButtonsThe front panel has LEDs. The side panel has a switch, buttons, and an Ethernet port.Router Link LEDRouter Arrow LEDClient Arrow LEDClient Link LEDPower LEDWPS LEDAccess Point/Extender switchPower On/Off buttonWPS buttonFactory Reset buttonEthernet portFigure 1. Extender front panel and side panelTable 1. LEDsLEDDescriptionRouter Link LED This LED indicates the connection between the extender and the routeror access point. Solid green. Best connection. Solid amber. Good connection. Solid red. Poor connection. Off. No connection.Client Link LEDThis LED indicates the connection between the extender and acomputer or mobile device. Solid green. Best connection. Solid amber. Good connection. Solid red. Poor connection. Off. No connection.Power LED Solid amber. The extender is booting.Solid green. The extender is powered on.Off. The extender is powered off.Get to Know Your Extender6
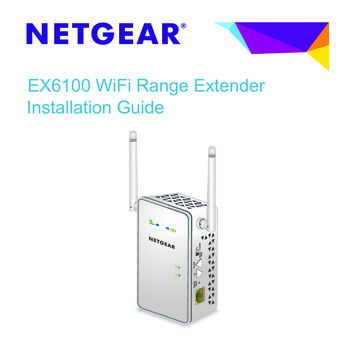
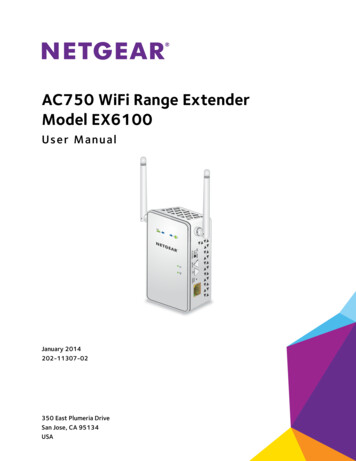
AC750 WiFi Range Extender Model EX6100Table 1. LEDs (continued)LEDDescriptionWPS LED Solid green. WiFi security is enabled (WPA or WPA2).Blinking green. A WPS connection is in progress.Off. WiFi security is not enabled.Router ArrowIf the Router Arrow or Client Arrow LED blinks, see Find theand Client Arrow Best Location on page 15. If no arrow LEDs are lit, the extenderis in a good location.When to Use Your ExtenderNETGEAR recommends that you connect to the extender only when your WiFi networkconnection is poor. Data traffic routed through the extender is inherently slower than trafficrouted directly from the network.How the Extender WorksThe extender increases the distance of a WiFi network. The extender can connect to yournetwork’s WiFi signal and then boost that signal, or it can connect to your network with awired connection and work as an access point. You use the Access Point/Extender switch onthe side of the extender to select which way you want to use the extender.Extender as a BoosterThis is the most common way to use the extender. The extender connects to your network’sWiFi signal and it broadcasts two extender WiFi signals, one in the 2.4 GHz band, andGet to Know Your Extender7
AC750 WiFi Range Extender Model EX6100another in the 5 GHz band. When you are too far away to connect to your network’s WiFisignal, you can connect to an extender WiFi signal instead.WiFi RangeExtenderBoosts the range of yourexisting WiFi and createsa stronger signal inhard-to-reach areas.Existing WiFiSometimes your routerdoes not provide the WiFicoverage you need.Figure 2. The extender WiFi signals reach areas outside the range of your routerExtender as an Access PointYou can connect the extender to your router or gateway with a wired connection and use theextender as an 11ac access point.Figure 3. Extender as an access pointGet to Know Your Extender8
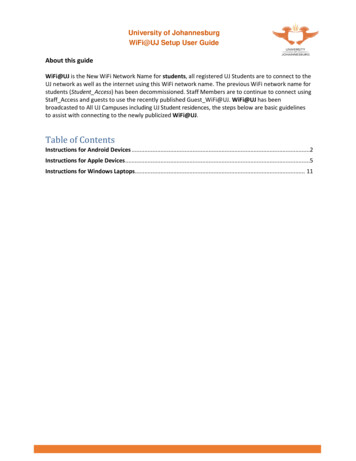
AC750 WiFi Range Extender Model EX6100Support for the 801.11ac Networking StandardThe extender supports the 802.11ac networking standard. This new standard offers betterspeed, improved reliability, and more range than older WiFi networking standards. Theextender is backward compatible with earlier WiFi standards. However, to get the benefits of802.11ac, your wireless router must support the 802.11ac WiFi networking standard.To learn more about the 802.11ac WiFi networking standard, e 4. Speed comparison between the 802.11n and 802.11ac standardsGet to Know Your Extender9
2.2Install Your ExtenderThis chapter covers the following topics: Install the Extender as a Booster Install the Extender as an Access Point10
AC750 WiFi Range Extender Model EX6100Install the Extender as a BoosterThe extender connects to your network’s WiFi signal and then boosts that signal to extendthe area that has a WiFi signal.Place the ExtenderNETGEAR recommends that you place the extender near the router during initial setup. Thenyou can move it farther away from the router as needed to increase the area that has a WiFisignal. To place the extender:1. Place your extender in the same room as your WiFi router.2. Plug the extender into an electrical outlet.The Power LEDbutton.lights green. If the Power LED does not light, press the Power3. Make sure that the switch on the extender is set to Extender.Connect to an Existing WiFi NetworkTo extend the range of your WiFi network, you must connect the extender to your existingWiFi network. You can do this in one of two ways: Connect with WPS. For more information, see Connect with WPS on page 11. Connect with genie Smart Setup. For more information, see Connect with NETGEARgenie Smart Setup on page 12.Connect with WPSWi-Fi Protected Setup (WPS) lets you join a secure WiFi network without typing the networkname and password. The WPS button is a physical button on the router or access point.WPS does not support WEP network security. If you are using WEP security, see Connectwith NETGEAR genie Smart Setup on page 12. To connect with WPS:1. Press the WPS button on the side panel of the extender.The WPS LEDblinks.2. Within two minutes, press the WPS button on your router or access point.The WPS LED on the extender lights solid green, the Router Link LEDthe extender is connected to your existing WiFi network.lights, andNote: If the Router Link LED does not light, try again. If it still does not light,see Connect with NETGEAR genie Smart Setup on page 12.Install Your Extender11
AC750 WiFi Range Extender Model EX61003. If your WiFi router supports the 5 GHz band, repeat steps 1 and 2 to connect the extenderto the 5 GHz band.4. Find the new extender network name.The extender’s wireless network name (SSID) changes to your existing WiFi networkname, with 2GEXT or 5GEXT at the end of the name, depending on whether theextender is connecting to your WiFi network in 2.4 GHz or 5 GHz.For example: Existing WiFi network name. MyNetworkName New extended network name. MyNetworkName 2GEXTorMyNetworkName 5GEXT5. Connect your existing WiFi devices to the new extended network.Use the same WiFi password that you use for your WiFi router.6. Unplug the extender and move it to a new location closer to the area with a poor WiFi signal.The location that you choose must be within the range of your existing WiFi routernetwork.7. Plug the extender into an electrical outlet and wait one minute.The Power LEDbutton.lights green. If the Power LED does not light, press the PowerUse the Router Link LED on the front panel to help you choose a spot where theextender-to-router connection is optimal.Connect with NETGEAR genie Smart SetupYou can use a web browser to connect to the extender and set it up. To connect with the browser-based Smart Setup:1. Make sure that the switch on the extender is set to Extender.2. Use a WiFi network manager on a computer or mobile device to find and connect to one ofthe extender WiFi networks.The extender is dual band, so it has two WiFi networks: 2.4 GHz network. EX6100 NETGEAR 2GEXT 5 GHz network. EX6100 NETGEAR 5GEXTAfter the connection with the computer or mobile device is established, the Client LinkLEDlights solid green.3. Open a web browser window from the same computer or mobile device.The browser takes you directly to NETGEAR genie Smart Setup.Install Your Extender12
AC750 WiFi Range Extender Model EX6100Note: If you are not automatically directed to NETGEAR genie, launch a webbrowser and enter www.mywifiext.net in the address field. Enteradmin for the user name and password for the password.4. Select a 2.4 GHz WiFi network to extend and click the Continue button.5. Type the network password (also called passphrase or security key) in the Password field,and click the Continue button.6. Select a 5 GHz WiFi network to extend and click the Continue button.If your router does not support the 5 GHz band, click the Skip button.7. Type the network password (also called passphrase or security key) in the Password field,and click the Continue button.8. Select the Private Network or Public Network radio button, and click the Continue button.9. Enter names (SSIDs) for your new extender WiFi network in the Name (2.4G SSID) andName (5G SSID) fields and click the Continue button.Note: You can use the same security settings as your existing network byselecting the check box.Install Your Extender13
AC750 WiFi Range Extender Model EX6100The settings are applied and the following screen displays:10. Use a WiFi network manager on the computer or mobile device to connect to the extender’snewly created WiFi network.11. Use your password to connect.12. Select the check box and click the Continue button.13. Unplug the extender and move it to a new location closer to the area with a poor WiFi signal.The location you choose must be within the range of your existing WiFi router network.14. Plug the extender into an electrical outlet and wait one minute.The Power LEDbutton.lights green. If the Power LED does not light, press the Power15. Use the Router Link LED on the front panel to help you choose a spot where theextender-to-router connection is optimal.Install Your Extender14
AC750 WiFi Range Extender Model EX6100Find the Best LocationIf the WiFi signal is weak, the first time you join the extender network, an arrow LED blinks fortwo minutes. If this happens, adjust the position of the extender. The arrow LEDs act asfollows: No arrow LEDs are lit. The extender is in a good location. Left arrow blinks. Move the extender closer to the router. Right arrow blinks. Move the computer or mobile device closer to theextender.Extender PerformanceThese extender LEDs indicate a WiFi connection: WiFi signal between the router and the extender WiFi signal between the extender and the computer or mobile deviceThe LEDs are color coded: Green indicates the best connection. Amber indicates a good connection. Red indicates a poor connection.An LED that is off indicates no WiFi connection.Connect a Computer or Device to the Ethernet PortYou can use an Ethernet cable to connect a computer or device to the Ethernet port on theextender. Here are some examples of when you might want to do this: You want to use a computer to log in to the extender to view or change its settings, butyou are having trouble connecting to the extender WiFi networks. You have already installed the extender and now you want to connect a device to theextender’s Ethernet port.If you are using the extender as an access point, then you have already used the Ethernetport to connect the extender to your router. if you disconnect this cable, the extender will nolonger be connected to your existing network. To connect a computer to the extender Ethernet port:1. Install the extender so that it is connected to your existing network with a WiFi link.Install Your Extender15
AC750 WiFi Range Extender Model EX61002. Connect an Ethernet cable to the Ethernet port on the extender and to an Ethernet port onyour computer.The computer connects to the extender. Your computer might display a message notifyingyou of an Ethernet connection. To connect a device to the extender Ethernet port:1. Install the extender so that it is connected to your existing network with a WiFi link.2. Connect an Ethernet cable to the Ethernet port on the extender and to an Ethernet port onyour device.Blu-ray playerExtenderWiFi routerThe device connects to the extender. Now, the device can access your existing WiFinetwork through the extender.Install Your Extender16
AC750 WiFi Range Extender Model EX6100Install the Extender as an Access PointYou can also use the extender as a WiFi access point, which creates an AC750 WiFi hotspotwithin your local network.Figure 5. Extender as an access point To install the extender as an access point:1. Set the Access Point/Extender switch to Access Point.2. Plug the extender into an electrical outlet near a router Ethernet LAN port or a remoteEthernet jack that has access to your local area network (LAN).3. Use an Ethernet cable to connect the extender to the router Ethernet LAN port or the remoteEthernet LAN jack with LAN access.The extender joins the LAN and creates a WiFi hotspot.4. On your computer or mobile device, find and join a WiFi extender network.The extender is dual band, so it has two WiFi networks: 2.4 GHz network. EX6100 NETGEAR 2GEXT 5 GHz network. EX6100 NETGEAR 5GEXTWhen you join the network, the extender Client Link LEDconnected.lights to show that you are5. Launch a web browser and enter www.mywifiext.net in the address field.6. Enter admin for the user name and password for the password.NETGEAR genie displays and detects the Internet connection.7. Follow the genie steps to set up WiFi security for both WiFi networks.Install Your Extender17
3.Manage the Extender Network andSettingsThis chapter covers the following topics: Log In to the Extender After Initial Setup Change the admin Password Set Up Password Recovery for admin Use the WPS Wizard for WiFi Connections View or Change Advanced Wireless Settings View or Change the WPS Settings Set Up a Wireless Access List Manage Profiles Operating Mode183
AC750 WiFi Range Extender Model EX6100Log In to the Extender After Initial SetupAfter installation, you can log in to the extender to view or change its settings. To log in to the extender after the initial setup:1. Connect a computer or mobile device to the extender’s network.2. Launch a web browser and enter www.mywifiext.net in the address field.A login screen displays.3. Enter admin for the user name and password for the password.If your extender has an Internet connection, the extender automatically checks for newfirmware at the NETGEAR website.The Status screen displays.Change the admin PasswordThe user name to access the extender is admin, and its default password is password.NETGEAR strongly recommends that you set a more secure password. To change the password for the extender:1. On your computer, launch a web browser.2. In the address field of your browser, enter http://www.mywifiext.net.You are prompted to enter a user name and password. If you do not see the login prompt,make sure to include http:// when you type http://www.mywifiext.net in your browser.Manage the Extender Network and Settings19
AC750 WiFi Range Extender Model EX61003. Type admin for the user name and password for the password.If you already changed the password and want to change it again, type your personalizedpassword.4. Select Maintenance Set Password.5. (Optional) Select the Enable Password Recovery check box.NETGEAR recommends that you enable password recovery. This feature lets yourecover the password if it is forgotten. Password recovery is supported in the InternetExplorer, Firefox, and Chrome browsers, but not in the Safari browser.6. If you enabled password recovery, select two security questions and provide answers tothem.7. Type the old password.8. Type the new password twice.9. Click the Apply button.Your settings are saved.Set Up Password Recovery for adminNETGEAR recommends that you enable password recovery if you change the password forthe extender user name admin. Then you can recover the password if it is forgotten. Thisrecovery process is supported in the Internet Explorer, Firefox, and Chrome browsers, but notin the Safari browser. To set up password recovery:1. On your computer, launch a web browser.2. In the address field of your browser, enter http://www.mywifiext.net.You are prompted to enter a user name and password. If you do not see the login prompt,make sure to include http:// when you type http://www.mywifiext.net in your browser.3. Type admin for the user name and password for the password.Manage the Extender Network and Settings20
AC750 WiFi Range Extender Model EX6100If you already changed the password and want to change it again, type your personalizedpassword.4. Select Maintenance Set Password.5. Select the Enable Password Recovery check box.6. Select two security questions and provide answers to them.7. Click the Apply button.Your settings are saved.Use the Smart Setup to Connect the Extender to aNetworkThe first time that you use a browser to connect to the extender to install it, the NETGEARgenie installation wizard displays. If you want to use a wizard to set up the extender again,you can log in to the extender and use the Smart Wizard. To use Smart Setup to connect the extender to a WiFi network:1. On your computer, launch a web browser.2. In the address field of your browser, enter http://www.mywifiext.net.You are prompted to enter a user name and password. If you do not see the login prompt,make sure to include http:// when you type http://www.mywifiext.net in your browser.3. Type admin for the user name and password for the password.If you already changed the password, type your personalized password.Manage the Extender Network and Settings21
AC750 WiFi Range Extender Model EX61004. Select Smart Setup.The Smart Setup displays the switch setting on your extender. In this example, the switchis set to Extender, which is the correct setting if you want your extender to use WiFi toconnect to your network.The extender finds the 2.4 GHz wireless networks in your area and displays a list.5. To select the network you want the extender to join, do one of the following: Select the radio button for the network. Select the Manually input my wireless SSID radio button and type the name of thenetwork.6. Enter the security settings for the network that you selected.The extender finds the 5 GHz WiFi networks in your area and prompts you to select a5 GHz WiFi network.7. If your router or gateway broadcasts a 5 GHz WiFi network, select it from the list. Otherwise,click the Skip button.Manage the Extender Network and Settings22
AC750 WiFi Range Extender Model EX6100The extender prompts you to specify whether the network is private or public.8. Specify if the network that you selected is private or public: If your network is private, leave the Private Network radio button selected. If you are connecting the extender to a public network, select the Public Networkradio button.Selecting the Public Network radio button enables a firewall to protect yourcomputer from others who are sharing this public network.9. Click the Continue button.You are prompted to name the extender networks.By default, the extender network names are the same as the networks that you selectedwith 2GEXT and 5GEXT at the end.10. Either change the names or leave them as they are, then click the Continue button.The settings are applied to the extender.Use the WPS Wizard for WiFi ConnectionsThe WPS Wizard helps you add a wireless computer or device to the extender’s WiFinetworks without typing the WiFi password. WPS does not support WEP network security. Ifyou are using WEP security, see Connect with NETGEAR genie Smart Setup on page 12.Note: For instructions about how to use the physical WPS button on theextender, see Connect with WPS on page 11. To use the WPS Wizard:1. Launch a web browser from a computer or wireless device that is connected to thenetwork.Manage the Extender Network and Settings23
AC750 WiFi Range Extender Model EX61002. In the address field of your browser, enter http://www.mywifiext.net.A login screen displays.You are prompted to enter a user name and password. If you do not see the login prompt,make sure to include http:// when you type http://www.mywifiext.net in your browser.3. Type admin for the user name and type your password.If you have not yet personalized your password, type password for the password.4. Select ADVANCED WPS Wizard.5. Click the Next button.6. Select the radio button for the setup method that you want to use: Push button. Click the WPS button on this screen. PIN Number. The screen adjusts. Enter the client security PIN, and click the Nextbutton.7. Within two minutes, go to the client device and use its WPS software to connect to the WiFinetwork.The WPS process automatically sets up your wireless computer with the networkpassword when it connects. The extender WPS screen displays a confirmation message.View or Change Advanced Wireless SettingsUse care when changing the wireless settings. Incorrect settings might disable the extender’sWiFi networks unexpectedly. To view or change the advanced wireless settings:1. On your computer, launch a web browser.2. In the address field of your browser, enter http://www.mywifiext.net.You are prompted to enter a user name and password. If you do not see the login prompt,make sure to include http:// when you type http://www.mywifiext.net in your browser.3. Type admin for the user name and type your password.If you have not yet personalized your password, type password for the password.Manage the Extender Network and Settings24
AC750 WiFi Range Extender Model EX61004. Select Advanced Wireless Settings.All the check boxes are selected by default.5. In the Advanced Wireless Settings section of the screen, select or clear the check boxes: Enable Wireless Access Point (2.4 GHz). When this check box is selected, theextender allows WiFi connections in the 2.4 GHz band. Clearing this check boxprevents wireless devices from connecting to the extender in the 2.4 GHz band. LANdevices can still connect to the extender over an Ethernet cable. Enable SSID Broadcast (2.4 GHz). When this check box is selected, the extenderbroadcasts its wireless network name (SSID) for the 2.4 GHz band. Clearing thischeck box hides the extender’s 2.4 GHz network name. In such a situation, thisnetwork name does not display in a WiFi network manager. A user who wants to jointhis hidden network must know its network name. Enable 20/40 MHz Coexistence (2.4 GHz). The extender 2.4 GHz WiFi network canrun in either 40 MHz mode or 20 MHz mode. When this check box is selected, theextender uses 40 MHz mode unless a nearby WiFi network is using 40 MHz mode. Ifthat happens, the extender uses 20 MHz mode to coexist with that network. Enable Wireless Access Point (5 GHz). When this check box is selected, theextender allows WiFi connections in the 5 GHz band. Clearing this check boxprevents wireless devices from connecting to the extender in the 5 GHz band. LANdevices can still connect to the extender over an Ethernet cable. Enable SSID Broadcast (5 GHz). When this check box is selected, the extenderbroadcasts its wireless network name (SSID) for the 5 GHz band. Clearing this checkbox hides the extender’s 5 GHz network name. In such a situation, this network namedoes not display in a WiFi network manager. A user who wants to join this hiddennetwork must know its network name.6. Click the Apply button.Manage the Extender Network and Settings25
AC750 WiFi Range Extender Model EX6100View or Change the WPS SettingsUse care when changing the wireless settings. Incorrect settings might disable the extender’sWiFi networks unexpectedly. To view or change the advanced wireless settings:1. On your computer, launch a web browser.2. In the address field of your browser, enter http://www.mywifiext.net.You are prompted to enter a user name and password. If you do not see the login prompt,make sure to include http:// when you type http://www.mywifiext.net in your browser.3. Type admin for the user name and type your password.If you have not yet personalized your password, type password for the password.4. Select Advanced Wireless Settings.In the WPS Settings section of the screen displays the extender’s PIN. You cannotchange this number.5. In the WPS Settings section of the screen, change the settings as needed: Enable Device’s PIN. By default, this check box is selected so that it is possible touse the WPS PIN method to connect to the extender’s network. To prevent PIN compromise. By default, this check box is selected. This featurelets you specify the maximum number of times someone can try to enter theextender’s PIN to connect with WPS before the extender disables its PIN. Keep Existing Wireless Settings (2.4 GHz b/g/n). By default, this check box isselected so that the SSID and passphrase stay the same when you use WPS toconnect to the 2.4 GHz band. NETGEAR recommends that you leave this check boxselected.Manage the Extender Network and Settings26
AC750 WiFi Range Extender Model EX6100 Keep Existing Wireless Settings (5 GHz a/n/ac). By default, this che
The extender increases the distance of a WiFi network. The extender can connect to your network's WiFi signal and then boost that signal, or it can connect to your network with a wired connection and work as an access point. You use the Access Point/Extender switch on the side of the extender to select which way you want to use the extender.