Transcription
Thin-Client SSL VPN (WebVPN) on ASA withASDM Configuration tsComponents UsedNetwork DiagramConventionsBackground InformationThin-Client SSL VPN Configuration using ASDMStep 1. Enable WebVPN on the ASAStep 2. Configure Port Forwarding CharacteristicsStep 3. Create a Group Policy and Link it to the Port Forwarding ListStep 4. Create a Tunnel Group and Link it to the Group PolicyStep 5. Create a User and Add That User to the Group PolicyThin-Client SSL VPN Configuration using CLIVerifyProcedureCommandsTroubleshootIs the SSL handshake process complete?Is the SSL VPN Thin-Client functional?CommandsRelated InformationIntroductionThin-Client SSL VPN technology allows secure access for some applications that have staticports, such as Telnet(23), SSH(22), POP3(110), IMAP4(143) and SMTP(25). You can use theThin-Client SSL VPN as a user-driven application, policy-driven application, or both. That is, youcan configure access on a user by user basis or you can create Group Policies in which you addone or more users. Clientless SSL VPN (WebVPN)—Provides a remote client that requires an SSL-enabledWeb browser to access HTTP or HTTPS Web servers on a corporate local-area network(LAN). In addition, clientless SSL VPN provides access for Windows file browsing through theCommon Internet File System (CIFS) protocol. Outlook Web Access (OWA) is an example ofHTTP access.Refer to Clientless SSL VPN (WebVPN) on ASA Configuration Example inorder to learn more about the Clientless SSL VPN.
Thin-Client SSL VPN (Port Forwarding)—Provides a remote client that downloads a smallJava-based applet and allows secure access for Transmission Control Protocol (TCP)applications that use static port numbers. Post Office Protocol (POP3), Simple Mail TransferProtocol (SMTP), Internet Message Access Protocol (IMAP), secure shell (ssh), and Telnetare examples of secure access. Because files on the local machine change, users must havelocal administrative privileges to use this method. This method of SSL VPN does not work withapplications that use dynamic port assignments, such as some file transfer protocol (FTP)applications.Note: User Datagram Protocol (UDP) is not supported.SSL VPN Client (Tunnel Mode)—Downloads a small client to the remote workstation andallows full secure access to resources on an internal corporate network. You can downloadpermanently the SSL VPN Client (SVC) to a remote workstation, or you can remove the clientonce the secure session is closed.Refer to SSL VPN Client (SVC) on ASA with ASDMConfiguration Example in order to learn more about the SSL VPN Client.This document demonstrates a simple configuration for the Thin-Client SSL VPN on the AdaptiveSecurity Appliance (ASA). The configuration allows a user to telnet securely to a router located onthe inside of the ASA. The configuration in this document is supported for ASA version 7.x andlater. PrerequisitesRequirementsBefore you attempt this configuration, ensure that you meet these requirements for the remoteclient stations:SSL-enabled Web browserSUN Java JRE version 1.4 or laterCookies enabledPopup blockers disabledLocal Administrative privileges (not required but strongly suggested)Note: The latest version of the SUN Java JRE is available as a free download from the JavaWebsite . Components UsedThe information in this document is based on these software and hardware versions:Cisco Adaptive Security Appliance 5510 seriesCisco Adaptive Security Device Manager (ASDM) 5.2(1)Note: Refer to Allowing HTTPSAccess for ASDM in order to allow the ASA to be configured by the ASDM.Cisco Adaptive Security Appliance Software Version 7.2(1)Microsoft Windows XP Professional (SP 2) remote clientThe information in this document was developed in a lab environment. All devices used in thisdocument were reset to their default configuration. If your network is live, make sure youunderstand the potential impact of any command. All IP addresses used in this configuration wereselected from RFC 1918 addresses in a lab environment; these IP addresses are not routable onthe Internet and are for test purposes only.
Network DiagramThis document uses the network configuration described in this section.When a remote client initiates a session with the ASA, the client downloads a small Java applet tothe workstation. The client is presented with a list of preconfigured resources.ConventionsFor more information on document conventions, refer to the Cisco Technical Tips Conventions.Background InformationIn order to start a session, the remote client opens an SSL browser to the outside interface of theASA. After the session is established, the user can use the parameters configured on the ASA toinvoke any Telnet or application access. The ASA proxies the secure connection and allows theuser access to the device.Note: Inbound access lists are not necessary for these connections because the ASA is alreadyaware of what constitutes a legal session.Thin-Client SSL VPN Configuration using ASDMIn order to configure Thin-Client SSL VPN on the ASA, complete these steps:1. Enable WebVPN on the ASA2. Configure Port Forwarding Characteristics3. Create a Group Policy and Link it to the Port Forwarding List (created in Step 2)4. Create a Tunnel Group and Link it to the Group Policy (created in Step 3)
5. Create a User and Add That User to the Group Policy (created in Step 3)Step 1. Enable WebVPN on the ASAIn order to enable WebVPN on the ASA, complete these steps:1. Within the ASDM application, click Configuration, and then click VPN.2. Expand WebVPN, and choose WebVPNAccess.3. Highlight the interface, and click Enable.4. Click Apply, click Save, and then click Yes to accept the changes.Step 2. Configure Port Forwarding CharacteristicsIn order to configure port forwarding characteristics, complete these steps:1. Expand WebVPN, and choose PortForwarding.
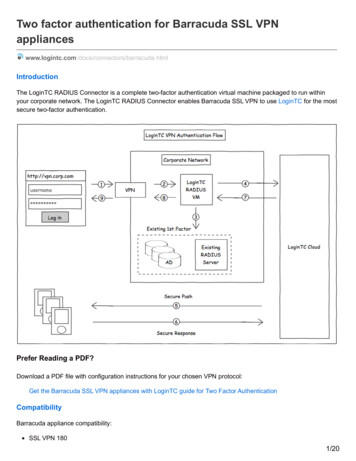
2. Click the Addbutton.3. In the Add Port Forwarding List dialog box, enter a list name, and click Add.The Add PortForwarding Entry dialog box
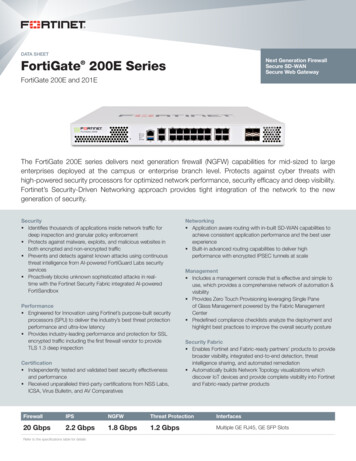
appears.4. In the Add Port Forwarding Entry dialog box, enter these options:In the Local TCP Port field,enter a port number or accept the default value.The value you enter can be any number from1024 to 65535.In the Remote Server field, enter an IP address.This example uses theaddress of the router.In the Remote TCP Port field, enter a port number.This example usesport 23.In the Description field, enter a description, and click OK.5. Click OK, and then click Apply.6. Click Save, and then click Yes to accept the changes.Step 3. Create a Group Policy and Link it to the Port Forwarding ListIn order to create a group policy and link it to the port forwarding list, complete these steps:1. Expand General, and choose GroupPolicy.
2. Click Add, and choose Internal Group Policy.The Add Internal Group Policy dialog boxappears.
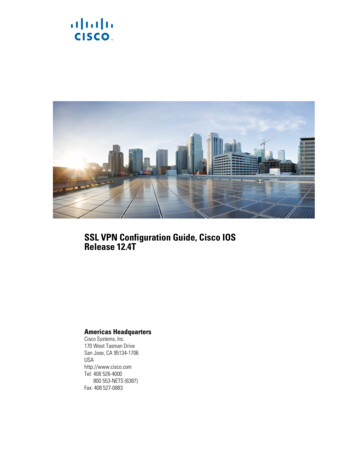
3. Enter a name or accept the default group policy name.4. Uncheck the Tunneling Protocols Inherit check box, and check the WebVPN check box.5. Click the WebVPN tab located at the top of dialog box, and then click the Functions tab.6. Uncheck the Inherit check box, and check the Enable auto applet download and Enableport forwarding check boxes as shown in thisimage:
7. Also within the WebVPN tab, click the Port Forwarding tab, and uncheck the PortForwarding List Inherit checkbox.
8. Click the Port Forwarding List drop-down arrow, and choose the port forwarding list youcreated in Step 2.9. Uncheck the Applet Name Inherit check box, and change the name in the text field.Theclient displays the Applet Name on connection.10. Click OK, and then click Apply.11. Click Save, and then click Yes to accept the changes.Step 4. Create a Tunnel Group and Link it to the Group PolicyYou can edit the default DefaultWebVPNGroup tunnel group or create a new tunnel group.In order to create a new tunnel group, complete these steps:1. Expand General, and choose TunnelGroup.
2. Click Add, and choose WebVPN Access.The Add Tunnel Group dialog boxappears.
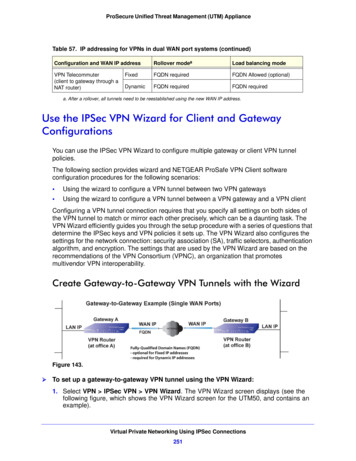
3. Enter a name in the Name field.4. Click the Group Policy drop-down arrow, and choose the group policy you created in Step 3.5. Click OK, and then click Apply.6. Click Save, and then click Yes to accept the changes.The tunnel group, group policy, andport forwarding characteristics are now linked.Step 5. Create a User and Add That User to the Group PolicyIn order to create a user and add that user to the group policy, complete these steps:1. Expand General, and chooseUsers.
2. Click the Add button.The Add User Account dialog boxappears.
3. Enter values for the username, password, and privilege information, and then click the VPNPolicytab.
4. Click the Group Policy drop-down arrow, and choose the group policy you created in Step3.This user inherits the WebVPN characteristics and policies of the selected group policy.5. Click OK, and then click Apply.6. Click Save, and then Yes to accept the changes.Thin-Client SSL VPN Configuration using CLIASAASA Version 7.2(1)!hostname ciscoasadomain-name default.domain.invalidenable password 8Ry2YjIyt7RRXU24 encryptednames!interface Ethernet0/0nameif insidesecurity-level 100ip address 10.1.1.1 255.255.255.0!--- Output truncated port-forward portforward 3044
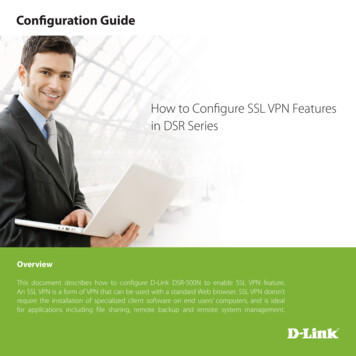
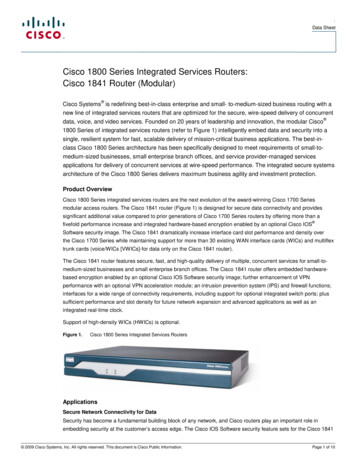
10.2.2.2 telnet Telnet to R1 !--- Configure the set ofapplications that WebVPN users !--- can access overforwarded TCP ports group-policy NetAdmins internal !-- Create a new group policy for enabling WebVPN accessgroup-policy NetAdmins attributes vpn-tunnel-protocolIPSec l2tp-ipsec webvpn !--- Configure group policyattributes webvpn functions port-forward auto-download!--- Configure group policies for WebVPN port-forwardvalue portforward !--- Configure port-forward to enableWebVPN application access !--- for the new group policyport-forward-name value Secure Router Access !--Configure the display name that identifies TCP port !-- forwarding to end users username user1 passwordtJsDL6po9m1UFs.h encrypted username user1 attributesvpn-group-policy NetAdmins !--- Create and add User(s)to the new group policy http server enable http 0.0.0.00.0.0.0 DMZ no snmp-server location no snmp-servercontact snmp-server enable traps snmp authenticationlinkup linkdown coldstart tunnel-group NetGroup typewebvpn tunnel-group NetGroup general-attributesdefault-group-policy NetAdmins !--- Create a new tunnelgroup and link it to the group policy telnet timeout 5ssh timeout 5 console timeout 0 ! class-mapinspection default match default-inspection-traffic ! !policy-map type inspect dns preset dns map parametersmessage-length maximum 512 policy-map global policyclass inspection default inspect dns preset dns mapinspect ftp inspect h323 h225 inspect h323 ras inspectnetbios inspect rsh inspect rtsp inspect skinny inspectesmtp inspect sqlnet inspect sunrpc inspect tftpinspect sip inspect xdmcp ! service-policyglobal policy global webvpn enable outside !--- EnableWeb VPN on Outside interface port-forward portforward3044 10.2.2.2 telnet Telnet to R1 prompt hostnamecontextVerifyUse this section to verify that your configuration works properly.ProcedureThis procedure describes how to determine the validity of the configuration and how to test theconfiguration.1. From a client workstation, enter https://outside ASA IP Address ; whereoutside ASA IPAddress is the SSL URL of the ASA.Once the digital certificate is accepted,and the user is authenticated, the WebVPN Service Web pageappears.
The address and port information required to access the application appears in the localcolumn. The Bytes Out and Bytes In columns display no activity because the application hasnot been invoked at this time.2. Use the DOS prompt or other Telnet application to start a Telnet session.3. At the command prompt, enter telnet 127.0.0.1 3044.Note: This command provides anexample of how to gain access to the local port displayed in the WebVPN Service Web pageimage in this document. The command does not include a colon (:). Type the command asdescribed in this document.The ASA receives the command over the secure session, andbecause it stores a map of the information, the ASA knows immediately to open the secureTelnet session to the mappeddevice.
Once you enter your username and password, access to the device is complete.4. In order to verify access to the device, check the Bytes Out and Bytes In columns as shownin thisimage:CommandsSeveral show commands are associated with WebVPN. You can execute these commands at thecommand-line interface (CLI) to show statistics and other information. For detailed informationabout show commands, refer to Verifying WebVPN Configuration.Note: The Output Interpreter Tool (registered customers only) (OIT) supports certain showcommands. Use the OIT to view an analysis of show command output.
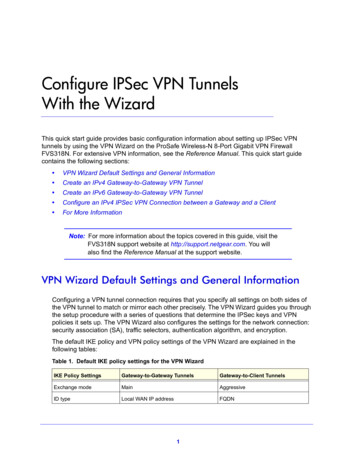
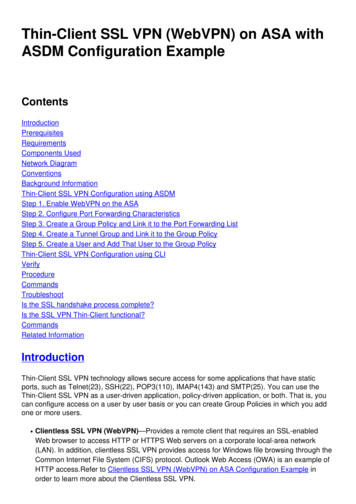
TroubleshootUse this section to troubleshoot your configuration.Is the SSL handshake process complete?Once you connect to the ASA, check if the real-time log shows the completion of the SSLhandshake.Is the SSL VPN Thin-Client functional?In order to verify that the SSL VPN Thin-Client is functional, complete these steps:1. Click Monitoring, and then click VPN.2. Expand VPN Statistics, and click Sessions.Your SSL VPN Thin-Client session shouldappear in the sessions list. Be sure to filter by WebVPN as shown in thisimage:
CommandsSeveral debug commands are associated with WebVPN. For detailed information about thesecommands, refer to Using WebVPN Debug Commands.Note: The use of debug commands can adversely impact your Cisco device. Before you usedebug commands, refer to Important Information on Debug Commands.Related Information Clientless SSL VPN (WebVPN) on ASA Configuration ExampleSSL VPN Client (SVC) on ASA with ASDM Configuration ExampleCisco ASA 5500 Series Adaptive Security AppliancesASA with WebVPN and Single Sign-on using ASDM and NTLMv1 ConfigurationExampleTechnical Support & Documentation - Cisco Systems
permanently the SSL VPN Client (SVC) to a remote workstation, or you can remove the client once the secure session is closed.Refer to SSL VPN Client (SVC) on ASA with ASDM Configuration Example in order to learn more about the SSL VPN Client. This document demonstrates a simple configuration for the Thin-Client SSL VPN on the Adaptive