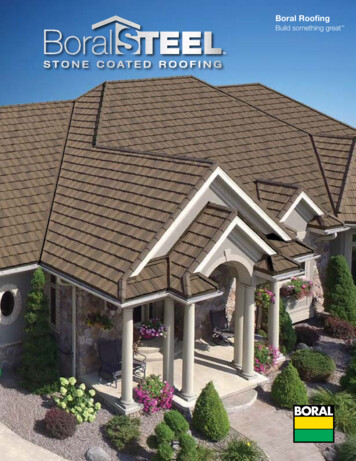
Transcription
BORAL ROOFINGBuild something great PATENT PENDINGINSTALLATION GUIDELINESBoralRoof.com/EnviroPro
Boral EnviroPro Installation GuidelinesDISCLAIMER: The installation recommendations providedin this guide are being furnished as general information tothe users of Boral Roofing, LLC products. Boral Roofingis the manufacturer of concrete roofing tiles and the BoralEnviroPro roofing component. The installation of theroofing tiles and the Boral EnviroPro roofing componentis the responsibility of the roofing contractor and must beperformed in accordance with prevailing building coderequirements. In some instances, a licensed engineer mustalso approve the roofing tile and component installation.Accordingly, Boral Roofing makes no representations orwarranties of any type regarding (i) the effectiveness of anymethod of installation (ii) the accuracy of the informationcontained herein or (iii) the suitability of its materials for anyapplication. These recommendations are not to be used inlieu of reliance upon the expertise of a roofing contractor oran engineer, if applicable, or in lieu of following the prevailingbuilding code rules and regulations that are applicable inyour geographic location.GENERAL NOTESBoral EnviroPro product is designed to be used asa component product in all field cut areas of the roof.Boral EnviroPro product profiles are designed to workwith related Boral Roofing standard concrete field tiles andinstalled following the general guidelines of standard rooftiles. For pitch requirements between 2-1/2:12 and 4:12,refer to local building code for underlayment requirements.For aesthetic installations below 2-1/2:12 a built up roofingsystem is required per building code requirements. Followlocal building code and product evaluation directions, asfound in ER-412.Recommendations contained in this guide are offered asa service to the users of Boral Roofing products. Minimumrequirements are identified as dictated by prevailingbuilding code. Any deviation from these standards are to beapproved by the Authority Having Jurisdiction (AHJ).OSHA RESPIRABLE CRYSTALLINE SILICA (RCS)STANDARDBoral EnviroPro roofing component is manufactured withreduced crystalline silica content. Installation in accordancewith instructions and good construction practices results insignificantly less respirable crystalline silica (RCS) exposurescompared to conventional roofing materials excusing use ofa wet saw or mandatory respiratory protection. To be in fullcompliance with the OSHA RCS Standard, 29 CFR 1926.1153,installers of this product - as with any other concrete rooftile -must have (1) a written Exposure Control Plan; (2) aCompetent Person to assume responsibility for proper healthand safety practices; (3) availability of relevant Safety DataSheets (SDS); and (4) communication and training of workerson RCS health hazards and proper work practices. Seeenclosed Templates 1 – 5 and Boral EnviroPro roofingcomponent Safety Data Sheet (SDS) for a suggested planand training materials. Each employer must evaluate its ownworking conditions to ensure compliance with all OSHAstandards. Other OSHA occupational safety and healthstandards apply to roofing installation work. See RONMENTAL STATEMENTBoral Roofing is an environmentally conscious companywhose policies and practices reflect a commitment tothe preservation and welfare of our environment. Boralconcrete roofing tiles and Boral EnviroPro roofingcomponent are manufactured in accordance with prevailingenvironmental guidelines. Because Boral roof tiles and BoralEnviroPro roofing component are designed to last, theywill not add to the volume expected at overtaxed landfills asother roofing materials do.EVALUATION REPORTS AND CODE COMPLIANCESFor more information, refer to BoralRoof.com.Safety Data Sheets (SDS) are available upon request.STRUCTURAL LOADING CONSIDERATIONSBoral EnviroPro product does not affect the standardroof load distribution and should be loaded per structuraldesignation. Refer to roof load diagram on page 2.IDENTIFYING BORAL ENVIROPRO ROOFING COMPONENTTo help identify the Boral EnviroPro product, Boral hascreated a patent pending design for the underlap/waterchannel and added two fastener locations (total of four)for each profile.Low (Flat) Profile: The primary fastening locations are theinner holes on the low profile.Primary Fastening LocationsPrimary Fastening LocationsMedium Profile: The primaryfastening locations are indicatedon the medium profile.Primary Fastening LocationsHigh Profile: The primaryfastening locations are the outerholes on the high profile.NOTE: Depending upon the profile selected for theproject, the Boral EnviroPro product may be installedin a “Straight bond” or a “Half (Broken) bond” pattern.“Straight bond” is illustrated in the Sidewall and TilePan details, while the “Half bond” or “Broken bond” isillustrated in the Skylight, Rake and Vent Pipe details.ROOFING LAYOUT PER PROFILEProfileLayout (Install) PatternStraight BondLow (Flat)MediumHigh Half (Broken) Bond 1
Boral EnviroPro Installation GuidelinesROOF LOADING BORAL ENVIROPRO COMPONENTThe loading shown below represents a method of placement of Boral EnviroPro product in relation to standardconcrete field tiles. It is not intended to suggest that this is the only method that will work. Each applicator will havepersonal preferences for the stack location and spacing. An important aspect of loading Boral EnviroPro productis to provide enough material at the location to have the correct amount of product for the detail being performed.NOTE: Green numbered blocks indicate suggestedlocations for the loading of the Boral EnviroPro product. Grey blocks indicate standard concrete fieldtile stacks.1. Course lines should be measured and chalkedaccording to the roof layout recommendation above,before loading the roof.2. Determine the approximate number of BoralEnviroPro product that is needed for each sectionof the roof.3. The spacing and location of the Boral EnviroPro product is determined by the number needed percourse.4. Starting on the third course from the eave, andcontinuing with every other course, distribute BoralEnviroPro product evenly over the roof. If cuts arerequired at gables, load one (1) Boral EnviroPro product per course of needed cuts.5. Load two (2) of the Boral EnviroPro product percourse at the hips and valleys.6. If more than one color of Boral EnviroPro productshas been selected to be installed, care should betaken upon roof loading to mix them throughout thecut detail locations.2
Boral EnviroPro Installation GuidelinesTYPICAL CLOSED VALLEY DETAILBoral EnviroPro cut pieces.Ribbed valley metal flashing.NOTE: Ensure that no fasteners arelocated inside the valley ribs.Minimum 1-inch diverter.Mark and cut Boral EnviroPro product to thedesired position and install to local building codesand jurisdictions.CLOSED VALLEY – “SPEED CUTTING” OR “LAYBACK” INSTALLATION METHOD1. Loosely place two (2) of the Boral EnviroPro products as tight to the center valley “V” as possible,leaving space for the Boral EnviroPro products. Donot extend the Boral EnviroPro product past thecenter line of the valley.5. Cut the Boral EnviroPro product up the chalk line(care must be taken to not cut into the underlayment).7. Install two (2) standard concrete field tiles.2. Measure the exposed width of the two (2) BoralEnviroPro products.8. Install the Boral EnviroPro cut pieces intothe valley.3. At the top and bottom of the valley, using the twopiece measurement, measure out from the center ofthe valley and mark the Boral EnviroPro productshorizontally.9. The Boral EnviroPro cut pieces should be securedby either of the following:a. Local building code approved adhesive; orb. Local building code approved fastening device.6. Remove the two (2) Boral EnviroPro cut pieces.4. Snap a chalk line up the valley on the marks (this isthe cut line).Standard concrete field tiles used to temporarilysupport the Boral EnviroPro product during layout.NOTE: Do not cut the support tiles.Two (2) of the Boral EnviroPro products per course.Chalk line (cut line).Example of closed valley layout and chalk line (cut line).CLOSED VALLEY - “CUT IN PLACE” OR “MARK AND CUT” INSTALLATION METHOD1. Install standard concrete field tiles as tight to thecenter valley “V” as possible, leaving space for theBoral EnviroPro product. Do not extend the BoralEnviroPro product past the center line of the valley.2. Measure the remaining space at both the bottomand top of the opening.3. Transfer measurements to the Boral EnviroPro product.4. Mark and cut the Boral EnviroPro product to size.5. Install the Boral EnviroPro cut pieces into place.6. The Boral EnviroPro cut pieces should be securedby either of the following:a. Local building code approved adhesive; orb. Local building code approved fastening device.NOTE: Removal of cut dust by blowing as a short duration activity at the end of each shift is acceptable for Boral EnviroPro roofing component installation.3
Boral EnviroPro Installation GuidelinesTYPICAL OPEN VALLEY DETAILBoral EnviroPro cut pieces.Ribbed valley metal flashing.NOTE: Ensure that no fasteners arelocated inside the valley ribs.Minimum 1-inch diverter.Mark and cut Boral EnviroPro product to thedesired position and install to local building codesand jurisdictions.OPEN VALLEY – “SPEED CUTTING” OR “LAYBACK” INSTALLATION METHOD1. L oosely place two (2) of the Boral EnviroPro products as tight to the center valley “V” as possible,leaving space for the Boral EnviroPro products. Donot extend Boral EnviroPro product past the centerline of the valley.2. Measure the exposed width of the two (2) BoralEnviroPro products, plus the desired “open” widthof the valley.NOTE: a. F inished roof product MUST extend aminimum of 4” over the valley metal.b. It may be necessary to use a third BoralEnviroPro product at a given course, ifvalley opening exceeds the two-piece layout.4. Snap a chalk line up the valley on the marks(this is the cut line).5. C ut the Boral EnviroPro product along the chalk line(care must be taken to not cut into the underlayment).6. Remove the two (2) Boral EnviroPro cut pieces.7. Install two (2) standard concrete field tiles.8. Install the Boral EnviroPro cut pieces intothe valley.9. The Boral EnviroPro cut pieces should be securedby either of the following:a. Local building code approved adhesive; orb. Local building code approved fastening device.3. At the top and bottom of the valley, using the twopiece measurement, measure from the desiredposition of the valley and mark the Boral EnviroPro products horizontally.OPEN VALLEY - “CUT IN PLACE” OR “MARK AND CUT” INSTALLATION METHOD1. Install standard concrete field tiles as tight to thecenter valley “V” as possible, leaving space forthe Boral EnviroPro product. Do not extend BoralEnviroPro product past the center line of the valley.2. Measure the remaining space at both the bottomand top of the opening, plus the desired “open”width of the valley.NOTE: a .F inished roof product MUST extend aminimum of 4” over the valley metal.b. I t may be necessary to use a third BoralEnviroPro product at a given course, ifvalley opening exceeds the two-piece layout.3. Transfer measurements to the Boral EnviroPro product, adding for the desired “open” width of thevalley.4. Mark and cut the Boral EnviroPro product to size.5. Install the Boral EnviroPro cut pieces into place.6. The Boral EnviroPro cut pieces should be securedby either of the following:a. Local building code approved adhesive; orb. Local building code approved fastening device.NOTE: Removal of cut dust by blowing as a short duration activity at the end of each shift is acceptable for Boral EnviroPro roofing component installation.4
Boral EnviroPro Installation GuidelinesHIP DETAILChalk line (cut line).Two (2) of the Boral EnviroPro products per course.Example of closed valley layout and chalk line (cut line).HIPS - “SPEED CUTTING” OR “LAYBACK” INSTALLATION METHOD1. Loosely place two (2) of the Boral EnviroPro products adjacent to the hip nailer (within a 1/2”of nailer board).2. Measure the exposed width of the two (2) BoralEnviroPro products.3. At the top and bottom of the hip, using the two-piecemeasurement, measure out from the hip board andmark the Boral EnviroPro product horizontally.4. Snap a chalk line up the hip on the marks (this is yourcut line).5. Cut the Boral EnviroPro product along the chalk line6. Remove the Boral EnviroPro cut pieces.7. Install two (2) standard concrete field tiles.8. Install the Boral EnviroPro cut pieces next tohip board.9. T he Boral EnviroPro cut pieces should be secured byeither of the following:a. Local building code approved addhesive; orb. Local building code approved fastening device.HIPS - “CUT IN PLACE” OR “MARK AND CUT” INSTALLATION METHOD1. Install standard concrete field tiles as tight to thehip nailer as possible (within a 1/2” of nailer board),leaving space for the Boral EnviroPro product.2. Measure the remaining space at both the bottomand top of the opening.3. Transfer measurements to the Boral EnviroPro product.4. Mark and cut the Boral EnviroPro product to size.5. Install the Boral EnviroPro cut pieces into place.6. The Boral EnviroPro cut pieces should be securedby either of the following:a. Local building code approved adhesive; orb. Local building code approved fastening device.NOTE: Removal of cut dust by blowing as a short duration activity at the end of each shift is acceptable for Boral EnviroPro roofing component installation.5
Boral EnviroPro Installation GuidelinesSIDEWALL DETAILBoral EnviroPro cut pieces.SIDEWALL - “CUT IN PLACE” OR “MARK AND CUT” INSTALLATION METHOD1. Install standard concrete field tiles as tight to thewall as possible, leaving space for the BoralEnviroPro product.2. Measure the remaining space at both the bottomand top of the opening.3. Transfer measurements to the Boral EnviroPro product.4. Mark and cut the Boral EnviroPro product to size.5. Install the Boral EnviroPro cut pieces into place.6. The Boral EnviroPro cut pieces should be securedby either of the following:a. Local building code approved adhesive; orb. Local building code approved fasteningdevice.NOTE: Removal of cut dust by blowing as a short duration activity at the end of each shift is acceptable for Boral EnviroPro roofing component installation.ROOF CURB/WALL DETAIL (SKYLIGHT, VENT AND/OR CHIMNEY)CONTINUOUS FLASHING METHODBoral EnviroPro cut piece.Apron flashing.Continuous flashing.STEP FLASHING METHODBoral EnviroPro cut piece.Step flashing a minimum of 17” in length.Apron flashing.TILE PAN METHODBoral EnviroPro cut piece.Counterflashing.Tile pan.6
Boral EnviroPro Installation GuidelinesRAKE DETAILCut Boral EnviroPro product to createproper stagger for roof layout.Mark and cut Boral EnviroPro product atleft side to fit roof layout.SPLAYED GABLE DETAILBoral EnviroPro cut piece.VENT PIPE DETAILOPTION 1Boral EnviroPro product cut around vent pipe.NOTE: Pipe penetrations are to be flashed as perindustry and building code standards.OPTION 2Boral EnviroPro product cut to meet atvent material and flashing.NOTE: Removal of cut dust by blowing as a short duration activity at the end of each shift is acceptable for Boral EnviroPro roofing component installation.7
Build something great ABOUT BORAL ROOFINGBoral Roofing LLC is a subsidiary of Boral USA and is the country’s largest premium provider of complete roofing and reroofing solutions for architects as well as commercial and residential builders. Boral Roofing operates manufacturing plantsthroughout the U.S.ABOUT BORAL NORTH AMERICAHeadquartered in Roswell, Georgia, Boral North America is a leader in key construction materials and building productsmarkets with operations across the USA, Canada, and Mexico. In 2017 Boral acquired Headwaters Incorporated, expandingBoral’s product offering and manufacturing and distribution footprint across North America. In construction materials, Boralhas a national footprint and industry-leading position in the processing and distribution of fly ash – a by-product of coalcombustion.In building products, Boral manufactures and supplies cladding, roof tiles, windows, and other light building products forresidential and commercial markets nationally. Boral’s manufactured stone veneer includes leading brands Cultured Stoneby Boral , Boral Versetta Stone , Eldorado Stone , Dutch Quality Stone , and StoneCraft Industries . Boral’s light buildingproducts portfolio includes Boral TruExterior Siding & Trim – a pioneer of the innovative poly-ash category of exteriorbuilding products – as well as shutters, gable vents, mounting blocks, and tool systems. In roofing, Boral is a leadingmanufacturer of clay and concrete roof tiles, and also produces composite polymer and stone-coated metal roof tiles. BoralAmerica.comSALES OFFICESPHOENIX, ARIZONALAKE WALES, FLORIDACORONA, CALIFORNIAOKEECHOBEE, FLORIDALATHROP, CALIFORNIAATLANTA, GEORGIASTOCKTON, CALIFORNIAKAPOLEI, HAWAIIRIALTO, CALIFORNIAHENDERSON, NEVADADENVER, COLORADOFORT WORTH, TEXASPOMPANO BEACH, FLORIDAKATY, TEXASCORPORATE OFFICECUSTOMER SERVICEBoral Roofing200 Mansell Court East, Suite 310Roswell, GA 30076800.669.8453Western OfficeBoral Roofing7575 Irvine Center Drive, Suite 100Irvine, CA 92618 2021 Boral Roofing LLC AC682 - 03/21WebsiteDownload a QR Code readerapp for your smart phone, thentake a photo to visit our websiteBoralRoof.com/EnviroPro
Boral EnviroPro product is designed to be used as a component product in all field cut areas of the roof. Boral EnviroPro product profiles are designed to work with related Boral Roofing standard concrete field tiles and installed following the general guidelines of standard roof tiles. For pitch requirements between 2-1/2:12 and 4:12,