Transcription
GoToAssist Express User GuideGoToAssist ExpressUser GuideVersion 1.0Citrix Online6500 Hollister Avenue Goleta, CA 93117 1-805-690-6400 Fax: 1-805-690-6471 2009 Citrix Online, LLC. All rights reserved.
GoToAssist Express User GuideContentsGetting Started . 3System Requirements . 3Install GoToAssist Express. 4Preferences . 4General Preferences . 4Connection Preferences . 5Screen Sharing Preferences. 5Terms . 6GoToAssist Express Components. 7Log In and Connect . 8Start GoToAssist Express . 8Close or Exit GoToAssist Express. 8Start a Support Session. 9Step 1: Generate a Support Key . 9Step 2: Share the Support Key with your customer . 10End a Support Session . 10Screen Sharing. 11Share My Screen. 11Resize the Image of Your Customer’s Desktop. 12Navigate the Desktop Image with Auto-Scroll . 12Resize the Viewer Window. 12Multiple Monitor Support . 13Monitor Layout Window . 14Features . 15File Transfer. 15Cut/Copy/Paste . 16Request Diagnostic Report . 17Chat. 18Notes. 18Drawing Tools . 19Run as a Service . 19Send the Ctrl-Alt-Delete Command . 20Reboot/Reconnect . 20Unattended Support . 21Unattended Support Setup. 21Connect to an Unattended Computer . 22Remove or Block Unattended Support . 23Change Your Unattended Support Access Code . 23Generate Reports . 24Attended Session Usage Report . 24Unattended Session Usage Report. 24Contact Support . 25 2009 Citrix Online, LLC. All rights reserved.
GoToAssist Express User GuideGetting StartedThank you for using Citrix GoToAssist Express 1.0. This user guide will introduce you tothe newest of the Citrix products.Citrix GoToAssist Express is a Web-based technology that enables you to deliver livetechnical support anywhere in real time. With this technology, you can: Communicate with a customer via a chat box View your customer’s desktop Share control of your customer’s mouse and keyboard Send and receive files Reboot and reconnect to your customer’s computer Use the Remote Diagnostics tool to retrieve key information on the status of thecustomer’s computer Connect with up to eight customers at one time Provide unattended support Leave zero footprint on your customer’s computerSystem RequirementsYour System Required: Windows Server 2003, Windows XP or Windows Vista; or Mac OS X10.4 or later Required: Internet Explorer , Netscape Navigator 4.0 or later, Mozilla Firefox 1.0 or later or Safari 1.3 or later Required: Ability to make direct outgoing TCP connections or availability of an HTTPproxy or a SOCKS server Recommended: Minimum of Pentium 300 with 64MB of RAM Recommended: Stable Internet connection with 56k or betterYour Customer’s System Required: Windows Server 2003, Windows XP, Windows Vista or Mac OS X 10.4 orlater Required: Internet Explorer, Netscape Navigator 4.0 or later, Mozilla Firefox 1.0 orlater or Safari 1.3 or later Required: 28.8Kbps or greater connection, 56K recommended Required: Ability to make direct outgoing TCP connections or availability of an HTTPproxy or a SOCKS serverMac SupportGoToAssist Express users can provide live support to both PC and Mac users – fromeither a PC or a Mac computer. However, some features are not currently availablefor use on the Mac platform. 2009 Citrix Online, LLC. All rights reserved.3
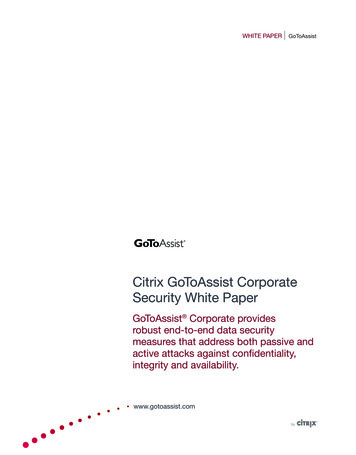
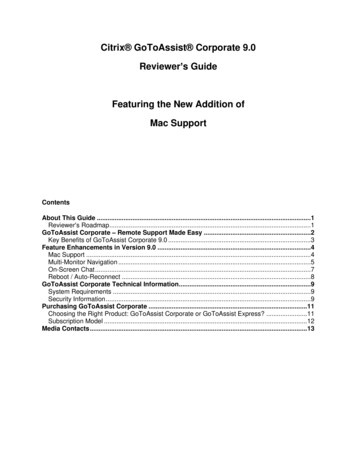
GoToAssist Express User GuideInstall GoToAssist ExpressX To download and install GoToAssist Express1. Go to www.gotoassistexpress.com.2. Log in with your account email and password.3. Click the Download & Start button to download and launch the application.4. Click Yes or Always if prompted by your browser.Note: You can download GoToAssist Express to as many of your computers as you like but you can only supportfrom one PC or Mac at a time.PreferencesThe Preferences feature allows you to set your preferences for how youwant GoToAssist Express to perform for you. Your preferences can beaccessed once you’ve logged in by either right-clicking thesystem tray, or from the Tools button in the Viewer.icon in theGeneral Preferences Automatically after I log into Windows – This optionstarts GoToAssist Expressautomatically after you login to your PC. Manually – This option setsGoToAssist Express to startonly when you launch theapplication from yourPrograms Menu. Remember me on thiscomputer – This checkboxenables automatic log in toGoToAssist Express. Uninstall customerapplication when sessionends – When this option ischecked, the GoToAssist iconand application will beremoved from thecustomer’s desktop at theend of the session. Leavingthe application on the customer’s computer will help the next session start faster. Multiple Monitor Notification – This option provides tips to you while you’resupporting customers with multiple monitors. 2009 Citrix Online, LLC. All rights reserved.4
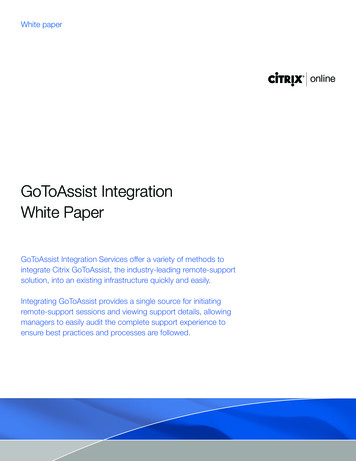
GoToAssist Express User GuideConnection PreferencesThe Connection category allows you to test the status of your GoToAssist Expressconnection.Note: To ensure a valid connection test, we advise that you refrain from testing your connection unless aGoToAssist Express Customer Care representative directs you to perform the connection test.Screen Sharing PreferencesColor Quality – Select True Color forbetter appearance or 256 Colors forimproved speed.Show remote cursor – View thecursor on your customer’s computeras well as your own.Pass system keys – Allows someWindows key functionality to bepassed to the customer’s PC, suchas Alt Tab.Performance Settings – Disable anyor all of the following displayoptions to improve speed. Display effects Desktop wallpaper Font smoothing Windows contents whiledraggingNote: Performance Settings options onlyapply to sessions with a Windows PC. 2009 Citrix Online, LLC. All rights reserved.5
GoToAssist Express User GuideTerms Portal – This will be the Web page that you will direct your customer to, in order toconnect with the session. The portal that your customer will go to iswww.fastsupport.com Support Key – This is the 9-digit code that you will provide to your customer, whichneeds to be inserted on the portal page in order to start a session with the customer. Viewer – The Viewer is the window used to view your customer’s desktop while in asession. The Viewer window has its own menu bar and can support up to 8simultaneous sessions. Customer’s Toolbar – The customer’s toolbar offers your customer the ability toend a session, stop screen sharing, initiate chat and send files. Unattended Support – This feature is available for those cases when a customerwants to allow you to access their PC when they are away from their computer. 2009 Citrix Online, LLC. All rights reserved.6
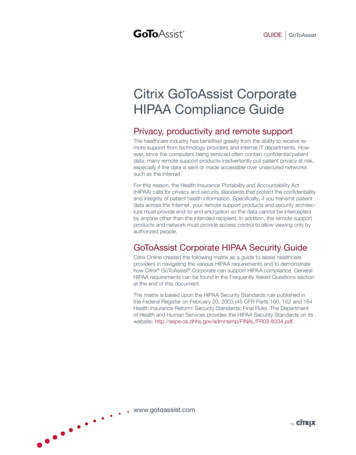
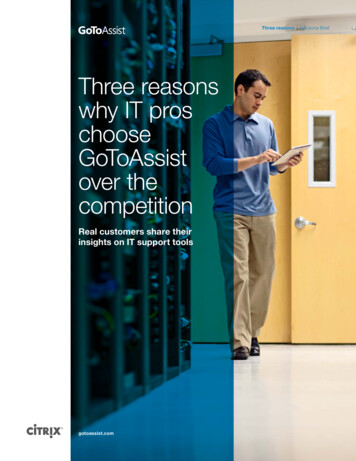
GoToAssist Express User GuideGoToAssist Express ComponentsThe primary components of a GoToAssist Express session.Viewer WindowThe Viewer window provides thescreen-sharing connection andtools needed to support yourcustomers.The Chat BoxThe chat box allows your andyour customer to communicatewithout a phone connection.The Customer ToolbarThe customer toolbar providesyour customer with a level ofcontrol during the session. 2009 Citrix Online, LLC. All rights reserved.7
GoToAssist Express User GuideLog In and ConnectStart GoToAssist ExpressX To start GoToAssist Express1. If you’ve already installed GoToAssist Express, then locate and double-click theGoToAssist Express iconthein your system tray or Mac dock. You can also right-clickicon in the system tray and select Start Support Session.icon is not in your system tray, navigate to the Citrix program folder fromIf thethe Windows Start button and select GoToAssist Express.2. Enter your email and password in the Login window and click Log In.Note: After 5 failed login attempts a soft lockout of 10 minutes will result.X To start GoToAssist Express from the Web site1. Log in to www.gotoassistexpress.com with your email and password.2. Select the Start Support Session link from the left navigation menu. GoToAssistExpress will automatically download to your PC or Mac and begin a session.Close or Exit GoToAssist ExpressTo close GoToAssist Express simply click the X in the top right corner of the Viewer window.To fully exit from GoToAssist Express, right-click theicon in your system tray and selectExit. Keep in mind that starting a new session is quicker if GoToAssist Express is running inthe background. 2009 Citrix Online, LLC. All rights reserved.8
GoToAssist Express User GuideStart a Support SessionTo begin a support session, you must first generate a Support Key and then convey that keyto your customer.Step 1: Generate a Support KeyYou will need to generate a different Support Key for each session and each customer. Oncea Support Key has been created it is valid for 10 minutes. Click the Session menu at the top of the Viewer and then select New Session.-or Double-click theicon in your system tray or Mac dock to begin a new session.-or- Right-click theicon in your system tray and select Start Support Session. 2009 Citrix Online, LLC. All rights reserved.9
GoToAssist Express User GuideStep 2: Share the Support Key with your customer Direct your customer to www.fastsupport.com and have him or her type their nameand Support Key into the connection box.-or- Click the Email Support Info button in the middle of your screen. This will open anemail in Microsoft Outlook with the Support Key and URL. Send the email to thecustomer and have the customer click the link that is included in the email.-or- Click the Copy Support URL button. Paste the information into an email or instantmessaging application and have your customer click the support link.End a Support SessionYou or your customer can end the support session at anytime. To end a session with yourcustomer, simply right-click the session thumbnail at the top left of the Viewer and selectEnd Session. Clicking X at the top right of the Viewer will end all of your current sessions.Your customer can exit the session by clicking the X at the top right of their toolbar. 2009 Citrix Online, LLC. All rights reserved.10
GoToAssist Express User GuideScreen SharingThe Screen Sharing component of GoToAssist Express allows you to view and access yourcustomer’s desktop. Your customer must first confirm that they are willing to share theirscreen at the beginning of the session and can stop the screen sharing portion of thesession at any time from their toolbar (a).(a)Share My ScreenWhen you begin a new support session you automatically start by viewing your customer’sdesktop but that can be reversed so that you can share your desktop with your customer.X To share your screen with your customer1. From the Viewer select the Screen Sharing menu.2. Select Share My Screen.3. Decide whether or not you want to share your keyboard andmouse with your customer and then minimize the Viewer todisplay your desktop.X To return to viewing your customer’s screen1. From the Viewer select the Screen Sharing menu.2. Select Start seeing customer’s name Screen. 2009 Citrix Online, LLC. All rights reserved.11
GoToAssist Express User GuideResize the Image of Your Customer’s DesktopYou can choose to change the size of the image of your customer’s desktop within yourViewer. You have the options of choosing to adjust your image size to Actual Size, Scale toFit or Zoom To. Actual Size - Displays the actual image of customer’sdesktop within the Viewer and may require you to autoscroll. Scale to Fit - Displays the image of the customer’s desktopscaled to fit the whole desktop image within the Viewer. Itwill display just one monitor if the customer has multiplemonitors. Zoom To - Allows you to zoom the image to a setting youchoose. You can choose from several pre-set options orchoose a custom option. This selection may require you toscroll.Navigate the Desktop Image with Auto-ScrollIf the customer’s desktop image is larger than your Viewer window, then a portion of thescreen will be hidden. To navigate the customer’s desktop, move the mouse to the edge ofthe Viewer window in the desired direction and the customer’s entire desktop image willauto-scroll within the Viewer.Resize the Viewer WindowYou can choose to have the Viewer appear as a window on your desktop or as a full-screenimage. Window mode - The Viewer appears as a window on yourdesktop just like any other application. The Viewer buttonson the top of your screen are always available and you canresize the Viewer just like any other application window. Full Screen mode - The Viewer expands to full screenand the Viewer menu auto-hides at the top of the screen.A tab is displayed at the top of the screen; this tab enablesaccess to the Viewer buttons and menus when needed. 2009 Citrix Online, LLC. All rights reserved.12
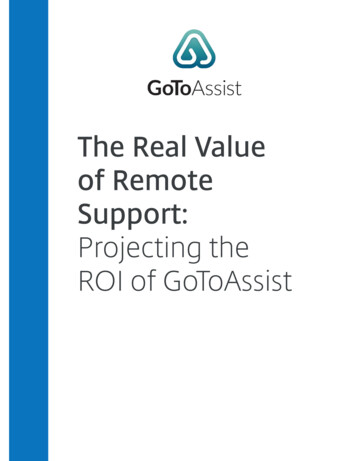
GoToAssist Express User GuideMultiple Monitor SupportGoToAssist Express helps you support those of your customers with multiple monitors. Youcan navigate between the monitors a few different ways while in a session. The followingscreen is displayed when GoToAssist Express identifies a system with multiple monitors.Note: If you and your customer both have two monitors then you can view both of their monitors at the same timeby holding the Shift key on your keyboard and then clicking the expand button on the top right of your Viewer.Multiple monitor support is currently unavailable for Mac users.X Working with a multi-monitor customer To select another monitor, click the arrow button located oneither side of the Viewer.–or- You can also click the Windows key the left or right arrow key on the keyboardto quickly switch between monitors.–or- The Monitor Layout window is also very useful for navigating multiple monitors. 2009 Citrix Online, LLC. All rights reserved.13
GoToAssist Express User GuideMonitor Layout WindowThe Monitor Layout window is a scaled down version of your customer’s monitor(s) and isuseful when you need to quickly navigate to a different area of your customer’s desktop.X Navigate with the Monitor Layout window1. From the Viewer, press and hold down the Ctrl Windows keys on your keyboardand then click the left mouse button to display the Monitor Layout window (a).2. While holding down the mouse button, maneuver the red box around to display thedesired desktop location.a 2009 Citrix Online, LLC. All rights reserved.14
GoToAssist Express User GuideFeaturesFile TransferThe File Transfer feature enables you and your customer to exchange files and folders. Ituses the same firewall and proxy-friendly connection techniques as Screen Sharing. Thereare no restrictions on the type or size of files that can be sent.The File Transfer feature is currently unavailable for Mac users.X To send a file to your customer1. From the Viewer select the File Transfer menu and select SendFiles.2. Locate the file or folder to be transferred and select Send.3. To send the file, you or the customer must choose a location for thefile and click Save.You and your customer bothreceive confirmation through aFile Transfer Status window.X To drag and drop files To drag and drop a file or folder directly between your computer and your client’s,simply drag a file from your desktop onto the Viewer to start copying.X To receive a file from your customer1. From your Viewer select File Transfer and select Get Files from Customer.2. You or your customer can locate the file and select Send.3. Select a location for the file and then click Save. 2009 Citrix Online, LLC. All rights reserved.15
GoToAssist Express User GuideX If your customer wants to send you a file1. Your customer can select the File Transfer button from their toolbar and select Sendfiles.2. Your customer navigates to the file they wish to transfer and selects Send.3. You are prompted to choose a location to store the file and then click Save.Cut/Copy/PasteThe Cut/Copy/Paste feature enables you to cut, copy and paste text between your computerand your client’s computer during a session.Note: The Cut/Copy/Paste feature has a text-only maximum of 1.5 MB of data.X To cut/copy and paste text1. Select the text you want to cut or copy by left-clicking your mouse and dragging thecursor over the text.2. Right-click your mouse on the selected text and choose Cut or Copy.3. Place your mouse in the location where you want to paste the text and left-click yourmouse.4. Right-click your mouse and select Paste. 2009 Citrix Online, LLC. All rights reserved.16
GoToAssist Express User GuideRequest Diagnostic ReportThe Diagnostic Report feature enables you to access specific system information on thecustomer’s PC or Mac.X To run system diagnostic report1. To view the diagnostics report, select the Diagnostics button fromthe Viewer. To save the report, click the Save As button at the bottom of theDiagnostic Report window and select either a text or XML file. To run the report again, select the Refresh button at the bottomof the Diagnostic Report window. Compare or view earlier reports by clicking the View Recent Reports button. 2009 Citrix Online, LLC. All rights reserved.17
GoToAssist Express User GuideChatChat is a function that enables you to communicate with your customer during a supportsession.To communicate via Chat, select the Chat button from the Viewer, enteryour text into the text entry field and click Send or press the Enter keyon your keyboard. The chat text is viewable during the session even if thechat window is closed and then later opened during the session. Your PCcustomers can also initiate the chat feature from their toolbar.The Chat feature is currently unavailable for Mac users.NotesThe Note function allows you to capture thoughts regarding the session that you may wantto reference later.To access the notes, select the Notes button from the Viewer, enter your textand then click Save at the bottom of the window. You can access these noteslater from either the Attended Session Usage Report or the UnattendedSession Usage Report. 2009 Citrix Online, LLC. All rights reserved.18
GoToAssist Express User GuideDrawing ToolsThe Drawing Tools feature can be useful during collaborations or demonstrations.To access the Drawing Tools, select Drawing Tools from the Tools menu on the Viewer.Once a drawing tool is enabled, the Drawing Tools menu can be reselected by either clickingon the drawing tools option or by right-clicking on your mouse. To deactivate a tool simplyselect Normal non-drawing mode from the menu.Note: Press the Shift key on your keyboard to make a straight line with the pen or highlighter.Drawing Tools are currently unavailable for Mac users.Run as a ServiceRunning as a service allows GoToAssist Express to run beyond the basic application level forimproved support. Running as a service allows you to send Ctrl-Alt-Delete commands,switch usernames and avoid limitations imposed by the Microsoft Windows Vista UserAccount Control (UAC). GoToAssist Express runs as a service by default and does not violateor circumvent the security model on your customer’s computer.If your customer has limited login credentials, GoToAssist Express will run as an applicationrather than a service. If you or the customer later enters admin level credentials then youcan select Upgrade to Run as a Service from the Tools menu.The Run as a Service feature does not apply to customers with a Mac. It also cannotbe initiated by a support provider using a Mac. 2009 Citrix Online, LLC. All rights reserved.19
GoToAssist Express User GuideSend the Ctrl-Alt-Delete CommandThe Send Ctrl-Alt Delete feature is useful if you need to log in with different Windowscredentials, lock the customer’s computer, access the Task Manager, etc.The Send Ctrl-Alt Delete feature is currently unavailable for Mac users.X To send a Ctrl-Alt-Delete to your customer’s computer1. Select the Tools menu from the Viewer.2. Select the Send Ctrl-Alt-Delete command.Reboot/ReconnectTo aid with software installation and upgrades, you can initiate a shut-down, restart andreconnection of the customer’s computer. Initiating the reboot and reconnect from yourViewer enables the customer to reconnect to the support session without having to postanother query or download the GoToAssist Express software again.The Reboot/Reconnect feature is currently unavailable for Mac users.X To reboot a customer’s computer and reconnect to the existing session1. Click the Tools menu from the Viewer and select Reboot or Reboot in Safe Mode.2. Either you or your customer can click Yes to authorize the Reboot/Reconnect.Selecting No will cancel the Reboot.3. The Windows login screen is displayed upon reboot, which provides you theopportunity to log in with your own credentials. Otherwise, once the customer hasentered his or her password the session will continue. 2009 Citrix Online, LLC. All rights reserved.20
GoToAssist Express User GuideUnattended SupportThe Unattended Support feature allows you to connect to your customer’s PC without thecustomer being present. With security in mind, Unattended Support can not be set upwithout permission from your customer.The Unattended Support feature is currently unavailable for Mac users.Unattended Support SetupX To set up a customer’s computer for Unattended Support1. Start a session with your customer’s computer.2. Click the Tools menu and select Set Up UnattendedSupport.3. A setup prompt appears on your customer’s desktop thatonly they can approve and requires their Windowspassword.4. To authenticate the Unattended Support from your side,enter your GoToAssist Express username and password.5. Create a nickname for your customer’s computer to make it easy to distinguish fromthose of your other customers (e.g., Customer John’s Home Computer.)6. Create and confirm an access code for the unattended computer with at least 6characters that includes both numbers and letters. Keep this access code in a safeplace and keep in mind that you will not be able to access your customer’s PCwithout it.7. A confirmation window appears on your customer’s PC when the installation iscomplete. 2009 Citrix Online, LLC. All rights reserved.21
GoToAssist Express User GuideConnect to an Unattended ComputerAfter a computer has been enabled with Unattended Support you can access yourcustomer’s unattended computer at any time. After you have disconnected from theUnattended Support session the customer’s computer is automatically locked.Note: After 15 minutes of inactivity an unattended support session will automatically disconnect.X To connect to a customer’s computer with Unattended Support1. Click the Session menu from the Viewer and select View UnattendedSupport Computer. You can also acce
GoToAssist Express users can provide live support to both PC and Mac users - from either a PC or a Mac computer. However, some features are not currently available