Transcription
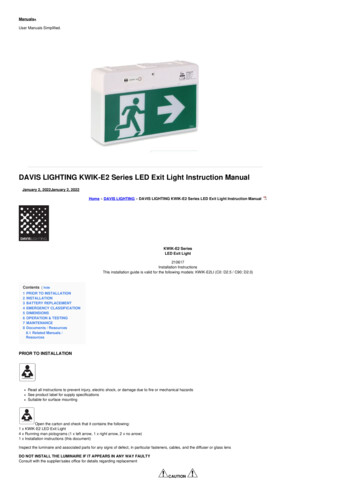
Manuals User Manuals Simplified.DAVIS LIGHTING KWIK-E2 Series LED Exit Light Instruction ManualJanuary 2, 2022January 2, 2022Home » DAVIS LIGHTING » DAVIS LIGHTING KWIK-E2 Series LED Exit Light Instruction ManualKWIK-E2 SeriesLED Exit Light210617Installation InstructionsThis installation guide is valid for the following models: KWIK-E2LI (C0: D2.5 / C90: D2.0)Contents [ hide12345678PRIOR TO INSTALLATIONINSTALLATIONBATTERY REPLACEMENTEMERGENCY CLASSIFICATIONDIMENSIONSOPERATION & TESTINGMAINTENANCEDocuments / Resources8.1 Related Manuals /ResourcesPRIOR TO INSTALLATIONRead all instructions to prevent injury, electric shock, or damage due to fire or mechanical hazardsSee product label for supply specificationsSuitable for surface mountingOpen the carton and check that it contains the following:1 x KWIK-E2 LED Exit Light4 x Running man pictograms (1 x left arrow, 1 x right arrow, 2 x no arrow)1 x Installation instructions (this document)Inspect the luminaire and associated parts for any signs of defect, in particular fasteners, cables, and the diffuser or glass lensDO NOT INSTALL THE LUMINAIRE IF IT APPEARS IN ANY WAY FAULTYConsult with the supplier/sales office for details regarding replacementCAUTION
Before commencing installation or maintenance, turn off and isolate the electrical supplyElectronic control equipment must not be subjected to high voltages. DO NOT MEGGER between Live and NeutralAll cable/conduit terminations must be installed in accordance with the designated IP rating of this productSuitable installation fastening methods should be employed to ensure the mounting points are not damaged when subjected to vibration and/or movementThis luminaire must be installed by a qualified electrician in accordance with local rules and codesThis luminaire cannot be disassembled by non-professional personsIf the external flexible cable or cord of this luminaire is damaged, it shall be exclusively replaced by the manufacturer or his service agent or a similarly qualified person in order to avoida hazardThe light source of this luminaire is not replaceable; when the light source reaches its end of life the whole luminaire shall be replacedPrior to installation, products are to be stored in cool dry conditionsINSTALLATION1. Loosen the locking screw by rotating 90⁰ anticlockwise2. Remove the top cover by sliding away fromthe body3. WALL MOUNT ONLY: knock out holes atthe rear of the cover for mounting and cableentry
4. Mount cover on fixing surface5. Connect the mains supply6. Move the slide switch to connect the battery7. Slide the body onto the cover
8. Tighten the locking screw by rotating 90⁰clockwiseBATTERY REPLACEMENT
1. Insert a flat screwdriver into the gap above the center ofthe diffuser cover and gently pry free2. Unscrew and remove the side plate from the cover. Setthe slide switch to “Disconnected”. Unscrew andgently detach the PCB3. Disconnect the battery from the PCB and remove it. Installthe new battery and reconnect4. Replace the PCB and screw into place – DO NOT OVERTIGHTEN. Confirmthe slide switch is set to “Connected”.Replace the side plateThe new battery will require 16 hrs to reach full chargeEMERGENCY CLASSIFICATIONMounting Height (m)Classification2.1I 2.42.73.01 3.35.3spacing between luminaires (m)Plane COD2.5L5.85.85.75.6Plane C90D2.0L5.25.15.04.7Classificationspacing between luminaire & wall (m)Plane COD2.5W2.92.92.852.8Plane C90D2.0W2.62.552.54.85Based on AS/NZS2293.1-2018 (minimum 0.2 lux)DIMENSIONS2.653.64.04.55.01 6.07.08.0 19.010.015.0
OPERATION & TESTINGLED IndicatorGreenGreenOperating ModeFunctionOnNormalBattery charging or fully chargedOffNormalBattery disconnectedOn OffEmergencyBattery dischargedTest Procedure:Ensure the supply is connected and the battery is fully charged Press and hold the test switchThe LED indicator will extinguish and the luminaire will go into emergency mode Release the switch to return to normal operating modeMAINTENANCEThe supply must be isolated before opening or accessing the luminaire. Product maintenance is critical to the product’s designed performance. Davis Lighting is not responsible for anyproduct not maintained in accordance with the recommended procedure or intervals. It is recommended that a bi-annual cleaning cycle is implemented. Inspect optical surfaces for damageor cracks. Products supplied with visors or covers must not be operated with a damaged visor or cover; it is recommended damaged visors or covers be replaced by a competent personimmediately. Seals and electrical components such as wiring should be checked for deterioration.All photometric and electrical data published are of 10% tolerance. Characteristics and specifications may change without notice. All electrical installations/connections should be carriedout by a suitably qualified person. Application images are indicative only and may not contain actual Davis products. The information contained in this publication is typical and must not beinterpreted as a guarantee of individual product performance.https://qrs.ly/kjcqsifThis product may contain substances that can be hazardous to the environment if not disposed of correctly. Electrical and electronic equipment should never be discarded along withgeneral waste but should be separated for correct treatment and recovery. Packaging and waste materials should be recycled wherever possible.Contact:HEAD OFFICE: : 61 (7) 3712 8988SALES OFFICES: 1300 851 001Email: australia@davislighting.comFax: 61 (7) 3272 8988Web: www.davislighting.com.auDocuments / ResourcesDAVIS LIGHTING KWIK-E2 Series LED Exit Light [pdf] Instruction ManualKWIK-E2 Series, LED Exit LightRelated Manuals / ResourcesDAVIS LIGHTING Helio- SLH LED Street Light Instruction ManualDAVIS LIGHTING Helio- SLH LED Street Light Instruction Manual Read all instructions to prevent injury, electric shock or
Davis WindTrak LED Light User ManualDavis WindTrak LED Light User Manual Illuminates WindTrak wind indicators for perfect night sailing RUGGED LEDBULB Low IQ Lighting ZEN Linear LED Top Light User ManualIQ Lighting ZEN Linear LED Top Light The ZEN fixture design allows for high-performance lighting in supplementalgreenhouse DAVIS LIGHTING FLORYN FLE Series 100W LED Floodlight Instruction ManualFLORIN – FILE SERIES Installation Instruction Read all instructions to prevent injury, electric shock, or damage due to Manuals ,homeprivacy
1 x KWIK-E2 LED Exit Light 4 x Running man pictograms (1 x left arrow, 1 x right arrow, 2 x no arrow) 1 x Installation instructions (this document) Inspect the luminaire and associated parts for any signs of defect, in particular fasteners, cables, and the diffuser or glass lens DO NOT INSTALL THE LUMINAIRE IF IT APPEARS IN ANY WAY FAULTY
