Transcription
POWERLIVE TVMENUCHANNEL10:35Hardware ManualOK
Moxi Mate Hardware ManualCopyright 2005 Digeo, Inc. All rights reserved.Digeo, the Digeo logo, the Moxi logo and combinations thereof are trademarks of Digeo, Inc. in the USA and othercountries. All other product, service or brand names are the property of their respective owners.Regulatory InformationFederal Communications Commission Radio and Television Interface Statement for a Class ‘B’ DeviceThis equipment has been tested and found to comply with the limits for a Class B digital device, pursuant to part 15 of theFCC Rules. These limits are designed to provide reasonable protection against harmful interference in the residentialinstallation. This equipment generates, uses and can radiate radio frequency energy and, if not installed and used inaccordance with the instructions, may cause harmful interference to radio communications. However, there is no guaranteethat interference will not occur in a particular installation.The remote control device referred to in this manual complies with part 15 of the FCC Rules Operation and is subject to thefollowing two Conditions: 1) This remote control device may not cause harmful interference, and 2) This remote controldevice must accept any interference received, including interference that may cause undesired operation.If the equipment does cause harmful interference to radio or television reception, which can be determined by turning theequipment off and on, the user is encouraged to try to correct the interference by one of the following measures:Re-orient or relocate the receiving antenna.Increase the separation between the equipment and receiver.Connect the equipment into an outlet on a circuit different from that to which the receiver is connected.Consult the dealer or an experienced radio/TV technician for help.Changes or modification not expressly approved by the party responsible for compliance could void the user’s authority tooperate the equipment.Declaration of ConformityAccording to 47 CFR, Parts 2 and 15 for Class B Personal Computers and Peripherals; and/or CPU Boards and PowerSupplies used with Class B Personal Computers, Digeo, Inc., 8815 122nd Avenue NE, Kirkland, WA 98033, declares undersole responsibility that the product identifies with 47 CFR Part 2 and 15 of the FCC Rules as a Class B digital device. Eachproduct marketed is identical to the representative unit tested and founded to be compliant with the standards. Recordsmaintained continue to reflect the equipment being produced can be expected to be within the variation accepted, due toquantity production and testing on a statistical basis as required by 47 CFR 2.909. Operation is subject to the followingcondition: This device must accept any interference received, including interference that may cause undesired operation.The above named party is responsible for ensuring that the equipment complies with the standards of 47 CFR, Paragraphs15.107 to 15.109.Canadian ComplianceThis Class B digital apparatus meets all requirements of the Canadian Interference-Causing Equipment Regulations.Cet appareil numérique de la classe B est conforme ả la norme NMB-003 du Canada.ii
Safety and Regulatory InformationIMPORTANT INFORMATIONWARNINGTo prevent fire or shock hazard, do not expose the Moxi Media Center Extension (Moxi Mate) to rain or moisture. Donot insert the Moxi Mate plug into an extension cord, receptacle, or outlet unless the blades can be fully inserted.To prevent overheating, situate the product away from heat sources such as radiators, heat registers, stoves, orother products (including amplifiers) that produce heat.To repair or replace the Moxi Mate if necessary, contact your cable system operator. The Moxi Mate contains nouser-serviceable parts. Do not remove cover or back.The following warning label appears on the bottom of the Moxi Mate.This symbol is intended to alert you to the presence of uninsulated "dangerous voltage" within the product’senclosure that may be of sufficient magnitude to constitute a risk of electric shock to persons.This symbol is intended to alert you to the presence of important operating and maintenance (servicing)instructions in the literature accompanying the appliance.Note to CATV system installerThis reminder is provided to call the CATV system installer’s attention to Article 820-40 of the NEC that provides guidelinesfor proper grounding and, in particular, specifies that the cable ground shall be connected to the grounding system of thebuilding, as close as possible to the point of cable entry as practical.USAGE WARNINGWarning About Photosensitive SeizuresExposure to certain visual images, including flashing lightsor patterns that may appear in online video games and otherfunctions or applications, can cause a very small percentageof people to experience a seizure. Even people without ahistory of seizures or epilepsy may have an undiagnosedcondition that can cause photosensitive epileptic seizureswhile watching or using video games. These seizures mayhave a variety of symptoms, such as eye or face twitching,lightheadedness, altered vision, shaking or jerking of armsor legs, confusion or disorientation, or momentary loss ofawareness. Seizures may also cause a loss ofconsciousness or convulsions that can lead to injury fromfalling down or striking nearby objects. If you experience anyof these symptoms, immediately stop using the service andconsult a doctor.Parents should watch for and ask their children about theabove symptoms because children and teenagers are morelikely than adults to experience these seizures.Taking the following precautions may reduce the risk ofphotosensitive epileptic seizures:Avoid using any such iTV features/services on largetelevision screensView your television in a well-lit roomSit farther from the television screenDo not use any such iTV features/services when drowsyor tiredIf you or any of your relatives have a history of seizures orepilepsy, consult a doctor before using the interactivetelevision services.Avoid Damaging Your Television or Other Audio/Video EquipmentCertain interactive television services or functions, suchas tickers and online video games that remain static onthe screen, can damage some televisions by "burning"the image into the screen. This results in a permanentshadow of the image, even when the service or feature isnot used. Consult the owner's manual for your television,the television dealer, or the manufacturer to determine ifsuch features and functions can be used safely on yourset.Before connecting or disconnecting any audio/videodevice, make sure that you turn off power to the MoxiMate and to the device. This reduces the risk of electricaldamage.To avoid damage to audio/video equipment or to theMoxi Mate, do not touch the audio/video cord's terminalsor the Moxi Mate's audio/video ports with your fingers orallow metal parts to touch them.iii
Moxi Mate Hardware ManualSAFETY PRECAUTIONSSafetyRead and follow all instructions and safety informationcarefully. Save the instructions for future reference.Do not place liquid-filled containers, such as coffee cupsor vases, on or near the Moxi Mate.Do not use the Moxi Mate near wet or water-filled areas,such as a bathtub, sink, wet basement, or swimmingpool.Do not overload wall outlets and extension cords.Do not defeat the safety purpose of the polarized plugon the Moxi Mate cord. It has one blade wider than theother, which allows it to fit into a power outlet only oneway. If you cannot insert the plug fully, try reversing it. Ifthat fails, contact your electrician to replace the outlet.Moxi Mate PlacementPlace the Moxi Mate on a stable platform. If you mountthe Moxi Mate on a bracket or stand, follow themanufacturer’s instructions and use mountingaccessories recommended by the manufacturer.To prevent overheating, place the Moxi Mate in an areathat allows adequate ventilation. Never place it on a softsurface, such as a bed or sofa that might block theventilation holes in the cabinet.Do not place the Moxi Mate near a heat source, such asa radiator or heat register.If you place the Moxi Mate in a bookcase or rack, makesure you allow proper ventilation. See “VentilationRequirements” in Chapter 2 for more information.Do not run the power cord so it is likely to be walked on,run over, or pinched by items placed on or against it.Power SourcesCAUTION: Operate the Moxi Mate only from the Digeoexternal power adapter provided with the product.For equipment intended to operate from battery power orother sources refer to the operating instructions for thatequipment.AttachmentsUse only attachments recommended by the Moxi Mate manufacturer. Other attachments may cause hazards.Care and MaintenanceUnplug the Moxi Mate from the wall outlet beforecleaning it. Wipe with a damp cloth only. Do not useliquid cleaners or aerosol cleaners.During a lightning storm or when leaving the Moxi Mateunattended and unused for long periods of time, unplug itfrom the wall outlet and disconnect the antenna or cablesystem. This will prevent damage caused by lightningand power line surges.Never place or spill liquid of any kind on the Moxi Mate.Never push objects of any kind into the Moxi Matethrough openings in the cabinet. The objects may touchdangerous voltage points or cause a short circuit thatcould result in a fire or electrical shock.Do not attempt to service this equipment yourself.Opening or removing covers might expose you todangerous voltage or other hazards. Refer all servicing toyour cable operator.If the Moxi Mate requires repair, contact your cablesystem operator.Battery Use and DisposalNotwithstanding any information provided by Digeo in this manual regarding the use of batteries, the end user assumesall responsibility and liability for the use and disposal of batteries in accordance with all applicable laws, rules, andregulations. Digeo will not be liable to anyone for the end user's failure to use and/or dispose of batteries in the propermanner and in accordance with such laws, rules, and regulations, or for any defect contained in batteries that may causeinjury damage to persons or property.iv
Table of ContentsTable of ContentsIntroduction . 2Moxi Mate Features . 2Power Modes. 2Moxi Mate Diagrams. 3Front View . 3Back View. 3Installation . 4Ventilation Requirements . 4Equipment Required . 5Moxi Mate Connection Procedure. 5Composite Video/Audio Connection. 6Basic RF Coaxial Video/Audio Connection . 6Installation Wrap-Up . 7Moxi Remote . 8Programming Procedure . 8Television Codes . 9Audio/Video Receiver Codes . 121
Moxi Mate Hardware ManualChapter 1IntroductionThe Moxi Media Center Extension (Moxi Mate) extends the features of the multi-room enabledMotorola Broadband Media Center to a second TV in the home. It delivers digital video and audio, plusa whole new experience in interactive cable television to the second TV. Finding what you want towatch and watching it when you want, no matter what room you're in, has never been easier. TheMoxi Mate is simple to set up and easy to operate.This guide introduces you to the features and setup of your Moxi Mate. Refer to the Moxi Viewer'sGuide to learn more about operating the Media Center and Moxi Mate, plus some of the advancedfeatures they provide.Moxi Mate FeaturesStandard Features of the Moxi MateShared dual cable tuners and Digital Video Recorder (DVR) with multi-room enabled Media CenterShared CD/DVD drive with multi-room enabled Media CenterHigh quality interactive graphicsStandard RF and Audio/Video outputsClock displayFront panel control buttonsSpecifications of the Moxi MatePower supply: line input voltage 95V - 125V AC; frequency 57Hz - 63HzOperating temperature: 15 C - 40 CDimensions (W x H x D): 10.3" x 2" x 6"Weight: approximately three poundsPower ModesIf the second TV uses coaxial cable to connect to the Moxi Mate (an RF connection, explained onpage 6), the Moxi Mate has two modes—On and Passthrough—which you control by pressing thePower button on the Moxi Mate. If the second TV uses composite cable to connect, the Moxi Matedoes not have Passthrough mode.On mode—In On mode, the Moxi Mate is fully functional. It provides the second TV with access to allthe features of the Media Center and any recordings on it.Passthrough mode—Passthrough mode allows basic analog cable feeds to pass through it to thesecond TV. In Passthrough mode you can watch analog cable on the second TV, but you cannot accessany of the features or recordings on the Media Center.In most cases, the Moxi Mate should remain in On mode. However, if you want to watch a show onlive TV at the same time you are recording two other shows, change the Moxi Mate to Passthrough2
Introductionmode. This allows you to use your TV's tuner to watch the show on live TV at the same time the twoother shows are recording. In Passthrough mode, you do not have access to the Moxi Menu and willnot be able to pause the show. Remember to change back to On mode when you finish watching theshow.NOTE The Moxi Mate depends on the multi-room enabled Media Center to operate. If you turn offthe Media Center, the Moxi Mate will not work.Moxi Mate DiagramsThe following illustrations identify the controls on the Moxi Mate. Slight variations may exist betweenthese illustrations and your Moxi Mate.Front ViewFigure 1: Moxi Mate FrontBack ViewFigure 2: Moxi Mate Back3
Moxi Mate Hardware ManualChapter 2InstallationThis chapter describes how to install the Moxi Mate and verify the installation. The chapter alsocontains information to help you successfully disconnect, move, and reconnect the cable connectionsbetween the Moxi Mate and the TV.When connecting the Moxi Mate, make sure all coaxial connections are "finger-tight"—secure, butnot so tight they cannot be undone with your fingers. You do not need any special tools to disconnectthe Moxi Mate, although you may need a wrench to loosen any tight connections.IMPORTANTWarningsMake sure your Media Center is installed before installing the Moxi Mate.Do not connect the Moxi Mate unit to any switched power source.Use only the power cord supplied with the Moxi Mate and use that cord only for theMoxi Mate.Keep the Moxi Mate on, unless moving or servicing the unit.Keep the multi-room enabled Media Center turned on. If power is removed, or apower outage occurs, the Moxi Mate will not operate.Ventilation RequirementsAllow adequate ventilation and airflow around the Moxi Mate to prevent overheating.WarningsCabinet installations must have open airflow or no doors.Vents must be unobstructed and open to surrounding air.Ensure top, side, and back clearance of at least two inches.Keep away from other heat-generating devices.Do not place the Moxi Mate on top of the TV.Figure 3: Moxi Mate Ventilation4
InstallationEquipment RequiredThree RCA male/male cablesOne RF coaxial cableSee the wiring diagrams starting on page 6 for reference.Moxi Mate Connection ProcedureThis section describes the possible installation scenarios for the Moxi Mate. Use the information in thissection and the accompanying wiring diagrams to install the Moxi Mate.The Moxi Mate allows multiple types of audio and video connections. We recommend you use thebest connection that your TV and audio system supports. Refer to the documentation that came withyour TV or audio device for specific information on what the device supports.1. Before you begin, make sure both the second TV and the Moxi Mate are turned off and allconnections are unplugged. Leave the multi-room enabled Media Center plugged in and turnedon.2. Position the Moxi Mate in a well-ventilated open area near, but not on top of, the second TV.3. Connect the incoming cable supply to the Moxi Mate. Attach one end of the coaxial cable to thewall port and the other end to the Cable In port of the Moxi Mate.4. To connect audio and video cables, refer to the diagram and instructions listed below that apply toyour installation.To integrate additional devices into your configuration, such as a DVD player or VCR, refer to themanufacturer’s documentation for each device.IMPORTANTDo not attach the Moxi Mate to the TV that has the Media Center attached.5
Moxi Mate Hardware ManualComposite Video/Audio Connection1. Attach one end of a composite cable to the video (V) output of the Moxi Mate and the other endto the Video In port of the second TV or receiver.2. Attach one end of the composite audio cables to the Left (L) and Right (R) audio outputs of theMoxi Mate and the other end to the respective L and R inputs of the TV or receiver.3. Follow the instructions under "Installation Wrap-Up," starting on page 7.Figure 4: Composite video/audioBasic RF Coaxial Video/Audio Connection1. Attach one end of the coaxial cable to the To TV port on the Moxi Mate and the other end to theCable/Antenna In port of the second TV. This connection provides both audio and video signals.2. Follow the instructions under "Installation Wrap-Up," starting on page 7.Figure 5: Basic RF coaxial connection6
InstallationInstallation Wrap-Up1. Verify that all cable connections are tight and secure, all coaxial connections are finger-tight andproperly seated, and that all RCA-style plugs are fully seated.2. Ensure that nothing blocks the vents of the Moxi Mate or other equipment.3. Plug the TV power cord into the wall outlet.4. Attach one end of the power cable to the Moxi Mate Power port and plug the other end into thewall outlet.5. Turn on the Moxi Mate and verify that the correct time appears on the clock on the front panel.This indicates it is operating correctly.NOTE The multi-room enabled Media Center connected to the main TV must be turned onbefore the Moxi Mate can operate.Depending on the type of TV and connection used, you may need to tune the TV to the properchannel or set the video input source. Refer to your TV user manual for details.When you first turn on the Moxi Mate, it must register itself with the Media Center. This may result ina slight delay before the Moxi Menu appears on the second TV.Once the Moxi Mate is turned on, you do not need to press the Power button again. Unless you aremoving the Moxi Mate, having it serviced, or if you want to watch a show on live TV at the same timeyou are recording two other shows, you should leave the Moxi Mate in On mode. If you put the MoxiMate in Passthrough mode, you will not have access to the Moxi Menu and will not be able to pausethe show you are watching. For more information on Passthrough and On modes, see "Power Modes"on page 2.7
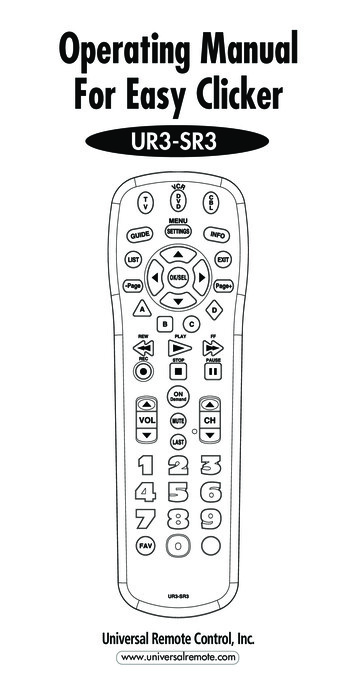
Moxi Mate Hardware ManualChapter 3Moxi RemoteThe Moxi remote allows you to access, control, and enjoy the manyfeatures of your Moxi Mate. You can also use this remote as the primaryone for many brands of TVs and audio devices. Instructions in thischapter show you how. Refer to the Moxi Viewer's Guide forexplanations of the buttons.Your cable operator may provide a different remote. If your remote doesnot look like the one pictured here, refer to the manual your cableoperator provided with the remote.NOTE When replacing batteries, use only high quality, non-corrosivebatteries designed for use in electronic equipment.Programming ProcedureThe Moxi remote will operate the Moxi Mate, and—once programmed—will simultaneously control the power, volume, and mute functions ofyour TV or audio receiver. Use the following instructions to program theremote.From the tables on the following pages, find the codes for your brand ofTV or audio receiver and use this information with the "Programming byCode" procedure below. If your brand is not listed or if the given codesdo not work, follow the instructions in the "Programming by Search"procedure on page 9.Programming by CodeFigure 6: Moxi remote1. Turn on the TV or receiver you want the remote to control.2. On the Moxi remote, press and hold the MOXI and OK buttons simultaneously until the LED lighton the top of the remote blinks twice.3. Using the number buttons on the remote, enter one of the codes for your device from thereference tables starting on page 9. When you enter the correct code, the LED blinks twice. (If itblinks once, the code was invalid—try again.)4. Press the Power or Mute button on the remote. If the TV or receiver does not respond, repeatsteps 2 and 3, using another listed code. Repeat until successful, or use the Programming bySearch procedure.NOTE To reset the remote to the original factory setting, enter code 9 9 9 9, and then press OK instep 3 above.8
Moxi RemoteProgramming by Search1. Turn on the TV or receiver you want the remote to control.2. On the Moxi remote, press and hold the MOXI and OK buttons simultaneously, until the LED lighton the top of the remote blinks twice.3. Using the number buttons on the remote, press 9 9 1 0 for TV, or 9 9 1 1 for audio receiver. TheLED light blinks twice.4. Press the Mute button.If this mutes the device, go to step 5.If this does not mute the device, press the Up arrow to advance to the next code, and thenpress Mute again. Repeat until the device responds.5. Press OK to set the current code and finish.NOTE Some older devices may not be supported. If the device still fails to respond, use its originalremote to control it. Contact your cable provider's customer service for additional assistance.Television CodesTV BrandManufacturer CodeTV BrandManufacturer Code3MAOCAdmiralAdventuraAiwaAlaronAmerica ActionAnamApex dChanghongCitizen07370030, 0003, 0052, 0137, 01850093, 0463004607010179, 0183, 021601800180, 0004, 0009, 00680748, 0765, 0767039101800355018000300611018007650060, 0030, 0056, 0039, 0046, 0092,0186, 0280, 056107490180, 0157, 0158, 018500540047, 0054, 0154, 0451, 0093, 0060,0030, 0145, 0056, 0016, 0039, 0166,0415, 0466, 0702, 0747, 1147, 13470145, 05110720, 077403910000, 01850154, 0236, 0463, 0180, 0282, 0178,0179, 0039, 0038, 0158, 0177, 0181,0182, 0183, 0185, 0270, 0280, 0623A-MarkAbexAdventAikoAkaiAmbassadorAmproAnam NationalArcherAudiovoxBroksonicCCECandleCarverBell & 0, 0098, 0591017707510055, 016100030451, 0180, 0003, 0092, 0623, 07130236, 0463, 0003, 0426, 06420037, 0217, 03290030, 0056, 0046, 01860054, 01700154, 001600000451, 00920185ConcertoCraigCrownDaewoo00560180, 01610180, 0039, 06720451, 0039, 0066, 0067, 0091, 004907350381, 0389, 04090030CompaqContecCrosleyCurtis MathesDenonDwinEctecElectrobandEmerson9
Moxi Mate Hardware ManualTV BrandManufacturer CodeTV BrandManufacturer CodeFisherFujitsuFuturetech0154, 01590179, 06830180FlexVisionFunaiGEGibralter0017, 0030GoldStarGoodmansGrundigHaierHarley DavidsonHarvardHavermy0360003707680179, 00430180, ugeHitachiInFocusInnovaJBLJVCJensenKMC0736, 0738, 0741, 0752003700540053, 0036, 0069, 0160, 0169, iKlossLG021600520024, 0046, 00780056, 0442KawashoKenwoodKonkaLXILoeweLuxmanMGA0136, 0633, 0693, 069400560150, 0030, 0178, , 0030, 0179, 0020, 0024, 0028,0036, 0096, 0186, 0187, 0230, 0386,1254, 14540054, 0030, 0037, 0444, 15540178, 0145, 000307130180, 0179, 01710047, 0051, 0451, 0282, 0178, 0021,0055, 0027, 0029, 0135, 0279, 0747,1147, 13470030, 0178, 0001, 0002, 0032, 0106,04090053, 0056, 0170, 03920180, 017901780054, 007806930145, 0056, 0016, 0032, 0038, 0095,0097, 0151, 0173, 0227, 0279, 0409,0413, 0576, 0577, 0583, 0723, 0770,1145005400170000004601800180, 0030, 0039, 0183, 0185, 0217,02800158, 0216, 030800300628, 0632, 0638, 0703, 07070047, 0054, 0154, 0156, 0178, 0148,0747001601850060, 0030, 0056, 0049, 0091, 0185,02160016, NAD0093, 00550156, 0178, ionPanasonic0092003703910018018007560236, 0463, 01790250, 0051, 0055, 0162, 0226, 0650NesaNikkoNoblexOn orex0250, 06500154, 0250, 0463, 0150, 0178, 0179,0016, 0106, 10370047, 0017, 0051, 0039, 0032, 0135,07470093, 0150, 0178, 0014, 0098, 0155,0331, 0358, 05920180, 0049, 02170030, 0056, 0036, 0170, 0434, 0455,070407630030, 0178, 0092, 0317043005310154, 0250, 0166, 06500093, 016507340047, 0156, 0051, 0060, 0030, 0178,0021, 0018, 0039, 0002, 0003, 0027,0032, 0110, 0135, 0149, 0309, 0747,1347
Moxi RemoteTV BrandManufacturer CodeTV BrandManufacturer CodePhilcoPhilips0054, 0037, 1354, 0038, 0166, 0172, 06790685, 0700, 07170047, 07470734, 0735, 0737, 0742, 07430250, 0051, 0165, 0055, 0219, 06500047, 0154, 0165, 0180, 0030, 0178,0056, 0039, 0032, 0409, 0747Rhapsody0183, 0185, 0216RosenSKYSampo0054, 0463, 0030, 0145, 0020, 0028,0096, 03020030, 00390039, 009200510178, 0003, 0031, 0052, 046600170047, 0018, 0029, 0038, 0090, 0135,0254, 0278, 0679, 0747, 1047, 1147,1247, 1347, 1447, 15470154, 0165, 0180, 0030, 0178, 0056,0039, 0032075600370030, 0039, 0032, 0052, 0100, ScotchSearsScottSemivoxSemp01780047, 0054, 0154, 0156, 0178, 0179,0056, 0015, 0146, 0148, 0149, 0159,0168, 0171, 0281, 074701560017, 0030, 061201800060, 0030, 0178, 0056, 0032, 0037,0329, 0408, 0427, 0482, 0702, 076604510154, 0088, 0107, 0146, 0159, 0232,04840236, 0180, 0178, 0179, signSquareviewSupre-MacySylvania0180, 0178, 0179, 0186017100460054, 0030, 0020, 0028, 0065, 0096,0171, 03810178, 0056, 017700930055, 0003, 0049, 039601790054, 0180, 0150, 0060, 0179, 0056,0016, 0039, 0092, 0175, 0186, 031207350209, 0210SpectriconStarliteSupremeSymphonic0093, 0165, 0039, 0153, 0157, 0281,0386, 0398, 0491, 06880186, 01870000, 0011, 0080, 0111, 0273, 0353,11000003, 0137018000000180, 250, 00510051, 0056, 00030056, 0101, 0702TeraToshiba01850157002700530054, 02420724, 07750054, 0165, 0030, 0178, 0021, 0179,0056, 0016, 0020, 0027, 0028, 0029,0080, 0096, 0111, 02020463, 0623TotevisionUltraVector ResearchVideo ConceptsVidtechVikingWaycon00310154, 0156, 0060, 0036, 0149, 0650,1256, 135600390391003000980178, 00360046, 03120156Yamaha00300017, 0463, 0016, isticTMKTandyTatungTechnol harp11
Moxi Mate Hardware ManualAudio/Video Receiver CodesReceiver BrandManufacturer CodeReceiver BrandManufacturer CodeADCAdcomAiwa35313002, 3304, 3319, 36164089, 4405, 3121, 3125, 3158, 3162,3189, 3249, 3284, 3301, 3361, 3544,3601, 3745, 4188, 4243, 4321, 4388,46414390340336874390370230493531, 3690ADSAdmiralAkai3375, 415731823076, 3115, 3151, 3224, 3450,4255ArcamAudio AuthorityAudiotronicB&KBang & OlufsenBoseCarverAlcoAudio AccessAudioSourceAudiovoxBKBondstecCapetronic3195, 32013195325342504104, 3004, 3273, 3386, 3771, 4142,4311, 4360, 466040614045, 4046, 4047, 4048CelestionCreekCurtis MathesDelphiEAD4120, 4212, 4214, 4216425641893701, 3820, 38403898, 40404229, 3238, 36394089, 4189, 3008, 3042, 3189,3270, 336042643792320142014045, 4046, 4047, 4048EmersonEroica3020, 3255, 3424, 349530513042, 3219, 3360, 48013744, 4299GEGarrardGlory 37413228, 3386, 3659, 42733110, 3794, 40023705, 3713, oodKossLXILexiconLloyd's3255, 3424, 3495, 3624, 3636, 3744,4366407631953260, 36493146, 3281, 3286, 3407, 3424,3440, 3463, 3640, 3644, 3744305731463110, 3189, 3891, 4004, 40053062, 30663074, 3464, 4263, 4282, 43744138, 43904313, 4027, 4570, 4569, 3027,3042, 3077, 3186, 3313, 3314,3337, 4032, 4051, 46703181, 3744, 3755LinnLuxmanMCS3039, 3044, 3201, 3346MagnavoxMarantz4089, 4189, 3006, 3039, 3189, 3200,3352, 3455, 4289, 489234663195408937443215, 3407, 3466, 3467, 3542, 3543,3609McIntosh31893149, 3267, 3329, 3330, 3429,34314089, 4189, 3189, 3195, 3204,3222, 3364, 3391, 35313258, 75, 3097, 3347, 38763413, 4173, 4
To repair or replace the Moxi Mate if necessary, contact your cable system operator. The Moxi Mate contains no user-serviceable parts. Do not remove cover or back. The following warning label appears on the bottom of the Moxi Mate. This symbol is intended to alert you to the presence of uninsulated "dangerous voltage" within the product's