Transcription
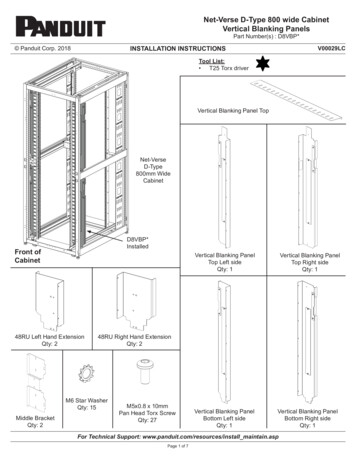
Net-Verse D-Type 800 wide CabinetVertical Blanking PanelsPart Number(s) : D8VBP*INSTALLATION INSTRUCTIONS Panduit Corp. 2018V00029LCTool List: T25 Torx driverVertical Blanking Panel TopNet-VerseD-Type800mm WideCabinetD8VBP*InstalledFront ofCabinetVertical Blanking PanelTop Left sideQty: 148RU Left Hand ExtensionQty: 248RU Right Hand ExtensionQty: 2M6 Star WasherQty: 15Middle BracketQty: 2Vertical Blanking PanelTop Right sideQty: 1M5x0.8 x 10mmPan Head Torx ScrewQty: 27Vertical Blanking PanelBottom Left sideQty: 1Vertical Blanking PanelBottom Right sideQty: 1For Technical Support: www.panduit.com/resources/install maintain.aspPage 1 of 7
INSTALLATION INSTRUCTIONS Panduit Corp. 2018Determine Configuration of Blanking Panels Vertical Blanking Panels come ready to install in a 42RU or 48RU Cabinet with Side Panels.For a 45RU Cabinet with Side Panels, rotate the Notch Covers around on the two bottom Blanking Panels only.When no Side Panels are utilized for any Cabinet configuration, then rotate all the Notch Covers around.42RU or 48RU CabinetAll (4) Vertical Blanking Panels come withNotch Covers installed in a 42RU or 48RUCabinet with Side Panels configurationFor a 42RU or 48RU Cabinet withNo Side Panels configuration,Rotate (4) Notch Covers on all(4) Vertical Blanking Panels.Rotated Notch CoverNotch Cover45RU CabinetFor a 45RU Cabinet with No SidePanels configuration,Rotate (4) Notch Covers on all(4) Vertical Blanking Panels.For a 45RU Cabinet withSide Panels configuration,rotate the (2) Notch Covers on the bottom(2) Vertical Blanking Panels only.Rotated Notch CoverRotated Notch CoverFor Technical Support: www.panduit.com/resources/install maintain.aspPage 2 of 7V00029LC
Panduit Corp. 2018INSTALLATION INSTRUCTIONSV00029LCInstall Vertical Blanking Panels Attach the (4) Vertical Blanking Panels using (4) M5x0.8 x 10mm Pan Head Torx Screw per Panel.48RU only- Leave the bottom M5x0.8 x 10mm Pan Head Torx Screw unattached on each Panel (see next step).One mounting screw per VerticalBlanking Panel is required at the paintmasked E-Rail location for bondingbetween the Vertical Blanking Panelmounting screw head and the E-Rail.M5x0.8 x 10mm Pan Head Torx Screw4 per Panel thru the rear set of holes.48RU only- Leave the bottom M5x0.8 x 10mm Pan Head TorxScrew unattached on each panel (see next step)Rear ofCabinetFor Technical Support: www.panduit.com/resources/install maintain.aspPage 3 of 7
INSTALLATION INSTRUCTIONS Panduit Corp. 2018V00029LCInstall 48RU Panel Extensions (for 48Ru Cabinets only) Attach the (4) 48RU Panel Extensions using (1) M5x0.8 x 10mm Pan Head Torx Screw & (1) M6 Star Washer per Panel.Attach the bottom (4) M5x0.8 x 10mm Pan Head Torx Screws that were left unattached from previous step.M5x0.8 x 10mmPan Head Torx Screw1 per Extension1M5x0.8 x 10mmPan Head Torx Screw1 per ExtensionM6 Star Washer1 per Extension(Mininum of 1 per Extension)2For Technical Support: www.panduit.com/resources/install maintain.aspPage 4 of 7
INSTALLATION INSTRUCTIONS Panduit Corp. 2018Install Middle Brackets Attach the (2) Middle Brackets using (4) M5x0.8 x 10mm Pan Head Torx Screws.42RU CabinetM5x0.8 x 10mmPan Head Torx Screw4 per Middle Bracket45RU Cabinet48RU CabinetRear ofCabinetFor Technical Support: www.panduit.com/resources/install maintain.aspPage 5 of 7V00029LC
Panduit Corp. 2018INSTALLATION INSTRUCTIONSInstall Top Panel Attach the Top Panel using (3) M5x0.8 x 10mm Pan Head Torx screws. Push Flange of the Top Panel tight againstCabinet E-Rails when tightening the (3) screws.M6 Star WasherMininum of 1M5x0.8 x 10mmPan Head Torx Screw3 placesFront of CabinetFor Technical Support: www.panduit.com/resources/install maintain.aspPage 6 of 7V00029LC
Panduit Corp. 2018INSTALLATION INSTRUCTIONSV00029LCOptional If additional sealing is required, Blanking Foam Strips (Panduit Part # BFS100x2000) can be ordered separately and applied.Each Blanking Panel has a 1RU opening with a removable cover attached. Reference the Panduit catalog for the full list of1RU Patch Panel and Blanking Panel components that can be ordered separately and applied.1RU opening4 places1RU opening Cover4 placesFor Instructions in Local Languagesand Technical Support:www.panduit.com/resources/install uit.comPage 7 of 7Phone:866-405-6654Rev.02
Vertical Blanking Panels art bers : 8 Front of Cabinet Tool List: T25 Torx driver Net-Verse D-Type 800mm Wide Cabinet D8VBP* Installed Middle Bracket Qty: 2 M5x0.8 x 10mm Pan Head Torx Screw Qty: 27 Vertical Blanking Panel Bottom Left side Qty: 1 Vertical Blanking Panel Bottom Right side Qty: 1