Transcription
Oracle Linux 8Installing Oracle LinuxF13930-23July 2022
Oracle Linux 8 Installing Oracle Linux,F13930-23Copyright 2022, Oracle and/or its affiliates.
ContentsPreface123ConventionsvDocumentation AccessibilityvAccess to Oracle Support for AccessibilityvDiversity and InclusionvPreparing to InstallSystem Requirements1-1System Configuration1-1Obtaining Installation Images1-2Preparing Installation Media1-3Customizing Boot Loader ActionsConfiguring the Boot Loader2-1Installation Boot Options2-1Installing Oracle Linux ManuallyInstalling in Graphics Mode3-1Localization Options3-3Software Options3-5System Options3-6User Settings3-8Completing the Installation3-9Installing in Text ModePostinstallation Configuration43-93-10Automating the Installation by Using KickstartCustomizing the Kickstart Configuration FileInstallation Options4-14-2iii
Packages to Install4-3Preinstallation Options4-4Postinstallation Options4-5Starting the Kickstart Installation4-55Installing Using the Driver Update Disk6Installing a System With a Btrfs root File System7AUsing the GUI Installer6-1Using the Text Installer6-3Verifying the Btrfs Installation6-3Troubleshooting Oracle Linux InstallationsTroubleshooting Menu Options7-1Debug and Log Information7-1Creating a Network Installation SetupSetting Up the Network ServerA-1How to Configure NFSA-1How to Configure dnsmasqA-3Configuring PXE Boot LoadingA-5How to Configure for BIOS-based PXE ClientsA-5How to Configure for UEFI-based PXE ClientsA-6Supporting Different Kinds of ClientsA-8iv
PrefaceOracle Linux 8: Installing Oracle Linux provides information about how to install the OracleLinux 8 release.ConventionsThe following text conventions are used in this document:ConventionMeaningboldfaceBoldface type indicates graphical userinterface elements associated with an action,or terms defined in text or the glossary.italicItalic type indicates book titles, emphasis, orplaceholder variables for which you supplyparticular values.monospaceMonospace type indicates commands within aparagraph, URLs, code in examples, text thatappears on the screen, or text that you enter.Documentation AccessibilityFor information about Oracle's commitment to accessibility, visit the Oracle AccessibilityProgram website at r information about the accessibility of the Oracle Help Center, see the Oracle AccessibilityConformance Report at plates/t2-11535.html.Access to Oracle Support for AccessibilityOracle customers that have purchased support have access to electronic support through MyOracle Support. For information, visit rningsupport.html#support-tab.Diversity and InclusionOracle is fully committed to diversity and inclusion. Oracle respects and values having adiverse workforce that increases thought leadership and innovation. As part of our initiative tobuild a more inclusive culture that positively impacts our employees, customers, andpartners, we are working to remove insensitive terms from our products and documentation.We are also mindful of the necessity to maintain compatibility with our customers' existingtechnologies and the need to ensure continuity of service as Oracle's offerings and industryv
Prefacestandards evolve. Because of these technical constraints, our effort to removeinsensitive terms is ongoing and will take time and external cooperation.vi
1Preparing to InstallWhether you are installing on a single system or on multiple systems, you should plan aheadto ensure a successful installation. System Requirements System Configuration Obtaining Installation Images Preparing Installation MediaNote:To upgrade from the latest version of the previous major Oracle Linux release to thecurrent major release version, use the Leapp utility. See Oracle Linux 8: PerformingSystem Upgrades With Leapp.System RequirementsVerify that your system fulfills the following minimum requirements. In general, having moreresources in the system improves a system's performance. Minimum of 2 logical CPUs up to 2048 logical CPUs 1.5 GB of memory per logical CPU, up to a maximum of 64 TB At least 10 GB of disk space (20 GB is the recommended minimum) On UEFI systems, ensure that the target disk uses GPT (GUID Partition Table), as someUEFI firmwares do not support UEFI/MBR bootRefer to the following additional resources for information related to installation issues andsystem requirements: https://linux.oracle.com/hardware-certifications The Release Notes of the Oracle Linux version you are installing at General Oracle Linuxdocumentation Unbreakable Enterprise Kernel documentationSystem ConfigurationThe configuration of the system itself also has an impact on the installation. Consider thefollowing:1-1
Chapter 1Obtaining Installation ImagesStorage Storage device and partition on which the operating system is installed. Theinstallation program displays a warning if disk space is insufficient. Storage space for each file system (/, /boot, /home, /var/tmp, and so on), the filesystem type, and whether the block device underlying each file system should beencrypted. Layout and configuration of the storage devices such as use of logical volumemanagement RAID configuration, encryption, and others. For iSCSI or FCoE connections, the WWID or the port, target, and LUN to beused.Network Required network setup using DHCP or static addresses, FQDN or host name,and so on. Other specialized network interfaces to be configured during installation, such asVLANs and network bonding.Software URLs of any additional repositories and proxy settings to be installed. Software packages to be installed based on system's intended purpose, such asa web server.Obtaining Installation ImagesTo install Oracle Linux, download the installation images from the following locations: Oracle Software Delivery Cloud at https://edelivery.oracle.com. Oracle Linux yum server at , however, that the Oracle Linux yum server does not provide equivalentrepositories for some channels that are available on Unbreakable Linux Network(ULN). These channels provide non-open source packages. For more informationabout ULN, see Oracle Linux: Managing Software on Oracle Linux.The following installation images are available for both the x86 64 platform and theaarch64 platform, unless indicated otherwise: Full ISO of Oracle Linux for typical installations on systems that are located locallyor remotely. Boot ISO of Oracle Linux for network installations or if the installation media lacksspace to store the full ISO. Boot ISO of the supported UEK release for installations in which you want to usethe Btrfs file system or for installing on hardware that is supported only on UEK.For instructions to install Oracle Linux with the Btrfs files system, see Installing aSystem With a Btrfs root File System. Source DVDs that contain the source code for the software packages in therelease.Aside from installation ISOs, you can also use Oracle Linux images to create computeinstances on Oracle Cloud Infrastructure (OCI). For information about these images,see the release notes for the specific image that you are using on the Oracle Cloud1-2
Chapter 1Preparing Installation MediaInfrastructure Documentation page at https://docs.oracle.com/iaas/images/. For informationabout using Oracle Linux instances, me.htm.For information about the available ISOs for the three most recent updates to the OracleLinux releases, refer to aring Installation MediaBefore you can use an ISO image to install Oracle Linux, you must first store it in a bootableinstallation media, such as the following: USB Flash Drive DVD or CD Network Drive Driver Update DiskUSB Flash DriveYou can install Oracle Linux by using a boot image on portable devices such as a USB flashdrive or an SD card, provided that the system's firmware supports booting from thosedevices.To create a bootable drive, use the dd command. Or, use a separate third-party utility to writethe ISO image to a drive. See, for example, Create USB Installation Media for Oracle LinuxWith Fedora Media Writer .Caution:This procedure destroys any existing data on the drive. Ensure that you specify thecorrect device name for the USB drive on your system.1.Insert a USB flash drive into an Oracle Linux system.2.Check the file systems that are on the drive.sudo df /media/usbFilesystem/dev/sdb13.1K-blocks35346Used Available Use% Mounted on353460 100% /media/USBUnmount the file system.sudo umount /dev/sdb14.Write the contents of the ISO image file to the USB device, for example:sudo dd if ./full image.iso of /dev/sdb bs 512kThe USB flash drive is now ready to be used to boot a system and start the installation.DVD or CDDue to storage limits, CDs or DVDs might no longer be sufficient to accommodate ISOimages. Or, they can store only the boot ISO image.1-3
Chapter 1Preparing Installation MediaTo write the downloaded ISO image file to a CD or DVD, use a command such ascdrecord, for example:sudo cdrecord -v -eject speed 16 dev ATA:0,2,0 file name.isoTo display the SCSI subsystem and device that corresponds to the CD or DVD writer,use the cdrecord -scanbus command.Network DriveFor the network drive, the image that you download can either be the full ISO image orjust the boot image, while the network server can be of any type, such as NFS or aweb server.To copy the ISO image to a network drive, first mount the image and then use thefollowing command syntax:sudo cp -a -T path-to-mounted-ISO-image network dirFor example, if you are using a web server to host the network drive, and havemounted the ISO image on the server’s /mnt location, you could run the followingcommand:sudo cp -a -T /mnt /var/www/html/OSimage/OL8When the command completes, you can boot the system from the network drive.Note:Using a network drive is part of network installation, which requires you tobuild a network configuration that provides network installation functionality.For details, see Creating a Network Installation Setup.Driver Update DiskA Driver Update Disk (DUD) provides a mechanism for delivering updated devicedrivers during system installation. On some systems, hardware might not be fullysupported for an Oracle Linux release. In these cases, a DUD may be released at alater date to facilitate installation on newer hardware.DUDs are released as modules and become available for previously unsupportedhardware. The DUD is usually in the form of an ISO and is available in the OracleSoftware Delivery Cloud or through MyOracle Support.Like the other ISOs, the DUD must be stored in an appropriate media or an alternativestorage device before it can be used to for installation.NOT SUPPORTED:Writing the DUD ISO to the wrong device may result in data loss. Check thatyou reference the correct device node when you copy the image. Use thelsblk utility to help you to identify the different disks block devices on yoursystem.1-4
Chapter 1Preparing Installation MediaTo use the driver update disk, issue the dd command line utility to transfer the DUD image toa separate storage device:sudo dd if /path/to/DUD.iso of /dev/sdX /path/to/DUD.iso refers to the full path to the location of the DUD ISO file. /dev/sdX refers to the device node of the storage media that you intend to use for theDUD.As an alternative, you can transfer the DUD image to a location that is accessible over thenetwork such as a web server or an NSF server.1-5
2Customizing Boot Loader ActionsBoot options determine how the installation proceeds. In addition to default settings, you canadd more options before you start the installation. Configuring the Boot Loader Installation Boot OptionsConfiguring the Boot LoaderBoot options are specified at the boot command line of the boot menu.1.Boot the system.2.When the boot menu is displayed, select any installation option, then press either E onUEFI-based systems or Tab on BIOS-based systems.The boot options line is displayed with some default options already defined.3.Add options at the end of the line.Separate multiple boot options with a space. Options that require parameters must be inthe option parameter format.For a list of common boot options, see Installation Boot Options.4.Save the changes by pressing either Ctrl X on UEFI-based systems or Return on BIOSbased systems.To discard your changes and return to the boot menu, press Esc.This example shows settings for the inst.repo and inst.ks options:inst.repo nfs:nfs.example.com:/ISOs/OL9/full image.iso \inst.ks nfs:nfs.example.com:/kickstart/OL9/server-ks.cfg ip dhcpWith these directives, the installation program is instructed to do the following: Use the full installation image stored on an NFS share directory. Start the installation automatically by using a file also stored on an NFS share directory.Installation Boot OptionsThis list contains some of the most commonly used boot options that further determine howthe installation proceeds. You specify these options at the installation menu before you initiatethe installation process.You can refer to these additional information sources for more boot options: t/boot-options.html The dracut.cmdline(7) manual page provides Dracut kernel command line options.2-1
Chapter 2Installation Boot OptionsInstallation Typeinst.graphicalSpecifies a graphical-based installation.inst.gptApplies only to BIOS-based systems with less than 2 TiB sized disk. Specifies to usethe GUID partition table when boot loader is installed instead of the default MBR.Installation Sourceinst.repo cdrom[:device]Specifies a CD or DVD drive as the location that contains everything needed to installthe software.The installation program searches all the system's CD or DVD drives, unless a deviceis specified.If access to a network is required and no network boot options are specified, theinstallation program enables DHCP on all available network devices.inst.repo ftp://user : password@FTP server/pathSpecifies an FTP server as the location that contains everything needed to install thesoftware.If access to a network is required and no network boot options are specified, theinstallation program enables DHCP on all available network devices.inst.repo hd:device:pathSpecifies a local disk as the location that contains everything needed to install thesoftware.You can specify the device by its device name (sdb2), label (LABEL label ), or UUID(UUID uuid ).inst.repo [http: https:]//HTTP server/pathSpecifies a web server as the location that contains everything needed to install thesoftware. If your system has access to the Internet, you can use the BaseOSrepository on the Oracle Linux yum server for the Oracle Linux release that you areinstalling. For example, you could set this value to /latest/x86 64inst.repo nfs:[options:]NFS server:pathSpecifies an NFS share as the location that contains everything needed to install thesoftware.Use options to specify a comma-separated list of NFS mount options.The NFS share can be the path to an ISO image or a directory.inst.stage2 [installation source]Specifies the location to fetch the installer runtime image; packages are ignored. Ifthis option is not specified, inst.repo is used instead. The path specified forinstallation source can match any of the protocol and path options used forinst.repo.The directory path specified for the installation source should contain avalid .treeinfo file that specifies the location of the runtime image. If a .treeinfo fileis not present at the source, the installer uses LiveOS/squashfs.img as the defaultlocation at the specified source.2-2
Chapter 2Installation Boot OptionsImportant:When specifying a runtime image in UEK network installations, use the UEK ISOfor the installation repository as well. Do not combine using the standard OracleLinux ISO image as the installation repository while specifying the Oracle LinuxUEK Boot ISO for the runtime image.Network Configurationip [interface:]dhcp dhcp6 auto6 ibftSpecifies a network automatic configuration method. If interface is not specified, allinterfaces are configured. Use ibft to use the MAC address of the interface specified by theiSCSI Boot Firmware Table (iBFT) in the system BIOS or firmware.ip es a static IP configuration for interface. Enclose IPv6 addresses in squarebrackets, for example [2509:f0d0:1001::0004].nameserver IPSpecifies the IP address of a DNS server to use during installation. Multiple nameserveroptions can be used.bootdev interfaceSpecifies the primary network interface. Required if you use more than one ip option.inst.dhcpclassSpecifies a vendor class identifier to DHCP.Kickstart Installationsinst.ks cdrom[:device]/pathSpecifies a kickstart file on a CD or DVD drive.inst.ks ftp://user : password@FTP server/pathSpecifies a kickstart file on an FTP server.inst.ks hd:device:pathSpecifies a kickstart file a local disk.You can specify the device by its device name (sdb2), label (LABEL label ) or UUID(UUID uuid ).inst.ks [http: https:]//HTTP server/pathSpecifies a kickstart file on a web server.inst.ks nfs:[options:]NFS server:pathSpecifies a kickstart file on an NFS share.Use options to specify a comma-separated list of NFS mount options.Remote Installationsinst.vncEnables remote graphical-based installation by starting a VNC server.2-3
Chapter 2Installation Boot OptionsA VNC client can connect by using a command such as vncviewer server:port ,where server is the IP address of the system being installed.After installation, the system starts in text mode even if a graphical desktopenvironment is selected as the base environment.inst.vncconnect client[:port]Specifies the VNC client and optional port that is listening for connections from a VNCserver (vncviewer -listen). The default port is 5900.inst.vncpassword passwordSpecifies the password for client connections using VNC.Miscellaneous Boot Optionsinst.keymap layoutSpecifies the keyboard layout for installation.inst.lang languageSpecifies the language for installation.inst.loglevel levelSpecifies the logging level for installation: critical, debug, error, info, or warning.The default level is info.2-4
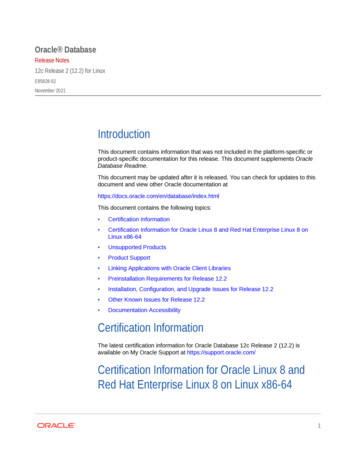
3Installing Oracle Linux ManuallyInstallation begins when you boot the system from the installation media. The installationmenu displays 3 options: Install Oracle Linux Test the media and then install Oracle Linux (default) TroubleshootingTwo modes are available to manually install Oracle Linux: Graphics mode where a graphical user interface guides you through the installationprocess. Selecting either the first or the second option in the menu starts the installationin graphic mode by default. Text mode which has limited options for installing the operating system.To use this mode, you must first configure the boot process further by following thesesteps:1.From the boot menu, press Tab to access the boot line options.2.At the end of this line, add inst.text.3.Continue booting.At the end of the boot process, the text-based installation menu is displayed.Installing in Graphics ModeThe graphics mode consists of installation directives in a series of graphical screens whereyou click representative icons and buttons to set the directives. Welcome Screen Installation Summary Localization Options Software Options System Options User SettingsWelcome ScreenThe Welcome Screen is the first screen to appear after the system completes the bootprocess.3-1
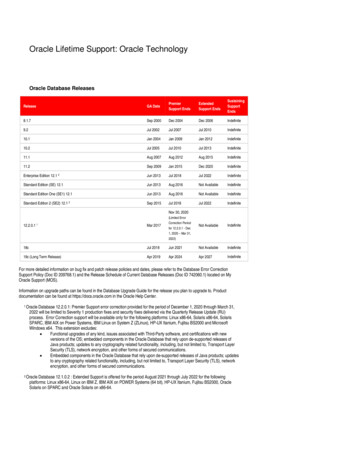
Chapter 3Installing in Graphics ModeFigure 3-1Welcome ScreenOn this screen, select the preferred language to be used during the installationprocess. You can further select a specific locale, if any, for your selected language.Then click Continue to proceed.Installation SummaryThe Installation Summary screen appears after you have selected the installationlanguage. It functions as the home or main screen.Figure 3-2Installation SummaryThe screen provides four categories of options: Localization, Software, System, andUser Settings. Clicking an option under any of these categories opens additionalscreens to configure the selected option.3-2
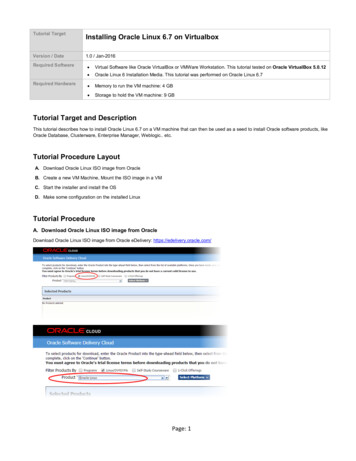
Chapter 3Installing in Graphics ModeThese options have default values. If you consider the values sufficient, you can skip openingthose options' screens. However, as a minimum, you must visit the options flagged with awarning icon.After defining directives in a specific screen, click Done to return to the Installation Summaryscreen. Then you can configure other options. As you visit each configuration screen, payattention to any warning messages that are displayed at the bottom of the screen.You can change the installation configuration options as much as you like. The installationdoes not begin until you click Begin Installation at the bottom of the screen. In turn, theBegin Installation button remains disabled until all the configuration warning flags havebeen cleared.Note:At the top right of the screen is the Keyboard switch. This switch appears in all ofthe option screens to enable you to change to a different available keyboard layoutat any time during configuration. See Keyboard Layout for more details aboutkeyboard layouts.Localization OptionsUnder Localization, you configure the keyboard layouts, languages that would be supported,and the date, time, and time zone of the system. After configuring any of these options, clickDone to return to the Installation Summary screen.Keyboard LayoutFigure 3-3Keyboard LayoutOn the left pane, you can add other keyboard layouts to the preselected default layout.Additionally, you can revise the order of the listed layouts. The layout at the top of the listbecomes the default layout.Language SupportConfiguring language support consists of specifying additional locales of the selectedlanguage that you want the system to support. This option is similar to the configuration of thekeyboard layout at the beginning of the installation.3-3
Chapter 3Installing in Graphics ModeFigure 3-4Language SupportFrom the list of languages on the left pane, select additional languages for the system.Then, on the right pane, select from the available locales for that language.Date and TimeThe Date & Time screen enables you to set the following options: Time zone for your system Actual time and the format for displaying time Current dateFigure 3-5Date & TimeTo select the system's time zone, click an area on the map that approximates the sitethat you want the system to be located. Alternatively, you can select from the Regionand City drop down lists to specify that location.3-4
Chapter 3Installing in Graphics ModeTo specify time, time format, and date, click the appropriate buttons at the bottom of thescreen.To enable NTP, toggle the Network Time switch at the upper right corner of the screen to ON.Click Settings to display a dialog box, where you can configure the NTP servers that thesystem would use. As an alternative, you can skip configuring NTP until later by using theChrony suite. See Oracle Linux 8: Setting Up Networking. See also Configure Chrony onOracle Linux.Software OptionsSoftware screens enable you to specify the installation source and the profile to be installed.After configuring any of these options, click Done to return to the Installation Summaryscreen.Figure 3-6Installation SourceInstallation source refers to the media that contains the ISO image. Auto detection is selectedby default. However, you can specify other sources such as repositories in the network.If you install from the network, then provide additional information such as the URL to therepository, and so on. If necessary, add repositories under Additional Repositories to obtainpackages from those sources. For example, to obtain packages from yum repositories, youwould specify the following URLs in the appropriate fields: /latest/architecture/ eam/latest/architecture/Figure 3-7Software SelectionSoftware selection refers to the profile to be used during the installation.3-5
Chapter 3Installing in Graphics ModeEach profile represents a set of functionalities and the required packages and softwareto fulfill those functionalities. By default, the Server with GUI profile is used. Choosethe profile that best fits the purpose of the system on which you are installing OracleLinux. From the right pane, you can add profiles to the base profile you selected on theleft pane.System OptionsThe set of options under System enables you to specify where the operation system isinstalled, configure Kdump, the network, and the security profile. After configuring anyof these options, click Done to return to the Installation Summary screen.Figure 3-8Installation Destination3-6
Chapter 3Installing in Graphics ModeEven if you accept the default settings, you must still open the Installation Destination screento clear the option's warning icon. Other disk configurations for the installation can becompleted in this screen, such as enabling disk encryption, configuring storage, creatingpartitions, adding disks, and so on.Figure 3-9KdumpIn the event of a system crash, Kdump captures information that assists in determining thecause. By default, Kdump is enabled and the amount of memory reserved for Kdump iscalculated automatically. Select the Manual option if you want to set the amount of reservedmemory yourself.Figure 3-10Network & Host NameNetwork connections are disabled during an Oracle Linux 8 installation. To enable thenetwork, select an interface from the list of interfaces on the left panel of the Network & HostName window, then toggle the switch at the upper right corner of the screen to ON.By default, network configuration uses DHCP for IPv4 addresses. IPv6 addresses areconfigured automatically. The default settings are generally sufficient for the system toprovide basic network functionality. However, you can customize the network configuration,3-7
Chapter 3Installing in Graphics Modefor example, by providing a custom host name, including a fully qualified domain name(FQDN). You can further opt to use static addresses instead of using DHCP, configureproxy settings, network bonds, and so on. To do these advanced types ofconfiguration, click Configure and go through additional configuration screens.Figure 3-11Security PolicyBecause security policy is not required on all systems, use the Security Policy screenonly if you need to enforce a specific security policy as defined by your organization orby government regulations.Available policies are listed in the profile window. These security policies follow therecommendations and guidelines that are defined by the Security Content AutomationProtocol (SCAP) standard. Select the security profile you want to enforce and ensurethat the Apply security policy is switched to On.If you prefer not apply any security policy, toggle the switch to Off.User SettingsThe User Settings section has the following options, with each option having its ownconfiguration window. Root Password: Create a root password and then confirm it. User CreationThis option enables you to configure a user's credentials to enable access to thesystem. You can optionally configure the user to have administrative privileges.–Create a user with the required information.3-8
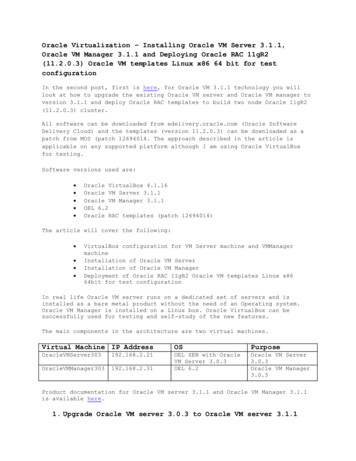
Chapter 3Installing in Text Mode–Optionally, grant the user administrator privileges.The privileges enable the user to issue administrator commands by using sudo.–To set additional user configurations, such as the user's home directory, clickAdvanced.You must configure at least one of the options. For example, if currently you want toenable only the root account, create its password. Then click Done to return to theInstallation Summary screen where you can proceed with the installation. You can addusers to the system later.Completing the InstallationFrom the Installation Summary screen, click Begin Installation. This button becomesavailable only when warning flags on option icons have been cleared.The installation takes a while. After it finishes, reboot the system as prompted. At thecompletion of the system reboot, the opening screen might prompt you to accept the licenseagreement as well as provide the option to create additional users. You must at least reviewand accept the license agreement to enable the Finish Configuration button. Then log in toyour system according to the credentials you previouly set in User Settings.If the prompt to review the license agreement is not displayed in the opening screen, you canoptionally review the license agreement in /usr/share/oraclelinux-release/EULA afterlogging in.For additional configurations you can set on the system, see Postinstallation Configuration.Installing in Text ModeThe Oracle Linux installation program can also run in text mode. Text mode is usedautomatically under certain circumstances, for example, if the system has insufficient memoryor the video card is not supported. You can manually switch to the text mode by specifyinginst.text as a boot option on the boot command line or by adding that option in a kickstartfile.Figure 3-12Text-Based Installation MenuThe numbered options on the menu are the equivalent of the screen options in graphic basedinstallations. Each option is preceded by a flag surrounded by brackets:3-9
Chapter 3Postinstallation Configuration [ ] - Option is not configured. [x] - Option is configured with the default setting.The setting is displayed between parentheses under the option. [!] - Option is configured but needs examination in case you want to specify yourown setting.To configure an option, type the option's number. The screen displays numberedvalue
For the network drive, the image that you download can either be the full ISO image or just the boot image, while the network server can be of any type, such as NFS or a web server. To copy the ISO image to a network drive, first mount the image and then use the following command syntax: sudo cp -a -T path-to-mounted-ISO-image network_dir