Transcription
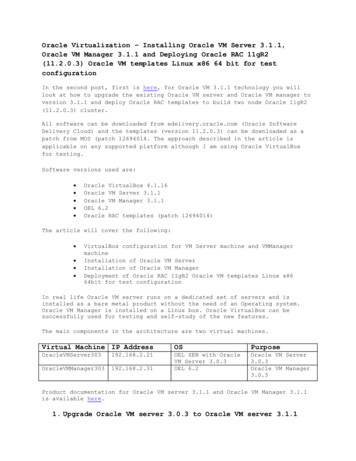
Oracle Virtualization – Installing Oracle VM Server 3.1.1,Oracle VM Manager 3.1.1 and Deploying Oracle RAC 11gR2(11.2.0.3) Oracle VM templates Linux x86 64 bit for testconfigurationIn the second post, first is here, for Oracle VM 3.1.1 technology you willlook at how to upgrade the existing Oracle VM server and Oracle VM manager toversion 3.1.1 and deploy Oracle RAC templates to build two node Oracle 11gR2(11.2.0.3) cluster.All software can be downloaded from edelivery.oracle.com (Oracle SoftwareDelivery Cloud) and the templates (version 11.2.0.3) can be downloaded as apatch from MOS (patch 12694014. The approach described in the article isapplicable on any supported platform although I am using Oracle VirtualBoxfor testing.Software versions used are: Oracle VirtualBox 4.1.16Oracle VM Server 3.1.1Oracle VM Manager 3.1.1OEL 6.2Oracle RAC templates (patch 12694014)The article will cover the following: VirtualBox configuration for VM Server machine and VMManagermachineInstallation of Oracle VM ServerInstallation of Oracle VM ManagerDeployment of Oracle RAC 11gR2 Oracle VM templates Linux x8664bit for test configurationIn real life Oracle VM server runs on a dedicated set of servers and isinstalled as a bare metal product without the need of an Operating system.Oracle VM Manager is installed on a Linux box. Oracle VirtualBox can besuccessfully used for testing and self-study of the new features.The main components in the architecture are two virtual machines.Virtual Machine IP eVMManager303192.168.2.31OEL XEN with OracleVM Server 3.0.3OEL 6.2Oracle VM Server3.0.3Oracle VM Manager3.0.3Product documentation for Oracle VM server 3.1.1 and Oracle VM Manager 3.1.1is available here.1. Upgrade Oracle VM server 3.0.3 to Oracle VM server 3.1.1
Make the VMserver311 ISO available to the virtual machineOracleVMserver303 and start the VM. Once the boot screen appears pressEnter.Press Skip.
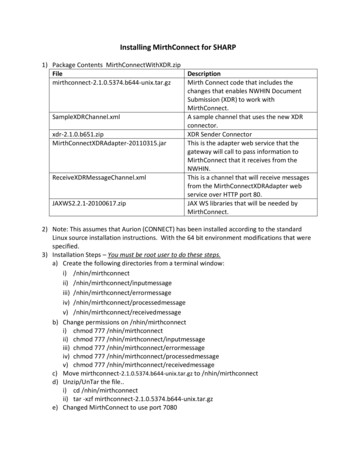
Select keyboard.
Accept the license agreement.Select an UPGRADE option and the Oracle VM server 3.0.3 to upgrade.
Upgrade the boot loader.
Take a note of the log file location and press OK.Wait for the upgrade to continue.
Reboot.
Press the highlighted selection.Wait for the boot to complete.
Press Alt-F2 to login
Login2. Upgrade Oracle VM Manager 3.0.3 to Oracle VM Manager 3.1.1Transfer to OracleVMManager303 virtual machine OracleVMManager311.isoimage a loop mount it.[root@vmmgr u01]# lsapp OracleVMManager311.iso r.txt stage t.txt VMManager303.iso[root@vmmgr u01]# mount -o loop OracleVMManager311.iso /mnt/stage[root@vmmgr u01]#From the stage directory invoke the upgrade script.[root@vmmgr stage]# ./runUpgrader.shStating OVM Manager upgrade on Sun May 20 16:28:43 EEST 2012Oracle VM Manager 3.1.1.305 upgrade utilityUpgrade logfile : /tmp/upgrade-2012-05-20-28.log
It is highly recommended to do a full database repository backup prior toupgrading Oracle VM Manager .Press any key to continue .Oracle VM Manager is running .Verifying installation status .Read Oracle VM Manager config file .Found Oracle VM Manager install files .Found Oracle VM Manager upgrader .Found Oracle WebLogic Server .Found Java .Using the following information :Database Host: localhostDatabase SID: XEDatabase LSNR: 1521Oracle VM Schema: ovsOracle VM Manager UUID : 0004fb0000010000f8a01f5a1718ffd9Current Build ID: 3.0.3.126Upgrade from version: 3.0.3Upgrade to version: 3.1.1Using /tmp/workdir.0zgO6hQ9um for backup and export location.Using /tmp/patchdir.Glh0EQQcD for patching.Enter password for user ovs :Undeploying previous version of Oracle VM Manager application .Undeploying Oracle VM Manager help .Undeploying Oracle VM Manager console .Undeploying Oracle VM Manager core .Waiting for Oracle VM Manager core to fully undeploy.Waiting.Finished undeploying previous version .Exporting Oracle VM Manager repository .Please wait as this can take a long time .Oracle VM Manager repository export completed .Creating backup file .Oracle VM Manager repository backup in /tmp/ovm-manager-3-backup-2012-05-20.zipUpgrading Oracle VM Manager .Backing up old files to ng old files .Unpacking Oracle VM Manager 3.1.1.305 transform 003001001000 010.xsl' - /tmp/patchdir.Glh0EQQcD/transform 003001001000 010.xsl' transform 003001001000 020.xsl' - /tmp/patchdir.Glh0EQQcD/transform 003001001000 020.xsl' deletedClasses.xml' - ng full repository export to the selective export subset at/tmp/workdir sel.XRjFLORxBo .cp: omitting directory /tmp/workdir.0zgO6hQ9um/jrnl'cp: omitting directory /tmp/workdir.0zgO6hQ9um/objs'adding: objs/63/639.cl.xml (deflated 81%)adding: objs/9.cl.xml (deflated 93%)adding: objs/16/161.cl.xml (deflated 67%)adding: objs/19/193.cl.xml (deflated 70%)Selective export is at /tmp/workdir sel.XRjFLORxBo4 objects selected (out of 508) to be upgradedTransform XSL files used:-rw-r--r--. 1 root root 56678 May 20 16:30/tmp/patchdir.Glh0EQQcD/transform 003001001000 010.xsl-rw-r--r--. 1 root root 10079 May 20 16:30/tmp/patchdir.Glh0EQQcD/transform 003001001000 020.xsl
Changed classes encountered in selective export ading Oracle VM Manager repository .Please wait as this can take a long time .Oracle VM Manager repository upgrade completed .Validating Oracle VM Manager repository .Oracle VM Manager repository validation completed .Refresh system-jazn-data.xml file .Redeploying Oracle VM Manager core container .Redeploying Oracle VM Manager console .Redeploying Oracle VM Manager help .Install ADF Patch .Completed upgrade to 3.1.1.305 .Writing updated config in /u01/app/oracle/ovm-manager-3/.configRestart WebLogic .Stopping Oracle VM Manager[ OK ]Starting Oracle VM Managernohup: ignoring input and redirecting stderr to stdout[ OK ]OVM Manager upgrade finished on Sun May 20 16:35:47 EEST 2012[root@vmmgr stage]#Let’s test Oracle VM Manager 3.1.1
After login you have.Starting and Stopping the OVM from OEL.[root@vmmgr ]# service ovmm stopStopping Oracle VM Manager[ OK ][root@vmmgr ]#[root@vmmgr ]# service ovmm startStarting Oracle VM Managernohup: ignoring input and redirecting stderr to stdout[ OK ][root@vmmgr ]#3. Deploy two node Oracle 11gR2 (11.2.0.3) RAC3.1 Add a file system /nfs that is to NFS mounted.Add 50GB disk to the OracleVMManager303 virtual machine. This diskis visible as /dev/sdb.Create a volume, file system and mount the file system on thisdisk.[root@vmmgr ]# fdisk -l /dev/sdb
Disk /dev/sdb: 53.7 GB, 53687091200 bytes255 heads, 63 sectors/track, 6527 cylindersUnits cylinders of 16065 * 512 8225280 bytesSector size (logical/physical): 512 bytes / 512 bytesI/O size (minimum/optimal): 512 bytes / 512 bytesDisk identifier: 0x00000000Disk /dev/sdb doesn't contain a valid partition table[root@vmmgr ]#[root@vmmgr ]# pvcreate /dev/sdbWriting physical volume data to disk "/dev/sdb"Physical volume "/dev/sdb" successfully created[root@vmmgr ]#[root@vmmgr ]# fdisk /dev/sdbDevice contains neither a valid DOS partition table, nor Sun, SGI or OSF disklabelBuilding a new DOS disklabel with disk identifier 0xb618dbd7.Changes will remain in memory only, until you decide to write them.After that, of course, the previous content won't be recoverable.Warning: invalid flag 0x0000 of partition table 4 will be corrected by w(rite)WARNING: DOS-compatible mode is deprecated. It's strongly recommended toswitch off the mode (command 'c') and change display units tosectors (command 'u').Command (m for help): cDOS Compatibility flag is not setCommand (m for help): uChanging display/entry units to sectorsCommand (m for help): nCommand actioneextendedpprimary partition (1-4)pPartition number (1-4): 1First sector (2048-104857599, default 2048):Using default value 2048Last sector, sectors or size{K,M,G} (2048 -104857599, default 104857599): 50GValue out of range.Last sector, sectors or size{K,M,G} (2048 -104857599, default 104857599): 49GCommand (m for help): tSelected partition 1Hex code (type L to list codes): 8eChanged system type of partition 1 to 8e (Linux LVM)Command (m for help): wThe partition table has been altered!Calling ioctl() to re-read partition table.Syncing disks.[root@vmmgr ]#[root@vmmgr ]# fdisk -l /dev/sdbDisk /dev/sdb: 53.7 GB, 53687091200 bytes171 heads, 46 sectors/track, 13330 cylindersUnits cylinders of 7866 * 512 4027392 bytes
Sector size (logical/physical): 512 bytes / 512 bytesI/O size (minimum/optimal): 512 bytes / 512 bytesDisk identifier: 0xb618dbd7Device Boot/dev/sdb1[root@vmmgr ]#Start1End13065Blocks51380224Id8eSystemLinux LVM[root@vmmgr ]# pvcreate /dev/sdb1Writing physical volume data to disk "/dev/sdb1"Physical volume "/dev/sdb1" successfully created[root@vmmgr ]#vgcreate NFSVolGroup /dev/sdb1[root@vmmgr ]# vgcreate NFSVolGroup /dev/sdb1Volume group "NFSVolGroup" successfully created[root@vmmgr ]#[root@vmmgr ]# vgdisplay NFSVolGroup--- Volume group --VG NameNFSVolGroupSystem IDFormatlvm2Metadata Areas1Metadata Sequence No 1VG Accessread/writeVG StatusresizableMAX LV0Cur LV0Open LV0Max PV0Cur PV1Act PV1VG Size49.00 GiBPE Size4.00 MiBTotal PE12543Alloc PE / Size0 / 0Free PE / Size12543 / 49.00 GiBVG mgr ]#lvcreate --size 48G NFSVolGroup[root@vmmgr ]# lvcreate --size 48G NFSVolGroupLogical volume "lvol0" created[root@vmmgr ]#[root@vmmgr ]# lvdisplay--- Logical volume --LV Name/dev/NFSVolGroup/lvol0VG NameNFSVolGroupLV UUID0M6eKi-2uiG-Chjl-rk6E-8BUc-WngI-SvvZplLV Write Accessread/writeLV Statusavailable# open0LV Size48.00 GiBCurrent LE12288Segments1AllocationinheritRead ahead sectorsauto
- currently set toBlock device256253:3--- Logical volume --LV Name/dev/vg vmmgr/lv rootVG Namevg vmmgrLV UUIDkpXFYY-eAPW-zCXW-wHnN-QuKw-kFxh-vjeaRXLV Write Accessread/writeLV Statusavailable# open1LV Size28.37 GiBCurrent LE7263Segments1AllocationinheritRead ahead sectorsauto- currently set to256Block device253:0--- Logical volume --LV Name/dev/vg vmmgr/lv homeVG Namevg vmmgrLV UUIDgaY4wY-aN48-SemS-iUps-L8CX-w27t-OQqPdFLV Write Accessread/writeLV Statusavailable# open1LV Size25.26 GiBCurrent LE6467Segments1AllocationinheritRead ahead sectorsauto- currently set to256Block device253:2--- Logical volume --LV Name/dev/vg vmmgr/lv swapVG Namevg vmmgrLV UUIDf3L33X-DIly-6iO3-hGgu-DrWM-0g1O-mACi0eLV Write Accessread/writeLV Statusavailable# open1LV Size5.88 GiBCurrent LE1504Segments1AllocationinheritRead ahead sectorsauto- currently set to256Block device253:1[root@vmmgr ]#/dev/NFSVolGroup/lvol0[root@vmmgr ]# mkfs.ext3 /dev/NFSVolGroup/lvol0mke2fs 1.41.12 (17-May-2010)Filesystem label OS type: LinuxBlock size 4096 (log 2)Fragment size 4096 (log 2)Stride 0 blocks, Stripe width 0 blocks3145728 inodes, 12582912 blocks629145 blocks (5.00%) reserved for the super userFirst data block 0
Maximum filesystem blocks 4294967296384 block groups32768 blocks per group, 32768 fragments per group8192 inodes per groupSuperblock backups stored on blocks:32768, 98304, 163840, 229376, 294912, 819200, 884736, 1605632, 2654208,4096000, 7962624, 11239424Writing inode tables: doneCreating journal (32768 blocks): doneWriting superblocks and filesystem accounting information:doneThis filesystem will be automatically checked every 21 mounts or180 days, whichever comes first. Use tune2fs -c or -i to override.[root@vmmgr ]#[root@vmmgr ]## See man pages fstab(5), findfs(8), mount(8) and/or blkid(8) for more info#/dev/mapper/vg vmmgr-lv root /ext4defaults1 1UUID 19fcf4b8-c245-4f71-bd73-5bf56c6dada5 /bootext4defaults1 2/dev/mapper/vg vmmgr-lv home /homeext4defaults1 2/dev/mapper/NFSVolGroup-lvol0 /nfsext4defaults1 2/dev/mapper/vg vmmgr-lv swap swapswapdefaults0 0tmpfs/dev/shmtmpfsdefaults0 0devpts/dev/ptsdevpts gid 5,mode 620 0 0sysfs/syssysfsdefaults0 0proc/procprocdefaults0 0[root@vmmgr mapper]#3.2 Create NFSModify /etc/exports as follows.[root@vmmgr ]# cat /etc/exportcat: /etc/export: No such file or directory[root@vmmgr ]# cat /etc/exports/nfs/stage*(rw,sync,no wdelay,insecure locks,no root squash)/nfs/stage1*(rw,sync,no wdelay,insecure locks,no root squash)[root@vmmgr ]#Create /nfs/stage and /nfs/stage1Enable and start nfs service[root@vmmgr stage]# chkconfig nfs on[root@vmmgr stage]# service nfs restartShutting down NFS mountd:Shutting down NFS daemon:Shutting down NFS quotas:Starting NFS services:Starting NFS quotas:Starting NFS daemon:Starting NFS mountd:[FAILED][FAILED][FAILED][ OK ][ OK ][ OK ][ OK ]
Starting and Stopping the OVM[root@vmmgr ]# service ovmm stopStopping Oracle VM Manager[ OK ][root@vmmgr ]#[root@vmmgr ]# service ovmm startStarting Oracle VM Managernohup: ignoring input and redirecting stderr to stdout[ OK ][root@vmmgr ]#3.3 Discover a VM server from the Oracle VM Manager 3.1.1Click discover servers in the tool bar.Wait until the server get discovered.
3.4 Create a networkClick the Networking tab, then the Networks subtab. Click CreateNew Network to start.
Select ‘Create a network with bonds/ports only. Press Next.
Specify Name.Select servers.Select ports. Make sure ONLY eth0 is selected. Picture is forillustration and should have only eth0.
Configure IP addresses. Select None and press Finish.After the network is created it will be displayed.
3.5 Create a file serverOn the storage tab select discover file servers and press Next oncefilled in the data.
Select server.Select the nfs from /etc/exports. Here should show one of it andpress Finish. (Instead of nfs:/u01/VM/nfs should be nfs:/nfs/stageor nfs:/nfs/stage1) /nfs/stage is for the file system and/nfs/stage1 is for the repository.
You will get some
Oracle VirtualBox 4.1.16 Oracle VM Server 3.1.1 Oracle VM Manager 3.1.1 OEL 6.2 Oracle RAC templates (patch 12694014) The article will cover the following: VirtualBox configuration for VM Server machine and VMManager machine Installation of Oracle VM Server Installation of Oracle VM Manager Deployment of Oracle RAC 11gR2 Oracle VM templates .