Transcription
CH A P T E R5Using the Network NavigatorRevised: December 14, 2011, OL-21064-07IntroductionTo manage a network entity—Service Control Engine (SCE) platform, Subscriber Manager (SM), orCollection Manager (CM)—from the Console, you must first define it as a device in the NetworkNavigator.This chapter describes how to use the Network Navigator tool to create a model of all local and remotesites and devices that are part of the Cisco Service Control solution, how to manage the devices remotely,and other functionality that is part of the Network Navigator tool.The Usage Analysis wizard, which can be used to create a simple model of devices and connect to them,is also described in this chapter. The Network Navigator Tool, page 5-2 Managing Sites, page 5-3 Managing Devices, page 5-7 Working with Network Navigator Configuration Files, page 5-31 Network Settings Requirements, page 5-35Cisco Service Control Application for Broadband User GuideOL-21064-075-1
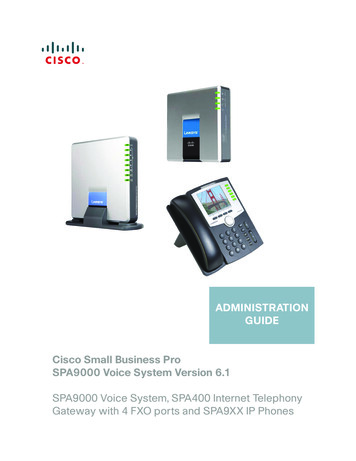
Chapter 5 Using the Network NavigatorThe Network Navigator ToolThe Network Navigator ToolThe Network Navigator tool (Figure 5-1) contains four views: Network Navigator view—Displays all sites and devices that you have defined as part of yoursystem, in the Site Manager tree. Properties view—Displays the editable properties of the node selected in the Site Manager tree inthe Network Navigator view. Progress view—Displays a progress bar when you perform an operation on a site or device in theSite Manager tree. Console view—Displays log messages concerning actions performed in the Network Navigator tool.Figure 5-1The Network Navigator ToolCisco Service Control Application for Broadband User Guide5-2OL-21064-07
Chapter 5 Using the Network NavigatorManaging SitesManaging SitesYou can manage an SCE, SM, or CM from the Console only if the network entity is defined as a devicein the Network Navigator. After a device is added to the Network Navigator, you can performmanagement and monitoring operations on the device.You can also perform operations on a group of devices. For example, you can apply the same serviceconfiguration to a group of SCE platforms. The Network Navigator allows you to group devices byadding them under the same site. A site is a group of devices that can be managed together. Atinstallation, the Network Navigator contains a default site with no devices. You can add devices to thissite or add additional sites, as described in the following sections.Grouping devices in sites can also help to manage the passwords for these devices (see PasswordManagement, page 5-7). How to Add a Site to the Site Manager, page 5-3 How to Add Devices to a Site, page 5-3 How to Delete Sites, page 5-6How to Add a Site to the Site ManagerBefore adding devices, you must add your sites to the Site Manager.Step 1In the Network Navigator view, right-click the Site Manager node.A popup menu appears (Figure 5-2).Figure 5-2Step 2Site Manager MenuFrom the menu, select New Site.A new Site node is added to the Site Manager.Step 3In the Properties view, enter a name for the site in the Name cell.Step 4(Option) In the Version cell, enter a version number.How to Add Devices to a SiteYou can add SCE, SM, CM, or database devices to a site. How to Add SCE Devices to a Site, page 5-4 How to Add SM Devices to a Site, page 5-4 How to Add CM Devices to a Site, page 5-5 How to Add Database Devices to a Site, page 5-5 How to Delete Devices, page 5-6Cisco Service Control Application for Broadband User GuideOL-21064-075-3
Chapter 5 Using the Network NavigatorHow to Add Devices to a SiteHow to Add SCE Devices to a SiteTo use the Network Navigator to configure, monitor, and update the software of an SCE platform, youmust first add the SCE platform to a site.Step 1In the Site Manager tree, right-click a site.A popup menu appears (Figure 5-3).Figure 5-3Step 2Site Manager Tree MenuFrom the menu, select New SCE.The Create New SCE wizard appears.Step 3In the Address field, enter the IP address of the SCE.Step 4(Option) In the Name field, enter a meaningful name for the SCE.Step 5Click Finish.The Create New SCE wizard closes.The new device is added to the site.How to Add SM Devices to a SiteTo use the Network Navigator to configure, monitor, and update the software of an SM, you must firstadd the SM to a site.Step 1In the Site Manager tree, right-click a site.A popup menu appears.Step 2From the menu, select New SM.The Create New SM wizard appears.Step 3In the Address field, enter the IP address of the SCMS-SM.Step 4(Option) In the Name field, enter a meaningful name for the SM.Step 5Click Finish.The Create New SM wizard closes.Cisco Service Control Application for Broadband User Guide5-4OL-21064-07
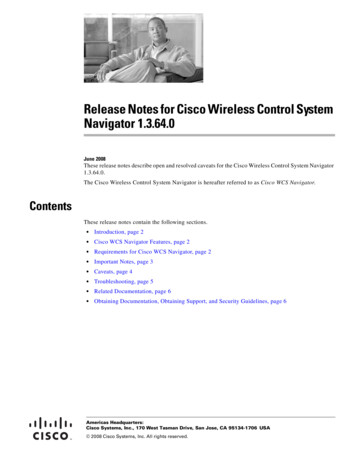
Chapter 5 Using the Network NavigatorHow to Add Devices to a SiteThe new device is added to the site.How to Add CM Devices to a SiteTo use the Network Navigator to monitor a CM, you must first add the CM to a site.Step 1In the Site Manager tree, right-click a site.A popup menu appears.Step 2From the menu, select New CM.The Create New CM wizard appears.Step 3In the Address field, enter the IP address of the CM.Step 4(Option) In the Name field, enter a meaningful name for the CM.Step 5Click Finish.The Create New CM wizard closes.The new device is added to the site.How to Add Database Devices to a SiteTo use the Reporter tool to produce reports, you must first connect to a database.Step 1In the Site Manager tree, right-click a site.A popup menu appears.Step 2From the menu, select New Database.The Create New Database wizard appears (Figure 5-4).Cisco Service Control Application for Broadband User GuideOL-21064-075-5
Chapter 5 Using the Network NavigatorHow to Delete SitesFigure 5-4Create New DatabaseStep 3In the Address field, enter the IP address of the database.Step 4(Option) In the Name field, enter a meaningful name for the database.Step 5From the Database type drop-down list, select a database type.Step 6(Option) Check the Enable Advanced Settings check box and enter new values in the Url, Driver, User,and Password fields.Step 7Click Finish.The Create New Database wizard closes.The new device is added to the site.How to Delete DevicesStep 1In the Site Manager tree, right-click a device.A popup menu appears.Step 2From the menu, select Delete.The device is deleted and removed from the Site Manager tree.How to Delete SitesStep 1In the Site Manager tree, right-click a site in the Site Manager tree.Cisco Service Control Application for Broadband User Guide5-6OL-21064-07
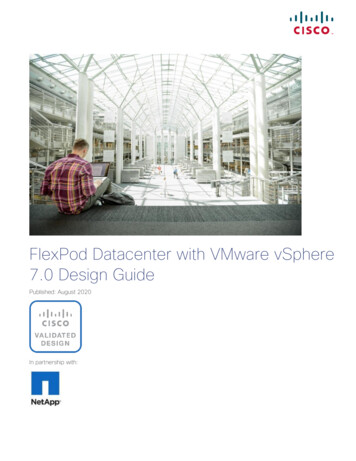
Chapter 5 Using the Network NavigatorManaging DevicesA popup menu appears. Step 2Enter your password if prompted.From the menu, select Delete.The site and all its devices are deleted and the site is removed from the Site Manager tree.Managing DevicesThe Network Navigator allows you to manage SCE, SM, CM, and database devices.NoteThe Usage Analysis wizard allows you to create a simple model of devices and connect to them. (SeeHow to Use the Usage Analysis Wizard, page 4-34.) Password Management, page 5-7 Managing SCE Devices, page 5-8 Managing SM Devices, page 5-25 Managing CM Devices, page 5-27 Managing Database Devices, page 5-28Password ManagementNormally, before you can access a device (SCE, SM, CM, or database), you must enter its password.When you try to perform any operation on a site device, the Network Navigator first asks for the deviceusername and password. (Repeating the same operation on the same device does not always require asecond entry of the password.)When performing operations on multiple devices, password entry can become tedious. The Site MasterPassword can help you remember some or all of your element’s usernames and passwords by storingthem as part of the site’s data, and entering them for you automatically when you connect to an element.The Site Master Password protects saved usernames and passwords in the password manager. ThePassword Management dialog box (Figure 5-5) prompts you for the site’s master password when youwish to activate the site password manager. If you have multiple sites, each site requires a separate masterpassword.Cisco Service Control Application for Broadband User GuideOL-21064-075-7
Chapter 5 Using the Network NavigatorManaging SCE DevicesFigure 5-5The Password Management Dialog BoxFor each site, when the Password Management dialog box appears, check the Enable Site MasterPassword check box.Managing SCE Devices How to Configure SCE and CM Devices Using a Wizard, page 5-8 How to Generate Tech Support Info Files for SCE Devices, page 5-16 How to Retrieve the Online Status of SCE Devices, page 5-18 How to Install a Protocol Pack, page 5-19 How to Apply Service Configurations to SCE Devices, page 5-20 How to Retrieve Service Configurations from SCE Devices, page 5-22 How to Install PQI Files on SCE Devices, page 5-23 How to Install an SCE OS Software Package on SCE Devices, page 5-24How to Configure SCE and CM Devices Using a WizardThe Network Navigator Device wizard allows you to configure SCA and CM devices and connect tothem.NoteStep 1If they do not already exist, devices defined in the wizard are added to the default site in the Site Managertree.In the Network Navigator view toolbar, click(Configure SCE and CM devices).Cisco Service Control Application for Broadband User Guide5-8OL-21064-07
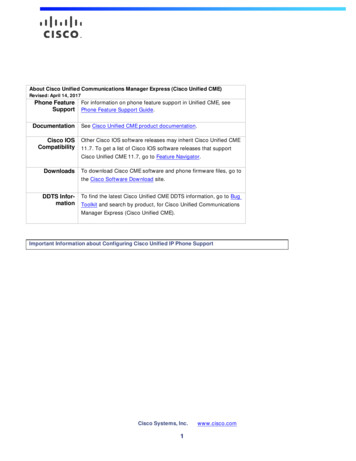
Chapter 5 Using the Network NavigatorManaging SCE DevicesThe Welcome window of the Network Navigator Device wizard appears (Figure 5-6).Figure 5-6Step 2Welcome - Network Navigator DeviceClick Next.The SCE IP Addresses page of the Network Navigator Device wizard opens (Figure 5-7).Cisco Service Control Application for Broadband User GuideOL-21064-075-9
Chapter 5 Using the Network NavigatorManaging SCE DevicesFigure 5-7Step 3SCE IP AddressesIn the edit box, enter the IP addresses of the SCE devices that should be added to the model.If you started from the Network Navigator, the IP addresses of the SCE devices that you selected aredisplayed in the edit box. You can add additional addresses.NoteStep 4You can work with up to 20 SCE devices at one time using the wizard.Click Next.The SCE Usernames and Passwords page of the Network Navigator Device wizard opens (Figure 5-8).Cisco Service Control Application for Broadband User Guide5-10OL-21064-07
Chapter 5 Using the Network NavigatorManaging SCE DevicesFigure 5-8Step 5SCE Usernames and PasswordsEnter the usernames and passwords for the SCE devices.Do one of the following:Step 6 To use the same username and password for all the SCE devices that you are adding, enter theusername in the Username field and the password in the Password field. To provide a different username and password pair for each SCE device, check the Use separateusernames and passwords for each SCE device radio button, and, for each SCE device, enter theusername and password in the appropriate cell of the SCE device table.Click Next.The Setting CM devices page of the Network Navigator Device wizard opens (Figure 5-9).Cisco Service Control Application for Broadband User GuideOL-21064-075-11
Chapter 5 Using the Network NavigatorManaging SCE DevicesFigure 5-9Step 7CM SetupDefine the SCSM Collection Manager (CM) to use with this configuration.Do one of the following: Enter the IP address, username, and password of the CM device in the appropriate fields.If you started from the Network Navigator, this information is retrieved and displayed. You canmodify these parameters. Step 8Check the Skip this step check box.Click Next.The Connectivity Test page of the Network Navigator Device wizard opens (Figure 5-10).Cisco Service Control Application for Broadband User Guide5-12OL-21064-07
Chapter 5 Using the Network NavigatorManaging SCE DevicesFigure 5-10Connectivity TestThe wizard tests to see that the connections to the defined devices can be made.NoteStep 9If a connection to one or more of the devices cannot be made or if there is some problem with theconnection (such as invalid version of the device) an error is displayed next to the device. You can skipthese tests by clicking Skip Connections. The connections are validated when you click Finish at theend of the wizard.Click Next.The Confirmation page of the Network Navigator Device wizard opens (Figure 5-11).Cisco Service Control Application for Broadband User GuideOL-21064-075-13
Chapter 5 Using the Network NavigatorManaging SCE DevicesFigure 5-11ConfirmationThe actions that the wizard is about to take are listed on the page.Step 10Click Finish.The Configuration Output page of the Network Navigator Device wizard opens (Figure 5-12).Cisco Service Control Application for Broadband User Guide5-14OL-21064-07
Chapter 5 Using the Network NavigatorManaging SCE DevicesFigure 5-12Configuration OutputNew devices are added to the default site in the Site Manager tree in the Network Navigator(Figure 5-13).Figure 5-13Network NavigatorThe wizard attempts to connect to all devices that you defined. The operation fails if: The wizard cannot connect to any of the SCE devices that you listed in Step 3. You defined a CM in Step 7, but the wizard cannot connect to it.If you defined a CM in Step 7, the SCE devices are configured so that the only category 1 RDRdestination is the CM.NoteRDR categories are the mechanism by which different types of RDRs can be sent to different collectors.For more information about RDR categories, see either the “Raw Data Formatting: The RDR Formatterand NetFlow Exporting” chapter of Cisco SCE8000 10GBE Software Configuration Guide or the “RawData Formatting: The RDR Formatter and NetFlow Exporting” chapter of Cisco SCE8000 GBE SoftwareConfiguration Guide.Cisco Service Control Application for Broadband User GuideOL-21064-075-15
Chapter 5 Using the Network NavigatorManaging SCE DevicesA new service configuration is created:Step 11 Report Only mode. The maximum Transaction RDR rate is set as the default value (250) divided by the number of SCEdevices. (To configure the Transaction RDR, see How to Manage Transaction RDRs, page 8-5; thecontent and structure of the Transaction RDR is listed in the “Transaction RDR” section in the “RawData Records: Formats and Field Contents” chapter of Cisco Service Control Application forBroadband Reference Guide.)Click Finish.The Network Navigator Device wizard closes.How to Generate Tech Support Info Files for SCE DevicesThis operation generates the SCE platform’s support file, for the use of Cisco technical support staff.Step 1In the Site Manager tree, right-click an SCE device.A popup menu appears (Figure 5-14).Figure 5-14Step 2Site Manager Tree MenuFrom the menu, select Generate Tech Support Info File.The Generate Tech Support Info File dialog box appears (Figure 5-15).Cisco Service Control Application for Broadband User Guide5-16OL-21064-07
Chapter 5 Using the Network NavigatorManaging SCE DevicesFigure 5-15Step 3Generate Tech Support Info FileClick Browse.A Select File dialog box appears.Step 4Browse to the folder where you want to save the tech support info file.Step 5In the File name field, enter a new file name, or select an existing ZIP file.Step 6Click Open to select the file.If the file exists, it is overwritten when you generate the tech support info.The Select File dialog box closes.Step 7(Optional) To add log files to the output tech support info file, check the Add GUI Console log filescheck box.Step 8(Optional) Check the Open file after it is fetched check box.Step 9Click Finish.The Generate Tech Support Info File dialog box closes.A Password Management dialog box appears.Step 10Enter the appropriate password. (For more information, see Password Management, page 5-7.)Step 11Click Generate.The Password Management dialog box closes.A Generate tech support info file progress bar appears.The file is generated.Cisco Service Control Application for Broadband User GuideOL-21064-075-17
Chapter 5 Using the Network NavigatorManaging SCE DevicesHow to Retrieve the Online Status of SCE DevicesThis operation provides information about the current software version and operational status of the SCEplatform. The enhanced SCE online statuses are categorized as: System—displays the platform information Configuration—displays the Hostname Status—displays the operational mode and total traffic on the SCEFor more information on monitoring SCE online status, see Cisco SCA BB Demo Kit Quick Start Guide.Step 1In the Site Manager tree, right-click an SCE device.A popup menu appears.Step 2From the menu, select Online Status.A Password Management dialog box appears.Step 3Enter the appropriate password. (For more information, see Password Management, page 5-7.)Step 4Enter the SNMP RO Community String.If SNMP is not already enabled on the SCE, it gets enabled.If RO communities are not configured on the SCE or if only RW communities are configured on theSCE, the SNMP RO community you provide here is added to the SCE.If only RO communities are configured on the SCE, the SNMP RO community you provide here isvalidated first against the RO communities configured on SCE. If the RO community is valid, theonline status window is launched. If the RO community is not valid, a validation message appears.Step 5Click Extract.The Password Management dialog box closes.An Extracting info progress bar appears.The SCE online status is retrieved (Figure 5-16).Figure 5-16SCE Online StatusCisco Service Control Application for Broadband User Guide5-18OL-21064-07
Chapter 5 Using the Network NavigatorManaging SCE DevicesHow to Install a Protocol PackYou can install a protocol pack on a single SCE platform, on selected SCE platforms, or on all SCEplatforms at one or more selected sites. For more information about protocol packs, see Working withProtocol Packs, page 4-19.NoteCisco recommends the use of SCE Software Upgrade wizard when installing a protocol pack on multipleSCE platforms. How to Install a Protocol Pack on a Single SCE Platform, page 5-19 How to Install a Protocol Pack on Multiple SCE Platforms, page 5-20How to Install a Protocol Pack on a Single SCE PlatformStep 1In the Site Manager tree, right-click the SCE where the protocol pack is to be installed.Step 2From the popup menu that appears, select Update Dynamic Signature Pack.The Update Dynamic Signature Pack dialog box appears (Figure 5-17).Figure 5-17Step 3Update Dynamic Signature PackClick Browse.A Select file dialog box appears.Step 4From the Files of type drop-down list, select *.spqi or *.dss, depending on the file to be installed.Step 5Browse to the file to be installed.Step 6Click Open.The Select file dialog box closes.Step 7(Recommended) Check the Backup the current configuration check box, click Browse, and select abackup file.Cisco Service Control Application for Broadband User GuideOL-21064-075-19
Chapter 5 Using the Network NavigatorManaging SCE DevicesStep 8Click Finish.A Password Management dialog box appears.Step 9Enter the appropriate password.For more information, see Password Management, page 5-7.Step 10Click Update.The Password Management dialog box closes.An Update Dynamic Signature Pack progress bar appears.The service configuration on the SCE platform is updated.How to Install a Protocol Pack on Multiple SCE PlatformsYou can install a protocol pack on multiple SCE Platforms using the SCE Software Upgrade wizard. SeeHow to Upgrade the SCE Using the SCE Software Upgrade Wizard, page 4-9.How to Apply Service Configurations to SCE DevicesYou can apply a service configuration to a single SCE platform, to selected SCE platforms, or to all SCEplatforms at one or more selected sites.NoteCautionThe service configuration that you are applying must be open in the Service Configuration Editor.If anomaly-based detection of malicious traffic is enabled, any access control list (ACL) that isconfigured on the Service Control Engine (SCE) platform but is not applied to anything (for example,an interface, an access map, or an SNMP community string) might be deleted when a serviceconfiguration is applied to the platform.Workaround:Disable anomaly-based detection of malicious traffic.In the Network Traffic tab, select Service Security.In the Service Security Dashboard, clear the Enable anomaly detection check box. How to Apply a Service Configuration to a Single SCE Platform, page 5-20 How to Apply a Service Configuration to Multiple SCE Platforms, page 5-21How to Apply a Service Configuration to a Single SCE PlatformStep 1In the Site Manager tree, right-click an SCE device.A popup menu appears.Step 2From the menu, select Apply Service Configuration.The Choose Policy dialog box appears (Figure 5-18), listing all service configurations that are open inthe Service Configuration Editor.Cisco Service Control Application for Broadband User Guide5-20OL-21064-07
Chapter 5 Using the Network NavigatorManaging SCE DevicesNoteIf only one service configuration is open in the Service Configuration Editor, a Password Managementdialog box appears. Continue at Step 5. (If no service configurations are open in the ServiceConfiguration Editor, an error message is displayed.)Figure 5-18Choose PolicyStep 3Select a service configuration from the list.Step 4Click OK.A Password Management dialog box appears.Step 5Enter the appropriate password. (For more information, see Password Management, page 5-7.)Step 6Click Apply.The Password Management dialog box closes.An Applying service configuration to SCE progress bar appears.The service configuration is applied to the selected SCE platform.How to Apply a Service Configuration to Multiple SCE PlatformsStep 1In the Site Manager tree, select sites or SCE devices to which you are applying the service configurationand right-click one of them.Step 2From the popup menu that appears, select Apply Service Configuration.The Choose Policy dialog box appears, listing all service configurations that are open in the ServiceConfiguration Editor.NoteIf only one service configuration is open in the Service Configuration Editor, a Password Managementdialog box appears. Continue at Step 4. (If no service configurations are open in the ServiceConfiguration Editor, an error message is displayed.)Cisco Service Control Application for Broadband User GuideOL-21064-075-21
Chapter 5 Using the Network NavigatorManaging SCE DevicesStep 3Select a service configuration from the list and click OK.A separate Password Management dialog box appears for each SCE device that you have selected.Step 4For each SCE device, enter the password and click Apply.The service configuration is applied to each selected SCE platform in turn.How to Retrieve Service Configurations from SCE DevicesYou can retrieve service configurations from a single SCE platform, from selected SCE platforms, orfrom all SCE platforms at one or more selected sites. How to Retrieve Service Configurations from a Single SCE Platform, page 5-22 How to Retrieve Service Configurations from Multiple SCE Platforms, page 5-22How to Retrieve Service Configurations from a Single SCE PlatformStep 1In the Site Manager tree, right-click an SCE device.A popup menu appears. Step 2Enter your password if prompted.From the menu, select Retrieve Service Configuration.A Password Management dialog box appears.Step 3Enter the appropriate password. (For more information, see Password Management, page 5-7.)Step 4Click Retrieve.The Password Management dialog box closes.A Retrieving from SCE progress bar appears.The service configuration is retrieved from the SCE platform and opened in the Service ConfigurationEditor.How to Retrieve Service Configurations from Multiple SCE PlatformsStep 1In the Site Manager tree, select sites or SCE devices whose service configurations you want to retrieve,and right-click one of them.Step 2From the popup menu that appears, select Retrieve Service Configuration.A separate Password Management dialog box appears for each SCE device that you have selected.Step 3For each SCE device, enter the password and click Retrieve.The service configuration is retrieved from each SCE platform in turn, and is opened in the ServiceConfiguration Editor.Cisco Service Control Application for Broadband User Guide5-22OL-21064-07
Chapter 5 Using the Network NavigatorManaging SCE DevicesHow to Install PQI Files on SCE DevicesThis operation installs the Cisco Service Control Application for Broadband (SCA BB) on the SCEplatform.NoteIt is recommended to use the SCE Software Upgrade wizard when installing a PQI file on multiple SCEdevices. See How to Upgrade the SCE Using the SCE Software Upgrade Wizard, page 4-9.NoteInstalling a PQI file usually takes a few minutes.Step 1In the Site Manager tree, select an SCE device.Step 2From the Console main menu, choose Network Install Application Software (PQI).The Update Software dialog box appears (Figure 5-19).Figure 5-19Step 3Update SoftwareClick Browse.A Select file dialog box appears.Step 4Browse to the PQI file that you are installing.Step 5Click Open.The Select file dialog box closes.Step 6Click Finish.A Password Management dialog box appears.Step 7Enter the appropriate password. (For more information, see Password Management, page 5-7.)Step 8Click Apply.The Password Management dialog box closes.An Updating software to SCE progress bar appears.Cisco Service Control Application for Broadband User GuideOL-21064-075-23
Chapter 5 Using the Network NavigatorManaging SCE DevicesThe PQI file is installed on the selected SCE.How to Install an SCE OS Software Package on SCE DevicesThis operation installs the SCE OS software package (the operating system software and firmware of theSCE platform).NoteIt is recommended to use the SCE Software Upgrade wizard when installing an SCE OS softwarepackage on multiple SCE platforms. See How to Upgrade the SCE Using the SCE Software UpgradeWizard, page 4-9.Step 1In the Site Manager tree, select an SCE device.Step 2From the Console main menu, choose Network Upgrade SCE Platform Firmware (PKG).The Update OS dialog box appears (Figure 5-20).Figure 5-20Step 3Update OSClick Browse.A Select file dialog box appears.Step 4Browse to the PKG file containing the OS that you are installing.Step 5Click Open.The Select file dialog box closes.Step 6Click Finish.A Password Management dialog box appears.Step 7Enter the appropriate password. (For more information, see Password Management, page 5-7.)Step 8Click Apply.The Password Management dialog box closes.An Updating software to SCE progress bar appears.Cisco Service Control Application for Broadband User Guide5-24OL-21064-07
Chapter 5 Using the Network NavigatorManaging SM DevicesThe PQI file is installed on the selected SCE.Managing SM Devices How to Generate Tech Support Info Files for SM Devices, page 5-25 How to Retrieve the Online Status of SM Devices, page 5-26 How to Connect to SM Devices, page 5-27How to Generate Tech Support Info Files for SM DevicesThis operation generates the SM’s support file, for the use of Cisco technical support staff.Step 1In the Site Manager tree, right-click an SM device.A popup menu appears (Figure 5-21).Figure 5-21Step 2Site Manager Tree MenuFrom the menu, select Generate Tech Support Info File.The Generate Tech Support Info File dialog box appears.Step 3Click Browse.A Select File dialog box appears.Step 4Browse to the folder where you want to save the tech support info file.Step 5In the File name field, enter a new file name, or select an existing ZIP file.Step 6Click Open to select the file.If the file exists, it is overwritten.The Select File dialog box closes.Step 7(Optional) To add log files to the output tech support info file, check the Add GUI Console log filescheck box.Step 8Check the Open file after it is fetched check box.Step 9Click Finish.The Generate Tech Support Info File dialog box closes.A Password Management dialog box appears.Step 10Enter the appropriate password. (For more information, see Password Management, page 5-7.)Cisco Service Control Application for Broadband User GuideOL-21064-075-25
Chapter 5 Using the Network NavigatorManaging SM DevicesStep 11Click Generate.The Password Management dialog box closes.A Generate tech support info file progress bar appears.The file is generated.How to Retrieve the Online Status of SM DevicesThis operation provides information about the SM’s current software version and operational status.Step 1In the Site Manager tree, right-click an SM device.A popup menu appears.Step 2From the menu, select Online Status.A Password Management dialog box appears.Step 3Enter the appropriate password. (For more information, see Password Management, page 5-7.)Step 4Click Extract.The Password Management dialog box closes.An Extracting info progress bar appears.The SCMS-SM online status is retrieved (Figure 5-22).Figure 5-22SCMS-SM Online StatusCisco Service Control Application for Broadband User Guide5-26OL-21064-07
Chapter 5 Using the Network NavigatorManaging CM DevicesHow to Connect to SM DevicesTo manage subscribers using the SM GUI tool, you must connect to an SM device.NoteStep 1The SM GUI tool performs authentication on the SCMS-SM by opening a PRPC connection to port14374 and attempting to log in using the username and password that you entered in the PasswordManagement dialog box. If a PRPC server with this user is not running on the SCMS-SM, authenticationfails.If you have changed the PRPC port on the SCMS-SM, see User Authentication, page 5-36.In the Site Manager tree, right-click an SM device.A popup menu appears.Step 2From the menu, select Manage Subscribers.A Password Management dialog box appears.Step 3Enter the appropriate password. (For more information, see Password Management, page 5-7.)Step 4Click Connecting.The Password Management dialog box closes.A Connecting to progress bar appears.You connect to the SM, and the Console switches to the SM GUI tool.For an explanation of how to proceed, see Using the Subscriber Manager GUI Tool, page 11-1.Managing CM DevicesYou can configure CM devices using a wizard. (See How to Configure S
Cisco Service Control Application for Broadband User Guide OL-21064-07 Chapter 5 Using the Network Navigator Managing Sites Managing Sites You can manage an SCE, SM, or CM from the Console only if the network entity is defined as a device in the Network Navigator. After a device is added to the Network Navigator, you can perform