Transcription
SM7BCardioid Dynamic Vocal MicrophoneOnline user guide SM7B dynamic microphone.Version: 2.2 (2021-K)
Shure IncorporatedTable of ContentsSM7B Cardioid Dynamic Vocal Microphone5Accessories73General Description3Mounting Instructions3WindscreenSpecifications4Furnished Accessories7Optional Accessories7Replacement Parts72/7
Shure IncorporatedSM7BCardioid Dynamic Vocal MicrophoneGeneral DescriptionThe Model SM7B dynamic microphone has a smooth, flat, wide-range frequency response appropriate for music and speech inall professional audio applications. It features excellent shielding against electromagnetic hum generated by computer moni tors, neon lights, and other electrical devices. In addition to its standard windscreen, it also includes the A7WS windscreen forclose-talk applications.The SM7B is an outstanding choice for the following applications: Recording Studio—Instrumental and VocalLocation RecordingMotion Picture and Television ScoringTelevision, Talk Shows, and News DesksRadio Announcing and ProductionNarrationMounting InstructionsThe SM7B can be mounted on a microphone stand or hung from a boom. It is shipped in the boom mounting configuration. Toset up the SM7B in the microphone stand mounting configuration, proceed as follows:1.2.3.4.Remove tightening nuts on the sides.Remove the fitted washers, the lock washers, the outer brass washers, and the brass sleeves.Slide the bracket off the microphone. Be careful not to lose the washers still on the microphone.Invert and rotate the bracket. Slide it back onto the bolts over the brass and plastic washers still on the microphone.The bracket should fit so the XLR connector faces the rear of the microphone, and the Shure logo on the back of themicrophone is right-side up.5. Replace the brass sleeves. Be sure they are seated properly within the inner washers.6. Replace the outer brass washers, the lock washers and the fitted washers.7. Replace the tightening nuts and tighten the microphone at the desired angle.NOTE: If the tightening nuts do not hold the microphone in position, one or both of the brass sleeves may not be prop erly seated within all the washers.3/7
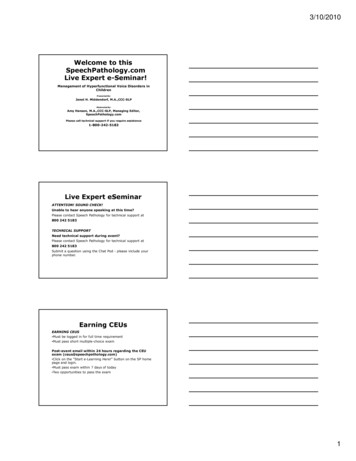
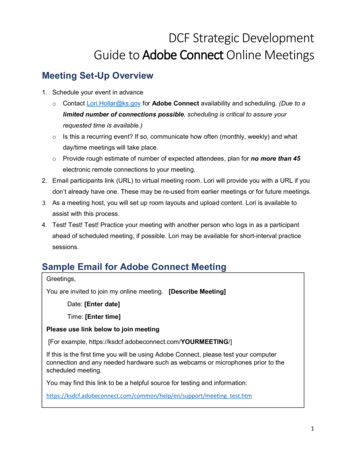
Shure IncorporatedBoom and Microphone Stand Mounting ConfigurationMOUNTING ASSEMBLY - EXPLODED VIEWWindscreenUse the standard windscreen for general voice and instrumental applications. Use the supplied A7WS windscreen for closetalk applications, such as voice overs or radio announcements, as it offers maximum protection from plosive breath noise andcreates a warmer, more intimate sound.4/7
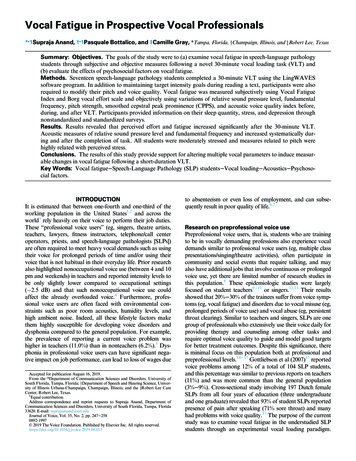
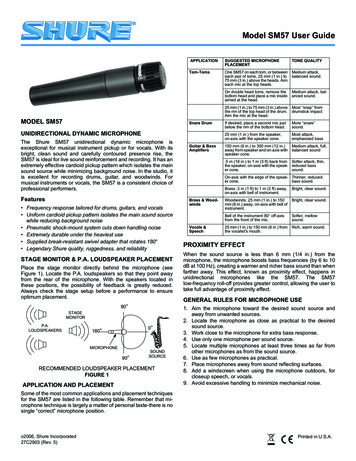
Shure IncorporatedTo install the A7WS, follow these instructions:1. To avoid tearing the windscreen during removal, grip it from the plastic ring and the base and remove by gently pullingand twisting.2. If desired, adhere the supplied velcro strips around the microphone grille, approximately one inch from the base of thegrille (as shown) to hold new windscreen in place.3. Install the A7WS windscreen by stretching over the velcro strips, then squeezing at the base of the windscreen to ad here to the velcro. No velcro strip inside the windscreen is needed, as the windscreen itself adheres to the velcro. To re move, grip at the base of the windscreen and pull while twisting.SpecificationsTypeDynamic (moving coil)Frequency Response50 to 20,000 HzPolar PatternCardioidOutput Impedance150 ΩSensitivity(@ 1 kHz, open circuit voltage) 59 dBV/Pa[1] (1.12 mV)Hum Pickup(typical, at 60 Hz, equivalent SPL/mOe)11 dBPolarityPositive pressure on diaphragm produces positive voltage on pin 2 with respect to pin 35/7
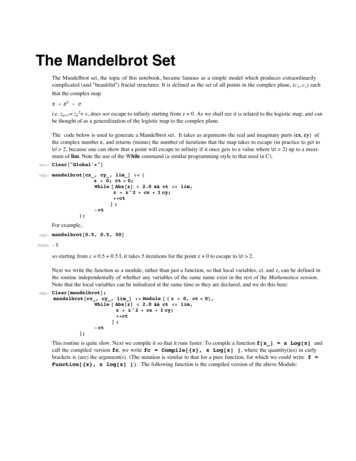
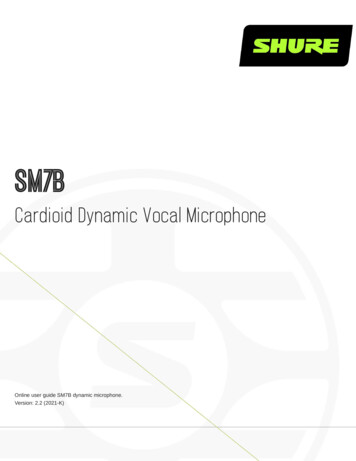
Shure IncorporatedNet Weight0.764 kg (1.69 lbs)HousingDark gray enamel aluminum and steel case with dark gray foam windscreen.[1] 1 Pa 94 dB SPLTypical Frequency ResponseTypical Polar Pattern6/7
Shure IncorporatedInternal ConnectionsOverall DimensionsAccessoriesFurnished AccessoriesSwitch Cover Plate for SM7, SM7A and SM7BRPM602Large Black Foam Windscreen for SM7, also see RK345A7WS5/8" to 3/8" Thread Adapter31A1856Optional Accessories25 foot (7.5m) Triple-Flex Microphone XLR Cable with chrome connectorsC25FReplacement PartsCartridge for SM7, SM7A and SM7BRPM106Black Windscreen for SM7, SM7A, SM7B, also see A7WSRK345Nut and Washer for SM7, SM7A and SM7B Yoke MountRPM6047/7
Invert and rotate the bracket. Slide it back onto the bolts over the brass and plastic washers still on the microphone. The bracket should fit so the XLR connector faces the rear of the microphone, and the Shure logo on the back of the microphone is right-side up. Replace the brass sleeves. Be sure they are seated properly within the inner washers.