Transcription
Bergstrom Warranty Portal SiteRevision: DDate: 03/19/2021BERGSTROM WARRANTY PORTAL SITEContentsBERGSTROM WARRANTY PORTAL SITE . 1WARRANTY PORTAL SITE INSTRUCTIONS:. 3PRODUCT REGISTRATION: . 4BUS A/C REGISTRATION: . 4Bus A/C Form: . 4ePRODUCT REGISTRATION: . 7eProduct NITE Phoenix Form: . 8eProduct System Information: . 9Fleet Owner/Operator Information: . 9Installation Facility Information: . 10Vehicle Information: . 10eProduct NITE SSI Form: . 11eProduct System Information: . 11Fleet Owner/Operator Information: . 12Installation Facility Information: . 12Vehicle Information: . 13eProduct eClimaCoach Form: . 13eProduct System Information: . 14Fleet Owner/Operator Information: . 14Installation Facility Information: . 14Vehicle Information: . 15eProduct eCoolPark Form: . 16eProduct System Information: . 16Fleet Owner/Operator Information: . 17Installation Facility Information: . 17Vehicle Information: . 17WARRANTY PREAUTHORIZATION: . 18WARRANTY ASSISTANCE: . 181
Bergstrom Warranty Portal SiteRevision: DDate: 03/19/2021CREATE ACCOUNT: . 19CREATE LOGIN: . 21Claim Submission: . 23Claim Information: . 26Part Information: . 26Vehicle Information: . 27Description of Failure: . 28Parts Claimed Information:. 28Labor Information (not covered on all product lines): . 29Additional Expenses: . 29Example of Warranty Form: . 31Review Claim Status:. 32Request Additional Product Line: . 32Update Address Information:. 33Change Current Password: . 34Contacts:. 35WEBSITE SUPPORT: . 352
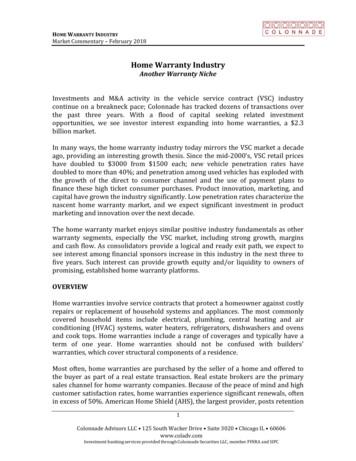
Bergstrom Warranty Portal SiteRevision: DDate: 03/19/2021WARRANTY PORTAL SITE INSTRUCTIONS:Place the following URL in your web browser search bar. Preferred web browser Mozilla Firefox.https://warranty.bergstrominc.comWhen entered, the following site will open. Site instructions can be viewed via a link in the upperright corner of the site.3
Bergstrom Warranty Portal SiteRevision: DDate: 03/19/2021PRODUCT REGISTRATION:Certain Bergstrom products must be registered to validate and start the warranty period for yourpurchased product. All Bus A/C Systems must be registered. All eProducts Systems which includesbut is not limited to products under the labels of NITE, eClimaCoach and eCoolPark must beregistered.BUS A/C REGISTRATION:1. Click on the Bus A/C System link. The following window will open.2. Follow the instructions and enter in the complete VIN number to begin registration. Hit theContinue button and the following form will open.Bus A/C Form:1. If the registration is complete, all sections will include the available information and theRegistration Date will be filled in. This date is the start of warranty coverage.4
Bergstrom Warranty Portal SiteRevision: DDate: 03/19/20212. If the registration is not complete, the Installation sections should be filled in and just theConsumer section will be blank. The Registration Date will say Not Registered.5
Bergstrom Warranty Portal SiteRevision: DDate: 03/19/2021Enter in your Consumer Information and click on the Save Registration button at the bottomof the page. The Registration Date will automatically fill in. This date is the start of warrantycoverage.6
Bergstrom Warranty Portal SiteRevision: DDate: 03/19/20213. If the registration is not complete and the installation sections are not filled in, the followingwindow will open. Follow the instructions.If known, enter in the Installer Facility Information. Enter the Owner Information and clickon the Save Registration button at the bottom of the page. The Registration Date willautomatically fill in. This date is the start of warranty coverage.Bergstrom personnel will receive an e-mail informing them of a new registration that does notinclude all the necessary installation information. Even without this information yourproduct will be registered for warranty coverage.ePRODUCT REGISTRATION:1. Click on the eProduct Registration link. The following window will open.7
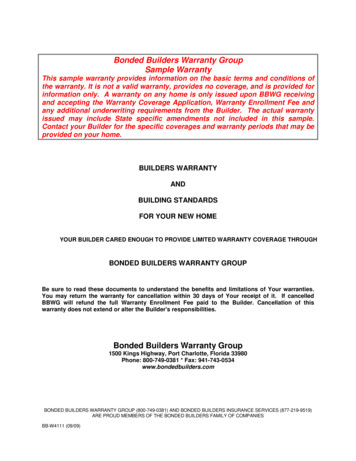
Bergstrom Warranty Portal SiteRevision: DDate: 03/19/20212. Enter the complete VIN number and choose the proper eProduct system model from thedrop down menu. Hit the continue button to open the registration form.3. The form will be slightly different depending on the eProduct you are registering.eProduct NITE Phoenix Form:8
Bergstrom Warranty Portal SiteRevision: DDate: 03/19/2021eProduct System Information:a. eProduct System Model-This field will automatically fill based on what you entered atthe beginning of the registration process.b. NITE Phoenix Unit Serial Number-Click in the entry field and enter the unit serialnumber that you are registering.c. Date of Installation-Click in the entry field and a calendar will open for you to choosethe installation date.d. Mileage at Installation-Click in the entry field and enter the vehicle mileage at thetime of installation.e. Extended Warranty-If extended warranty is being purchased choose the properextended warranty from the drop down menu.Fleet Owner/Operator Information:a. Name-Click in the entry field and enter the Fleet Owner/Operator name.b. Address, City, State/Province, Zip Code-Click in the individual entry fields and enterthe address information.c. Contact Name-Click in the entry field and enter the Contact Name for this registration.d. Phone, Email-Click in the individual entry fields and enter the contact person’s phoneand email address.9
Bergstrom Warranty Portal SiteRevision: DDate: 03/19/2021Installation Facility Information:a. Same As Owner?-If the installation facility information is the same as theowner/operator information just entered check the Yes box. If not, enter theinstallation facility information.b. Name-Click in the entry field and enter the Installation Facility name.c. Address, City, State/Province, and Zip Code-Click in the individual entry fields andenter the address information.Vehicle Information:a. Vehicle Year-Click in the entry field and enter the Vehicle Year.b. Vehicle Make-Click in the entry field and enter the Vehicle Make.c. Vehicle Model-Click in the entry field and enter the Vehicle Model.d. Vehicle ID Number (VIN)-The VIN number will automatically fill in based on what youentered at the beginning of the registration process.10
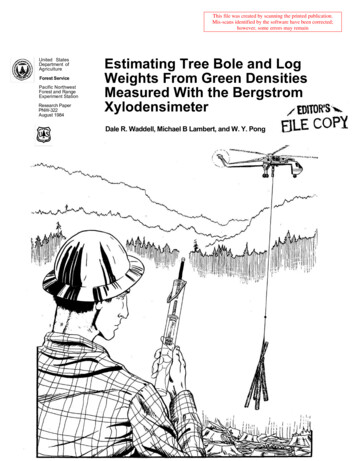
Bergstrom Warranty Portal SiteRevision: DDate: 03/19/2021eProduct NITE SSI Form:eProduct System Information:a. eProduct System Model-This field will automatically fill based on what you entered atthe beginning of the registration process.b. NITE SSI Unit Serial Number-Click in the entry field and enter the unit serial numberfor the system you are registering.c. NITE SSI Condenser Serial Number-Click in the entry field and enter the condenserserial number for the system you are registering.d. Date of Installation-Click in the entry field and a calendar will open for you to choose11
Bergstrom Warranty Portal SiteRevision: DDate: 03/19/2021the installation date.e. Mileage at Installation-Click in the entry field and enter the vehicle mileage at thetime of installation.f. Extended Warranty-If extended warranty is being purchased choose the properextended warranty from the drop down menu.Fleet Owner/Operator Information:a. Name-Click in the entry field and enter the Fleet Owner/Operator name.b. Address, City, State/Province, Zip Code-Click in the individual entry fields and enterthe address information.c. Contact Name-Click in the entry field and enter the Contact Name for this registration.d. Phone, Email-Click in the individual entry fields and enter the contact person’s phoneand email address.Installation Facility Information:a. Same As Owner?-If the installation facility information is the same as theowner/operator information just entered check the Yes box. If not, enter theinstallation facility information.b. Name-Click in the entry field and enter the Installation Facility name.12
Bergstrom Warranty Portal SiteRevision: DDate: 03/19/2021c. Address, City, State/Province, and Zip Code-Click in the individual entry fields andenter the address information.Vehicle Information:a. Vehicle Year-Click in the entry field and enter the Vehicle Year.b. Vehicle Make-Click in the entry field and enter the Vehicle Make.c. Vehicle Model-Click in the entry field and enter the Vehicle Model.d. Vehicle ID Number (VIN)-The VIN number will automatically fill in based on what youentered at the beginning of the registration process.eProduct eClimaCoach Form:13
Bergstrom Warranty Portal SiteRevision: DDate: 03/19/2021eProduct System Information:a. eProduct System Model-This field will automatically fill based on what you entered atthe beginning of the registration process.b. eClimaCoach AC Unit 1 Serial Number-Click in the entry field and enter the unit 1serial number for the system you are registering.c. eClimaCoach AC Unit 2 Serial Number-Click in the entry field and enter unit 2 serialnumber for the system you are registering.d. eClimaCoach Condenser Serial Number-Click in the entry field and enter thecondenser serial number for the system you are registering.e. Date of Installation-Click in the entry field and a calendar will open for you to choosethe installation date.f. Mileage at Installation-Click in the entry field and enter the vehicle mileage at thetime of installation.Fleet Owner/Operator Information:a. Name-Click in the entry field and enter the Fleet Owner/Operator name.b. Address, City, State/Province, and Zip Code-Click in the individual entry fields andenter the address information.c. Contact Name-Click in the entry field and enter the Contact Name for this registration.d. Phone, Email-Click in the individual entry fields and enter the contact person’s phoneand email address.Installation Facility Information:a. Same As Owner?-If the installation facility information is the same as the14
Bergstrom Warranty Portal SiteRevision: DDate: 03/19/2021owner/operator information just entered check the Yes box. If not, enter theinstallation facility information.b. Name-Click in the entry field and enter the Installation Facility name.c. Address, City, State/Province, and Zip Code-Click in the individual entry fields andenter the address information.Vehicle Information:a. Vehicle Year-Click in the entry field and enter the Vehicle Year.b. Vehicle Make-Click in the entry field and enter the Vehicle Make.c. Vehicle Model-Click in the entry field and enter the Vehicle Model.d. Vehicle ID Number (VIN)-The VIN number will automatically fill in based on what youentered at the beginning of the registration process.15
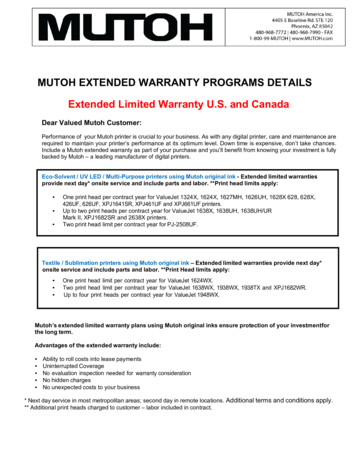
Bergstrom Warranty Portal SiteRevision: DDate: 03/19/2021eProduct eCoolPark Form:eProduct System Information:a. eProduct System Model-This field will automatically fill based on what you entered atthe beginning of the registration process.b. eCoolPark Unit Serial Number-Click in the entry field and enter the unit serial numberfor the system you are registering.c. Date of Installation-Click in the entry field and a calendar will open for you to choosethe installation date.16
Bergstrom Warranty Portal SiteRevision: DDate: 03/19/2021d. Mileage at Installation-Click in the entry field and enter the vehicle mileage at thetime of installation.Fleet Owner/Operator Information:a. Name-Click in the entry field and enter the Fleet Owner/Operator name.b. Address, City, State/Province, and Zip Code-Click in the individual entry fields andenter the address information.c. Contact Name-Click in the entry field and enter the Contact Name for this registration.d. Phone, Email-Click in the individual entry fields and enter the contact person’s phoneand email address.Installation Facility Information:a. Same As Owner?-If the installation facility information is the same as theowner/operator information just entered check the Yes box. If not, enter theinstallation facility information.b. Name-Click in the entry field and enter the Installation Facility name.c. Address, City, State/Province, and Zip Code-Click in the individual entry fields andenter the address information.Vehicle Information:a. Vehicle Year-Click in the entry field and enter the Vehicle Year.b. Vehicle Make-Click in the entry field and enter the Vehicle Make.c. Vehicle Model-Click in the entry field and enter the Vehicle Model.d. Vehicle ID Number (VIN)-The VIN number will automatically fill in based on what youentered at the beginning of the registration process.17
Bergstrom Warranty Portal SiteRevision: DDate: 03/19/20214. When all the information has been entered, click on the Continue button at the bottom of thepage.5. If there are missing required fields, the following window will open and you will need toreturn to the form to enter in order for the registration to be complete.6. If all required fields have been entered, the following window will open.7. Follow instructions if you want to enter another eProducts registration. If not, click on theHome link to go to the registration home page or Bergstrom Warranty link to go to theBergstrom warranty website.WARRANTY PREAUTHORIZATION:Certain Bergstrom products require preauthorization before repairs are completed. All Bus A/CSystems repairs 200 must be preauthorized. All eProducts Systems repairs must bepreauthorized. All eProducts Systems include but is not limited to products under the labels ofNITE, eClimaCoach and eCoolPark.Call the appropriate number to obtain preauthorization for the repair. If the repair is approved,Bergstrom personnel will provide a preauthorization number. This number will be needed whensubmitting the claim.WARRANTY ASSISTANCE:Before a warranty claim can be submitted you must have a six digit account number with Bergstromand you must register your company to use this site.18
Bergstrom Warranty Portal SiteRevision: DDate: 03/19/2021CREATE ACCOUNT:1. If you do not have a Bergstrom six digit account code, click on the Create Account link. Thefollowing account registration form will open.a. Select Program(s)-Check the box next to the program(s) that you would like anaccount for. Multiple account numbers may be needed if you purchase or serviceproduct across our different divisions. Bergstrom personnel will determine if this isneeded.b. Company Name-Click in the entry field and enter the Company name.19
Bergstrom Warranty Portal SiteRevision: DDate: 03/19/2021c. Address, City, State/Province, and Zip Code-Click in the individual entry fields andenter the address information.d. Contact Name-Click in the entry field and enter the Contact Name for this account.e. Phone, Email-Click in the individual entry fields and enter the contact person’s phoneand email address.f. In order to complete the registration and assign an account number a W-9 form isrequired for all US based companies. This federal form can be obtained on-line.g. When all the information has been entered, click on the Continue button at thebottom of the page.h. The following will open on the site acknowledging your submittal.i.An e-mail (subject Bergstrom Account Registration) will be sent to the e-mailprovided in the registration form also acknowledging the registration was received.j.Bergstrom personnel will receive an e-mail informing them of a new registration. Thiswill be reviewed and once the W-9 is received an account number will be assigned.k. When an account number is assigned, Bergstrom personnel will create a customerlogin for the Bergstrom Warranty Portal. When complete, an e-mail (subject Warranty Registration) will again be sent to the e-mail provided showing their username (which is their account number) and password.20
Bergstrom Warranty Portal SiteRevision: DDate: 03/19/2021l.When done click on the Home link in the upper left corner and this will return you tothe Bergstrom warranty portal home page.CREATE LOGIN:1. If you have a Bergstrom six digit account code, but not a portal login, click on the Create Loginlink. The following window will open.2. Enter your six digit account code and click on the Continue button. The following registrationform will open.21
Bergstrom Warranty Portal SiteRevision: DDate: 03/19/2021a. Warranty Program Registering For-Check the box next to the program(s) that youwould like to register for. This should be the same as when you registered for youraccount. Multiple account numbers may be needed if you purchase or service productacross our different divisions. Bergstrom personnel will determine if this is needed.b. Company Name-Click in the entry field and enter the Company name.c. Address, City, State/Province, and Zip Code-Click in the individual entry fields andenter the address information.d. Contact Name-Click in the entry field and enter the Contact Name for this account.e. Phone, Email-Click in the individual entry fields and enter the contact person’s phoneand email address.f. When all the information has been entered, click on the Continue button at thebottom of the page.g. The following will open on the site acknowledging your submittal.22
Bergstrom Warranty Portal SiteRevision: DDate: 03/19/2021h. An e-mail (subject Bergstrom Warranty Registration) will be sent to the e-mailprovided in the registration form also acknowledging the registration was received.i.Bergstrom personnel will receive an e-mail informing them of a new registration. Thiswill be reviewed and approved or if questions exist you will be contacted to resolve.j.Once approved, an e-mail (subject Warranty Registration) will again be sent to thee-mail provided showing their user name (which is their account number) andpassword.k. When done click on the Home link in the upper left corner and this will return you tothe Bergstrom warranty portal home page.3. If the account has already been registered the following window will open. Follow theinstructions on the screen if you do not remember your login information.Claim Submission:1. If you already have an account number and a password you can Signin to the BergstromWarranty Portal to submit a warranty claim.23
Bergstrom Warranty Portal SiteRevision: DDate: 03/19/2021a. Account Number-Click in the entry field and enter your account number.b. Account Password-Click in the entry field and enter your password.c. Account Registered For the Following Product Line(s)-This will automatically fill inbased on the account number entered. If this is not the correct product line verify youhave entered the correct account number or contact Bergstrom via the E-mail underwebsite support.d. Click on the Continue button at the bottom of the page.2. The following Request for Warranty Main Menu will open. To Log Out click on the Log Outlink in the upper left corner and you will go back to the Bergstrom Warranty Portal.3. For new warranty claims in the upper right corner use the drop down to select the productline you are submitting a claim for. If your account number is only registered for one productline, you will not see a drop down and the registered product line will be shown. Oncechosen, click on the Submit new claim button.24
Bergstrom Warranty Portal SiteRevision: DDate: 03/19/20214. The product line’s warranty policy will open and you must click on the AGREE button at thebottom of the page to continue. If DISAGREE is chosen a new claim cannot be submitted.5. When the AGREE button is chosen, page 1 of the request for warranty form will open. TheDate Requested and Account Number will automatically fill in. Enter as much information aspossible. The required items must be entered. The form will be slightly different dependingon the product line.25
Bergstrom Warranty Portal SiteRevision: DDate: 03/19/2021Claim Information:a. Date Requested-This will automatically fill in with the current date.b. Account Number-This will automatically fill in with your account number.c. Claim Preauthorization Number-This is required for some of our product lines. Enterthe preauthorization number you were given by our technical line personnel.d. Customer Reference Number-This is not needed for Bergstrom, but some customersuse this to record the repair/service order number so they can tie the claim number tothe repair/service order number.Part Information:a. Parts In-Service Date-Click in the entry field and a calendar will open for you to choosethe in-service date. If the in-service date is not known enter the installation date.NOTE: For BusAC and eProducts, if this is not known, go to the product registration26
Bergstrom Warranty Portal SiteRevision: DDate: 03/19/2021section of the portal and look up the date via the VIN number.b. Part Failure Date- Click in the entry field and a calendar will open for you to choosethe failure date. If the failure date is not known enter the repair date.c. Vehicle Mileage @ In-Service-Click in the entry field and enter the mileage at inservice date. If the mileage at in-service is not known enter the mileage at installation.NOTE: For BusAC and eProducts, if this is not known go to the product registrationsection of the portal and look up the mileage via the VIN number. The mileage may ormay not be on the registration form.d. Vehicle Mileage @ Failure-Click in the entry field and enter the mileage at failure. Ifthe mileage at failure is not known enter the mileage at repair.e. Distance Type-Click on the drop down and choose the correct type (miles, kilometers,hours).Vehicle Information:a. Vehicle Manufacturer-Click in the entry field and enter the Vehicle Manufacturer.b. Vehicle Model-Click in the entry field and enter the Vehicle Model.c. Vehicle Identification Number-Click in the entry field and enter the entire 17 digitVehicle Identification Number.d. Vehicle Build Date-Click in the entry field and a calendar will open for you to choosethe build date.27
Bergstrom Warranty Portal SiteRevision: DDate: 03/19/2021Description of Failure:a. Description of Failure-Click in the entry field and enter a detailed description ofdiagnostics performed, potential failure, repair completed, etc. Entering as muchdetailed information as possible allows for a better analysis.6. Click on the Continue button at the bottom of the page.7. If not all the required fields are entered, the following error will open on the screen.8. If all required fields are entered, page 2 of the request for warranty form will open. Again,the required items must be entered. The form will be slightly different depending on theproduct line.Parts Claimed Information:a. Part Number-Click in the entry field and enter the Part Number. Part numbers mustbe entered for proper analysis.b. Part Description-Click in the entry field and enter the Part Description.28
Bergstrom Warranty Portal SiteRevision: DDate: 03/19/2021c. Part Cost-Click in the entry field and enter the Part Cost.d. Part QTY-Click in the entry field and enter the Part Quantity.e. Part S/N-Click in the entry field and enter the Part Serial Number/Date Code.f. Non-Warrantable Part-If the part returned is found non-warrantable the default isScrap by Bergstrom. If you want the part returned click on the drop down arrow andchoose Return to Repair Location.g. Add Additional Part-Click on the button if more than one part number is beingclaimed.Labor Information (not covered on all product lines):a. Labor Code-Click in the entry field and enter the labor code for the repair. This mustbe entered for all Bergstrom supplied labor codes.b. Labor Hours-Click in the entry field and enter the labor hours spent for the labor codeentered. The labor hours allowed will be per Bergstrom supplied SRT’s. If no SRT’s areprovided enter in the labor hours spent. Unreasonable hours will be questioned andmay be reduced.c. Labor Rate-Click in the entry field and enter the labor rate.d. Service Repair Times Link-Click on this link to pop up a window showing Bergstrom’spublished repair codes and repair times that should be used when submitting claims.This will not be available for all product line.e. Add Additional Labor-Click on the button if more than one labor code is being claimed.Additional Expenses:a. Freight Amount-Click in the entry field and enter the freight cost to ship the part backto Bergstrom. If the claim is approved, Bergstrom will cover this cost.9. Click on the Review Claim Information button at the bottom of the page.10. If not all the required fields are entered, the following error will open on the screen.29
Bergstrom Warranty Portal SiteRevision: DDate: 03/19/202111. Review the claim information. Once submitted, you will not be able to edit the claim. If all iscorrect, click on the Submit Claim button at the bottom of the page.If information needs to be changed follow instructions on bottom of page or click on the partinformation link in the upper left corner. This will take you back to page 2 (part, labor andadditional expenses). If the claim information needs to be changed, after clicking on the partinformation link click on the claim information link in the upper left corner. This will take youback to page 1 (claim, part, vehicle and description of failure).12. Once the Submit Claim button is pushed a claim number will be assigned and the followingsubmittal page will open. Also, there will be a window open for you to pri
Bergstrom Warranty Portal Site Revision: D Date: 03/19/2021 _ 4 PRODUCT REGISTRATION: Certain Bergstrom products must be registered to validate and start the warranty period for your purchased product. All Bus A/C Systems must be registered. All eProducts Systems which includes