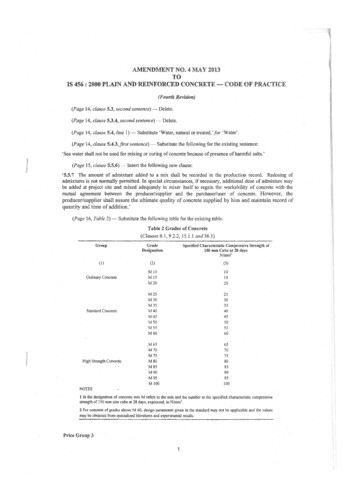
Transcription
Operating InstructionsforElcometer 456Basic ModelsFerrous, Non-FerrousandDual Ferrous/Non-FerrousModels(F, N & FNF)FNF UK Patent No: 2306009BFNF US Patent No: 5886522
This product meets the emc directive89/336/EEC, amended 92/31/EEC & 93/68/EECWarningThis instrument uses a Liquid Crystal Display. If it isheated above 50 C (120 F) it may be damaged. Thiscan happen if it is left in a car parked in strong sunlight. ,andare registeredtrademarks of Elcometer Instruments Ltd. Elcometer Instruments Ltd. England 2000/2001All rights reserved. No part of this document may bereproduced, transmitted, transcribed, stored (in aretrieval system or otherwise) or translated into anylanguage in any form or by any means (electronic,mechanical, magnetic, optical, manual or otherwise)without the prior written permission of ElcometerInstruments Ltd.Doc.No: TMA-0239 Issue 01Text with cover Part No: 16454
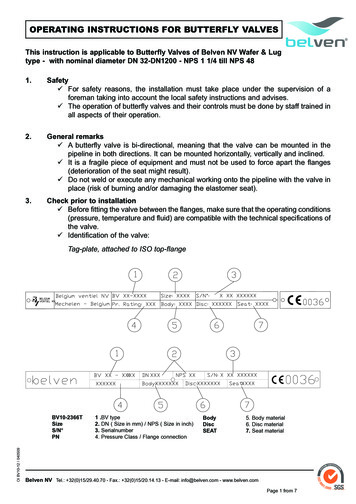
Elcometer 456Basic ModelsContentsPage No.1Introduction12Getting Started33MENU STRUCTURE4General Operating Instructions125Calibration Adjustment166Data Output217Service228Error Messages239Technical Data2410Accessories3111Glossary337
1INTRODUCTIONThe Elcometer 456 Coating Thickness Gauges have afull range of probe options for ferrous (F), non-ferrous(N) and dual ferrous/non-ferrous (FNF) operation.The F probes measure the thickness of non-magneticcoatings on steel or iron substrates. They can be usedon paint, plastic, galvanising, enamel, powder, hardchrome and other coatings such as electroless nickel.The N probes are for measuring the thickness of nonmagnetic coatings on non-magnetic metals. They canbe used on anodising, paint, plastic coatings, powder,etc applied to aluminium, brass, non-magneticstainless steel, etc.The FNF probes are dual function with Automatic orManual substrate selection.The gauges are available as either integral probe orseparate probe versions. All separate probes are fullyinterchangeable and there is a Plug IN Integral Probe(PINIP ) option so that an integral style probe can bepluged in to a separate probe type gauge.Coatings on Galvanised or Metallised (Al andZn) Steel Using the FNFThe FNF in fixed N mode may be used to measurepaint coatings on galvanised, aluminium or zincsprayed steel substrates. The instrument must be setto the manual mode before the N mode is selected.The unit should then be zeroed and calibrated on asample of the coated steel. Care must be taken toensure that the calibration conditions are not affectedby changes in the zinc or aluminium coating thickness.This can be determined by checking the zero over anarea of the galvanised or metal-coated steel. Metalcoatings on steel above 50µm (2 mil/thou) should beconsistent enough to obtain a stable zero on the layerof metal.1
1.1FeaturesThe Elcometer 456 Basic versions have a graphicsdisplay, multiple calibration adjustment options,backlight and infrared data output.For readings memory see the Standard and Topversions.1.2The Package contains456 Gauge456 Probe (Chosen from the list of options,including integral probes.)Calibration FoilsCarrying PouchBatteriesOperating Instruction Book2
22.1GETTING STARTEDFitting The BatteriesUse the thumb nail in recess to press the battery doortoward back of the gauge to release. Note batterypolarity. Rechargeable batteries can be used but theywill only have 25–30% of the life of alkaline batteries.2.2Fitting The HarnessStep 1Step 23
Step 32.3Fitting The Separate ProbesAlign connector keyway andpush home. The connectorlocks automatically.NOTE: The design of theprobe connector allowssome movement between theprobe and the gauge. This isintentional and does notaffect measurementperformance.To release the probe, graspthe knurled section and pullgently away from the gauge.The connection will unlockand the probe will release.4
Fitting the PINIP Twist PINIP until the connector locates, then lock byturning the locking ring 11/2 times clockwise.NOTE: To ensure correct transfer of data from theprobe and detection of a new probe, the gauge mustbe switched off when separate probes are fitted.2.4Switch OnAll versions of the Elcometer 456 can be switched onby pressing thekeypad. Integral probe versionscan also be switched on by placing the integral probeon a surface. (See Section 4.1)5
2.4.1 Soft KeysF1CALSTATSMENUSoftkey operations depend on the screen beingviewed and are indicated on the screen as in theexample above.Some screens allow the status of a feature to bechanged e.g. on to off or select or deselect, etc. A tickbox indicates this type of feature. Use the BACKsoftkey to close the screen without a change or use theSEL softkey to change the status, tick off to on or tickon to off. See Section 3.3 for an example.To return from any screen to the Reading screen pressthe BACK softkey until the Reading screen appears.2.5Taking a Readingor456 Separate and Integral Probe beingplaced on surface.6
3MENU STRUCTURE3.1Reading Screen OptionsProbe Scale ( A indicates FNFprobe in Automatic Mode)F1MeasurementSTATS MENUUnitsCal MethodIconSoftkeysCALBatteryIndicatorExample of Reading Screen with Smooth SurfaceCalibration Method SelectedCAL– Operates selected calibration adjustmentmethodSTATS – Clears Simple Statistics and switchesstatistics display on or off.MENU – Main Menu for User selectable features3.2Calibration Adjustment MethodsCALIBRATION STEP 1PLACE PROBE ONCAL STANDARDOR PRESS NEXTESCNEXTExample of Calibration Step 1 screen. The detail of thisscreen changes with the calibration method chosen.7
3.3Simple StatisticsSTATS MENUSTATS ON LCDCLEAR STATSSELECT STATSCOMBINE STATSBACKSELThis menu shows the current selection status with atick if selected or no tick if not selected. Press BACKsoftkey to leave status unchanged or press SELsoftkey to change status.3.4Main Menu LPRINT/OUTPUT – Prints or outputs the currentstatisticsDELETE– Last reading onlySETUP– Select featuresRESET– Select Cal or Gauge resetsABOUT– Select Probe or Gauge information3.4.1 Delete MenuDELETELAST READINGBACKSELLAST READING – Deletes last reading from thestatistical calculation.8
3.4.2 Setup MenuSETUPCAL L METHOD– Selects calibration method fromlist. See Section 5STATISTICS– To select simple statistics to bedisplayed from list and combinestatistics for Dual probes.BACKLIGHT– Switches feature on or off. Whenswitched on, the backlightilluminates the display for 4seconds after each reading or keypress. Use of the backlightreduces the battery life.PROBE– Displays probe type in use andselects range on dual functionprobes, F1 2 or FNF1.UNITS– Selects measurement unitsOUTPUT– Select infrared printer output.BEEP VOLUME – Switch bleep off or set level from 1(low) to 5 (high).LANGUAGE– Select from list.*AUTOSWITCH-OFF– Select delay time or turn thisfeature off.OPENINGSCREEN– Turn this feature on or off.* See next page9
* To change language which is not understood:Press left hand key until READING SCREEN isdisplayed.Press right hand key once - displays MAIN MENU. Presskey (3rd from left) twice - moves cursor toSETUP selection.Press right hand key once - displays SETUP MENU. Presskey (3rd from left) 8 times - moves cursor toLANGUAGE selection.Press right hand key once - displays languageoptions.Move cursor to recognised language, press righthand key to select.3.4.3 ResetRESETFACTORY CALINTL GAUGEUSA GAUGEBACKSELFACTORY CAL– Returns gauge to calibrationadjustment set at time ofmanufacture.INTL GAUGE– Resets the gauge to Internationaldefault settings eg. DD/MM/YYdate format and metric units.US GAUGE– Resets the gauge to USA defaultsettings eg. MM/DD/YY dateformat and imperial units.10
3.4.4 AboutABOUTPROBE INFORMATIONGAUGE INFORMATIONBACKSELPROBE– Serial number, type and scale ofINFORMATIONprobe connected to NF1 DUAL01/01/20010160001/01/200101600OKExample for an FNF1 ProbeGAUGE INFORMATIONGAUGE INFORMATIONMODEL:S/NVERSIONBasic F&NTK01000-20501.02 2000 Elcometer Instruments LtdOKNOTE: The probe range shown on the ProbeInformation screen is the full operating range for theindividual probe not the specified range for the probetype.11
44.1GENERAL OPERATINGINSTRUCTIONSSwitch On/Switch OffGauges with Separate and PINIP probes are switchedon or off by pressing.Integral probe units switch on when the probe isplaced on a surface.To switch off all gauge types, press and holdfor 3seconds. The gauge will bleep, two single tonesfollowed by a double tone.12
The Elcometer 456 switches itself off 60 seconds afterthe last operation unless the Auto Switch Off time ischanged in the SETUP menu. The Auto Switch Offfeature can be set to a maximum of 10 minutes or canbe deactivated in the SETUP menu.4.2Opening Screen & Readings ScreenThe opening screen can be deactivated in the SETUPmenu. The gauge then wakes up showing the readingscreen.F1CALSTATS MENUReading Screen with all statistics activated.NOTE: If CAL softkey indicator is flashing the gaugeshould be recalibrated. This is due to the calibrationadjustment method having been changed or a probechange. See Section 5.34.3Select LanguageThe most suitable language for the user can beselected within the Setup menu under the Languageoption. See section 3.4.2.13
4.4Battery ConditionWhen symbol is empty and is flashing a bleep willsound every 10 seconds to indicate that the batteryshould be changed.If the battery charge drops below the acceptable levelthe gauge will bleep 5 times and switch itself off.NOTE: Batteries in this condition must be changed tooperate the gauge.4.5Probe Mode SelectionThe Probe options found in the Setup menu willdepend on the probe type in use.The intelligent probe also selects the units eg. µm ormm and mil, thou or in, until the user changes the unitsin the SETUP, UNITS menu.4.5.1 F1 2 Scale SelectionThe F1 2 probe has two range and resolution selectionsin the SETUP menu under the PROBE option.F1METRIC RANGE0–1,500µm with resolution 0.1µmup to 20µm and 1µm from 20µm to1,500µm.IMPERIAL RANGE 0–60 mil with resolution 0.01 mil to1 mil and 0.1 mil from 1 mil to 60 mil14
F2METRIC RANGE0–5.00mm with resolution of 1µm(0.001mm) to 1.00mm and 10µm(0.01mm) from 1.00mm to 5.00mmIMPERIAL RANGE 0–200 mil with resolution of 0.1 to50 mil and 1.0 mil from 50 to 200 mil4.5.2 FNF Mode SelectionSelect the mode in the SETUP menu under thePROBE option.SELECT FUNCTIONAUTOF1N1ESCOKManual Mode. For use when only one type ofsubstrate is being used, F or N.WARNINGDo not try to take readings on a ferrous (F)substrate when in the N manual mode. Thereadings will be incorrect.Automatic Mode. The gauge automatically selectseither F or N depending on the substrate. F or N isshown on the display.4.6UnitsSelect from µm, mm, mil, thou or in.4.7BacklightWhen activated the backlight illuminates the display for4 seconds after a reading is taken or a key is pressed.Backlight is controlled through the BACKLIGHT optionin the SETUP menu.NOTE: The battery life is reduced by about 1/3rd whenthe backlight is activated.15
55.1CALIBRATION ADJUSTMENTFactory CalibrationThe gauge is dispatched from the factory with a pre-set(factory) calibration. This can be restored at any timethrough the RESET menu in SETUP.The Elcometer 456 should be adjusted before use or atleast checked to ensure that it has been previouslyadjusted correctly for the conditions of use.5.2Calibration MethodThe User is guided through the operation of thechosen calibration procedure by means of instructionsand illustrations on the graphics screen. Audiblewarnings are also provided when action is required,e.g. when the probe must be placed down to get areading.The gauge can be adjusted using several different methodsdescribed in National and International Standards.CAL METHODSMOOTH2 POINTROUGHSPECIAL SUBZERO OFFSETSET OFFSETBACKSELThe calibration adjustment method chosen is indicatedon the reading screen by one of the following icons:2 pntSp Smooth surface calibration Rough surface calibration Two point calibration Zero offset calibration Special substrate calibration method (2point calibration)16
5.3Calibration AdjustmentCalibration adjustment should be carried out with theappropriate probe on the same type of metal, the samecurvature and similar finish to the item to be measured.It is best to use an uncoated sample of the items to betested.Calibration can be carried out using measured foils orcoated standards. The use of coated standards onlyconfirms that the gauge meets its specifications. Whenusing foils care must be taken to keep the foils cleanand free from dust and to avoid damage by creasingparticularly the lower value foils.NOTE: To calibrate 5mm (200 mils) and 13mm (500mils) range gauges it will be necessary to stack thefoils. Care must also be taken to avoid errors due toplacing the foil labels between the foils.SMOOTH – Smooth surface calibration where the gaugeis set to zero on the uncoated surface and a knownthickness above the expected thickness of the coating.2-POINT – Calibration on a thin value and a thick valueeither side of the expected thickness. This will enhancethe accuracy of the gauge over the thickness rangedefined by the two values. This method is also calledRough Surface Calibration.SPECIAL SUB – This method uses the 2-pointcalibration for unusual substrate materials such as castiron, certain types of stainless steel, high carbon steel,special aluminium alloys, etc.17
ZERO OFFSET – This is the method described in BSEN ISO 19840 for coatings on steel surfacesroughened by blast cleaning. The calibration uses thesmooth surface technique and a correction value (zerooffset) is applied to each reading to account for theeffect of the roughened surface.SET OFFSET – This screen sets and changes theoffset for different surface roughness.ZEROSET OFFSET VALUE0.0ESCOKCorrection Value TableProfile accordingto ISO 8503-1Correction Value µm(Zero Offset)FineMediumCoars
Elcometer 456 Basic Models Ferrous, Non-Ferrous and Dual Ferrous/Non-Ferrous Models (F, N & FNF) FNF UK Patent No: 2306009B FNF US Patent No: 5886522. This product meets the emc directive 89/336/EEC, amended 92/31/EEC & 93/68/EEC Warning This instrument uses a Liquid Crystal Display. If it is heated above 50 C (120 F) it may be damaged. This can happen if it is left in a car parked in