Transcription
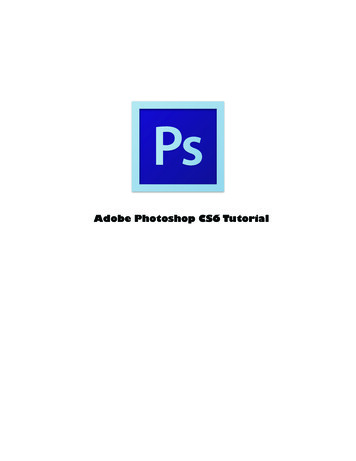
InDepth: Alternate LayoutsBy Claudia McCueAlternate Layouts in InDesign CS6Creating Multiple Versions When One Size Doesn’t Fit AllScenario #1: You’ve just finished designing an 18"x24" poster, incorporating all thecorrections from your client. The phone rings [queue up theme from Jaws]. It’s yourclient: “Would it be any trouble to also build a 17"x11" version of the poster? How hardcould it be? Oh, and I still need the job first thing tomorrow morning. But I’m not sureabout the size ”Scenario #2: You’re creating content for the iPad using Adobe’s Digital Publishing tools,and you need to create both vertical and horizontal versions of your layout, and there’s achance you’ll also need to create yet another set of layouts for an Android tablet.In CS5/5.5, Scenario #1 could be solvedby creating a new document, or by usingmultiple page sizes within the document.But Scenario #2 required that you createseparate documents for each orientation.Now, in InDesign CS6, both scenarios areeasily solved by the new Alternate LayoutI N D E S I G N M A G A Z I N E 47 April May 2012contentsfeature, which allows the equivalent ofmultiple versions of a document within asingle file. While this new feature is a boonto designers creating content with Adobe’sDigital Publishing tools in mind, it’s alsobeneficial to anyone faced with the need tocreate multiple sizes of any document.previousnextfull screen34
InDepth: Alternate LayoutsWhy not just create a duplicate document, you ask? The Alternate Layout featureoffers some advantages:»» Text frames in the “child” layouts areautomatically linked to the “parent” layout: Edit text in the parent layout, andthen use the Links panel to update thedescendant content in the child layout.Very cool!»» All pages reside in the same document,which facilitates preflighting, packaging,and export.»» You can keep track of all the alternateversions of your poster, ad, catalog,magazine, flyer, or whathaveyou in oneplace, without having to go searchingfor multiple documents.You’ll find that Alternate Layout is not astandalone concept; it’s affected by LiquidLayout rules, and also benefits from theContent Collector/Placer. I’ll touch on thosevery supportive features, so you can get aI N D E S I G N M A G A Z I N E 47 April May 2012glimpse of the whole picture. But for a moreextensive study of the wonders of LiquidLayout, see Pariah Burke’s article in thisissue. Go ahead; I’ll wait here.Oh, you’re back!Creating an Alternate LayoutYou can create an Alternate Layout for adocument of any size or orientation, withfacing or non-facing pages. But sincethe most common motivation for usingAlternate Layouts is to create content destined for tablet viewing, I’ll use that as myexample. In my document, the initial pagesize is 768x1024 px, the vertical dimensions of the iPad 1 & 2. (The iPad 3 sportsa 2048-x-1536 pixel screen. While thatoption isn’t available as a preset in the NewDocument dialog, you can just enter thosevalues manually.)NOTE: Liquid Layout and LayoutAdjustment are mutually exclusive—if youcontentsenable Layout Adjustment, all Liquid Layoutoptions will be disabled.To create an Alternate layout, use one ofthese alternate (ha) methods:»» Choose Layout Create Alternate Layout.»» In the Pages panel menu, choose CreateAlternate Layout.»» In the Pages panel, right-click (or Controlclick with a one-button mouse) on anysmall black-triangle section marker in thedocument thumbnails.»» Choose View Pages By Alternate Layoutin the Pages panel menu, and then clickthe small downward triangle to the rightof a layout name at the top of the pagessection of the Pages panel.InDesign recognizes the orientation ofthe existing layout, assumes you want itscomplementary orientation, and populates the dimension fields accordingly. Forexample, if your initial layout is 768x1024pixels, the new layout’s dimensions are setpreviousnextfull screen35
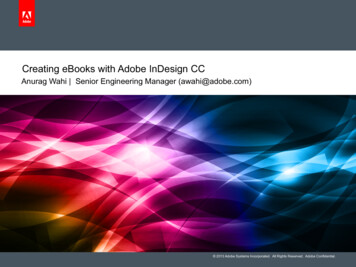
InDepth: Alternate Layoutsto 1024x768 pixels (Figure 1). You’re notlimited to just one alternate layout; you canhave as many as you like. It’s a good ideato name your alternate layouts after theirdestiny—iPad V, GalaxyTab H, Poster V,and so on.Figure 1: The default settings for Alternate Layout creation.In this instance, the primary layout is 768 x 1024 pixels—avertical orientation—so InDesign automatically assumesthat the new layout should be a horizontal orientation withthe same dimensions.I N D E S I G N M A G A Z I N E 47 April May 2012Where’s myalternate layout?If you use default settingswhen you create the alternatelayout, the initial results aregoing to require extensive massaging—and probably makeyou think it would be justas easy to start from scratch(Figure 2). Quick: Undo!Object-based LiquidLayout settings are usuallythe remedy. First, I set theframe-fitting options forthe images to Auto-Fit, thenselect each image with thePage Tool to activate theLiquid Layout controls. Iclick the small padlocks foreach axis to allow the imageto scale with the page. Inessence, I’m giving InDesignpermission to change theframe size in accordanceIf you’re on a Master page,the option to create anAlternate Layout is available only via the smalldrop-down triangle nextto a layout name in thePages panel.Figure 2: With the default settings, my alternate layout is going to requireextensive renovations. There’s a better way contentspreviousnextfull screen36
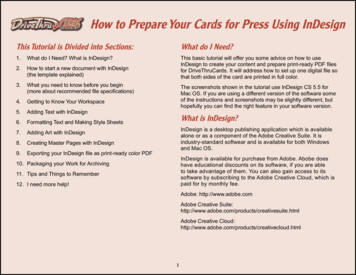
InDepth: Alternate Layoutswith the dimensions of the new layout. Ialso select text frames, and perform thesame operation (Figure 3).Now, when I create the Alternate Layoutwith the Object-Based Liquid Layout option,InDesign does the heavy lifting for me. Theresults are much better (Figure 4).Figure 4: By setting the framefitting options to Auto-Fit, andusing object-based Liquid Layoutoptions that allow the frame tofollow the dimensions of the newlayout, I save a lot of work.Viewing Alternate LayoutsFigure 3: To ensure that the large image adheres tothe top and sides of the layout, I select the frame andset the Liquid Layout options to pin those edges,resize with the page, and use Auto-Fit. This only takesseconds, and greatly improves the results. Here, I’veused the Liquid Layout panel to specify the behaviorfor this frame.I N D E S I G N M A G A Z I N E 47 April May 2012Tip #1: To view alternate layouts side by side in the Pages panel, go tothe Pages panel menu, and choose View Pages By Alternate Layout.Tip #2: To change the name of any layout, just click its name in thePages panel, wait a second until the name highlighted, then type thenew name.Tip #3: To view layouts side by side in the main window, chooseWindow Arrange Split Window. Then, set each window to a separate layout within your document. While there’s no synchronizedscrolling feature, you can still easily compare your layouts and tweakas necessary.contentspreviousnextfull screen37
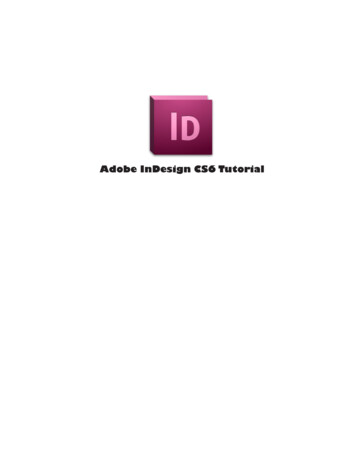
InDepth: Alternate LayoutsRelationships Between LayoutsThink of the original layout as the parent,and the new layout as its child. As withmany parent/child relationships, there arelimits to the family ties (not to mention twoway communications). Text frames on theoriginal layout are automatically linked tothe text frames on the new alternate layout. If text in the original frame is edited,the descendant frame in the alternate layout displays the Yellow Triangle of Terror toindicate that it’s a bit out of date (Figure 5).Update the out-of-date frame by clickingthe yellow triangle on the frame (yes, thatlittle badge is new in CS6, too), or by usingthe Update Link button in the Links panel.But editing text in a “child” frame onan alternate layout doesn’t spawn a corresponding alert on the frame or in theLinks panel—it’s not a two-way process.So if you intend to synchronize the text inyour layouts, remember to perform all editson the original layout. If you edit the childframe, then subsequently make changesto the original parent frame, you’ll receivean alert when you attempt to update thetext frame in the alternate layout (Figure 6).If you delete the original ancestral frame,Figure 5: The link icon adorning a text frame in the alternate layout indicates itsrelationship with its ancestor on the original layout. Edit the parent frame, and thechild frame displays a yellow alert triangle, as does its entry in the Links panel.I N D E S I G N M A G A Z I N E 47 April May 2012contentsFigure 6: If you edit text in the alternate layout, andthen make additional changes to the original textframe, and then update the “child” frame, you’rewarned that you’ll lose all edits you had made in thealternate layout.the descendant frame doesn’t disappear; itjust becomes a plain old independent textframe. Orphaned, if you will.Two More TipsTip #1: You can select a “child” textframe and jump to the “parent” textframe by choosing Edit Go to Source(which is a lot like Edit Original).Tip #2: Each layout must have aunique name. Swatches and rulermeasurements are universal in a document, not layout-specific, so you maynot want to mix print and web layoutsin the same document.previousnextfull screen38
InDepth: Alternate LayoutsIf you’re using paragraph and character styles (and you should be!), you can tellInDesign to clone them for each new alternate layout by enabling the Copy Text Stylesto New Style Group checkbox in the CreateAlternate Layout dialog box (Figure 7). Foryour convenience, they’re stored in separate style groups (folders). Initially, stylesare identical between layouts, but you canredefine styles in each layout—there is noparent/child relationship between the styles;they’re linked only by their names. In otherwords, if you have a style called “bodytext”Figure 7: Paragraph andCharacter styles are clonedfor each layout—they can bedefined differently for eachlayout. Frustrated and/orrebellious children, take note.I N D E S I G N M A G A Z I N E 47 April May 2012lights camera alternate!Click the image to watcha video demonstrationof the key points ofAlternate Layouts.in one layout,it will still becalled “bodytext” in the otherlayout, but youcan define the new one completely differently if you want. This allows you to styletext appropriately for each layout withoutstarting over. Plus, if you delete an alternatelayout, its duplicate styles disappear—easyhousecleaning.Using the Content Collector, ContentPlacer, and Content ConveyorDespite the fact that the original layout isthe basis for the descendant layout, thisrelationship is not like that of a documentpage to a Master page: Adding somethingto the original layout does not automaticallyadd that content to alternate layouts.When you create an alternate layout,existing text frames in the alternate arecontentsautomatically linked to the original parentframes—but graphics are not. The assumption is that you’ll use the Links panel toupdate modified graphics, and the Relinkoption to introduce replacement graphics.It’s just One of Those Things, but there areother, more efficient ways to keep your layouts in sync.First, if you change the attributes ofan anchored graphics frame within atext frame on the original layout, thosechanges are telegraphed to any alternatelayouts when you update the text frameson the other layouts! If you add a newanchored graphic object to a parent textframe, the object is seen as a text edit, andis also added to alternate layouts. If youpreviousnextfull screen39
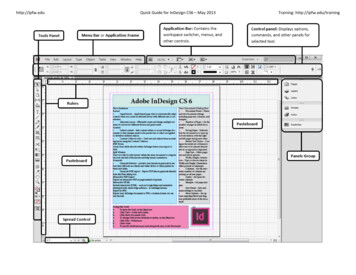
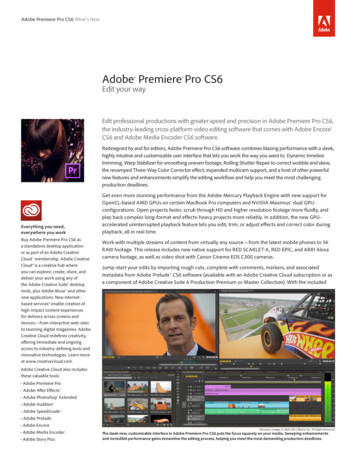
InDepth: Alternate LayoutsContentConveyor Tipsreplace a graphic in an anchored frame onthe original layout, it’s also updated whenalternate layouts are updated.Second, the Place and Link feature (whichin CS5.5 only created linked text frames) hasnow been expanded to create linked objectframes, too. That means you can select anobject on one layout, choose Edit Placeand Link (which loads the place cursor withthe object on the page), switch to the newlayout, and click. The “new” object is closelylinked to the original. For example, if it’s animage frame and you change the imageon the original layout, the frame shows upas Modified on the alternate layout, readyfor you to Update. If you change the stokeweight on the original, you can update thelinked version on the alternate layout, and itgets that stroke weight, too. Helpful!The third method of keeping your layouts in sync is to use the new ContentCollector and Content Placer tools. Whenyou use the Content Collector tool to selectobjects, they’re added to the ContentConveyor, which automatically appears(Figure 8). Switch to the Content Placer toolTip #1: The shortcut for the ContentCollector and Content Placer tools is“B”—just press “B” to toggle betweenharvesting and placing objects.Tip #2: Items in the Conveyor evaporate if the source document is closed.If you want persistence, you’ll have tocreate an old-fashioned Library.Tip #3: You can invoke style-mappingso that text is formatted on the fly during placement.Tip #4: Press Escape to delete the currently loaded object when placing (justas you would with the Place Gun).Figure 8: Use the Content Collector Tool to gather objects and store them on the Content Conveyor. Use the Content PlacerTool to deposit the Conveyor’s contents in the document. Options at the bottom of the Conveyor govern how objects arestored and placed. Warning: If a source document is closed, the objects harvested from it disappear from the Conveyor.I N D E S I G N M A G A Z I N E 47 April May 2012contentspreviousnextfull screen40
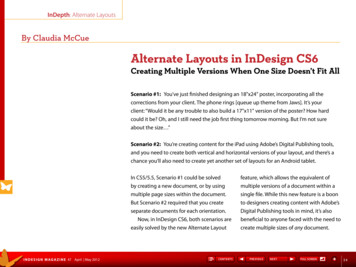
InDepth: Alternate Layoutsto place objects in an alternate layout, elsewhere within the same layout, or in anotheropen document.By default, when you collect and placeusing these tools, you just get duplicates ofyour page items. However, you’ll find thatthe Content Conveyor also provides methods for creating links between content, aswell as mapping styles. The tiny “Create Link”checkbox in the Content Conveyor panelallows you to create a link as you place content into a new location (Figure 9). It’s like alittle two-step: First, you choose the ContentCollector tool , and gather up all thedesired objects. Then, you select the targetdocument, switch to the Content Placer tool, click the Create Link option, and plopthe content into the target page, layout, ordocument.Links are automatically created; if youalter the original object, its descendantdisplays a yellow triangle alert (Figure 10).I N D E S I G N M A G A Z I N E 47 April May 2012Just click the triangle toupdate the link.To set up paragraphand character style mapping, first select theContent Placer tool,and then click the StyleMapping icon button tolaunch open the CustomStyle Mapping dialog(Figure 11). Click NewStyle Mapping to createa new recipe, and selectthe source document. Onelittle twist: A target layout or document must bethe active document—ifyou’re still in the originaldonor document, you’llonly see its styles.You can select a singleobject with the ContentFigure 9: Note the checkboxes for Create Link and Map Styles.The circled option allows you to set up Style Mapping.Figure 10: The yellow alert triangle indicates an out-ofdate link (from a modified image or linked parent frame).Figure 11: The Content tools include an option formapping styles between documents and layouts ascontent is placed.contentspreviousnextfull screen41
InDepth: Alternate LayoutsCollector tool, or marquee-drag aroundmultiple objects. You can also select objectswith the Selection tool, and then chooseEdit Place and Link; the objects are subsequently added as one “stacked” entry set inthe Conveyor (though they’re not groupedin the conventional sense). You can evenload all the content in all the pages of adocument or one of its layouts (Figure 12).You can even use Place and Link or theContent Collector tools to transplant framesfrom one document to another, and thetarget remembers the donor document—make a change in the original, and the target (“child”) document sees and offers toupdate the link, even if the donor documenthas been closed.Keep in mind that the Content Collectortools are useful in any project, whether yourequire alternate layouts or not. It’s a greatway to scoop up content and deposit itI N D E S I G N M A G A Z I N E 47 April May 2012Figure 12: The Load Conveyor button brings up adialog allowing you to load all objects in a document, allobjects in a layout, or even gather up all that junk in thePasteboard. By default, it creates a separate stacked setfor each page, but notice the handy option to create oneenormous single set.wherever you need it, regardless of whatyou’re creating.Printing and Exporting Alternate LayoutsWhen you print, or export to PDF (whetherPrint or Interactive), you can choose toprint/export a single layout or all pages(Figure 13). If you select All Pages (like you’reprobably used to doing), the resulting PDFwill contain all layouts as one long stringof pages (Layout 1, followed by Layout 2,etc.); there’s no demarcation between them,nor is the start of each layout automaticallybookmarked. So you may elect to exporteach layout separately.contentsFigure 13: During export to PDF, you can choose a singlelayout, or all pages.Alternate Layouts are actually a variationon document sections, but since each layout contains the same page-number range,exporting a single page or page rangerequires that you specify the completename of the page to target it for output,by including its alternate layout name andpage number. In other words, you can’t justsay you want “page 1” anymore becausethere could be a page 1 in each one ofyour alternate layouts. Instead, when youchoose Layout Go to Page, for example,the drop-down list allows you to target aparticular page within one of your layoutspreviousnextfull screen42
InDepth: Alternate Layouts(Figure 14). In the Print or Export PDFdialog boxes, you can specify a particularpage number in a layout by inserting thelayout name followed by a colon. For example, you can jump to the third page of alayout called Letter H by typing “Letter H:3”.Digital Publishing: Building FoliosAs you might expect, the process of digital publishing is streamlined by the use ofalternate layouts. When you specify dual orientation in the Folio Builder panel, InDesignis clever enough to select the first set ofvertical and horizontal layouts and populatethe Portrait and Landscape options for you(Figure 15). Of course, you can select anotherlayout for each. Now, rather than havingto manually choose and upload a separatecarefully-named InDesign document foreach orientation of a digital publication, youcan upload both orientations in one move.I N D E S I G N M A G A Z I N E 47 April May 2012Figure 14: The Go To Page option displays a list of pages inthe document, organized by layout.How Will You Use Alternate Layouts?If you’re creating content for tablet devices,Alternate Layouts (and the companionLiquid Layout and Content Placementtools) are going to make your life quite a biteasier—that’s their main purpose, after all.But print designers should find a lot to lovein these new features—just don’t let yourfickle customer know how easy it is to makeall those sizes she keeps asking for!contentsFigure 15: When you choose the dual orientation icon inthe New Folio dialog, InDesign automatically vacuums upthe first vertical and horizontal layouts in articles you add.nClaudia McCue is the author of Real World Print Productionwith Adobe Creative Suite Applications (Peachpit Press,2009) and Fearless Flash: Use Adobe InDesign CS5 and theTools You Already Know to Create Engaging Web Documents(Adobe Press, 2010), a contributor to several other graphicsarts books, and the presenter for “Acrobat X: CreatingForms” for Lynda.com. When not chained to the computer,she’s riding her motorcycle on country roads, singing in herhelmet. She swears it’s the cure for writer’s block.After 25 years in real-world print production, she nowteaches creative and production professionals how to useAdobe products without hurting themselves or others.Claudia is a Certified Technical Trainer and an AdobeCertified Expert for Photoshop, Acrobat, Illustrator, andInDesign. Read her blog at www.claudiamccue.com.previousnextfull screen43
Viewing Alternate Layouts Tip #1: To view alternate layouts side by side in the Pages panel, go to the Pages panel menu, and choose View Pages By Alternate Layout. Tip #2: To change the name of any layout, just click its name in the Pages panel, wait a second until the name highlighted, then type the new name.