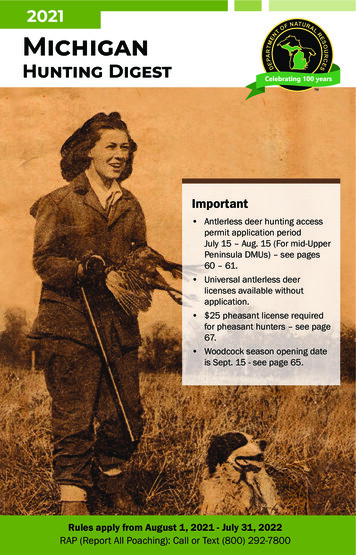
Transcription
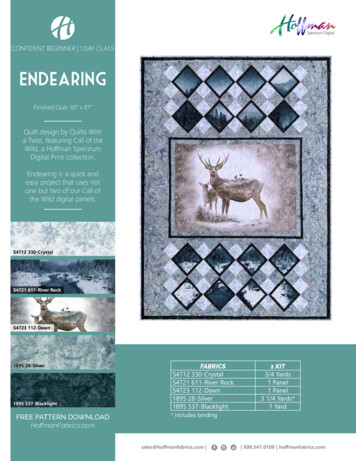
CONFIDENT BEGINNER 1 DAY CLASSEndearingFinished Quilt: 60” x 87”Quilt design by Quilts Witha Twist, featuring Call of theWild, a Hoffman SpectrumDigital Print collection.Endearing is a quick andeasy project that uses notone but two of our Call ofthe Wild digital panels.S4712 330-CrystalS4721 611-River RockS4723 112-Dawn1895 28-Silver1895 537-BlacklightFREE PATTERN DOWNLOADHoffmanFabrics.comFABRICSS4712 330-CrystalS4721 611-River RockS4723 112-Dawn1895 28-Silver1895 537-Blacklight* includes bindingsales@hoffmanfabrics.com 1 KIT3/4 Yards1 Panel1 Panel3 1/4 Yards*1 Yard 800.547.0100 hoffmanfabrics.com
Endearinga free pattern by Lisa Moore, Quilts With a TwistThis free pattern is brought to you by Hoffman CaliforniaFabrics. It uses not one but two of their Call of the WildPanels. The on-point setting is simple and effective.Fabrics Used:S4721-611 River Rock Digital Scenic PanelS4723-112 DawnDigital Panel, DeerS4712-330 CrystalAccent squares1895-28 SilverBackground and Binding1895 537 BlacklightFraming and Narrow BordersBackground (continued)Cut two 4 1/2” stripsCut into sixteen 4 1/2” squaresCut six 1 1/2” stripsCut four 2” strips (center panel, first border)Cut two 9” strips (outer border, center)Cut three 6 1/2” strips (side borders, top & bottom)Binding (Silver)Cut eight 2 1/2” strips (or your favorite width forYardagebinding)Cutting InstructionsFraming and Narrow Borders (Blacklight)Cut one 7” stripCut this into thirty two 7” x 1 1/4” piecesCut one 8 1/2” stripCut this into thirty two 8 1/2” x 1 1/4” piecesCut four 1 1/4” strips (center narrow border)Cut eight 1 3/4” strips (final border)Twin Size (60” x 87”)Scenic Panel1 panel (30” x 43”)Deer Panel1 panelAccent Squares (Crystal)3/4 yardBackground & Binding (Silver)3 1/4 yardsFrames & Narrow Borders (Blacklight) 1 yardBacking5 1/4 yardsAn 8 1/2” x 24” ruler is helpfulScenic Panel - See Pages 2 and 3 for illustratedcutting instructions.Center Panel (Deer)- Press panel with spraystarch. Trim away the white perimeter and squareup the panel. Size does not matter.All remaining strips are cut from selvedge to selvedge,approximately 42” wide.Accent Squares (Crystal)Cut five 4 1/2” stripsCut into forty 4 1/2” squaresBackground (Silver)Cut 25” of background fabric. Starch and press wellfor the following cuts - they will have bias edges.Cut three 8” strips. Cut these into eleven 8” squaresCut each square on the diagonal twice tocreate in forty-four quarter Triangle AsAUse remainder to cut four 5” squares.Cut these squares on the diagonal onceBto result in eight Triangle BsPage 1 of 6DirectionsThe quilt is made in sections; top section, bottomsection, and center section. The framed blocks shouldbe the same size as the four-patch blocks. It is notcritical that the sections finish the same size. Outerside borders will be added to the top, bottom, andcenter sections. The three sections will be joined, andthen trimmed as required to be the same size.Use a 1/4” seam allowance. Press toward the darkerfabric. Check the dimensions of your units when theyare given.Copyright 2020 by Lisa Moore
Cutting Instructions - Steps 1 and 2are illustrated below5”Row 3Row 2Row 47”5”Row 17”Row 57”7”Row 67”7”7”Cutting Instructions Scenic PanelNotes: Do not prewash. Press panel twice using spraystarch to stabilize the bias edges. Refer to the drawingsabove and on Page 3 to cut the panel. I recommend thatyou draw the lines on the fabric before cutting as a guidefor cutting. When you cut, use the ruler and rotary cutterinstead of the drawn lines - they are for reference only andwill not be as accurate as the ruler.An 8 1/2” x 24” ruler is helpful.If you prefer, you can cut sixteen 7” squares on point.1. The blocks are 7” square, cut on point. Start bydrawing a 7” line on a 45 degree angle at the upperright corner of the panel. Measure and mark 5” alongthe side and the top and draw a line between the twomeasurements using the 45 degree angle on yourruler. The 7” line does not include any of the whiteperimeter around the panel.You will need to use a marker that is removablein case you need to make any adjustments. I use achalk-o-liner for this. The chalk mechanical pencilswould also be a good choice. Test to make certainthe marks are removable.2. Draw a 7” line parallel to the first line, thencontinue drawing 7” lines. You will have seven linesSee Page 3 for illustration of Steps 3-6.3. Starting at the first two lines, draw a 7” blockbetween those lines. Continue these lines across thepanel, stopping just before Row 5. Draw the blocksof Rows 5 and 6 as shown on Page 3.4. Continue to draw parallel lines 7” apart as shown.5. Now cut the blocks. Start with the first linesdrawn in Steps 1 and 2. You should use your rotarycutter and ruler to cut these lines, making certain theyare 7” apart. Once you get all the rows cut, then cutthem into 7” blocks.6. Lay out the blocks as you want them to appear andlabel them as shown. Refer to Pages 3 and 6 for labellocations.Page 2 of 6Copyright 2020 by Lisa Moore
Cutting Illustration - Steps 3-68 1/2”Piece Side UnitsNote: Triangle A is larger than required. It will betrimmed.Sew a Triangle A to the remaining four sets as shown.Make four.ABe certain to sew themMake 4in the configurationshown here. Trimexcess from triangle as shown by the dashed line.Sew a Triangle A to a 4 1/2” square of backgroundfabric. Make four.Be certain to sew them in theAconfiguration shown here. TrimMake 4excess from triangle as shownby the dashed line8 1/2”Make 16Sew the sixteen 4 1/2” squares of backgroundfabric to sixteen of the 4 1/2” squares of accentfabric. Press toward the background fabric.Sew two of the alternating block setstogether to make six four patches.Reserve remaining foursets for end units.16615Piece Focal BlocksPiece Alternating Blocks12owR14Sew a 7” x 1 1/4” strip of the framingfabric to two sides of each focal block.Press outward, toward the frame.Make 16.Because of the bias edges on the focalblocks, sew these with the framing stripson top to avoid stretching the blockfabric.You may chain piece these togetherfor better efficiency.Repeat for the 8 1/2” x 1 1/4” strips on the remainingtwo sides of the 16 focal blocks.These blocks should measure 8 1/2” square.85111013owR7694431325owR2owRowRowR1are illustrated belowSew the two unitstogether as shown.Make four.Make 4Trim away the “dog ears” whenever you can.8 1/2”Page 3 of 6Copyright 2020 by Lisa Moore
Piece Corner UnitsUpper Left and Lower Right UnitsSew a Triangle A and a Triangle Bto a 4 1/2” square of accentfabric. Trim excess. Make four.Be certain to sew them in theconfiguration shown hereUpper Right and Lower Left UnitsSew two Triangle Asto a 4 1/2” square ofaccent fabric as shown.Press toward backgroundfabric. Trim.Add a Triangle B as shown.Make four. Triangle B will betrimmed later if required.AMake 4BMake 4AATop and Bottom UnitsMake 12Sew a Triangle Ato a 4 1/2” square of accentfabric as shown. Trim dog ear.Make 12Sew a second Triangle Ato a this unit as shown.BMake 4AMake twelve.APiece Top and BottomSections.Layout the top section asshown. This is an on-pointsetting. Join the blocks andunits into diagonal rows.Press toward frames, trim dogears. Join the diagonal rowstogether. Press seams towardthe frames. This will meanchanging the direction ofpressing.12563478Repeat this process for thebottom section (Blocks 9-16).Square up the top and bottom sections. Size is not important. Just trim as required to make certain all the edges arestraight and square.Sew the six 1 1/2” strips of background fabric together, end to end, to make one long strip. Pin and sew these strips to thetop and bottom of each section. Press toward the 1 1/2” strip. Trim to fit.Sew the three 6 1/2” strips of background fabric together, end to end, to make one long strip. Use a vertical seam. Pinand sew these strips to the sides of each section. Press toward the 6 1/2” strip. Trim to fit.Page 4 of 66 1/2” Strip6 1/2” Strip1 1/2” Strip1 1/2” StripTop andBottomSectionCopyright 2020 by Lisa Moore
Add Borders to Center PanelSquare up the center panel, if you have not already done this. Trim away the white perimeter and square up the panel.Size does not matter.Add 2” strips of background fabric to top and bottom, then sides of the center panel. Press toward background fabric.Trim to fit.Add 1 1/4” strips of narrow border fabric to sides of the center panel unit. Press toward the narrow border. Trim to fit.Sew the remainder of these strips to the two remaining narrow border strips, using a diagonal seam. Add these to the topand bottom of the panel unit. Press toward the narrow border. Trim to fit.Add the 9” strips of Background fabric to the sides of the center panel unit. Press toward the narrow border. Trim to fit.9” strip2” strip2” strip9” strip2” StripCenterSection2” StripJoin Top and Bottom Sections to Center SectionLocate the centers of the top section and the center section. Pin together from the centers outward. The two pieces may notbe the same size - they will be trimmed to fit after joining. Sew, press toward the center (toward the narrow border).Repeat for the bottom section and the center section.Trim the sides as required.Add Final Borders (Blacklight)Sew the 1 3/4” strips of final border fabric together, end to end, to make one long strip. Use vertical seams. Pin, then sewthese strips to the sides, then top and bottom of the quilt center, trimming to fit. Press toward the blacklight fabric.Finishing1. Prepare the backing, baste layers together, and quilt as desired. I quilted in the ditch around each focal block, frame,and background, then quilted the focal blocks and center panel following the images in the fabric. The remaining quiltingis a meander.2. Square up the quilted piece. Trim to 1 1/4” from the seam of the final border.3. Make a label and attach to the back of the quilt. I use a 5” square of fabric, folded on the diagonal, and placed in acorner before binding is installed.4. Attach binding using your favorite method.www.quiltswithatwist.comPage 5 of 6Copyright 2020 by Lisa Moore
123456786 1/2” Strip6 1/2” Strip1 1/2” Strip1 1/2” Strip9” strip2” stripQuilt Layout Drawing2” strip9” strip2” Strip2” Strip91011131415126 1/2” Strip6 1/2” Strip1 1/2” Strip161 1/2” StripLisa would like to thank Hoffman California Fabrics for designing and producing amazing digitalpanels. Also for sending her early JPEGS of the fabrics for designing the project, as well as the box of lovelyfabric to make the quilt. She is especially grateful for fourteen years of support from Sandy at Hoffman.Lisa Moore is a retired electrical engineer living on beautiful Silver Bay in Sitka, Alaska. She is a memberof New Archangel Dancers, a Russian Folk Dance group, and Sitka Tree & Landscape Committee. Lisa ismarried to a retired Coast Guard helicopter pilot. They enjoy living in a small island town in Alaska and allthat it has to offer. They have an incredibly sweet black lab named Mist.Page 6 of 6
Wild, a Hoffman Spectrum Digital Print collection. Endearing is a quick and easy project that uses not one but two of our Call of the Wild digital panels. FREE PATTERN DOWNLOAD HoffmanFabrics.com CONFIDENT BEGINNER 1 DAY CLASS Finished Quilt: 60” x 87” Endearing * includes binding FABR