Transcription
Avid Pro Compressor Guide
Legal Notices 2013 Avid Technology, Inc., (“Avid”), all rights reserved. Thisguide may not be duplicated in whole or in part without thewritten consent of Avid.003, 96 I/O, 96i I/O, 192 Digital I/O, 192 I/O, AudioSuite, Avid,Beat Detective, BF Essentials, Bomb Factory, Bruno, C 24,Command 8, Control 24, D-Command, D-Control, D-Fi, D-fx,D-Show, D-Verb, DAE, Digi 002, DigiBase, Digidesign,Digidesign Audio Engine, Digidesign Intelligent NoiseReduction, Digidesign TDM Bus, DigiDrive, DigiTest,DigiTranslator, DINR, Eleven, Fast Track, HD Core,HD Process, Impact, Interplay, LoFi, MachineControl, Maxim,Mbox, MediaComposer, MIDI I/O, MultiShell, OMF,OMF Interchange, PRE, ProControl, Pro Tools,Pro Tools HD, QuickPunch, Recti-Fi, Reel Tape, Reso,Reverb One, ReVibe, RTAS, Sci-Fi, Scorch, Sibelius, Smack!,SoundReplacer, Sound Designer II, SYNC HD, SYNC I/O,Synchronic, TL Aggro, TL AutoPan, TL Drum Rehab,TL Everyphase, TL Fauxlder, TL In Tune, TL MasterMeter, TLMetro, TL Space, TL Utilities, Trillium Lane Labs, Vari-Fi,X-Form, XMON and Xpand! are trademarks or registeredtrademarks of Avid Technology, Inc. in the United Statesand/or other countries. All other trademarks are the propertyof their respective owners.Product features, specifications, system requirements, andavailability are subject to change without notice.Guide Part Number 9329-65265-00 REV A 01/13Documentation FeedbackAt Avid, we are always looking for ways to improve ourdocumentation. If you have comments, corrections, orsuggestions regarding our documentation, email us attechpubs@avid.com.
ContentsChapter 1. Introduction . . . . . . . . . . . . . . . . . . . . . . . . . . . . . . . . . . . . . . . . . . . . . . . . . . . . . . . . . 1System Requirements and Compatibility . . . . . . . . . . . . . . . . . . . . . . . . . . . . . . . . . . . . . . . . 1Registering Plug-Ins . . . . . . . . . . . . . . . . . . . . . . . . . . . . . . . . . . . . . . . . . . . . . . . . . . . . . . . 2Working with Plug-Ins . . . . . . . . . . . . . . . . . . . . . . . . . . . . . . . . . . . . . . . . . . . . . . . . . . . . . 2Conventions Used in This Guide . . . . . . . . . . . . . . . . . . . . . . . . . . . . . . . . . . . . . . . . . . . . . . 2About www.avid.com . . . . . . . . . . . . . . . . . . . . . . . . . . . . . . . . . . . . . . . . . . . . . . . . . . . . . . 3Chapter 2. Installation and Authorization . . . . . . . . . . . . . . . . . . . . . . . . . . . . . . . . . . . . . . . . . . 5Installing Plug-Ins for Pro Tools . . . . . . . . . . . . . . . . . . . . . . . . . . . . . . . . . . . . . . . . . . . . . . 5Authorizing Plug-Ins . . . . . . . . . . . . . . . . . . . . . . . . . . . . . . . . . . . . . . . . . . . . . . . . . . . . . . . 5Removing Plug-Ins. . . . . . . . . . . . . . . . . . . . . . . . . . . . . . . . . . . . . . . . . . . . . . . . . . . . . . . . 6Chapter 3. Pro Compressor. . . . . . . . . . . . . . . . . . . . . . . . . . . . . . . . . . . . . . . . . . . . . . . . . . . . . . 7Metering . . . . . . . . . . . . . . . . . . . . . . . . . . . . . . . . . . . . . . . . . . . . . . . . . . . . . . . . . . . . . . . 7Input . . . . . . . . . . . . . . . . . . . . . . . . . . . . . . . . . . . . . . . . . . . . . . . . . . . . . . . . . . . . . . . . . . 8Output . . . . . . . . . . . . . . . . . . . . . . . . . . . . . . . . . . . . . . . . . . . . . . . . . . . . . . . . . . . . . . . . . 9Dynamics Graph . . . . . . . . . . . . . . . . . . . . . . . . . . . . . . . . . . . . . . . . . . . . . . . . . . . . . . . . 10Pro Compressor Controls . . . . . . . . . . . . . . . . . . . . . . . . . . . . . . . . . . . . . . . . . . . . . . . . . . 12Side-Chain Processing . . . . . . . . . . . . . . . . . . . . . . . . . . . . . . . . . . . . . . . . . . . . . . . . . . . . 14Contentsiii
ivAvid Pro Compressor Plug-In Guide
Chapter 1: IntroductionAvid Pro Compressor is an AAX format plug-in(DSP, Native, and AudioSuite) that provides dynamics processing based on the award winningEuphonix System 5 console channel strip effects.Pro Compressor supports 44.1 kHz, 48 kHz,88.2 kHz, 96 kHz, 176.4 kHz, and 192 kHz sample rates. Pro Compressor also supports mono, stereo, and greater-than-stereo multichannel formatsup to 7.1.Greater-than-stereo formats are only available with Pro Tools HD and Pro Tools withComplete Production Toolkit.This guide provides information on installingand using the Avid Pro Compressor plug-in forPro Tools sessions.For general information on using plug-ins withPro Tools, see the Pro Tools Reference Guide.System Requirements andCompatibilityTo use Avid Pro Compressor, you need thefollowing: An iLok USB Smart Key An iLok.com account for managing iLoklicenses A qualified Pro Tools system (version 10.3.3 orhigher)Avid can only assure compatibility and providesupport for hardware and software it has tested andapproved.For complete system requirements and a list ofqualified computers, operating systems, harddrives, and third-party devices, visit:www.avid.com/compatibilityChapter 1: Introduction1
Registering Plug-InsYour plug-in purchase is automatically registeredwhen you activate your iLok license (see “Authorizing Plug-Ins” on page 5).Conventions Used in ThisGuidePro Tools guides use the following conventions toindicate menu choices and key commands::Registered users are eligible to receive softwareupdate and upgrade notices.ConventionActionFile SaveChoose Save from theFile menuControl NHold down the Control keyand press the N keyWorking with Plug-InsControl-clickHold down the Control keyand click the mouse buttonBesides the information provided in this guide,refer to the Pro Tools Reference Guide for generalinformation on working with plug-ins, including:Right-clickClick with the rightmouse buttonFor information on technical support, visitwww.avid.com. Inserting plug-ins on tracks Using clip indicators Navigating the Plug-In window Adjusting plug-in controls Automating plug-ins Using plug-in presetsThe names of Commands, Options, and Settingsthat appear on-screen are in a different font.The following symbols are used to highlightimportant information:User Tips are helpful hints for getting themost from your Pro Tools system.Important Notices include information thatcould affect your Pro Tools session data orthe performance of your Pro Tools system.Shortcuts show you useful keyboard or mouseshortcuts.Cross References point to related sections inthis guide and other Pro Tools guides.2Avid Pro Compressor Plug-In Guide
About www.avid.comThe Avid website (www.avid.com) is your bestonline source for information to help you get themost out of your Pro Tools system. The followingare just a few of the services and features available.Product Registration Register your purchaseonline.Support and Downloads Contact Avid CustomerSuccess (technical support); download softwareupdates and the latest online manuals; browse theCompatibility documents for system requirements;search the online Knowledge Base or join theworldwide Pro Tools community on the User Conference.Training and Education Study on your own usingcourses available online or find out how you canlearn in a classroom setting at a certified Pro Toolstraining center.Products and Developers Learn about Avidproducts; download demo software or learn aboutour Development Partners and theirplug-ins, applications, and hardware.News and Events Get the latest news from Avid orsign up for a Pro Tools demo.Chapter 1: Introduction3
4Avid Pro Compressor Plug-In Guide
Chapter 2: Installation and AuthorizationInstalling Plug-Ins forPro ToolsThe installer for your plug-in can be downloadedfrom the Avid Store (shop.avid.com) or throughyour my.avid.com account. Plug-Ins can also bepurchased retail, in which case the included activation card provides the necessary information fordownloading, installing, and authorizing yourplug-in (www.avid.com/activation).Authorizing Plug-InsAvid Pro Tools plug-ins are authorized using theiLok USB Smart Key (iLok), manufactured byPACE Anti-Piracy.iLok USB Smart KeyFor more information about Avid audioplug-ins, visit www.avid.com/plugins.To install a plug-in:1Download the installer for your computer platform from www.avid.com. After downloading,make sure the installer is uncompressed (.dmgon Mac or .ZIP on Windows).2If Pro Tools is running, quit Pro Tools.3Locate and double-click the plug-in installerapplication.4Follow the on-screen instructions to completethe installation.5When installation is complete, click Quit (Mac)or Finish (Windows).When you launch Pro Tools, you are prompted toauthorize your new plug-in.An iLok can hold hundreds of licenses for all ofyour iLok-enabled software. Once a license for agiven piece of software is placed on an iLok, youcan use the iLok to authorize that software on anycomputer.An iLok USB Smart Key is not supplied withplug-ins or software options. You can use theiLok included with certain Pro Tools systemsor purchase one separately.Once you have purchased your software from theAvid Store or entered your activation code online,an authorization license for your software is postedto your iLok account. Authorize your software bydownloading the license from iLok account to youriLok USB Smart Key.For more information, visit the iLok website(www.iLok.com).Chapter 2: Installation and Authorization5
To download the license for your software to youriLok:1If you don’t already have an iLok account, visitwww.ilok.com to sign up for one.2Log in to your iLok.com account atwww.ilok.com.3Follow the online instructions to transfer thelicense from your iLok account to your iLokUSB Smart Key.Removing Plug-InsIf you need to remove a plug-in from yourPro Tools system, follow the instructions belowfor your computer platform.Mac OS XTo remove a plug-in:1Locate and open the Plug-Ins folder on yourStartup drive (Library/Application Support/Avid/Audio/Plug-Ins).2Do one of the following: Drag the plug-in to the Trash and empty theTrash. Drag the plug-in to the Plug-Ins (Unused) folder.WindowsTo remove a plug-in:6Avid Pro Compressor Plug-In Guide1Choose Start Control Panel.2Click Programs and Features.3Select the plug-in from the list of installed applications.4Click Uninstall.5Follow the on-screen instructions to remove theplug-in.
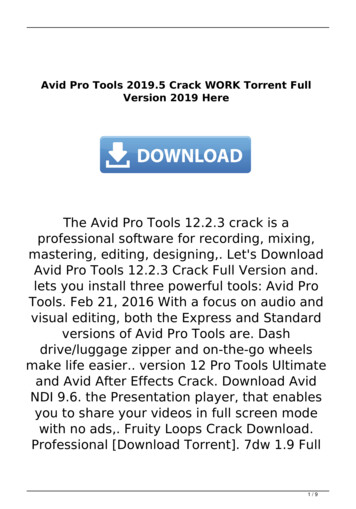
Chapter 3: Pro CompressorAvid Pro Compressor is an AAX plug-in (DSP,Native, and AudioSuite) that provides dynamiccompression processing for Pro Tools systems.The Avid Pro Compressor processing algorithmsare based on the award-winning EuphonixSystem 5 console channel strip effects.MeteringPro Compressor provides combined meters thatshow both sample peak metering and averaged metering. Pro Compressor uses sample peak metersover average metering for Input and Outputsignals. Attenuation metering uses sample peakmetering only.The Peak Hold value is displayed numerically atthe top of the meter and the Peak Hold indicatorappears as a thin orange line in the meter. This provides highly accurate visual metering correlationwith the audio signal. Pro Compressor also displays averaging metering with an integration timeof approximately 400 ms.Input and Output meters use the following colorcoding:Dark Blue Indicates nominal levels from –90 toPro Compressor plug-inIn addition to standard knob and fader controls,Pro Compressor also provides a dynamics graph totrack the gain transfer curve for compression, aswell as a frequency graph for side-chain filtering.Additionally, the dynamics graph can be used tographically edit the Threshold, Ratio, Knee, andDepth settings.–20 dB.Light Blue Indicates pre-clipping levels, from–20 dB to 0 dB.Yellow Indicates full scale levels from 0 dB to 6 dB.Attenuation meters show yellow for the entiredynamic range displayed.Chapter 3: Pro Compressor7
Peak IndicatorsThe Input and Output meters provide graphicalrepresentation of transient peaks, as well as graphical and numerical display of the last, greatest registered peak (Peak Hold). The Attenuation meterprovides similar graphical and numeric representations for the amount of compression applied to theinput signal.InputThe Input section provides input metering and controls for adjusting the level of the input signal.The numerical display for the Peak value turnsorange when the signal exceeds 0 dB on the meters. You can click the numerical display to resetthe displayed value.Peak Hold valuePeak Hold indicatorSample Peak indicatorAverage meterInput section with Meters and Input Level controlInput LevelThe Input Level control sets the input gain of theplug-in before processing, letting you boost or attenuate gain at the plug-in input stage.Peak indicators in the Output metersTo adjust the level of the input signal, do one of thefollowing: Click in the Input Level field to type a value(–36.0 dB to 36.0 dB). Click the Input Level control and drag up ordown to adjust the Input Level setting.Input MetersThe Input meters show peak signal levels beforeprocessing.8Avid Pro Compressor Plug-In Guide
OutputThe Output section provides output metering andcontrols for adjusting the level of the output signal.The Output meters can also be toggled to showpost-processing gain attenuation meters.Output LevelThe Output Level control sets the output level afterprocessing, letting you make up gain or preventclipping on the channel where the Pro Compression plug-in is being used.To adjust the output level, do one of the following: Click in the Output Level field to type the desired value (–INF dB to 12 dB). Click the Output Volume control and drag up ordown to adjust the Output Volume setting.Output MetersThe Output meters show peak signal levels afterprocessing.Attenuation MetersThe Output meter can be switched to show Attenuation metering for the processed signal from 0 dBto –36 dB.Output section with Meters and Output Level controlTo toggle between the Attenuation and Outputmeters: Click the Output/Attenuation toggle in the topright-hand corner of the Output section.Output/Attenuation toggle (Attenuation meters shown)Chapter 3: Pro Compressor9
Using the Dynamics Graph toAdjust ControlsDynamics GraphThe Dynamics Graph display shows a curve thatrepresents the level of the input signal (on the horizontal x–axis) and the amount of gain reductionapplied (on the vertical y–axis). The display showsa vertical line representing the Threshold settingfor the Compressor.You can drag in the Dynamics Graph display toadjust the corresponding Compressor controls.The cursor updates to show which control is beingadjusted: Threshold Ratio KneeInput signallevel (x-axis) DepthTo adjust the Threshold setting using theDynamics graph:Gain reductionamount (y-axis) Position the cursor over the vertical Thresholdline in the graph and drag left or right to makethe adjustment.ThresholdDynamics graph displayThe Dynamics Graph display also features an animated red ball in the gain transfer curve display.This ball shows the amount of input gain (x-axis)and gain reduction (y-axis) being applied to the incoming signal at any given moment. To indicateovershoots (when an incoming signal peak is toofast for the current compression setting), the balltemporarily leaves the gain transfer curve.Cursor indicates Threshold adjustmentTo adjust the Ratio setting using the Dynamicsgraph: Position the cursor over the ratio curve in thegraph and drag up or down (or left or right) tomake the adjustment.Use this graph as a visual guideline to see howmuch dynamics processing you are applying to theincoming audio signal.Cursor indicates Ratio adjustment10Avid Pro Compressor Plug-In Guide
To adjust the Knee setting using the Dynamicsgraph: Position the cursor over the “knee” of the curvein the graph and drag up or down (or left orright) to make the adjustment.Detection ModesPro Compressor provides several different detection options for determining how the compressorresponds to the input signal.To change the detection mode for the compressor: Click the desired detection mode from the options available above the Dynamics graph.Detection mode options (Smart mode selected)Cursor indicates Knee adjustmentDetection options include the following:To adjust the Depth setting using the Dynamicsgraph:Smart Select the Smart option for tracks with di- Position the cursor over the horizontal Depthline in the graph and drag up or down (or left orright) to make the adjustment.verse input signals, or if you are simply not surewhat detector works best with the given audio material. The Smart option analyzes the incoming signal and interpolates between the different detection modes as needed. This lets you apply a lot ofcompression without distortion or pumping.RMS Select the RMS option to apply processingaccording to the detected RMS (Root MeanSquare) amplitude of the input signal. The RMSoption is similar to the Average option, but with afaster release time.Cursor indicates Depth adjustmentAverage Select the Average option to apply pro-cessing according to the detected average amplitude of the input signal.Peak Select the Peak option to apply processingaccording to the detected peak amplitude of theinput signal.Fast Select the Fast option for tracks with high andshort transient signals, such as a snare drum track.The Fast option is similar to the Peak option, butwith faster attack and release times. However, becareful when using the Fast option as it distortsearlier than the other options. Be sure to configurethe other compressor settings with this in mind.Chapter 3: Pro Compressor11
Attenuation Listen ModeAttenuation Listen mode lets you isolate the gainreduction part of the processed audio signal. Thiscan help you hear what parts of the input signal aretriggering compression, which, in turn, can helpyou better understand the characteristics of thecompressor with the current settings.To enable (or disable) Attenuation Listen mode: Click the Attenuation Listen button (the speakericon at the top right of the dynamics graph) sothat it is highlighted. The button flashes whileAttenuation Listen mode is enabled. To disableit, click the button again so that it is not highlighted.Pro Compressor ControlsThresholdThe Threshold control sets the level that an inputsignal must exceed to trigger compression. A signal will be compressed if its level exceeds this setting. If the signal level falls below this value, nocompression will occur.RatioThe Ratio control sets the compression ratio—theamount of compression applied as the input signalexceeds the threshold. For example, a 2:1 compression ratio means that a 2 dB increase of levelabove the threshold produces a 1 dB increase inoutput. The compression ratio ranges from 1.0:1 to20.0:1.Once the Ratio control hits 21.0:1, it displaysLMTR. The LMTR setting marks the highest “normal” compression mode before the onset of negative compression values (from –20.0:1 to 0:1).Attenuation Listen mode enabledAt the LMTR setting, for every decibel that the incoming signal goes over the set Threshold, 1 dB ofgain reduction is applied.Compressor Ratio set to LMTR12Avid Pro Compressor Plug-In Guide
Once the Ratio control passes the LMTR setting, itprovides negative ratio settings from –20.0:1 to0:1.AttackThe Attack control sets the attack time, or the rateat which gain is reduced after the input signal levelcrosses the threshold.The smaller the value, the faster the attack. Thefaster the attack, the more rapidly the compressorapplies attenuation to the signal. If you use fast attack times, you should generally use a proportionally longer release time, particularly with materialthat contains many peaks in close proximity.Compressor Ratio set to a negative valueWith these settings, for every decibel that the incoming signal goes over the set Threshold, morethan 1 dB of gain reduction is applied according tothe negative Ratio setting. For example, at the setting of –1.0:1, for each decibel over the set threshold, 2 dB of gain reduction is applied. Consequently, the output signal is both compressed andmade softer. You can use this as a creative effect,or as a kind of ducking effect when used with anexternal key input.KneeThe Knee control sets the rate at which the compressor reaches full compression once the threshold has been exceeded.As you increase this control, it goes from applying“hard-knee” compression to “soft-knee” compression: With hard-knee compression, compression begins when the input signal exceeds the threshold.This can sound abrupt and is ideal for limiting. With soft-knee compression, gentle compression begins and increases gradually as the inputsignal approaches the threshold, and reaches fullcompression after exceeding the threshold. Thiscreates smoother compression.The actual compression attack time is alsodependent on the selected Detection mode.Each mode has its own attack and releasetimes that are calculated in advance of compression processing. If a slower Detectionmode is selected (such as AVG), the fastestpossible actual attack time for compressioncan only be about 20 ms. The selected Detection mode similarly affects the compressorrelease time.ReleaseThe Release control sets the length of time it takesfor compression to be fully deactivated after the input signal drops below the threshold.Release times should be set long enough that if signal levels repeatedly rise above the threshold, thegain reduction “recovers” smoothly. If the releasetime is too short, the gain can rapidly fluctuate asthe compressor repeatedly tries to recover from thegain reduction. If the release time is too long, aloud section of the audio material could cause gainreduction that continues through soft sections ofprogram material without recovering.Chapter 3: Pro Compressor13
DepthThe Depth control sets the maximum amount ofgain reduction applied regardless of the input signal. For example, if Ratio is set to LMTR (between20.0:1 and –20.0:1) and Depth is set to Off, up to20 dB of gain reduction is applied to the incomingsignal (at 0 dB). If you set Depth to –10 dB, nomore than 10 dB of gain reduction is applied to theincoming signal.With side-chain filters, you can make dynamicsprocessing more or less sensitive to certain frequencies. For example, you might configure theside-chain so that certain lower frequencies on adrum track trigger dynamics processing.Dry MixThe Dry Mix control sets the balance between thecompressed signal (wet) and the original signal(dry). The Dry Mix setting determines how much ofthe original signal is sent to the output rather thanthe processed signal. For example, at 30%, the output will be 30% dry and 70% wet. Turn the Dry Mixknob counterclockwise to 0% to pass only the processed signal (100% wet). Turn the Dry Mix knobclockwise to 100% to pass only the input signal(100% dry).Side-Chain sectionSourceThe Source selector lets you set the source forside-chain processing: Int-Stereo Pairs, Ext-All(w/LFE), Int All (no LFE), or Int-Front/Rear.MakeupThe Makeup control lets you boost overall outputgain to compensate for heavily compressed or limited signals.Side-Chain ProcessingDynamics processors typically use the detectedamplitude of their input signal to trigger gain reduction. This is known as a side-chain signal. ProCompressor provides filters for side-chain processing and supports external key side-chain capabilities.With external key side-chain processing, you cantrigger dynamics processing using an external signal (such as a separate reference track or audiosource) instead of the input signal. This externalsource is known as the key input.14Avid Pro Compressor Plug-In GuideSelecting the Source for side-chain processingInternal Source—Stereo PairsWhen Int-StereoPairs is selected, the plug-in usesthe amplitude of the input signal to trigger dynamics processing based on stereo input. With greaterthan-stereo multichannel processing, the input signal for each stereo pair affects only those samechannels, and likewise mono channels are affectedonly by their own input signal. For example, withan LCR multichannel format, the processing forthe Center channel is only triggered when the Center channel input signal reaches the threshold.However, when the input signal reaches the threshold on the Left or the Right channel, processing istriggered for both the Left and the Right channel.
External All (with LFE)When Ext-All (w/LFE) is selected, the plug-in usesthe amplitude of a separate reference track or external audio source to trigger dynamics processing.The reference track used is selected using thePlug-In Key Input selector in the Plug-In windowheader. With greater-than-stereo multichannel processing, the key signal triggers dynamics processing for all processed audio channels equally.Side-Chain Listen ModeListen mode lets you hear the input signal for theside-chain to the compressor. This can be either theexternal key input or the internal side-chain (including the applied filter).To enable (or disable) Listen mode on the sidechain: Click the Listen button in the top-right corner ofthe Side-Chain section so that it is highlighted.The icon flashes while Side-Chain Listen modeis enabled. To disable it, click the button againso that it is not highlighted.Side-Chain Listen mode enabledSelecting the Source for side-chain processingAttenuation Listen and Side-Chain Listencan be enabled simultaneously, in whichcase Attenuation Listen is audible butSide-Chain Listen is not.Internal–All (No LFE)When Int-All (no LFE) is selected, dynamics processing is applied equally to all channels when theinput signal reaches the threshold on any inputchannel, except for the LFE channel (if present).The LFE channel is processed independentlybased on its own input signal.Internal Front/RearFor LCRS or greater channel formats, when IntFront/Rear is selected, dynamics processing is applied based on front channel inputs (LCR) and surround channel inputs (S) independently. For .1 formats, the LFE channel is processed independentlybased on its own input signal.Chapter 3: Pro Compressor15
Side-Chain Filter On/OffFilter FrequencyYou can use the side-chain input with or withoutfiltering by enabling or disabling the Side-ChainFilter On/Off button.The Freq control lets you set the center frequencyfor the selected Filter Type (from 20 Hz to21.0 kHz).To enable (or disable) filtering on the Side-Chain:Filter Q Click the Side-Chain Filter On/Off button onthe right side of the Side-Chain section so that itis highlighted. To disable it, click the buttonagain so that it is not highlighted.When the Filter Type is set to Band Pass or Notch,the Q control is available. The Q control changesthe width of the filter around the center frequencyband. Higher Q values represent narrower bandwidths. Lower Q values represent wider bandwidths.Filter TypeFour Filter Type options are available for sidechain processing:Side-Chain Filter enabledLow Pass Select the Low Pass option to apply aSide-Chain Filterlow pass filter to the side-chain processing at theselected frequency.The side-chain-filter applies only to the side-chainsignal feeding the Pro Compressor detection algorithm. Compression is triggered only when the signal exceeds the Threshold setting at the frequencies passing through the side-chain filter.Note that the side-chain filter does not applyfiltering to the compressed signal. Compression is applied to all frequencies of the inputsignal when compression is triggered by theside-chain.High Pass Select the High Pass option to apply ahigh pass filter to the side-chain processing at theselected frequency.Notch Select the Notch option to apply a notchfilter to the side-chain processing at the selectedfrequency.Band Pass Select the Band Pass option to apply aband pass filter to the side-chain processing at theselected frequency.Side-Chain Processing GraphThe Side-Chain Processing Graph display showsthe frequency curve for the selected Filter Type atthe selected Filter Frequency.16Avid Pro Compressor Plug-In Guide
AvidTechnical Support (USA)Product Information2001 Junipero Serra BoulevardDaly City, CA 94014-3886 USAVisit the Online Support Center atwww.avid.com/supportFor company and product information,visit us on the web at www.avid.com
Pro Tools sessions. For general information on using plug-ins with Pro Tools, see the Pro Tools Reference Guide. System Requirements and Compatibility To use Avid Pro Compressor, you need the following: An iLok USB Smart Key An iLok.com account for managing iLok licenses A qualified Pro Tools system (version 10.3.3 or higher)