Transcription
BLACKBOARDQUICK START GUIDEHelping Faculty build their course in Blackboard, 2020MCC FacultyUse this reference guide to build your course in Blackboard; post asyllabus, create an assignment, organize your grade center, build atest, create a discussion board, use Collaborate, the webconferencing tool and more.Roxanne McCorry, Director, Academic technology & Distance Learningmccorryr@middlesex.mass.eduDaniela Loghin, Instructional Designer and part-time Faculty, MCCloghind@middlesex.mass.edu
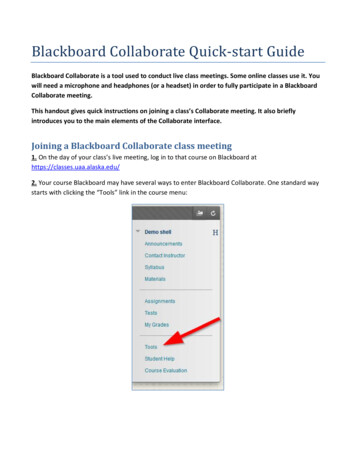
Quick Start Guide for Blended and Online CoursesRequest your course content copied at: loghind@middlesex.mass.edu or mccorryr@middlesex.mass.eduNote: Course copy can take a week to process.Find Your Course1. Log in x with your email credentials.2. Find your course in the Courses tab on the left navigation bar.3. Click on your course title to launch the course.Add Your Syllabus1. Check that Edit mode is ON (top right of your course). Edit mode must be ON for you to edit in yourcourse.2. Click on Start Here (Syllabus)- (on left-hand side of course menu)3. Click on Build Content on the action bar at the top of the page.4. Choose Item5. Name file as desired6. Browse your computer to find your syllabus7. Under file options: be sure file is set to open in a new window8. Then Submit!Make an Announcement1. Click on Announcements—on the course menu2. Click Create Announcement3. Give it a subject4. Type your announcement5. Check the Email announcement box6. Then Submit!Add Content (see Pg. 2 if you need to add a content area to your course menu)1. Click on Course Materials or Weekly Sessions in the Course menu2. Choose the Build Content menu3. Click Content Folder, Item, or Web Link for the type of content you want4. Follow the steps and Submit!5. Repeat to add more contentCreate a Discussion1. Click on Discussions on the course menu2. Choose Create Forum3. Name the Forum4. Type your prompt or question to be discussed in the text box5. Choose Grade if you plan to grade forum and set the points available6. Keep the default settings and Submit!**Please take time to read this entire Quick Start Guide as it is designed to inform you about BlackboardBasics2
STEP 1: Set up your Course MenuImportant: You may need to add a “CONTENT AREA” to your Course Menu.A Content Area is where you will place your course content such as your weekly folders with your assignments or youmay want to create Thematical Units. You can name this “content area” several names based on your course needs.Such as;Weekly assignments, Units of Study, Course Content, Course Materials, Assignments, etc.Once logged in to your course, click on the “ in the circle” (see below) to get the drop down that you see below.Next, click on “Content Area” and name the content area (ie) Course Content.Then, select “make available” checkbox.You will see the “Content Area” that you just created at the bottom of your course menu.To move the “Course Content” area up on the course menu, left click next to “Course Content” that you just created anddrag it to the top of your course menu until it is under your “Syllabus”.Now you can click on “Course Content” and start building your course sections.
Quick Start GUIDE – Designing & Developing Content in BlackboardMCC’s Course MenuAll MCC Blackboard courses have been designed with a basic template to create a consistent look and feel.Please think carefully before changing this course menu template.1. Course menu: The menu is used as a way to navigate your course. We provide you with a basictemplate that includes most of the menu items that you will need.2. Student Preview and Edit Mode: These two buttons are in the upper right corner of the course.3.4.5.6.7.8.9.10.11.Student Preview (looks like an eye) allows you to see your course from a student’s perspective.To make any changes, edits, or additions to the course Edit Mode must be ON.Announcements: The landing page for the course. Links to the announcement page, where you mayaddress the entire class with important information. You can also add or delete modules as neededfor your course.Start Here (Syllabus): A content area for uploading your syllabus.Weekly Sessions: A content area for uploading materials into weekly folders. Best for multiple itemsper week. Hide this area if you do not intend to use it.Course materials: (hidden from students) An open content area for uploading materials if not usingWeekly Sessions. Best for a smaller number of items. Unhide this area if you intend to use it.My Grades: Where your students may view their grades.Discussion Posts: Links to the discussion board. Access old or create new forums from this link. Hereyou will also find Course Questions & Answers.External Email: (hidden from students) Allows you to email one, several, or all your students via theirMCC email accounts. No records of these emails are kept in Blackboard.Course Message: Recommended, email stays internal within Blackboard, keeps a record ofemails sent and read.Web Conferencing: Gives you access to Blackboard Collaborate Ultra, a web conferencing tool and theinformational resources to use it. This tool allows your class to meet synchronously online.7
The Blackboard Four FundamentalsFour Basic Fundamentals that you can apply throughout Blackboard.1. Edit Mode: To do ANY editing in your course be sure Edit Mode is ON.2. Hover: To edit content, hover just to the right of titles to display a hidden drop-down arrow. This willreveal an edit menu.3. Drag and Drop: Newly added content appears at the bottom of the page. To move your newcontent into place, you can eithera. Drag and drop: by hovering over the left side of the new content until a double-sided arrowappears. Then click and drag into place ORb. Use the arrows located on the upper right corner of the content area to re-order items.4. Breadcrumb trail: The Light Gray Bar tells you where you are in the course and the Breadcrumb Trailhelps you navigate back.9
The Course Menu - how to move/edit content1. To “Edit” a Course Menu link such as Discussions hover to the right of its title to reveal adrop-down arrow. This arrow, when clicked, opens an edit menu allowing you to rename, hide ordelete the link. Drag and Drop will allow you to rearrange the menu order.2. Icons: The box with a diagonal line through it means Hidden from Students. The plain gray box meansNo content or empty.3. The Control Panel, under Course Management, is available ONLY to instructors. The grade centeris located under the control panel.10
Adding Course ContentIn a content area such as the Start Here (Syllabus), Weekly Sessions, or Course Materials, you will find amenu across the middle top of the screen that looks like this:Be sure you are where you want to add content and then click on the down arrow to the right of Build Contentto open the build menu.There are three main content types that you will use the most to add content.1. Item: an item allows you to add some text and to optionally to attach a file such as a PDF, Word doc,or a Power point (pptx).2. Web Link: links the user to an outside URL (it is important that these are set to open in a newwindow).3. Content Folder: creates a new area for content such as a Weekly Session folder or a readings folder(just like a regular manila folder).11
Follow the steps to add an item and attach a syllabus:1. Click the Start here (Syllabus) content area.2. Hover over Build Content on the dark gray action bar and click Item.3. Name it, “Syllabus” or your choice of title.4. Add instructional text about the document (i.e. Be sure to read the syllabus )5. Next, see below, to attach a document (syllabus).12
Attach a document:1. Attach a document by clicking Browse My Computer. Upload a PDF or a Word document.2. Accept the default settings under Standard Options (Best Practices). Permit students to view the document (Yes) Track number of views (No) Select time and date (Blank)Click Submit,3. Use Student Preview to review the Item you have created and access the document.13
To Add a Content Folder:1. Choose Content Folder from the Build Content menu.2. Follow the same steps as you would to create an Item.3. If you want the content of the folder to be available only for a specific time period or after a specificdate, use the Select Date and Time Restrictions option.To Add a Web Link:1. Choose Web Link from Build Content menu.2. Give the link a name and fill in the complete URL.3. Follow the same steps as creating an Item.4. Set to open in a new window and click Submit.Check if students can see the Content Folder and Web Link by using the Student Preview. (looks like an eyein the upper right corner of your screen.)Be Aware When Copying and PastingWhen copying from a Word document, the Web, or any other Document, be sure to use the RemoveFormatting Button to clear hidden formatting.This is an important step to ensure that you can edit text in Blackboard without causing formatting issues.Also, it promotes a well-organized and consistent format throughout your course.If you use the HTML button, a separate window will open. Paste the html code in this window and clickUpdate. This will clear all unwanted and hidden formatting code. Example; Embed YouTube HTML here.14
Creating an AssignmentWhen you add an Assignment, you are creating a “dropbox” for students to submit their work. Also, onceyou create an assignment, Blackboard automatically creates a grade book column in the GradeCenter.Note: You can also create online Tests with many different types of questions and options to deter cheating.Go to https://help.blackboard.com/Learn/Instructor/Tests Pools Surveys to learn more about these andother educational technologies.Create an Assignment:1. In the content area, select Weekly Session, Course Materials, Exams, etc., click on Assessment.2. Select Assignment to create an assignment.15
3. Name your assignment4. Write your instructions in the text box5. Choose your due date16
6. Set the number of points possible7. Under Submission details – choose individual submission, and the number of attempts allowed. Wesuggest two attempts, so if a student makes a mistake, they can try again without your help. Multipleattempts can also be used to provide initial feedback and preliminary grades.8. Under Display of Grades leave as default setting unless you desire a change.9. Check the assignment available and use Limit Availability to set the date and time that you want yourstudents to have access to the assignment.10. Then, click Submit17
The Grade CenterThere are two main things you need to know when it comes to the Grade Center. After you click,Grade Center from the left-hand course menu, you will have two options, Needs Grading and FullGrade Center.To access any of the work your students have submitted via the assignment tool, go to Needs Grading.There you will find all submitted work. When you click on a student’s name, you will be able to seetheir work and grade it in Blackboard. Once you input the grade in Needs Grading , Blackboardautomatically enters the grade in the grade book column.In the Full Grade Center, you will be able to manage columns, create manual columns, hide and showcolumns, edit grades, and total columns. You can also create a weighted column to match thedesignated grading formula in your syllabus.**The Grade Center can be tricky so we suggest you radeThe Grade Center:18
Help & ResourcesContact Technical Help:Call 1-978-656-3301 or visit https://www.middlesex.mass.edu/technologycenter/ to chator submit a ticket to the Help Desk.You can also email servicedesk@middlesex.mass.edu for technical help.Consult with e-learning and instructional support for Online Course Development;Roxanne McCorry mccorryr@middlesex,mass.eduDaniela Loghin loghind@middlesex.mass.eduWe hope you have found this Quick Start Guide useful. Please feel free to share yourfeedback, so we can continue to improve it!Thank you.E-learning and Instructional Support19
Roxanne McCorry, Director, Academic technology & Distance Learning mccorryr@middlesex.mass.edu Daniela Loghin, Instructional Designer and part-time Faculty, MCC loghind@middlesex.mass.edu . Quick Start Guide for Blended and Online Courses Request your course content copied at: loghind@middlesex.mass.edu or mccorryr@middlesex.mass.edu Note .